
How to Put a Tesla in Service Mode
Contents
- 1 Key Takeaways
- 2 📑 Table of Contents
- 3 What Exactly is Tesla Service Mode?
- 4 How to Access Service Mode: The Step-by-Step Sequence
- 5 Navigating the Service Mode Interface: A Tour of the Menus
- 6 Common and Practical Uses for Service Mode
- 7 Critical Precautions: What NOT To Do
- 8 How to Exit Service Mode Properly
- 9 Conclusion: Knowledge is Power, But Responsibility is Key
- 10 Frequently Asked Questions


Service Mode is Tesla’s built-in diagnostic tool, not a driving mode. It’s accessed via a secret steering wheel button combo and provides real-time data on every vehicle system. While invaluable for technicians and informed owners to check battery health, sensor status, and software versions, it is strictly for stationary diagnostics. Driving with Service Mode active is dangerous, can void your warranty, and may trigger legal issues. Always exit the mode before driving and use it responsibly.
Key Takeaways
- Service Mode is a diagnostic portal: It’s a hidden, non-driving menu for technicians and owners to access live sensor data, software versions, and system health checks, similar to a “check engine” code reader for conventional cars.
- Activation requires a specific button sequence: You must press the steering wheel scroll wheels in a precise order while the car is in Park and powered on. The process is identical across Model S, 3, X, and Y.
- It is illegal and unsafe to drive in Service Mode: The car’s instrument cluster and safety systems behave abnormally. Driving with it active can lead to accidents, police stops, and immediate warranty voidance.
- Primary uses are for inspection, not adjustment: Use it to read battery cycle counts, check individual cell voltages, verify tire pressure sensor data, or confirm software versions before a service appointment.
- Exit is simple but critical: Double-tap the “Home” button on the touchscreen or power cycle the vehicle. Always confirm the normal Tesla interface returns before driving.
- Not for casual tinkering: While fascinating, changing settings without expertise can cause system errors, require a service visit, and potentially create safety hazards like disabling critical alerts.
- Service centers use a more advanced version: What owners access is a limited subset. Tesla technicians use a password-protected, deeper system for calibrations and repairs.
📑 Table of Contents
- What Exactly is Tesla Service Mode?
- How to Access Service Mode: The Step-by-Step Sequence
- Navigating the Service Mode Interface: A Tour of the Menus
- Common and Practical Uses for Service Mode
- Critical Precautions: What NOT To Do
- How to Exit Service Mode Properly
- Conclusion: Knowledge is Power, But Responsibility is Key
What Exactly is Tesla Service Mode?
If you own a Tesla, you’re used to a car that feels more like a sophisticated computer on wheels than a traditional internal combustion vehicle. That seamless, software-driven experience is its magic. But what happens when you need to peek under the digital hood? That’s where Tesla Service Mode comes in. Think of it as the equivalent of popping the hood and connecting a professional OBD-II scanner, but it’s already built into your car’s system. It’s a hidden, factory-level diagnostic interface that displays raw data from dozens of sensors, controllers, and software modules.
This isn’t a “sport mode” or a “valet mode” that changes driving characteristics. Service Mode is purely informational and diagnostic. It shows you the unvarnished truth about your vehicle’s health—battery cell voltages, motor temperatures, brake pad wear estimates, CAN bus communication status, and exact software builds. For the average owner, it’s a fascinating window into the complex machinery. For a knowledgeable enthusiast or a technician, it’s an indispensable troubleshooting tool. It’s important to understand from the outset: you cannot drive the car while Service Mode is active on the main display. The system is designed to be used with the vehicle parked and in a safe, stationary location.
The feature has existed in Tesla vehicles for years, but it gained wider attention online as owners sought to understand their cars better or diagnose minor issues before scheduling a service appointment. It reflects Tesla’s unique philosophy: instead of a physical engine with dipsticks and mechanical linkages, you have a digital ecosystem where all health metrics are logged and accessible. However, with this transparency comes great responsibility. Misuse can lead to confusion, false error reports, and even safety system disablement. Let’s walk through everything you need to know, from how to access it to what all those menus actually mean.
How to Access Service Mode: The Step-by-Step Sequence
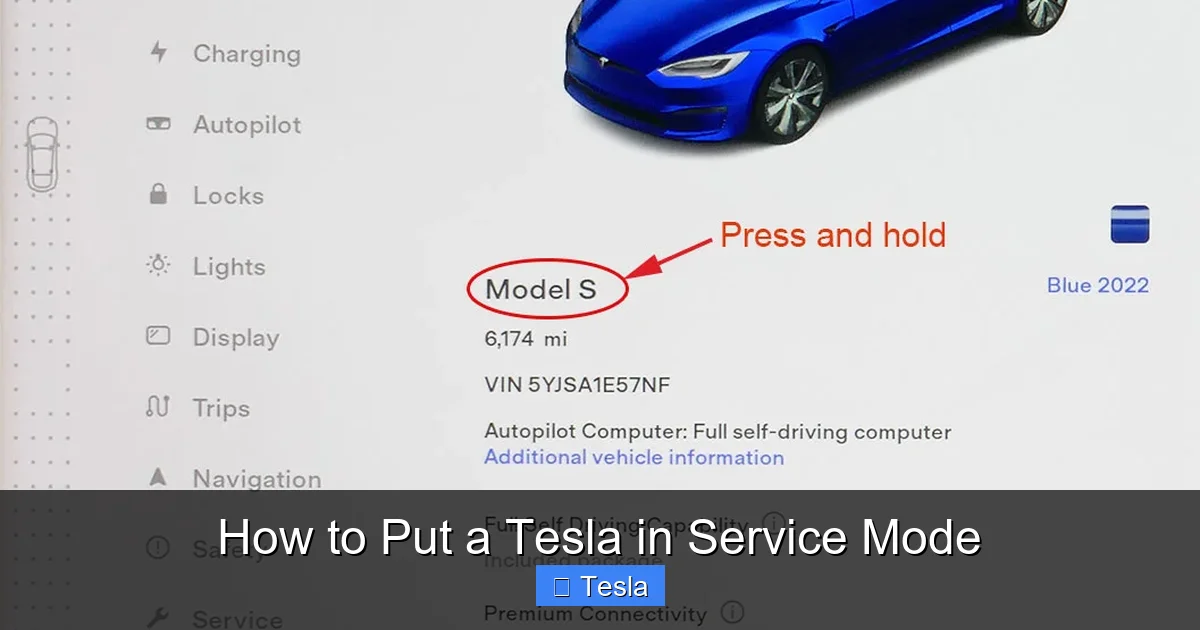
Accessing Service Mode is deliberately not obvious. Tesla doesn’t want drivers accidentally stumbling into it while operating the vehicle. The activation sequence must be performed precisely while the car is in Park and powered on (you don’t need to press the brake pedal, but the car must be “awake”). The process is the same for Model S, Model 3, Model X, and Model Y, though the physical scroll wheel layout differs slightly between the older round-wheel designs and the newer rectangular scroll wheels.
Visual guide about How to Put a Tesla in Service Mode
Image source: teslatap.com
The Universal Button Sequence
Here is the exact sequence, broken down into simple steps:
- Ensure your Tesla is parked, in Park (P), and the touchscreen is on and responsive.
- Locate the scroll wheels on the left and right sides of the steering wheel. You will use both.
- Step 1: Press and hold the LEFT scroll wheel down until you hear a single chime (about 3-5 seconds), then release.
- Step 2: Immediately press and hold the RIGHT scroll wheel down until you hear a single chime (again, 3-5 seconds), then release.
- Step 3: Quickly press the LEFT scroll wheel three times in rapid succession. You do not need to hold it; just press it down firmly three times in a row.
- Step 4: Finally, quickly press the RIGHT scroll wheel three times in rapid succession.
If done correctly, the main touchscreen will go black for a second and then reload into the Service Mode interface. It looks distinctly different from the normal Tesla UI—often with a darker, more technical theme and a menu tree on the left side. If nothing happens, you likely missed the timing between steps. Try again, ensuring each step is completed fully before starting the next.
Important Activation Prerequisites
Before you try, confirm these points:
- Car State: The vehicle must be in Park. It does not need to be connected to a charger, but a higher battery state of charge is preferable to avoid any unexpected low-voltage warnings during your diagnostic session.
- Key Fob/Phone Key: Your authenticated key (phone or fob) must be inside the car or in your pocket. The car must recognize you as an authorized user.
- Patience: The first load of Service Mode can take 15-30 seconds as the system compiles data from all the vehicle’s modules. Don’t keep pressing buttons if it seems slow.
Remember, this is a diagnostic tool. If you are doing this simply out of curiosity, that’s fine! But if you are trying to fix a specific problem, note down any relevant data (like battery module voltages or error codes) before you exit, as this information will be crucial for a Tesla service advisor.
Once you’re in, the interface can seem overwhelming. It’s organized as a hierarchical menu tree, typically on the left side of the screen, with the data displayed on the right. Let’s break down the main categories you’ll encounter and what they’re useful for.

Visual guide about How to Put a Tesla in Service Mode
Image source: teslatap.com
The Main Menu Categories
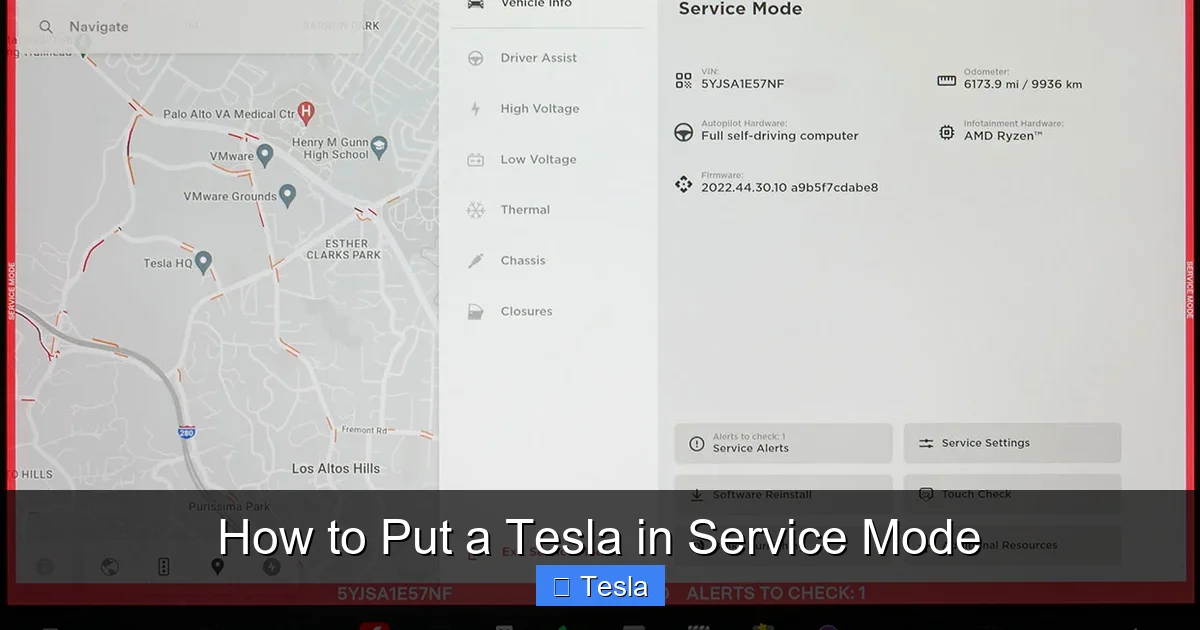
1. Vehicle Info: This is your starting point. It shows the vehicle’s VIN, software version (the exact build number), and sometimes the current service mode version. If you’re calling Tesla support, they will ask for the software version first.
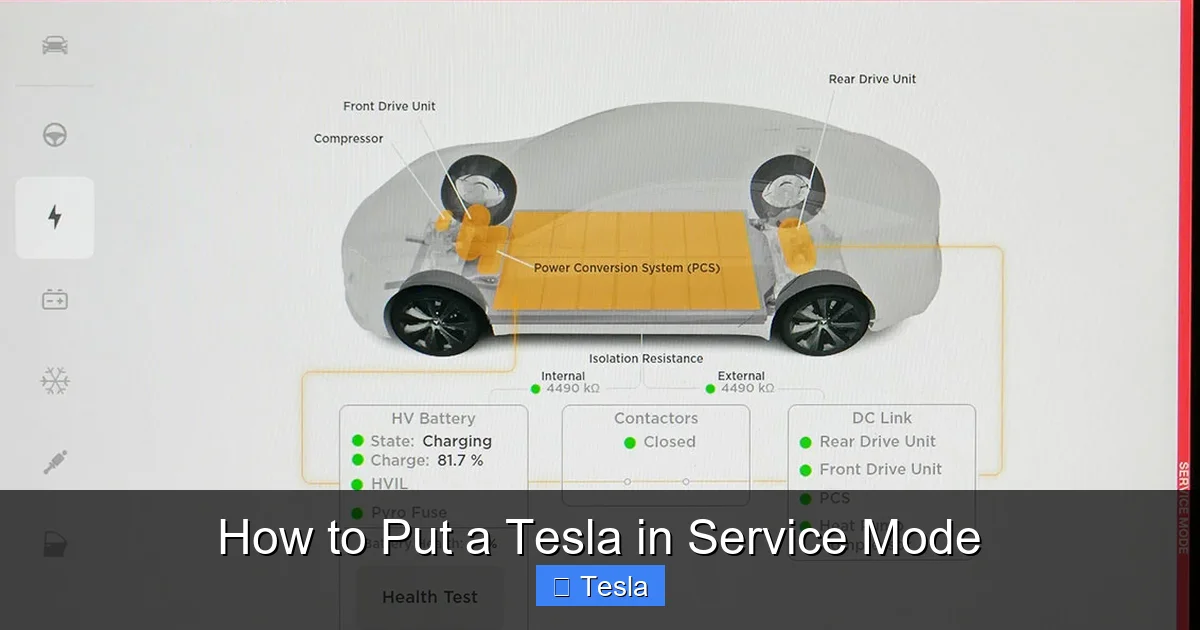
2. Battery: Arguably the most interesting section for many owners. Here you can see:
- Total Battery Range: The EPA-rated or current configured range.
- Battery Health / State of Health (SOH): A percentage representing the battery’s current capacity compared to its original new capacity. This is the number people obsess over. A value above 90% is generally considered very good for a Tesla with some miles.
- Cell Voltages: A list of all the individual battery cell groups (or “modules”) and their current voltage. A healthy pack shows very consistent voltages across all modules, typically within 0.05-0.1 volts of each other. Large discrepancies can indicate a failing module.
- Charge/Discharge Limits: The current set limits for daily charging.
- Cycle Count: How many full charge cycles the main battery has experienced. One cycle equals 100% of the battery’s capacity used, cumulatively (e.g., two 50% charges).
3. Drivetrain: Covers the motor(s) and power electronics. You can see:
- Motor Temperatures: Real-time temps for front/rear drive units and power electronics (inverter). These get hot during hard acceleration or sustained high speeds.
- Motor RPM: Current rotational speed of each motor.
- Inverter Status: Health and temperature of the inverter that converts DC battery power to AC for the motors.
- Gear Status: Confirms the current gear selection (Park, Neutral, Drive, Reverse).
4. Brakes: Displays data from the brake system. Useful for checking:
- Brake Pad Wear: Estimated thickness remaining for front and rear pads (in mm). This is an estimate based on sensor data and driving style.
- Brake Fluid Level: Status of the master cylinder reservoir.
- ABS/ESC Status: Activity and health of anti-lock braking and stability control systems.
5. Tires: Shows pressure and temperature for each tire (if equipped with TPMS sensors). You can compare the live readings to the car’s recommended cold inflation pressure. Large temperature differences between tires can indicate an issue like a dragging brake caliper.
6. Charging: Details about the last charging session or current session if plugged in. Shows charge rate (kW), voltage, amperage, and any charging errors that occurred.
7. HVAC: Heating, Ventilation, and Air Conditioning system status. You can see coolant temperatures, compressor status, and cabin temperature sensor readings.
8. Gateway & Networks: This is more technical. It shows the communication status between the car’s various computer modules (CAN bus networks). Errors here often manifest as “vehicle communication errors” or random warning icons on the main screen. A healthy system shows all gateways as “operational.”
9. Software Logs & DTCs: This is the most critical section for troubleshooting. DTC stands for Diagnostic Trouble Code. These are the stored error codes, similar to those in a traditional car. You can view active (current) and stored (past) codes. Each code has a number (e.g., B1234) and a description. If you have a persistent warning light, this is where you find the root cause. You can also view software crash logs here.
Practical Navigation Tips
The interface is navigated entirely via the touchscreen. Use the menu tree on the left to drill down. Many pages have sub-tabs. For example, within the Battery menu, you might see tabs for “Summary,” “Cell Voltages,” and “History.” Look for small arrows or labels. Take your time. The data is live and updates every few seconds. If you change a physical condition (like letting air out of a tire), you should see the pressure value in the Tires menu change accordingly, confirming the sensor works. This is a great way to verify sensor accuracy without special tools.
Common and Practical Uses for Service Mode
Now that you can get in and find your way around, what should you actually do with it? For 99% of owners, Service Mode is for information gathering and verification, not for making changes. Here are the most practical and safe applications.
Visual guide about How to Put a Tesla in Service Mode
Image source: teslatap.com
1. Pre-Service Appointment Intelligence
Before you book a service visit for a nagging warning or a suspected issue, gather data. If you see a “Battery Service Required” message, go into Service Mode > Battery > Cell Voltages. Take a screenshot (if your phone is paired, you can use the Tesla app’s remote screenshot feature, or just take a photo of the screen). Note any modules that are significantly higher or lower than the others. Also, check the Battery Health (SOH) percentage. When you call Tesla or use the in-app service request, you can say, “I’m seeing a 12% variance between module 4 and module 8, and my SOH is at 88%.” This immediately gives the service center a head start and may help them pre-order parts.
2. Verifying Post-Repair Work
After any service that involves the battery, motors, or brakes, it’s reasonable to want confirmation the job was done correctly. You can use Service Mode to check:
- Brake pad thickness estimates before and after a pad replacement.
- Battery cell balance after a pack service or module replacement.
- Motor temperatures to ensure no abnormal heat soak after a repair.
This empowers you as a customer and ensures the repair was completed to standard.
3. Monitoring Battery Health Over Time
Curious about how your driving habits affect the battery? Check the State of Health (SOH) and Cycle Count every few months. A gradual, slow decline is normal. A sharp drop might indicate an issue. You can also look at the “Battery History” if available on your model/year to see long-term trends in capacity and charging efficiency. This is purely for your own knowledge and peace of mind.
4. Diagnosing TPMS Issues
If you get a tire pressure warning, first check the physical tire with a gauge. If the gauge reads correctly but the car still warns, go to Service Mode > Tires. You can see the live sensor readings. Is one sensor dead (showing “–” or 0)? Is the temperature reading wildly inaccurate? This tells you if it’s a sensor problem or just a need for air. For routine maintenance like adding air, you should never need Service Mode—just use the in-car tire pressure screen. But for sensor diagnostics, it’s perfect.
Pro Tip: For basic tire pressure maintenance, you don’t need Service Mode at all. The standard Tesla touchscreen > Service > Tire Pressure screen shows the recommended values and current readings. If you need to add air to a flat tire, follow standard procedures—the car’s regular interface is sufficient. However, Service Mode can help if you suspect a faulty sensor after you’ve already inflated the tires correctly.
5. Understanding and Clearing Non-Critical Warnings
Sometimes, a temporary glitch causes a warning like “Reduced Power” or “Vehicle Hold Unavailable” that disappears after a restart. If it comes back, Service Mode > Software Logs > DTCs can show you if there was a transient network error or sensor dropout. Seeing a past, stored code that’s no longer active can reassure you it was a one-time hiccup. However, do not attempt to clear DTCs yourself in Service Mode. On most models, the “Clear Codes” function is either greyed out or requires a technician-level password. Clearing codes without fixing the underlying problem is pointless and can be dangerous if it masks a real fault.
Critical Precautions: What NOT To Do
This is the most important section. Service Mode is a powerful tool, and misuse can have serious consequences. Let’s be absolutely clear about the boundaries.
Never, Ever Drive With Service Mode Active
This is non-negotiable. When Service Mode is on the main touchscreen, the normal driving interface is replaced. You lose:
- The visual energy/range meter.
- The speedometer and gear indicator (in some versions).
- Critical warning pop-ups for things like low battery, door ajar, or collision warnings.
- Turn signal and shifter animations are often absent or altered.
Driving blind is incredibly dangerous. You will not know your speed, selected gear, or battery status. Police will pull you over for a “broken dashboard,” and you will be cited for operating an unsafe vehicle. Tesla’s terms of use explicitly forbid it. If you accidentally engage it while moving (which is nearly impossible due to the activation sequence), pull over safely immediately, put the car in Park, and exit the mode.
Do Not Change Settings You Don’t Understand
Within some Service Mode menus, there are options to “reset” or “calibrate” certain systems (e.g., steering angle sensor, tire pressure monitoring system). These procedures are designed for technicians with specific conditions (vehicle on level ground, tires at exact pressure, etc.). Performing them incorrectly can:
- Cause permanent sensor calibration errors.
- Trigger new, more severe DTCs that require a service center visit.
- Disable safety systems like Autopilot until recalibrated by Tesla.
If you see a “Reset” button, leave it alone unless you are following a precise, documented procedure from a reliable Tesla technician source for your specific issue.
Warranty Implications
Using Service Mode itself does not void your warranty. It’s a built-in feature. However, damage caused by its misuse can void warranty coverage for the affected component. For example, if you fiddle with battery settings and cause a battery module error, Tesla may argue the damage was user-induced and deny warranty repair. The principle is the same as using a manufacturer’s diagnostic tool incorrectly. Use it to look, not to touch.
It’s Not a Replacement for Professional Service
Service Mode gives you data, not solutions. Interpreting DTCs requires extensive knowledge of Tesla’s systems. A code like “U0100: Lost Communication with ECM/PCM” could be caused by a loose connector, a faulty gateway, or a software bug. Don’t guess. Use the data to inform your conversation with Tesla Service. Say, “I’m seeing this active code,” and let them diagnose the fix.
Analogy: Service Mode is like giving you an MRI scan of your car’s skeleton. It shows you all the bones (systems) and if any are cracked (faulty). But you still need a doctor (Tesla technician) to interpret the scan, diagnose the disease, and perform the surgery. Don’t try to set your own broken bone based on the MRI film.
How to Exit Service Mode Properly
Exiting is straightforward, but you must confirm you’ve successfully returned to the normal interface before driving.
The Standard Exit Method
The easiest way is to simply double-tap the large “Home” button (the house icon) at the bottom center of the touchscreen. This is the same button you use to return to the main menu from any other screen. A double-tap should immediately reboot the system back to the standard Tesla user interface.
Alternative: Power Cycle the Vehicle
If the double-tap doesn’t work or the screen is frozen, you can perform a soft reboot. With the car in Park, press and hold both scroll wheels on the steering wheel for about 10 seconds until the screen goes black. The system will restart, and after 30-60 seconds, it should boot into the normal UI. This is the same as a regular Tesla reboot.
Critical Final Check: After exiting, do not just assume it worked. Look at the screen. Do you see your usual speedometer, energy graph, and media controls? Is the “P” indicator visible? Can you shift into Drive? Only when the standard interface is fully restored and functional should you put the car in Drive and proceed. Make it a habit to do this visual confirmation every single time you use Service Mode.
Conclusion: Knowledge is Power, But Responsibility is Key
Tesla Service Mode demystifies the complex digital heart of your vehicle. It transforms your car from a black box into a transparent system where you can verify health, understand warnings, and speak the same language as service technicians. For the curious owner, exploring the battery cell voltages or watching real-time motor temperatures is genuinely fascinating and builds a deeper connection to the machine.
However, this power comes with a strict code of conduct. Treat Service Mode as a read-only diagnostic window. Your role is to be an informed observer, not an amateur mechanic. Use it to gather data before a service appointment, to monitor long-term health trends, or to satisfy your curiosity about how your car works. But never compromise safety by attempting to drive with it active, and never tamper with settings you don’t fully comprehend. The goal is to become a more knowledgeable Tesla owner, not to create problems that require a tow truck.
If you ever feel in over your head, the best action is to exit Service Mode, note down any relevant codes or readings, and schedule a service appointment through the Tesla app. Provide them with the data you collected—it will make their job easier and your repair faster. In the world of software-defined vehicles, Service Mode is your most direct line to the car’s inner workings. Use it wisely, respectfully, and always with safety as the top priority. Happy (and safe) diagnosing!
Frequently Asked Questions
Is it legal to drive with Tesla Service Mode on?
No. Driving with Service Mode active is illegal in virtually all jurisdictions because it renders critical driver information like speed and gear selection unavailable or obscured. It is considered operating an unsafe vehicle and will likely result in a traffic stop and citation.
Will using Service Mode void my Tesla warranty?
Simply accessing and viewing data in Service Mode does not void your warranty. However, if you change settings or perform calibrations incorrectly and cause damage to a component, Tesla can deny warranty coverage for that specific damaged part, citing user-induced error.
Can I clear error codes (DTCs) in Service Mode myself?
On most owner-accessible versions of Service Mode, the function to clear DTCs is either disabled or requires a technician password. Even if you could, clearing codes without repairing the underlying fault is ineffective and dangerous, as it can mask serious problems. Codes should only be cleared after a verified repair by a qualified technician.
What’s the difference between Service Mode and Valet Mode?
They are completely opposite. Valet Mode is a restricted driving profile that limits power, speed, and storage access for when you hand your car to a valet. Service Mode is a diagnostic interface that replaces the normal UI and is not drivable. Valet Mode is for driving with limits; Service Mode is for parked diagnostics only.
Can Tesla tell if I’ve been in Service Mode?
Yes. The vehicle logs the timestamp and duration of every Service Mode session. This log is accessible to Tesla technicians. While occasional, responsible use for data gathering is normal, frequent or prolonged sessions, especially if followed by system errors, may be noted during a service visit.
Is there a way to permanently enable Service Mode while driving?
No. The activation sequence is designed to only work when the vehicle is in Park. The system will not activate the diagnostic overlay while a drive gear is selected. This is a critical safety lock that cannot be overridden by the user. Any claims of a “drivable Service Mode” are misinformation or refer to hacked/modified firmware, which is against Tesla’s terms and extremely risky.


