Where Is the Starter on a Ford F-150?
Contents
- 1 Key Takeaways
- 2 📑 Table of Contents
- 3 Understanding Your Ford F-150’s Starter: More Than Just a Motor
- 4 The Exact Location: Finding the Starter on Your F-150
- 5 How to Visually Confirm You’ve Found the Right Part
- 6 Common Symptoms of a Failing Starter on an F-150
- 7 Step-by-Step: Replacing the Starter on Your F-150
- 8 When to Seek Professional Help
- 9 Conclusion: Knowledge is Power (and a Running Truck)
- 10 Frequently Asked Questions
The starter on a Ford F-150 is mounted on the driver’s side (left side) of the engine, bolted to the transmission bellhousing. Its precise position can vary slightly depending on the truck’s model year and engine size (like the 3.5L EcoBoost V6 or 5.0L V8). Knowing this location is crucial for diagnosing click-no-start issues and performing a replacement, as it’s a common point of failure in high-mileage trucks.
Key Takeaways
- Location is Consistent: The starter is always found on the driver’s side of the engine, attached to the back of the engine block where it meets the transmission.
- Access Varies by Year: Pre-2015 models (11th/12th Gen) often have more straightforward access from the top or driver’s side wheel well. Newer models (13th Gen, 2015+) may require removing the driver’s side front wheel and inner fender liner for better access.
- Two-Piece vs. Integrated: Most F-150 starters are separate units, but some newer models with the 3.5L EcoBoost may have the starter motor integrated into the transmission bellhousing, making replacement more complex.
- Symptoms Point to the Starter: A single loud click, a whirring sound without engine turnover, or complete silence when turning the key (with good battery) are classic signs of starter failure.
- Safety First: Always disconnect the negative battery terminal before touching the starter to prevent electrical shorts or accidental engine starting.
- Diagnostic Step: Before replacing the starter, check battery voltage and connections. A weak battery or corroded terminal can perfectly mimic starter failure.
- Torque is Critical: Starter mounting bolts must be torqued to the manufacturer’s specification (often 30-40 ft-lbs) to ensure proper engagement and prevent damage.
📑 Table of Contents
- Understanding Your Ford F-150’s Starter: More Than Just a Motor
- The Exact Location: Finding the Starter on Your F-150
- How to Visually Confirm You’ve Found the Right Part
- Common Symptoms of a Failing Starter on an F-150
- Step-by-Step: Replacing the Starter on Your F-150
- When to Seek Professional Help
- Conclusion: Knowledge is Power (and a Running Truck)
Understanding Your Ford F-150’s Starter: More Than Just a Motor
Let’s talk about that crucial little component that gets your massive F-150’s engine roaring to life: the starter. It’s an electric motor, but think of it as the strongman that gives your truck’s huge, heavy engine the initial push it needs to start breathing on its own. When you turn the key (or press the start button), a signal tells the starter’s solenoid to engage. This solenoid is a clever little switch that does two jobs at once: it pushes a small gear (the Bendix drive) to mesh with the engine’s flexplate or flywheel teeth, and it closes a heavy-duty electrical circuit to power the starter motor itself.
That mesh is everything. The starter motor spins, turning the gear, which turns the flexplate, which rotates the engine’s crankshaft. Once the engine fires and is running under its own power, the starter’s gear automatically retracts. If this process fails—the gear doesn’t engage, the motor doesn’t spin, or it spins too slowly—your truck just sits there, maybe clicking or whining, but not going anywhere. It’s a simple concept, but a failure can be incredibly frustrating. Understanding where this part lives is the first step to diagnosing whether it’s truly the culprit or if another component, like the battery or ignition switch, is at fault. This knowledge saves you time, money, and the hassle of replacing the wrong part.
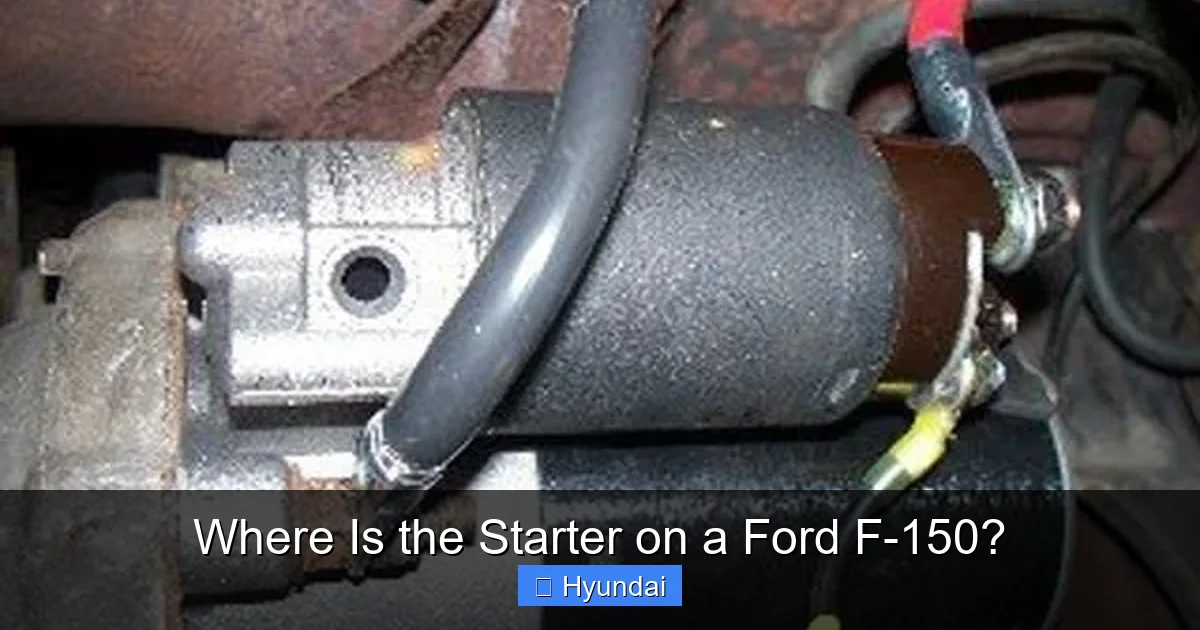
The Exact Location: Finding the Starter on Your F-150
Now for the treasure map. The starter on every Ford F-150, from the classic 1990s models to the latest 2024s, is installed in the same fundamental area: on the driver’s side (left side if you’re sitting in the truck facing forward) of the engine, bolted directly to the rear of the engine block. It’s nestled up against the front of the transmission bellhousing. This location makes sense from an engineering perspective—it’s a straight shot to the engine’s crankshaft via the flexplate.
Visual guide about Where Is the Starter on a Ford F-150?
Image source: mikrora.com
General Location Guide (All Generations)
Pop the hood of your F-150. Stand on the driver’s side of the truck and look down at the engine. You’re looking for a cylindrical, heavy-looking component, usually about the size of a small coffee can or a bit larger, made of metal (often black or silver). It will have two or three thick bolts holding it to the engine block and two heavy electrical cables attached: one from the battery (the main positive feed) and one from the ignition switch (the trigger wire, which is smaller). It’s typically low down, near the bottom of the engine, close to where the engine meets the transmission.
Visual Cues: It’s often near the engine oil filter (which is also on the driver’s side on most F-150s) but farther back, closer to the firewall. On V8 engines, it’s usually tucked behind the intake manifold’s rear section. On the 3.5L EcoBoost V6, it’s located in a similar spot but can be more obscured by turbocharger and exhaust manifold components. Don’t confuse it with the alternator, which is on the opposite side (passenger’s side) and has a pulley and belt attached.
Access Differences by Generation and Engine
While the final resting spot is the same, how easy it is to see and reach changes dramatically. This is the real key to your repair plan.
- Pre-2015 (11th & 12th Generation, 2004-2014): These are often the easiest. The starter is generally accessible from the top of the engine bay after removing some plastic covers, or from the driver’s side wheel well by removing a few screws from the inner fender liner. The engine bay is more open, and the starter isn’t typically hidden behind major components.
- 2015-2020 (13th Generation): This generation introduced the “three-box” frame and more compact engine bay packaging. Access usually requires removing the front driver’s side wheel and then the plastic inner fender liner (the splash guard behind the wheel). This gives you a straight shot at the starter from the wheel well. From the top, it’s often very difficult to see or reach due to the intake manifold and other components.
- 2021-Present (14th Generation): Similar to the 2015-2020 models in terms of needing wheel and liner removal. The placement is nearly identical. However, some models with the 3.5L EcoBoost have the starter integrated more deeply into the transmission bellhousing, which might require dropping the transmission or at least supporting it and removing the rear transmission mount for adequate access—a significantly bigger job.
Practical Tip: Before you start, consult a factory service manual or a trusted online repair guide (like from Alldata or Mitchell) for your specific year, make, engine size, and drivetrain (2WD vs. 4WD). The difference between a 2-hour and a 6-hour job can come down to these tiny details. For instance, on a 4WD model, the front driveshaft and differential housing might be in the way, requiring their removal.
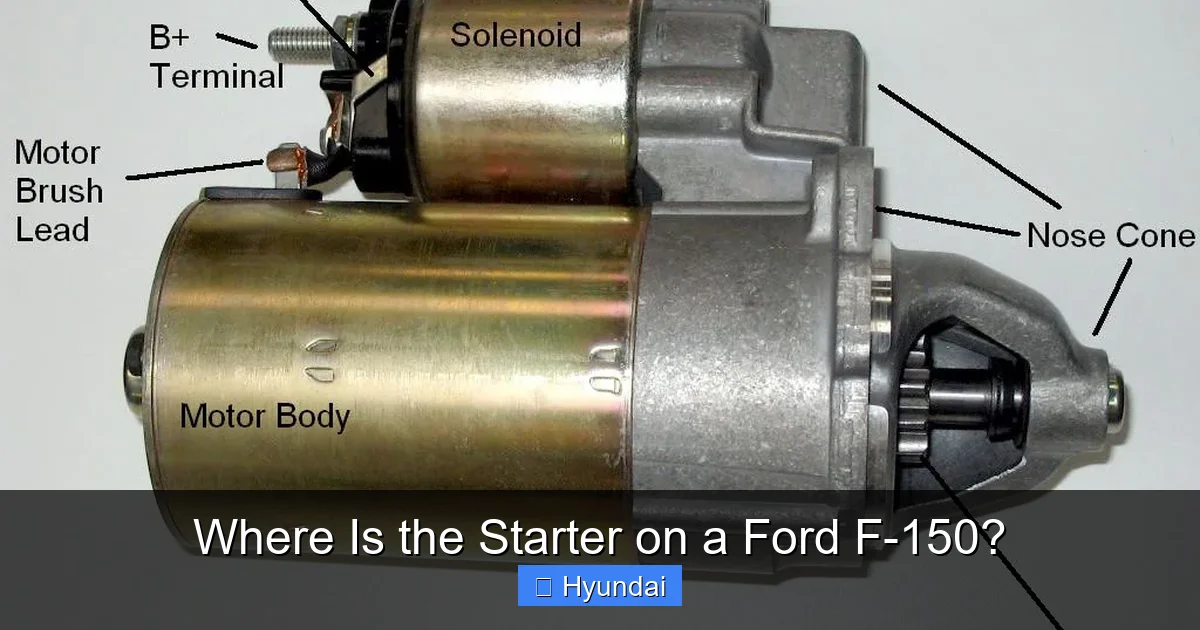
How to Visually Confirm You’ve Found the Right Part
You’re looking at a cylindrical component in the right general area. How can you be 100% sure it’s the starter and not, say, the ABS module or a transmission solenoid pack? Here’s your confirmation checklist:
Visual guide about Where Is the Starter on a Ford F-150?
Image source: cimg6.ibsrv.net
- Follow the Wires: The starter will have the single largest-gauge wire going to it—this is the main power cable coming directly from the positive battery terminal or a main fuse box. It’s usually secured with a nut. The second wire is smaller, often a push-on spade connector, which comes from the ignition switch or the starter relay.
- Look for the Solenoid: The starter motor itself is cylindrical. Attached to its top or side is a smaller cylindrical or squarish component—this is the solenoid. It’s the part that makes the distinctive “click” sound. The trigger wire connects directly to this solenoid.
- Trace to the Flywheel: If you can see behind the starter (often by looking up from the wheel well or using a mirror), you should see the tip of the starter gear (the Bendix drive) very close to the ring gear on the engine’s flexplate (or flywheel on a manual transmission). You won’t see the teeth clearly without removal, but you can see the gap.
- Physical Removal: There’s no substitute. If you can remove the two or three mounting bolts (they are often very long, 4-6 inches), and the component comes free, you’ve found it. The starter is a single, self-contained unit. It will be heavy for its size (typically 10-15 pounds).
Pro Tip: Use your smartphone’s flashlight and camera. Take pictures from multiple angles before you unbolt anything. This will be invaluable when it’s time to reinstall, ensuring you reconnect every wire in the right place and don’t forget any bolts or brackets.
Common Symptoms of a Failing Starter on an F-150
Knowing the location helps with replacement, but knowing the symptoms tells you if replacement is even necessary. Don’t immediately blame the starter; the problem could be upstream.
Visual guide about Where Is the Starter on a Ford F-150?
Image source: 3.bp.blogspot.com
The Classic “Click” with No Crank
This is the most famous symptom. You turn the key, and you hear a single, solid CLICK from under the hood (or sometimes from the starter solenoid on the fender well in older models), but the engine does not turn over at all. This usually means the solenoid is receiving the signal and engaging (hence the click), but the starter motor itself is not spinning. This could be due to worn-out brushes, a failed armature, or a shorted winding inside the motor. It could also mean a severe lack of battery power, but a healthy battery should still crank the engine slowly in that case.
The “Whirr” or “Grind” Without Starting
You hear a high-pitched whirring noise, like an electric motor spinning freely, but the engine doesn’t crank. This means the starter motor is spinning, but its gear is not engaging with the flexplate’s ring gear. The most common cause is a worn-out Bendix drive that fails to extend. Less commonly, the flexplate’s ring gear teeth could be damaged, preventing engagement.
Slow Cranking or “Grinding” Noise
The engine turns over very slowly, labored, or you hear a terrible grinding/screaming noise. Slow cranking is often a battery issue, but if the battery is new and fully charged, it points to a starter drawing too much current due to internal shorts. The grinding noise means the starter gear is engaging but then slipping against the ring gear teeth, usually because the starter is mounted incorrectly (misaligned) or the Bendix drive is sticking. This can quickly destroy the ring gear, a very expensive repair.
No Sound at All
Total silence. No click, no whirr. This is a diagnostic starting point. First, check the battery—a dead battery is the #1 cause. If the battery is good, the issue could be in the starter circuit: a blown fuse, a failed starter relay, a broken ignition switch, or a faulty neutral safety switch (or clutch safety switch on manuals). The starter itself could also have an open circuit internally.
Important: Always perform a systematic diagnosis. Check battery voltage at the starter’s main terminal while someone cranks. If you see 12+ volts there but the starter isn’t moving, the starter is bad. If you see 0 volts, the problem is in the wiring, fuses, or ignition circuit. For modern F-150s with complex engine management, reading diagnostic trouble codes (DTCs) from the OBD2 port can also reveal related electrical issues.
Step-by-Step: Replacing the Starter on Your F-150
So you’ve diagnosed a bad starter. Let’s replace it. This is a moderate DIY job for a pre-2015 F-150 but can be a challenging, contortionist-level task for 2015+ models requiring wheel and liner removal. Here is the generalized process.
Tools and Safety You’ll Need
- Socket set (usually 13mm, 15mm, or 18mm for mounting bolts)
- Wrenches or swivel sockets for battery terminals
- Torque wrench (CRITICAL for reinstallation)
- Flashlight or work light
- Gloves and safety glasses
- THE MOST IMPORTANT TOOL: A fully charged battery disconnect tool or a wrench to disconnect the NEGATIVE battery terminal first.
The Replacement Procedure
Step 1: Disconnect the Battery. Loosen the negative (black, -) battery terminal clamp and move the cable aside. Tuck it so it can’t accidentally touch the terminal. This prevents a short circuit if your wrench touches metal while unbolting the starter.
Step 2: Access the Starter. Based on your model year, raise and support the driver’s side of the truck with jack stands if needed. Remove the front driver’s side wheel. Then, remove the plastic inner fender liner (splash guard). It’s held by plastic clips and a few screws. Work carefully to avoid breaking clips. For pre-2015 models, you may only need to remove a few engine covers from the top.
Step 3: Disconnect Electrical Cables. With the starter exposed, you will see two wires. The large main power cable (from the battery) is secured with a nut, usually 10mm or 13mm. Remove the nut and pull the terminal off. Be careful—it’s a heavy-gauge wire. The smaller trigger wire has a spade connector. Gently pull it off its terminal. Tip: Take a picture of the wiring before disconnecting.
Step 4: Remove Mounting Bolts. There are typically two or three long bolts that hold the starter to the engine block. They may be very tight, especially on older trucks. Use penetrating oil (like PB Blaster) and let it soak for 10-15 minutes if they are rusted. Use the appropriate socket and a breaker bar for leverage. Support the starter with one hand as you remove the last bolt; it will be heavy and will fall if unsupported.
Step 5: Remove the Old Starter. Maneuver the old starter out. This can be tricky due to tight engine bay spaces. You may need to twist and turn it. On some models, you might have to temporarily move other components like the exhaust pipe or brake line bracket.
Step 6: Install the New Starter. Position the new starter (ensure it’s the correct part number for your exact engine and year!). Hand-thread the mounting bolts to avoid cross-threading. Tighten them gradually in a criss-cross pattern to the manufacturer’s torque specification. Do not overtighten. Overtightening can crack the starter housing or distort the mounting surface, causing gear misalignment.
Step 7: Reconnect Electrical Cables. First, connect the smaller trigger wire spade connector. It only fits one way. Then, attach the main battery cable terminal and tighten the nut securely. Ensure there is no stray wire touching metal.
Step 8: Reassemble. Put the inner fender liner back on (if removed), reinstall the wheel, and lower the truck. Reconnect the positive battery terminal last, then the negative.
Step 9: Test. Start the truck. It should crank normally and start. If it still clicks or doesn’t crank, double-check all connections and torque. If problems persist, the issue may be elsewhere in the starting circuit.
When to Seek Professional Help
While a starter replacement is a defined mechanical job, several factors make it a professional job for many F-150 owners:
- Extremely Tight Access: On some 2021+ EcoBoost models where the starter is deeply integrated into the bellhousing, the job may involve supporting the transmission and potentially dropping it slightly. This is beyond most DIYer’s toolkits and confidence.
- Electrical Diagnostics Required: If your initial diagnosis is uncertain—especially if the problem is intermittent—a professional has advanced tools to test the starter draw, voltage drop in the circuit, and scan for related codes. A seemingly bad starter could be caused by a faulty ignition or control module issue.
- Ring Gear Damage: If your starter failed with a grinding noise, the mechanic must inspect the flexplate’s ring gear. If the teeth are damaged, the flexplate must be replaced, which requires removing the transmission—a major job.
- Warranty and Peace of Mind: A reputable shop will warranty both the part and the labor. If you DIY and damage something (like stripping the bolt holes in the engine block), the repair cost multiplies quickly.
The Bottom Line: If your F-150 is a 2015 or newer, and you’re not experienced with major drivetrain component removal, getting a quote from a trusted mechanic is highly advisable. For older, simpler models, a confident DIYer with the right tools can save significant money.
Conclusion: Knowledge is Power (and a Running Truck)
Finding the starter on your Ford F-150 isn’t a guessing game. It’s a fixed, logical location: driver’s side, attached to the back of the engine. The real challenge lies in the access, which is dictated by your truck’s specific generation and engine. By understanding the common failure symptoms—the click, the whirr, the grind—you can confidently point your diagnosis toward the starter. And if you decide to tackle the replacement yourself, methodical preparation—disconnecting the battery, taking pictures, using the correct torque—is what separates a successful repair from a frustrating, damaging experience. Remember, when in doubt, consult a model-specific guide or a professional. Your F-150 is a workhorse, and ensuring its starting system is healthy means that workhorse is ready to roll whenever you need it. Now you know exactly where to look when it doesn’t.
Frequently Asked Questions
What are the most common signs that my F-150’s starter is bad?
The most common sign is a single loud click from the engine bay when turning the key, with no cranking. Other signs include a whirring sound without engine turnover, slow cranking, or a grinding noise. Always rule out a dead battery or poor connections first.
How much does it cost to replace a starter on a Ford F-150?
DIY costs range from $100-$300 for the part alone, depending on whether you choose OEM, aftermarket, or remanufactured. Professional replacement, including labor, typically runs $400-$800 for older models. For newer models with difficult access (like some EcoBoost engines), labor can push the total to $900-$1,200.
Is the starter location the same on a 2WD and 4WD F-150?
Yes, the starter is mounted in the exact same location on the driver’s side of the engine block for both 2WD and 4WD models. The transfer case on 4WD models is behind the transmission, but the starter bolts to the engine, so its position is unaffected.
Can I test the starter without removing it?
Yes. With the battery disconnected, you can bench-test the starter by connecting it to a known-good battery using jumper cables (connect the main cable to the positive terminal and the trigger wire briefly to the positive terminal as well). It should spin and extend its gear. You can also perform a “voltage drop” test at the starter terminals while cranking to diagnose circuit issues without removal.
Is a starter replacement a good DIY project for a beginner?
It’s considered an intermediate DIY job. The process itself is straightforward (disconnect wires, unbolt, reverse to install), but the difficulty is in access. On pre-2015 F-150s, it’s a great learning project. On 2015+ models requiring wheel and fender liner removal, it’s more challenging and requires comfort with basic hand tools and working in cramped spaces. If you’re a beginner, start with an older, more accessible model.
My F-150 makes a rapid clicking sound. Is that the starter?
A rapid, machine-gun-like clicking is almost always a severe battery issue—the battery is too weak to turn the engine, so the solenoid rapidly engages and disengages. It can also be caused by very corroded battery terminals. Jump-start the truck or have the battery load-tested before replacing the starter.