
How to Install a 220v Outlet for Tesla
Installing a 220V outlet for your Tesla slashes charging time from hours to minutes. This guide breaks down the entire process, from electrical fundamentals to final testing, with a strong emphasis on safety and local code compliance. While a skilled DIYer can tackle this project, the risks of improper installation make hiring a licensed electrician the wisest choice for most homeowners.
So, you’ve joined the electric revolution and are loving your Tesla. But that nagging thought creeps in after a long day: “Is it fully charged?” Plugging into a standard 120V wall outlet (what Tesla calls a “Level 1” charger) is agonizingly slow, adding maybe 3-5 miles of range per hour. For a full recharge from empty, you’re looking at a 12-hour-plus wait. The solution? A 220V outlet, which enables much faster “Level 2” charging at home. But how do you get one? Installing a 220V outlet for Tesla charging is a common and worthwhile project, but it’s serious electrical work. This guide will walk you through everything you need to know, from the “why” to the “how,” and help you decide if this is a DIY job or a moment to call the pros.
Think of it this way: your Tesla’s charger is like a big, thirsty sponge. A 120V outlet is a tiny drip of water. A 220V outlet is a steady stream. That stream can replenish your battery at 20-30 miles of range per hour, meaning a full charge overnight is not just possible, it’s guaranteed. The key is that 220V (technically 240V in modern homes) provides double the voltage of a standard outlet, allowing the same amperage to deliver twice the power (Watts = Volts x Amps). More power means faster charging. The most common and versatile setup for a Tesla is a 50-amp circuit with a NEMA 14-50 outlet, which works perfectly with the included Tesla Mobile Connector.
Before we dive into wire strippers and conduit, a crucial disclaimer: This article is for informational purposes. Electrical work is dangerous and subject to local codes. If you are not 100% confident in your ability to work safely with high-voltage electricity, you must hire a licensed electrician. Improper installation can lead to electrocution, fire, damage to your Tesla’s onboard charger (a very expensive repair), and voided warranties. Your safety and your car’s safety are the top priorities. With that said, let’s understand what you’re getting into.
Key Takeaways
- Safety is non-negotiable: Always turn off the breaker at the main panel and verify power is off with a tester before touching any wires.
- Permits are usually required: Most jurisdictions require an electrical permit for a new 220V circuit. Check with your local building department before starting.
- Match amperage to your charger: The Tesla Mobile Connector typically requires a 40- or 50-amp circuit. Your outlet and wiring must match this amperage rating.
- Wire gauge matters: Using the correct wire size (e.g., 6 AWG copper for a 50-amp circuit) is critical to prevent overheating and fire.
- The standard outlet is NEMA 14-50: This 4-prong receptacle is Tesla’s recommended choice for its versatility and safety.
- Professional installation protects your wallet and warranty: A mistake can damage your Tesla, cause a fire, and void warranties. A licensed electrician ensures code compliance and safety.
- Test before you trust: Use a multimeter or outlet tester to confirm correct voltage, polarity, and grounding before plugging in your Tesla.
📑 Table of Contents
- Understanding 220V vs. 120V for Tesla Charging
- Tools, Materials, and Safety Precautions: Your Prep Checklist
- Step-by-Step Installation Process
- Common Mistakes to Avoid: The Pitfalls That Cause Problems
- When to Hire a Professional: Know Your Limits
- Maximizing Your New 220V Outlet: Beyond the Basics
- Conclusion: Powering Your Tesla the Right Way
Understanding 220V vs. 120V for Tesla Charging
It’s not just about “more power.” It’s about the fundamental relationship between voltage, amperage, and your car’s onboard charger. Every Tesla has an internal charger that converts AC power from your wall into DC power for the battery. This charger has a maximum power rating. For most modern Teslas, the onboard charger can handle up to 48 amps on a 240V circuit.
The Math of Charging Speed
Charging speed is measured in kilowatts (kW). To calculate it, you multiply the voltage by the amperage and divide by 1000. Let’s compare:
- Standard 120V, 15A Outlet: 120V x 12A (continuous) / 1000 = ~1.4 kW. This adds about 3-5 miles of range per hour.
- 220V/240V, 40A Circuit: 240V x 32A (continuous) / 1000 = ~7.7 kW. This adds about 25-30 miles of range per hour.
- 220V/240V, 50A Circuit (NEMA 14-50): 240V x 40A (continuous) / 1000 = ~9.6 kW. This is the sweet spot for most owners, adding 30-35 miles per hour.
Notice we use “continuous” amperage at 80% of the circuit’s rating (e.g., 40A continuous on a 50A breaker). This is a critical electrical code rule for continuous loads like charging a car for hours.
Why NEMA 14-50 is the King
You’ll see many outlet types: NEMA 10-30 (old dryer style, 3-prong, no ground), NEMA 14-30 (for newer dryers), NEMA 14-50 (for ranges). The NEMA 14-50 is the gold standard for Tesla home charging. It has four prongs: two hot wires (each 120V out of phase, creating 240V between them), one neutral, and one ground. This is the safest, most modern configuration. Tesla’s Mobile Connector comes with an adapter for it. It also future-proofs you; if you get a second Tesla or a higher-amperage charger later, you’re already set. While you can use other outlets with the right adapter, hardwiring a dedicated circuit to a NEMA 14-50 is the cleanest, most robust solution.
Tools, Materials, and Safety Precautions: Your Prep Checklist
Half the battle is being properly prepared. Rushing to the hardware store mid-project is frustrating. Here’s your comprehensive list.
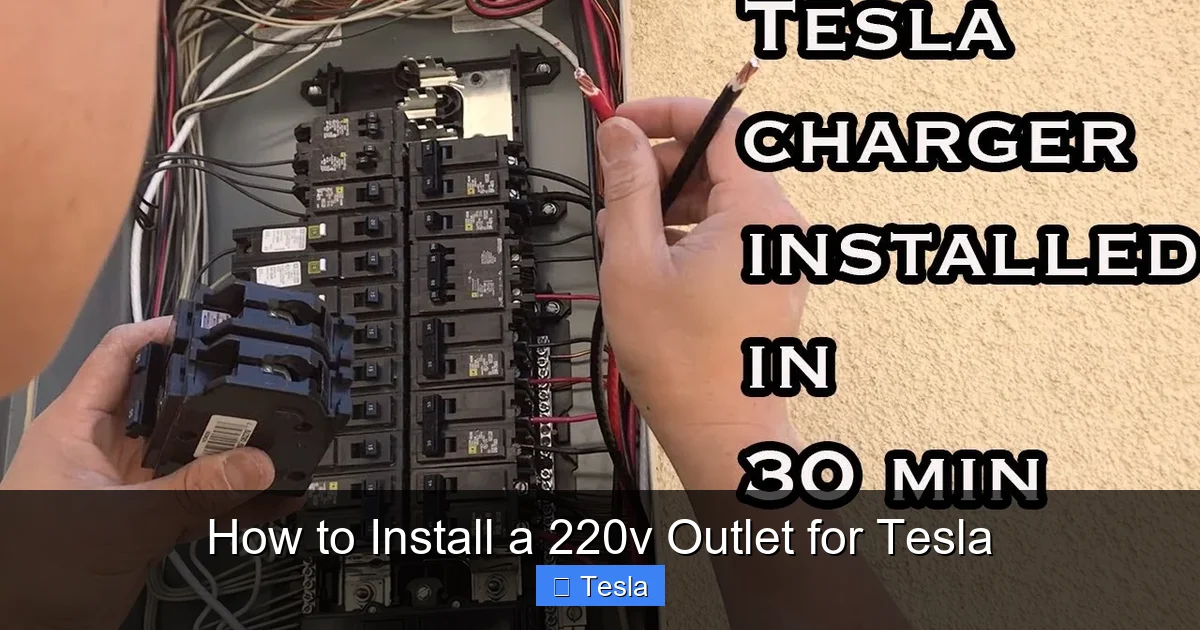
Visual guide about How to Install a 220v Outlet for Tesla
Image source: i.ytimg.com
Essential Tools
- Safety Gear: Safety glasses, insulated gloves, and sturdy shoes.
- Hand Tools: Voltage tester/non-contact voltage detector, wire strippers, utility knife, screwdrivers (flathead and Phillips), needle-nose pliers, wrench set (especially for conduit and outlet), and a fish tape or wire puller.
- Power Tools (Optional but helpful): Drill with hole saw bits (for running cable through studs/joists), reciprocating saw or hole-cutting drill bit for conduit.
- Measurement: Tape measure, level.
- Testing: A multimeter is highly recommended for final verification.
Required Materials
- Circuit Breaker: A 2-pole 50-amp (or 40-amp) breaker that matches your main panel’s brand (e.g., Siemens, Square D, GE). This is not a place for a generic.
- Electrical Cable: For a 50-amp circuit, you need at least 6 AWG (American Wire Gauge) copper THHN/THWN-2 wire. This is 4 wires: two hots (black and red), one neutral (white), and one ground (green or bare). You can also use 6/3 with ground UF-B cable for direct burial, but THHN in conduit is more common for interior runs. Never use a smaller gauge like 8 AWG for a 50A circuit.
- Conduit: EMT (electrical metallic tubing) or PVC conduit to protect the wire from the panel to the outlet location. You’ll need fittings, couplings, and conduit straps.
- Outlet & Box: A NEMA 14-50R (receptacle) and a heavy-duty single-gang or two-gang metal electrical box (metal is preferred for grounding).
- Other: Wire nuts, electrical tape, cable clamps for the panel, grounding screw, and label for the breaker.
Non-Negotiable Safety Steps
- Turn Off the Main Power: Go to your main service panel and flip the main breaker to OFF. This is your master safety switch. Verify with your voltage tester that all wires in the panel are dead.
- Use a Voltage Tester: Before touching ANY wire—even if you think the breaker is off—test it. Touch the tester’s probes to each pair of terminals (hot-to-hot, hot-to-neutral, hot-to-ground). It must read zero.
- Work in Dry Conditions: Never work on electrical systems in damp or wet environments.
- One Hand Rule: When working near live parts (though you should have power off!), keep one hand behind your back to avoid current crossing your chest.
- Know Your Limits: If the inside of your main panel is crowded, complex, or you see any signs of overheating (discoloration, smell), stop and call a pro.
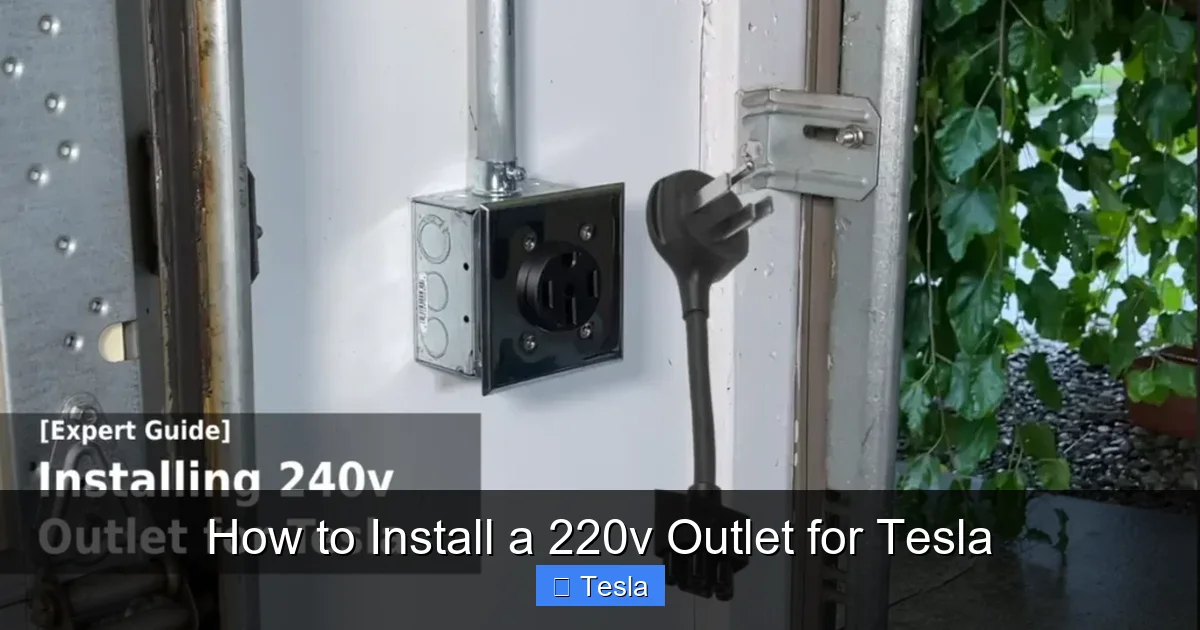
Step-by-Step Installation Process
Assuming you have your permit (if required) and all materials, here is the general workflow. Locations vary (garage, exterior wall, basement), but the principles are the same.

Visual guide about How to Install a 220v Outlet for Tesla
Image source: evseekers.com
Step 1: Plan and Prepare
Decide on the outlet location. It should be on a wall near where you park, ideally on the same side as your Tesla’s charge port. Consider the length of the Tesla Mobile Connector cable (20 feet). The outlet should be at a convenient height (generally 18-24 inches from the floor). Ensure the location is away from water sources and combustible materials. Plan your cable run from the main panel to this spot. The shortest, straightest route is best. You’ll likely run conduit along walls, through joists, or in a basement/crawlspace.
Step 2: Install the Conduit
Measure and cut your EMT or PVC conduit to length. Use a hacksaw or pipe cutter. Install couplings and elbows as needed to navigate corners. Secure the conduit to walls or joists with straps every 3-4 feet. Leave a few inches of slack at both ends (the panel and the outlet box). If running through a finished wall, you may need to drill holes through studs/joists.
Step 3: Pull the Wire
This is often the trickiest part. Turn the power back OFF at the main (you’ll need light to see!). Using fish tape, feed it through the entire conduit run from the panel end to the outlet end. Attach the 4 wires (black, red, white, green) securely to the fish tape with electrical tape, making a smooth, tapered end. From the panel end, slowly and carefully pull the fish tape back, drawing the wires through the conduit. Do not use excessive force. If it binds, check for sharp bends or kinks. Leave about 12 inches of extra wire at each end.
Step 4: Connect at the Main Panel
This is the most dangerous step. If you are uncomfortable here, stop and call an electrician. With the main breaker OFF and verified dead, you will connect the new circuit.
- Mount the new 2-pole 50A breaker in an empty slot in your panel. It will connect to both bus bars.
- Strip about 3/4 inch of insulation from each wire end.
- Connect the two hot wires (black and red): One to each screw on the new breaker. Tighten firmly.
- Connect the neutral wire (white): To the neutral bus bar in the panel (this is a separate bar from the ground bus in modern panels; if they are the same bar, it’s an older panel—consult an electrician).
- Connect the ground wire (green/bare): To the ground bus bar.
- Secure the wires: Use a cable clamp where the conduit enters the panel. Ensure no bare copper is exposed except at the screw terminals.
- Double-check all connections. Ensure no stray strands are sticking out.
Step 5: Install the Outlet Box and Receptacle
Mount your metal electrical box at the planned location. Run the 4 wires into the box, securing with a clamp. Strip about 3/4 inch of insulation from each wire.
- NEMA 14-50 outlets have specific terminals: Look for X and Y (the two brass-colored screws for the hot wires), W (the silver screw for the neutral), and G (the green screw for the ground).
- Connect the black wire to the X terminal and the red wire to the Y terminal.
- Connect the white wire to the W (neutral) terminal.
- Connect the green/bare ground wire to the G (ground) terminal.
- Carefully fold the wires back into the box and attach the receptacle, ensuring it’s level and secure. Screw on the cover plate.
Step 6: Final Inspection and Power-Up
With the outlet cover on and the panel cover removed for now, go back to the main panel. Turn the main breaker ON. Then, flip your new 2-pole breaker ON. Immediately use your voltage tester to check the outlet:
- Test between the two vertical slots (X and Y): You should read ~240V.
- Test between either hot (X or Y) and the round ground: You should read ~120V.
- Test between the neutral (the T-slot) and ground: Should be near 0V or a very small voltage.
If all readings are correct, turn the breaker OFF, replace the panel cover, and label the breaker clearly (“Tesla Charger” or “220V Outlet”). You are now ready to plug in your Tesla and configure the charging settings in the car.
Common Mistakes to Avoid: The Pitfalls That Cause Problems
Even with the best intentions, small errors can have big consequences. Here are the most frequent missteps.
Visual guide about How to Install a 220v Outlet for Tesla
Image source: evseekers.com
Using the Wrong Wire Gauge
This is the #1 mistake. Using 8 AWG wire for a 50A circuit is a fire hazard. The wire will overheat under continuous load. The ampacity of copper wire in conduit is defined by code: 6 AWG is rated for 55A, making it safe for a 50A circuit (at 80% continuous load = 40A). Always oversize if unsure. For a 40A circuit, 8 AWG is acceptable.
Skipping the Grounding or Neutral
Some older 3-prong outlets (NEMA 10-30) have no ground. Do not use these for a Tesla. The car’s charger needs a proper ground for safety. Also, the neutral is required for a NEMA 14-50. Do not bond neutral and ground at the outlet—they must be kept separate except at the main service panel.
Overloading the Circuit
Do not plug anything else into this outlet. It should be a dedicated circuit for EV charging. Using a “cheater” plug to add another outlet or running an extension cord off it defeats the purpose and creates an overload risk.
Poor Conduit and Wire Protection
Running NM-B (Romex) cable exposed in a garage or basement without conduit is often not code-compliant for a new 220V circuit. You must protect the wire with conduit where it’s subject to damage. Also, ensure all conduit connections are tight and secured to prevent wires from rubbing on sharp edges.
Ignoring Local Amendments
The National Electrical Code (NEC) is the baseline, but your city or county can have stricter rules. Some require a disconnect near the outlet, specific types of breakers (like GFCI for garages or outdoors), or even hardwiring instead of a receptacle. Your permit inspector will know. Always get the permit and have the work inspected. This isn’t bureaucracy; it’s a safety net that protects you.
When to Hire a Professional: Know Your Limits
So, you’ve read the steps and feel a little queasy. That’s a good sign. Here’s when to absolutely call a licensed electrician.
Complex Panel Situations
If your main panel is already full (no empty spaces), is an older, obsolete brand (like Federal Pacific or Zinsco), or is located in a difficult spot (tight closet, high ceiling), the job becomes much more complex. An electrician can safely add a subpanel or perform a “panel upgrade,” which is beyond DIY scope.
Long or Difficult Runs
If your run from the panel to the garage is very long (over 100 feet), voltage drop becomes a concern. You may need to upsize the wire to 4 AWG to maintain charging efficiency. Calculating this correctly requires expertise.
Code Compliance and Insurance
A proper permit and inspection create a paper trail. If a fire occurs and the work was unpermitted DIY, your homeowner’s insurance could deny the claim. A licensed electrician provides liability and ensures the work meets all codes, giving you peace of mind and protecting your investment.
The Tesla Warranty Angle
Tesla’s warranty on the vehicle and its onboard charger is generally not voided by a properly installed third-party outlet. However, if an electric fault from a shoddy installation damages the car, Tesla will likely deny warranty coverage for that damage. Using a Tesla certified electrician provides an extra layer of assurance that the installation meets Tesla’s recommendations.
Cost Consideration: Professional installation for a straightforward run typically costs between $500 and $2,000, depending on your location, panel complexity, and run length. This includes the permit, materials, and labor. For a detailed breakdown of what influences the price, you can read more about 220V outlet installation costs here.
Maximizing Your New 220V Outlet: Beyond the Basics
You’ve got your NEMA 14-50 installed and it’s working. Now what? Let’s get the most out of it.
Optimize Your Tesla’s Charging Settings
In your Tesla, go to Controls > Charging. Set the maximum amperage. For a 50A circuit, set it to 40A (80% of 50A). This is optimal for battery health and code compliance. You can also schedule charging to start during off-peak electricity hours to save money if your utility has time-of-use rates.
Use the Right Adapter Kit
Your Tesla Mobile Connector comes with a NEMA 14-50 adapter. Keep it with the connector. You might also consider purchasing the official Tesla J1772 adapter if you ever need to use public Level 2 stations that use that standard plug. Never use cheap, uncertified adapters from third parties.
Consider Future-Proofing
If you think you might buy another EV in the future that needs more power (like a Cybertruck with a larger battery), or if you want the absolute fastest home charging, you could install a higher-amperage circuit now (like a 60A or 80A) with 4 AWG wire and a NEMA 14-60 or 14-70 outlet. The Tesla Mobile Connector maxes at 48A, but a future Wall Connector could use more. This is more expensive upfront but avoids a second electrical project later.
Energy Monitoring and Solar Integration
For the tech-savvy, you can integrate your charger with home energy monitors like Sense or Emporia Vue to track exactly how much energy your Tesla uses. If you have solar panels, you can configure your charging to use primarily solar power during the day, maximizing your green energy usage and reducing grid dependence.
The Next Step: A Dedicated Wall Connector
While a NEMA 14-50 outlet with the Mobile Connector is excellent, Tesla’s Wall Connector offers advantages: a sleeker design, cable management, Wi-Fi connectivity for scheduling and monitoring, and the ability to hardwire for a cleaner install. It can also share power among multiple Wall Connectors if you have two cars. If you’re committed to Tesla for the long haul, this is the ultimate home charging solution. Installing a dedicated Tesla charger is a similar electrical process but requires a specific hardwired connection or a different outlet, and the hardware cost is higher.
Conclusion: Powering Your Tesla the Right Way
Installing a 220V outlet for your Tesla is one of the best upgrades you can make to your EV ownership experience. The transformation from “range anxiety” to “plug in and forget” is real. The process, while grounded in simple electrical principles, demands respect for the dangers involved and adherence to the meticulous rules of the National Electrical Code.
Your takeaway should be this: Plan meticulously, prioritize safety above all else, and never compromise on wire size or grounding. If any step feels beyond your comfort zone—especially working inside the main service panel—that’s your cue to hire a licensed professional. The cost of an electrician is a small price to pay for the guarantee of a safe, code-compliant, and warranty-friendly installation. Once that beautiful NEMA 14-50 receptacle is on your wall, you’ll plug in your Tesla, set the charge timer, and walk away with the confidence that tomorrow will start with a full battery. That’s the true joy of electric driving, powered by a properly installed 220V outlet.
Frequently Asked Questions
Can I install a 220V outlet for my Tesla myself?
Technically yes, if you have extensive electrical experience, understand local codes, and are comfortable working in your main service panel. However, for the vast majority of people, hiring a licensed electrician is strongly recommended due to the serious risks of shock, fire, and potential damage to your vehicle.
What specific outlet does Tesla recommend for home charging?
Tesla officially recommends the NEMA 14-50 outlet for use with its Mobile Connector. This 4-prong, 240V, 50-amp receptacle is the industry standard for EV charging and provides the best balance of safety, power, and compatibility with the included adapter.
How much does it typically cost to have a 220V outlet installed?
Professional installation costs vary widely based on your home’s layout and local labor rates, but typically ranges from $500 to $2,000. This covers the permit, the breaker, conduit, wire, the outlet, and labor. Complex runs or panel upgrades will be on the higher end.
Do I need an electrical permit for this project?
Yes, in almost all cases. Installing a new 220V circuit is a permanent electrical alteration and requires a permit from your local building department. The work must then be inspected to ensure it meets code. Skipping this step is illegal, unsafe, and can void insurance coverage.
Can I use an adapter to plug my Tesla into a different 220V outlet, like a dryer plug?
You can use certified Tesla adapters for outlets like NEMA 14-30 (common for dryers). However, the charging speed will be limited by the outlet’s amperage (e.g., 24A on a 30A circuit). Never use an adapter that isn’t specifically designed and listed for EV charging, as they can overheat and cause fire.
Will installing a third-party 220V outlet void my Tesla’s warranty?
No, a properly installed, code-compliant 220V outlet will not void your Tesla’s warranty. However, if a fault in the home wiring or outlet causes damage to the vehicle’s onboard charger or other components, Tesla may deny warranty coverage for that damage, attributing it to the external power source.


