
How to Reset the Maintenance Light on a Toyota Avalon
Contents
- 1 Key Takeaways
- 2 📑 Table of Contents
- 3 Why the Maintenance Light Matters on Your Toyota Avalon
- 4 Understanding the Toyota Avalon Maintenance Light System
- 5 Tools and Preparation Needed to Reset the Maintenance Light
- 6 Step-by-Step Guide to Reset the Maintenance Light (2013 and Newer Models)
- 7 Resetting the Maintenance Light on Older Toyota Avalon Models (Pre-2013)
- 8 Troubleshooting Common Reset Problems
- 9 Best Practices for Maintaining Your Toyota Avalon
- 10 Conclusion: Take Control of Your Avalon’s Maintenance
- 11 Frequently Asked Questions

Car Shampoo Concentrate

Diesel Fuel Additive

LED Indicator Light

Portable Work Light
Resetting the maintenance light on your Toyota Avalon is simple and can be done at home in under two minutes. This guide covers every model year, from older generations to the latest 2023+ Avalons, with clear, easy-to-follow instructions.
Key Takeaways
- Know Your Model Year: Reset procedures differ slightly between older (pre-2013) and newer (2013+) Toyota Avalon models due to dashboard and instrument cluster changes.
- Use the Trip Meter Button: Most Avalons rely on the trip meter or odometer button to cycle through menu options and reset the maintenance light.
- Turn the Ignition On (But Don’t Start the Engine): The reset process requires the ignition to be in the “ON” position without the engine running.
- Follow the Correct Sequence: Missing a step or pressing buttons in the wrong order can prevent the reset from working—precision matters.
- Reset After Every Service: Always reset the maintenance light after oil changes or scheduled maintenance to keep accurate service records.
- Check the Owner’s Manual: When in doubt, refer to your vehicle’s manual for model-specific instructions or troubleshooting tips.
- Seek Professional Help if Needed: If the light won’t reset after multiple attempts, there may be an underlying issue requiring a technician’s diagnosis.
📑 Table of Contents
- Why the Maintenance Light Matters on Your Toyota Avalon
- Understanding the Toyota Avalon Maintenance Light System
- Tools and Preparation Needed to Reset the Maintenance Light
- Step-by-Step Guide to Reset the Maintenance Light (2013 and Newer Models)
- Resetting the Maintenance Light on Older Toyota Avalon Models (Pre-2013)
- Troubleshooting Common Reset Problems
- Best Practices for Maintaining Your Toyota Avalon
- Conclusion: Take Control of Your Avalon’s Maintenance
Why the Maintenance Light Matters on Your Toyota Avalon
The maintenance light on your Toyota Avalon isn’t just a nagging reminder—it’s a vital part of your vehicle’s health monitoring system. Designed to alert you when routine service is due, this light helps ensure your Avalon runs smoothly, efficiently, and safely. Whether it’s time for an oil change, tire rotation, or brake inspection, the maintenance light keeps you on schedule. Ignoring it might seem harmless at first, but skipping regular maintenance can lead to bigger, costlier problems down the road.
Toyota engineers the Avalon with reliability and longevity in mind, and part of that commitment includes smart onboard diagnostics. The maintenance light—often labeled as “MAINT REQD” or “OIL”—is triggered based on mileage, driving conditions, and engine runtime. Unlike a check engine light, which signals a potential mechanical issue, the maintenance light is purely a service reminder. Still, it’s important to treat it seriously. Resetting it promptly after service ensures your Avalon’s computer continues to track future maintenance accurately.
Many Avalon owners are surprised to learn that resetting this light doesn’t require a trip to the dealership or a scan tool. In fact, most models allow you to reset it yourself using simple steps involving the dashboard controls. This saves time and money, and gives you more control over your vehicle’s upkeep. Whether you’re a DIY enthusiast or just want to avoid an extra service fee, knowing how to reset the maintenance light is a valuable skill.
Understanding the Toyota Avalon Maintenance Light System
Before diving into the reset process, it helps to understand how the maintenance light system works in your Toyota Avalon. This system is part of Toyota’s broader Maintenance Reminder System (MRS), which monitors various service intervals based on real-world driving data. Unlike older vehicles that rely solely on mileage, the Avalon’s system considers factors like engine temperature, idle time, and driving patterns to determine when service is needed.
The maintenance light typically illuminates around every 5,000 to 10,000 miles, depending on your driving habits and the type of oil used. For example, if you frequently drive in stop-and-go traffic or extreme temperatures, the system may recommend service sooner. Conversely, highway driving with synthetic oil might extend the interval. This adaptive approach ensures your Avalon gets the care it needs without unnecessary visits.
It’s also worth noting that the maintenance light is different from the check engine light. The check engine light (usually an icon of an engine or labeled “CHECK ENGINE”) indicates a potential mechanical or emissions problem that requires immediate attention. The maintenance light, on the other hand, is a friendly nudge to schedule routine service. Confusing the two can lead to unnecessary worry or, worse, ignoring a real issue.
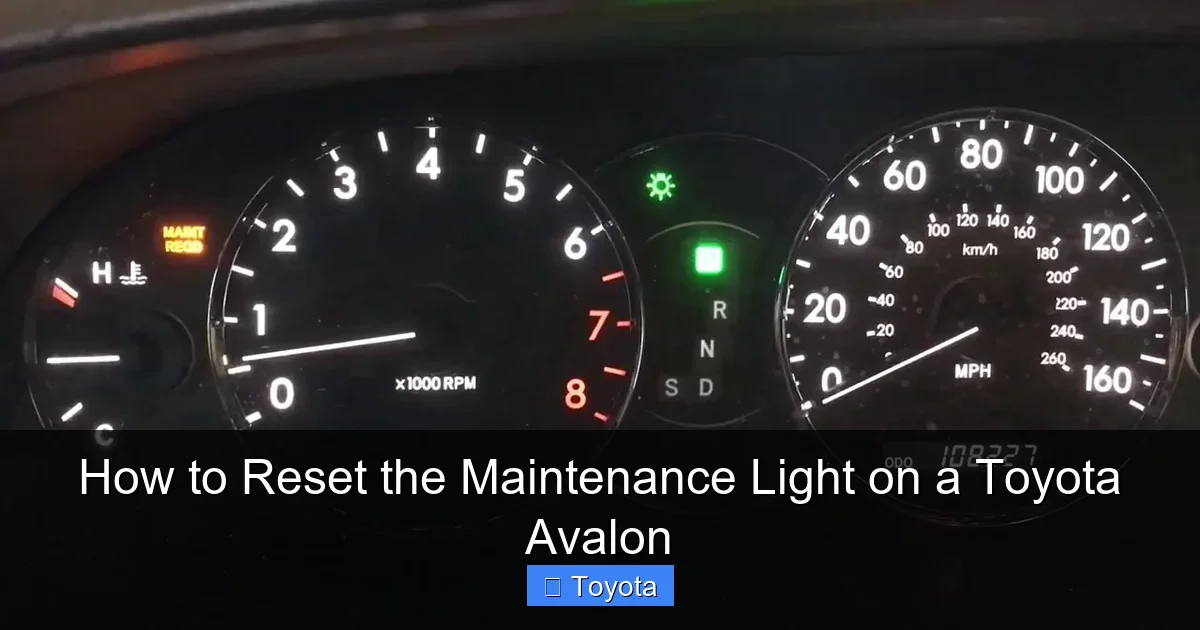
The Avalon’s instrument cluster displays the maintenance light in the form of text (“MAINT REQD”) or a wrench icon. On newer models with digital displays, you may also see service messages or countdowns to the next recommended service. This level of detail helps you stay proactive about maintenance and avoid surprises.
Tools and Preparation Needed to Reset the Maintenance Light
One of the best things about resetting the maintenance light on a Toyota Avalon is that you don’t need any special tools. Everything you need is already in your vehicle. However, a little preparation can make the process smoother and reduce the chance of errors.
First, make sure your Avalon is parked on a flat surface and the engine is off. You’ll need access to the driver’s seat and the ability to reach the ignition and dashboard controls. It’s also a good idea to have your owner’s manual nearby, especially if you’re unsure about your model year or specific dashboard layout.
You don’t need a scan tool, OBD2 reader, or any electronic device. The reset is performed entirely through the vehicle’s built-in controls. That said, having a pen and paper handy can help you note down the steps if you’re doing this for the first time. Some owners also find it helpful to have a second person assist, especially when navigating menu options on newer models.
Ensure the vehicle is in “Park” (for automatic transmissions) and the parking brake is engaged. This prevents any accidental movement during the process. Also, make sure all doors are closed and the key fob is within range if your Avalon has a push-button start system.
Lastly, confirm that the maintenance light is actually on. Sometimes, the light may appear briefly during startup and then turn off—this is normal. If the light stays illuminated after the engine starts, then a reset is needed. If you’ve recently had service and the light is still on, it’s likely just waiting for you to reset it.
Step-by-Step Guide to Reset the Maintenance Light (2013 and Newer Models)
If you own a Toyota Avalon from 2013 or later, you’re in luck—the reset process is straightforward and uses the vehicle’s digital display and trip meter button. These models feature a more advanced instrument cluster with menu navigation, making the reset process intuitive once you know the steps.
Step 1: Turn the Ignition to the “ON” Position
Insert your key into the ignition or press the “Start” button (without pressing the brake pedal) to turn the ignition to the “ON” position. You should see the dashboard lights illuminate, including the maintenance light. Do not start the engine—just leave it in the “ON” state. This powers up the vehicle’s electronics without engaging the engine.
Visual guide about How to Reset the Maintenance Light on a Toyota Avalon
Image source: i0.wp.com
Visual guide about How to Reset the Maintenance Light on a Toyota Avalon
Image source: i.ytimg.com
Visual guide about How to Reset the Maintenance Light on a Toyota Avalon
Image source: motorbiscuit.com
Step 2: Navigate to the Trip Meter Menu
Locate the trip meter button on your steering column or dashboard. It’s usually labeled “TRIP” or has a small icon of a trip meter. Press and hold this button. While holding it, watch the digital display on your instrument cluster. You’ll see the trip meter values (Trip A, Trip B, or odometer) cycle through.
Step 3: Find the “MAINT REQD” or “OIL” Message
Continue holding the trip meter button until you see the maintenance light message appear on the screen. This may take 5–10 seconds. On some models, you’ll see “MAINT REQD” or “OIL” flash on the display. Once this message appears, keep holding the button.
Step 4: Release and Press Again to Reset
When the maintenance message is displayed, release the trip meter button. Then, press and hold it again for about 5–10 seconds. You should see the message begin to blink or change. On some Avalons, the odometer will show a countdown or the word “RESET” will appear.
Step 5: Confirm the Reset
After holding the button for the required time, the maintenance light should turn off, and the message should disappear. Release the button and turn the ignition off. Wait a few seconds, then turn it back on to confirm the light is no longer illuminated. If it’s off, the reset was successful.
Tips for Success
- Be patient—timing is important. If the reset doesn’t work the first time, try again, ensuring you follow each step precisely.
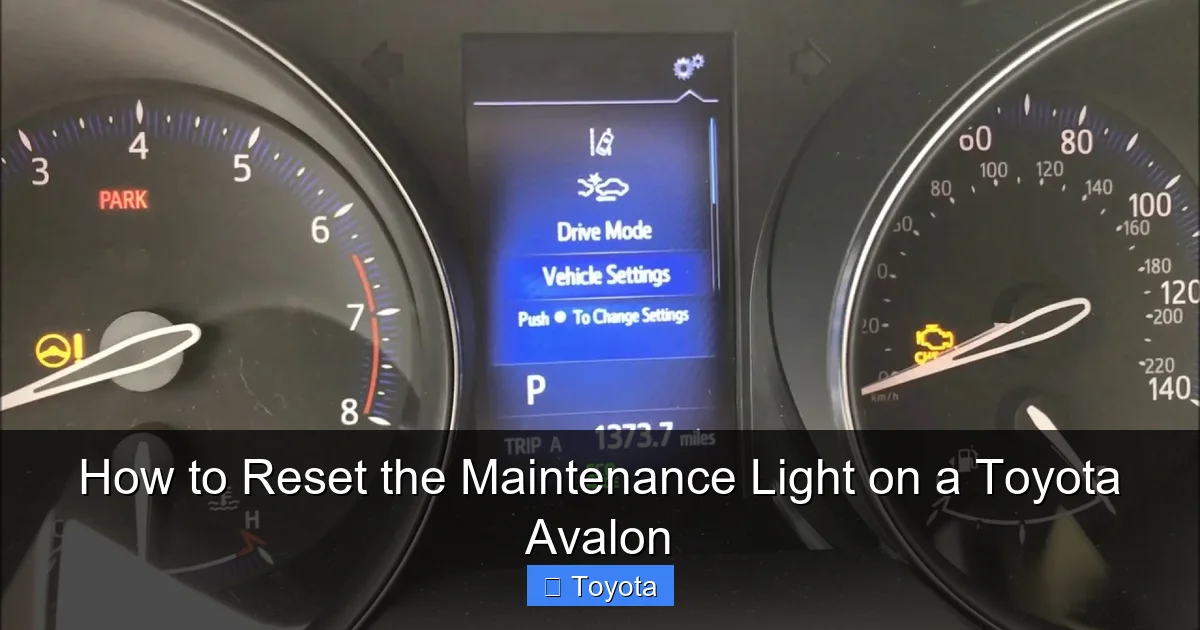
- If your Avalon has a multi-information display (MID), you may need to use the steering wheel controls to navigate to the “Settings” or “Vehicle” menu and select “Maintenance Reset.”
- Some 2021–2023 models with Toyota’s latest infotainment system may require accessing the reset through the touchscreen. Look for “Vehicle Settings” > “Maintenance” > “Reset.”
Resetting the Maintenance Light on Older Toyota Avalon Models (Pre-2013)
For Toyota Avalon owners with models from 2005 to 2012, the reset process is slightly different but still manageable without special tools. These older models use a more mechanical approach, relying on the odometer and trip meter buttons without digital menus.
Step 1: Turn the Ignition to “ON”
As with newer models, start by turning the ignition to the “ON” position without starting the engine. All dashboard lights should illuminate, including the maintenance light.
Step 2: Press and Hold the Trip Meter Button
Locate the trip meter button (usually on the instrument cluster or steering column). Press and hold it. Watch the odometer display—it should begin to count up or cycle through trip values.
Step 3: Wait for the Odometer to Reset
Continue holding the button until the odometer display resets to zero or begins to flash. This indicates the system is ready to accept a reset command. On some models, you’ll see the mileage digits roll over or the display blink.
Step 4: Turn the Ignition Off and On
Once the odometer has reset or started blinking, release the trip meter button. Turn the ignition off completely. Wait about 10 seconds, then turn it back to the “ON” position. The maintenance light should now be off.
Alternative Method for Some 2005–2009 Models
On certain older Avalons, you may need to press the trip meter button while turning the ignition on. Insert the key, press and hold the trip button, then turn the key to “ON.” Continue holding the button for 10–15 seconds until the maintenance light turns off.
Common Issues and Fixes
- If the light doesn’t turn off, try repeating the process. Timing is critical—holding the button too short or too long can prevent the reset.
- Ensure the vehicle is in “Park” and the parking brake is on. Some systems won’t allow a reset if the car is in gear.
- If the odometer doesn’t respond, check the fuse for the instrument cluster. A blown fuse can disable dashboard functions.
Troubleshooting Common Reset Problems
Even with clear instructions, sometimes the maintenance light won’t reset. Don’t panic—this is more common than you think, and there are usually simple explanations and fixes.
The Light Won’t Turn Off After Reset
If you’ve followed the steps correctly but the maintenance light remains on, double-check that you turned the ignition to “ON” without starting the engine. Starting the engine during the process can interrupt the reset sequence. Also, ensure you held the trip meter button long enough—some models require a full 10 seconds of continuous pressure.
The Odometer Doesn’t Respond
If pressing the trip meter button doesn’t change the display, the button may be faulty or the instrument cluster may have a power issue. Try cleaning the button with compressed air or gently pressing it multiple times. If the problem persists, consult a technician—there may be a wiring or fuse issue.
Maintenance Light Comes Back On Immediately
If the light resets successfully but turns back on after driving a short distance, it could indicate a deeper issue. Some Avalons have sensors that detect oil quality or engine wear. If the oil is old or contaminated, the system may re-trigger the light. In this case, an oil change and filter replacement may be necessary before the reset will hold.
Model-Specific Confusion
With over a decade of Avalon models, it’s easy to mix up reset procedures. Always confirm your model year and trim level. For example, the 2012 Avalon Limited may have a different dashboard layout than the base model. When in doubt, refer to the owner’s manual or search for your specific year and model online.
When to Visit a Dealer or Mechanic
If you’ve tried multiple times and the light won’t reset, or if other warning lights are also on, it’s time to seek professional help. A certified Toyota technician can use a diagnostic tool to clear the light and check for underlying issues. This is especially important if the check engine light is also illuminated.
Best Practices for Maintaining Your Toyota Avalon
Resetting the maintenance light is just one part of keeping your Avalon in top shape. To get the most out of your vehicle, follow these best practices for ongoing care.
Follow the Scheduled Maintenance Plan
Toyota provides a detailed maintenance schedule in the owner’s manual. Stick to it—whether it’s oil changes every 5,000 miles, tire rotations every 7,500, or brake inspections every 15,000. Regular service extends the life of your Avalon and prevents costly repairs.
Use Genuine Toyota Parts and Fluids
While aftermarket parts may be cheaper, genuine Toyota components are designed specifically for your Avalon. Using the right oil, filters, and fluids ensures optimal performance and protects your warranty.
Keep Records of All Service
Maintain a log of every oil change, tire rotation, and repair. This not only helps you stay on schedule but also increases your vehicle’s resale value. Digital apps or a simple notebook work well for tracking.
Monitor Dashboard Warnings
Pay attention to all dashboard lights, not just the maintenance light. Early detection of issues like low tire pressure, brake wear, or battery problems can save you from breakdowns and expensive fixes.
Drive Responsibly
Your driving habits impact maintenance needs. Avoid aggressive acceleration, hard braking, and excessive idling. Smooth, consistent driving reduces wear on the engine, transmission, and brakes.
Conclusion: Take Control of Your Avalon’s Maintenance
Resetting the maintenance light on your Toyota Avalon is a simple yet powerful way to stay in control of your vehicle’s health. With just a few button presses, you can clear the reminder and keep your service schedule on track—no dealership visit required. Whether you drive a brand-new 2023 Avalon or a reliable 2008 model, the process is designed to be accessible and user-friendly.
By understanding how the maintenance light works, preparing properly, and following the correct steps for your model year, you can reset the light confidently and avoid unnecessary service fees. And remember, resetting the light is only part of the equation. Regular maintenance, quality parts, and attentive driving are what truly keep your Avalon running smoothly for years to come.
So the next time that “MAINT REQD” light pops up, don’t stress. Grab your owner’s manual, follow this guide, and reset it like a pro. Your Avalon—and your wallet—will thank you.
Frequently Asked Questions
How often should I reset the maintenance light on my Toyota Avalon?
You should reset the maintenance light every time you complete scheduled service, such as an oil change or tire rotation. This ensures the system accurately tracks your next service interval.
Can I reset the maintenance light without going to a dealership?
Yes, most Toyota Avalon models allow you to reset the maintenance light yourself using the trip meter button and ignition. No special tools or dealership visit is needed.
Why won’t my maintenance light reset even after following the steps?
This could be due to incorrect timing, a faulty button, or an underlying issue like old oil. Try the process again, ensure the ignition is on but the engine is off, and check your owner’s manual for model-specific tips.
Is the maintenance light the same as the check engine light?
No, the maintenance light is a service reminder, while the check engine light indicates a potential mechanical or emissions problem. Do not confuse the two—address the check engine light immediately.
Do I need to reset the light after every oil change?
Yes, it’s recommended to reset the maintenance light after every oil change to maintain accurate service records and ensure the system reminds you at the correct interval.
What if my Avalon has a touchscreen infotainment system?
On newer models (2021+), you may need to access the reset through the touchscreen. Go to “Vehicle Settings” > “Maintenance” > “Reset” and follow the on-screen prompts.


