
How to Put Freon in Rv Air Conditioner
Contents
- 1 Key Takeaways
- 2 📑 Table of Contents
- 3 Why Your RV Air Conditioner Might Need Freon
- 4 Signs Your RV AC Is Low on Freon
- 5 Tools and Supplies You’ll Need
- 6 Step-by-Step Guide to Adding Freon to Your RV AC
- 7 Safety Precautions and Common Mistakes to Avoid
- 8 When to Call a Professional
- 9 Maintaining Your RV AC to Prevent Future Issues
- 10 Conclusion
- 11 Frequently Asked Questions


Putting Freon in your RV air conditioner isn’t as hard as it sounds—but it does require care, the right tools, and safety precautions. This guide walks you through everything you need to know, from diagnosing low refrigerant to safely recharging your system and avoiding common mistakes.
Key Takeaways
- Low Freon isn’t always the problem: Before adding refrigerant, rule out airflow issues, dirty coils, or electrical problems that mimic cooling failure.
- Safety first: Always wear gloves and eye protection when handling Freon. Work in a well-ventilated area and never inhale refrigerant fumes.
- Use the correct refrigerant type: Most RVs use R-22 or R-410A—check your AC unit’s label to avoid damaging the system.
- Invest in a quality manifold gauge set: This tool lets you monitor pressure levels and ensures you don’t overcharge the system.
- Recharging is a temporary fix if there’s a leak: Adding Freon without fixing the leak will only delay the inevitable—have leaks repaired by a professional.
- Know when to call a pro: If you’re unsure about pressure readings or system components, it’s safer (and often cheaper long-term) to consult an HVAC technician.
- Regular maintenance prevents low Freon: Clean filters, coils, and vents monthly to keep your AC running efficiently and reduce strain on the refrigerant system.
📑 Table of Contents
Why Your RV Air Conditioner Might Need Freon
Picture this: You’re parked at a scenic campground on a sweltering summer afternoon. You flip on your RV’s air conditioner, expecting instant relief—but instead, you get lukewarm air or nothing at all. Your first thought? “Maybe it’s low on Freon.” And while that’s a common assumption, it’s not always the culprit.
Freon—technically a brand name for certain refrigerants like R-22 or R-410A—is the lifeblood of your RV’s cooling system. It absorbs heat from inside your rig and releases it outside, keeping you comfortable. But unlike car AC systems, RV air conditioners are designed to be sealed and should rarely need recharging. If your unit is blowing warm air, the issue might be clogged filters, dirty condenser coils, a faulty thermostat, or even a tripped breaker—not low refrigerant.
That said, refrigerant leaks do happen. Over time, vibration from travel, corrosion, or worn seals can cause tiny cracks in the copper lines or connections. When that happens, Freon escapes, reducing cooling efficiency. And once levels drop below a certain point, your AC simply can’t do its job. So yes—sometimes, adding Freon is necessary. But it’s not a DIY job for everyone. Understanding when (and how) to safely recharge your system is key to staying cool without causing more harm than good.
Signs Your RV AC Is Low on Freon
Before you grab a can of refrigerant and start poking around under your roof, take a moment to confirm that low Freon is actually the issue. Misdiagnosing the problem can waste money, damage your system, or even create safety hazards.

Visual guide about How to Put Freon in Rv Air Conditioner
Image source: rvtripstravel.com
Warm or Weak Airflow
The most obvious sign is warm air blowing from the vents—even when the thermostat is set to “cool” and the fan is running. However, this symptom overlaps with many other issues. A dirty air filter, for example, restricts airflow and makes the AC work harder, which can mimic low refrigerant symptoms. Always check and replace your filter first.
Longer Cooling Cycles
If your AC runs constantly but never seems to reach the desired temperature, it could indicate low Freon. The compressor keeps cycling because the system can’t absorb enough heat. But again, this also happens with blocked condenser coils or a malfunctioning capacitor. Inspect the outdoor unit (on your RV roof) for debris like leaves, dirt, or spider webs.
Ice Buildup on Coils
Strange but true: low refrigerant can cause the evaporator coils inside your AC to freeze. Why? Because with less Freon, the pressure drops, causing the coils to get colder than intended. Moisture in the air then freezes on them. If you see ice or frost on the indoor coil (usually behind the return air grille), turn off the AC immediately. Let it thaw completely before investigating further.
Hissing or Bubbling Noises
A faint hissing sound near the refrigerant lines or a bubbling noise from the indoor unit can signal a leak. These sounds occur when pressurized gas escapes through a small hole. While not always audible, they’re a red flag worth investigating—especially if combined with poor cooling performance.
Pressure Gauge Readings
The only definitive way to confirm low Freon is with a manifold gauge set. This tool connects to the service ports on your AC unit and displays low- and high-side pressure readings. Compare these to the manufacturer’s specifications (found in your owner’s manual or on a label near the compressor). If the low-side pressure is significantly below normal—say, under 60 psi for R-22 systems—you likely have a refrigerant deficiency.
Tools and Supplies You’ll Need
Recharging your RV air conditioner isn’t a job you can tackle with just a can of Freon and hope. It requires specific tools, safety gear, and the right refrigerant. Skipping any of these can lead to inaccurate charging, system damage, or personal injury.

Visual guide about How to Put Freon in Rv Air Conditioner
Image source: rvandplaya.com
Refrigerant (Freon)
First and foremost, you need the correct type of refrigerant. Older RV AC units often use R-22 (also known as HCFC-22), which is being phased out due to environmental concerns. Newer models typically use R-410A, a more eco-friendly alternative. Never mix refrigerants! Using the wrong type can destroy your compressor. Check the label on your AC unit—it will specify the required refrigerant and charge amount (usually in ounces or pounds).
Manifold Gauge Set
This is your most important tool. A manifold gauge set includes hoses, a center manifold, and two gauges (low-pressure and high-pressure). It allows you to monitor system pressures in real time while adding refrigerant. Look for a set rated for the refrigerant you’re using (R-22 or R-410A). Cheap sets may not seal properly or give accurate readings—invest in a reputable brand like Yellow Jacket or Fieldpiece.
Refrigerant Scale (Optional but Recommended)
For precision charging, especially if your system requires a specific weight of refrigerant, a digital refrigerant scale helps ensure you don’t overfill. Overcharging can cause high pressure, compressor damage, and even safety risks. If your AC manual specifies a charge by weight (e.g., “32 oz of R-410A”), use a scale.
Safety Gear
Freon is not toxic in small amounts, but it can displace oxygen in enclosed spaces and cause dizziness or asphyxiation if inhaled. Always wear safety goggles and nitrile gloves to protect your eyes and skin. Work in a well-ventilated area—preferably outdoors or with windows open. Never smoke or use open flames near refrigerant.
Leak Detection Kit (Highly Recommended)
Adding Freon without fixing the leak is like pouring water into a bucket with a hole. A simple electronic leak detector or UV dye kit can help locate the source of the leak. Some DIYers use soapy water: apply it to refrigerant lines and connections—if bubbles form, you’ve found a leak. For small leaks, sealants exist, but major repairs should be handled by a certified technician.
Basic Hand Tools
You’ll likely need a screwdriver to remove access panels on your RV roof or interior ceiling. A wrench may be necessary to loosen service port caps. Keep a small toolkit handy with common sizes.
Step-by-Step Guide to Adding Freon to Your RV AC
Now that you’ve confirmed low Freon and gathered your tools, it’s time to recharge your system. Follow these steps carefully. Rushing or skipping steps can lead to improper charging, system damage, or personal injury.
Visual guide about How to Put Freon in Rv Air Conditioner
Image source: m.media-amazon.com
Step 1: Turn Off Power and Access the Unit
Safety first! Turn off power to your RV air conditioner at the breaker panel. This prevents accidental startup while you’re working. Next, locate your AC unit—it’s usually mounted on the roof. Remove the exterior cover (typically held by four screws) to expose the compressor, condenser coils, and service ports.
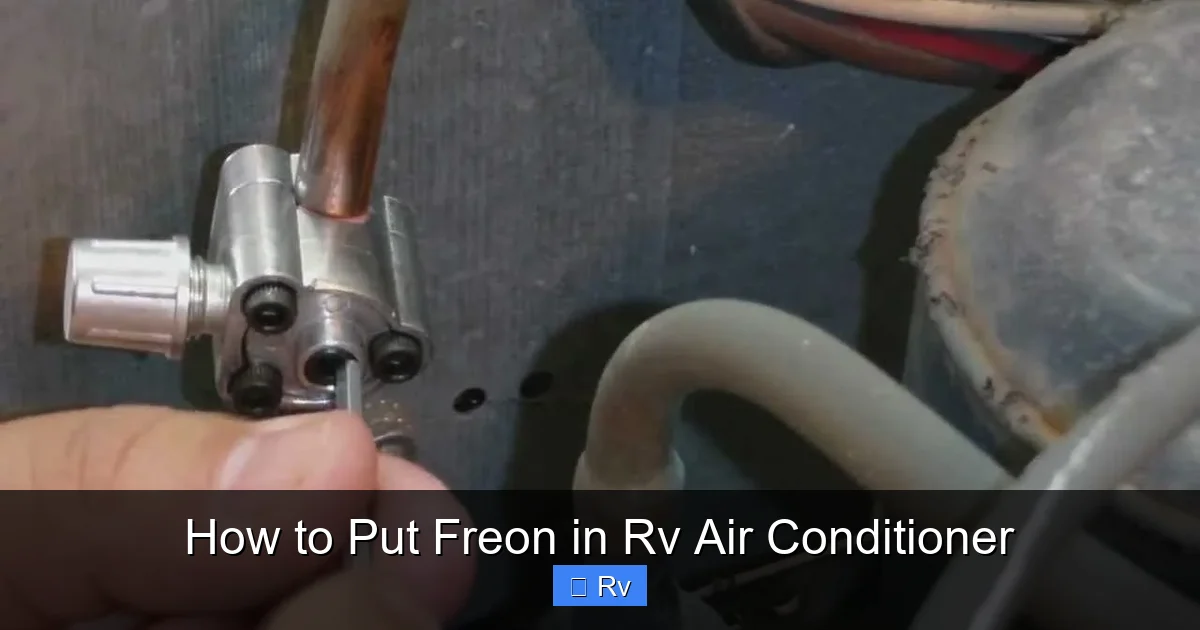
Step 2: Identify the Service Ports
Your AC has two service ports: a low-pressure (suction) port and a high-pressure (discharge) port. The low-pressure port is larger in diameter and usually located near the compressor suction line. It’s where you’ll add refrigerant. The high-pressure port is smaller and used for diagnostics or recovery. Look for color-coded caps: blue for low-side, red for high-side.
Step 3: Connect the Manifold Gauge Set
Attach the blue hose from your manifold gauge set to the low-pressure service port. Tighten the connection securely but don’t overtighten—you can strip the threads. Leave the valve on the manifold closed for now. Do not connect the red (high-side) hose unless instructed by a professional—most DIY recharges only use the low side.
Step 4: Purge Air from the Hose
Before opening any valves, purge air from the charging hose to avoid introducing non-condensables into the system. With the can of refrigerant upright, slightly open the valve on the manifold, then briefly crack the connection at the service port. You’ll hear a hiss as air escapes. Tighten the connection and close the manifold valve.
Step 5: Start the AC and Begin Charging
Turn the power back on and set your thermostat to “cool” with the fan on “auto.” Let the system run for 5–10 minutes to stabilize. Then, slowly open the valve on the manifold gauge set. Keep the refrigerant can upright—this ensures only liquid refrigerant enters the system (if charging into the suction line, some systems allow vapor charging, but liquid is safer for most RVs).
Step 6: Monitor Pressure and Temperature
Watch the low-pressure gauge. For R-22 systems, ideal low-side pressure is typically between 65–85 psi when ambient temperature is 80–90°F. For R-410A, it’s higher—around 110–130 psi. Also check the temperature of the air coming from the vents. It should drop to 15–20°F below ambient within 10–15 minutes of charging.
Step 7: Stop Charging When Full
Once pressures stabilize and cooling improves, close the manifold valve. If using a scale, stop when the specified weight is reached. Disconnect the hose quickly to avoid losing refrigerant. Replace the service port cap tightly.
Step 8: Test and Observe
Let the AC run for another 20–30 minutes. Check that it cools consistently and doesn’t ice up. If performance is good, reassemble the cover and clean up your tools. If cooling is still poor, there may be another issue—or a significant leak requiring professional repair.
Safety Precautions and Common Mistakes to Avoid
Working with refrigerant isn’t rocket science, but it does come with risks. A few simple mistakes can turn a quick fix into a costly repair—or worse, a dangerous situation.
Never Overcharge the System
Adding too much Freon increases pressure, which can blow seals, damage the compressor, or even cause the relief valve to rupture. Always follow the manufacturer’s charge specifications. If in doubt, add refrigerant slowly and monitor gauges closely.
Don’t Ignore Leaks
Recharging without fixing a leak is a temporary solution. Freon will escape again, and you’ll be back where you started—wasting money and potentially harming the environment. Use a leak detector or soapy water to find the source. Small leaks in Schrader valves can often be fixed by replacing the core; larger line leaks need professional welding or replacement.
Avoid “Top-Off” Kits Without Gauges
Many retail “AC recharge kits” come with a can and a simple hose—no gauges. These are risky because you can’t monitor pressure. You might overcharge the system or add the wrong amount. Always use a manifold gauge set for accuracy.
Don’t Work in Confined Spaces
Freon is heavier than air and can accumulate in low areas, displacing oxygen. Never recharge your AC in a closed garage or tightly sealed RV without ventilation. Open windows or work outside.
Respect Environmental Laws
In the U.S., releasing refrigerant into the atmosphere is illegal under the Clean Air Act. Only certified technicians can legally recover refrigerant. As a DIYer, you’re allowed to recharge your own system, but you must prevent accidental releases. Use hoses with self-sealing fittings and handle cans carefully.
When to Call a Professional
There’s no shame in admitting when a job is beyond your skill level. HVAC systems are complex, and refrigerant work requires precision. Here’s when it’s smart to call in an expert:
- You can’t locate the leak after thorough inspection.
- The compressor is making unusual noises or won’t start.
- Pressure readings are erratic or don’t stabilize after charging.
- Your AC uses R-22 and needs a major recharge—this refrigerant is expensive and tightly regulated.
- You’re uncomfortable handling pressurized chemicals or electrical components.
A certified RV technician has the tools, training, and EPA certification to safely diagnose and repair refrigerant issues. They can also perform a full system evacuation and recharge using proper recovery equipment—something most DIYers don’t have.
Maintaining Your RV AC to Prevent Future Issues
The best way to avoid Freon problems is to keep your air conditioner in top shape year-round. Regular maintenance reduces strain on the system and helps catch leaks early.
Clean Filters Monthly
Dirty filters restrict airflow, making the evaporator coil colder and more prone to freezing. Remove and wash reusable filters or replace disposable ones every 30–60 days during heavy use.
Inspect and Clean Coils
Both the indoor evaporator coil and outdoor condenser coil collect dust and debris. Use a soft brush or coil cleaner spray to gently remove buildup. Avoid high-pressure washers—they can bend delicate fins.
Check Refrigerant Lines
Periodically inspect the copper refrigerant lines running from the compressor to the evaporator. Look for signs of oil residue (a telltale sign of a leak), corrosion, or physical damage. Seal minor leaks with approved sealants, but replace damaged lines.
Keep the Area Around the Unit Clear
Ensure nothing is blocking airflow around the roof-mounted AC unit—no tarps, branches, or storage items. Good ventilation helps the condenser release heat efficiently.
Schedule Annual Inspections
Before each camping season, have a technician inspect your entire HVAC system. They can check refrigerant levels, test for leaks, and verify electrical connections—catching problems before they leave you sweating in the heat.
Conclusion
Learning how to put Freon in your RV air conditioner empowers you to take control of your comfort on the road. With the right tools, knowledge, and caution, many RV owners can safely recharge their systems and enjoy cool, refreshing air wherever they roam. But remember: Freon is just one piece of the puzzle. Proper diagnosis, leak repair, and routine maintenance are equally important.
Don’t let a warm breeze ruin your adventure. By following this guide, you’ll not only extend the life of your AC unit but also save money on unnecessary service calls. Stay cool, stay safe, and happy camping!
Frequently Asked Questions
Can I add Freon to my RV air conditioner myself?
Yes, you can legally recharge your own RV AC system if you have the right tools and knowledge. However, you must follow safety guidelines and avoid overcharging. If you’re unsure, consult a professional.
How often does an RV air conditioner need Freon?
A properly sealed RV AC should never need Freon under normal conditions. If it does, there’s likely a leak that needs repair. Regular maintenance helps prevent refrigerant loss.
What type of Freon does my RV air conditioner use?
Most older RVs use R-22, while newer models use R-410A. Check the label on your AC unit near the compressor or in the owner’s manual to confirm the correct refrigerant type.
Will adding Freon fix my AC if it’s not cooling?
Not necessarily. Low Freon is just one possible cause. Dirty filters, blocked coils, faulty thermostats, or electrical issues can also prevent cooling. Always diagnose the root cause first.
Is it dangerous to handle Freon?
Freon is generally safe when handled properly, but it can cause frostbite on skin or displace oxygen in enclosed spaces. Always wear gloves and goggles, and work in a ventilated area.
Can I use a car AC recharge kit for my RV?
No. Car AC systems operate at different pressures and use different refrigerants. Using a car kit on an RV AC can damage the system or lead to improper charging. Always use RV-specific tools and refrigerant.


