
How to Clean Tesla Cameras Safely
Contents
- 1 Key Takeaways
- 2 📑 Table of Contents
- 3 Why Cleaning Your Tesla Cameras is Non-Negotiable
- 4 Essential Tools: What You Need (And What to Avoid)
- 5 The Step-by-Step Safe Cleaning Process
- 6 Camera-Specific Considerations and Locations
- 7 Troubleshooting: When Cleaning Isn’t Enough
- 8 Prevention and Long-Term Care Strategies
- 9 Conclusion: Clarity is Safety
- 10 Frequently Asked Questions

Car Battery Charger

Octane Booster

Tire Repair Kit

Portable Air Pump
Cleaning your Tesla’s cameras is crucial for Autopilot, Sentry Mode, and cabin camera functionality. Using the wrong tools or techniques can scratch lenses or damage sensors. Always use proper microfiber cloths and approved cleaners, never spray liquid directly on the camera, and be extremely gentle. A clean camera system ensures your vehicle’s safety features work as intended.
Key Takeaways
- Always use a clean, high-quality microfiber cloth: Abrasive or dirty cloths are the #1 cause of scratched camera lenses.
- Never spray cleaning solution directly onto the camera: Liquid can seep into sensitive electronics. Always spray onto the cloth first.
- Use only camera-safe or pH-neutral glass cleaners: Harsh chemicals like ammonia (Windex) or alcohol can degrade lens coatings and seals.
- Clean in a circular, outward motion with light pressure: This prevents swirl marks and avoids pressing debris into the lens surface.
- Dry the lens completely with a separate dry microfiber: Water spots or residue can interfere with the camera’s vision, especially at night.
- Be mindful of the camera housing and surrounding paint: Use a soft brush or compressed air first to remove grit that could scratch the car’s finish.
- Regular, gentle cleaning is better than infrequent, aggressive scrubbing: Build-up of grime is harder to remove and increases the risk of damage.
📑 Table of Contents
Why Cleaning Your Tesla Cameras is Non-Negotiable
Your Tesla isn’t just a car; it’s a computer on wheels with a suite of sensors and cameras that act as its eyes. These cameras power everything from the revolutionary Autopilot and Full Self-Driving (FSD) capabilities to the ever-watchful Sentry Mode and the in-cabin camera that monitors driver attentiveness. When these lenses get dirty—covered in mud, bug splatter, road salt, pollen, or water spots—their ability to “see” is compromised. This isn’t just about a blurry backup camera; it’s about the core safety systems that help prevent collisions. A smudged forward-facing camera might miss a stop sign or a pedestrian. A dirty side repeater camera can blind the blind-spot monitoring. Simply put, maintaining clean cameras is a critical part of Tesla ownership and road safety. It’s a quick, easy task that has an outsized impact on your vehicle’s performance and your peace of mind.
The High Cost of Neglect
Ignoring camera cleanliness can lead to several frustrating and potentially dangerous issues. The most common symptom is a cascade of warning messages on your touchscreen: “Camera Obstructed,” “Clean Front Camera for Autopilot,” or “Vision System Degraded.” These alerts often disable Autopilot and other advanced features until the camera is clear. Beyond software warnings, physical damage is a real risk. Grit and sand trapped under a wiping cloth can act like sandpaper, creating permanent fine scratches. These scatter light, causing haze and glare that is especially problematic at night or in direct sunlight. Furthermore, using the wrong chemicals can strip away the special anti-reflective and hydrophobic coatings that manufacturers apply to these lenses, permanently reducing their effectiveness and making them more susceptible to future grime.
Essential Tools: What You Need (And What to Avoid)
Before you touch a camera, gather the right supplies. Using improper tools is the fastest way to cause damage. Think of cleaning a camera lens like you would a high-end pair of glasses or a camera lens—with extreme care and the correct materials.

Visual guide about How to Clean Tesla Cameras Safely
Image source: s1.cdn.autoevolution.com
The Golden trio: Microfiber, Microfiber, Microfiber
You cannot have too many clean, soft microfiber cloths. They are the single most important tool. Invest in high-quality, plush microfiber designed for optical surfaces. Cheap, thin cloths from a gas station can leave lint and have a rougher weave that scratches. Designate specific cloths for your Tesla cameras and never use them after they’ve been used on wheels, tires, or the car’s painted surfaces, as they will be contaminated with abrasive brake dust and grit. Always wash new cloths before first use to remove manufacturing lint.
Choosing the Right Cleaning Solution
For most day-to-day dust and light smudges, a dry microfiber cloth is often sufficient. For more stubborn grime like bug guts or dried water spots, you need a liquid. Your best options are:
- Dedicated Camera/Glass Lens Cleaners: Brands like LensPen, Zeiss, or Whoosh! make excellent, residue-free sprays safe for coated optics.
- pH-Neutral Glass Cleaners: Look for cleaners labeled as such. They are gentle on coatings.
- Isopropyl Alcohol (IPA) Solution (70% or less): A 50/50 mix of IPA and distilled water is a fantastic, evaporating cleaner used by professionals. Test on a small, inconspicuous area first if concerned.
What to Absolutely Avoid: Household window cleaners like Windex (contains ammonia), all-purpose cleaners, vinegar solutions (too acidic), and any solvent-based products. Also, avoid “shine” or “antistatic” sprays that leave residues.
Supporting Cast: Brushes and Air
Before you wipe, you must remove loose dirt. A soft-bristled brush (like a makeup brush or dedicated detailing brush) is perfect for dislodging sand and pollen from around the camera housing. A can of compressed air (or a manual air duster) is excellent for blowing debris out of crevices without physical contact. For the cabin camera, a soft brush is key for clearing dust from the dashboard surface around it.
The Step-by-Step Safe Cleaning Process
Patience and a systematic approach are everything. Rushing leads to mistakes. Always clean your cameras when the car is cool and parked in the shade. Hot surfaces can cause cleaners to evaporate too quickly, leaving residue.

Visual guide about How to Clean Tesla Cameras Safely
Image source: evsguy.com
Step 1: The Dry First Pass (The Most Critical Step)
Grab your dedicated dry microfiber cloth. Gently brush away any loose dirt, dust, or sand from the camera lens and its surrounding plastic housing with your soft brush or a puff of compressed air. Do not skip this. This step removes the abrasive particles that would otherwise be ground into the lens if you applied liquid first. Then, using a brand-new, dry microfiber cloth, make very gentle, circular motions starting from the center of the lens and moving outward. Apply minimal pressure. The goal is to lift light dust and any oily film from fingerprints or environmental fallout. Check your progress by looking at the lens from an angle to see streaks.
Step 2: The Damp Pass (If Needed)
If the dry pass didn’t remove all the grime (especially bug splatter or dried water spots), it’s time for moisture. Never spray liquid directly onto the camera lens or housing. Instead, lightly mist 1-2 sprays of your chosen camera-safe cleaner onto a different, clean microfiber cloth until it is damp, not wet. Wring out any excess liquid. Using this damp cloth, gently wipe the lens in the same circular, outward motion. Let the chemical dwell for a second on stubborn spots, but do not let it pool. For particularly stuck-on bugs, you can place a damp cloth over the spot for 10-15 seconds to soften it before wiping.
Step 3: The Final Dry Buff
Immediately after the damp wipe, take a third, completely dry and pristine microfiber cloth. Buff the lens thoroughly with gentle pressure to remove all moisture and cleaner residue. Any leftover liquid will evaporate and potentially leave mineral spots if you have hard water, or hazy residue from the cleaner. Inspect the lens from multiple angles under good light. You should see a perfectly clear, streak-free surface. If you see streaks, repeat the dry buff with a fresh dry cloth.
A Special Note on the Rear View Mirror Camera
The camera inside the rear-view mirror (for the cabin camera and rear-facing cameras) has a very delicate lens and a tight seal. Be extra gentle here. Use a cotton swab lightly dampened with your cleaner to get into the corners if needed, but avoid excessive moisture. Never insert anything into the small gap between the lens and the housing.
Camera-Specific Considerations and Locations
Your Tesla has several cameras, each with its own challenges. Knowing their locations helps you tailor your approach.
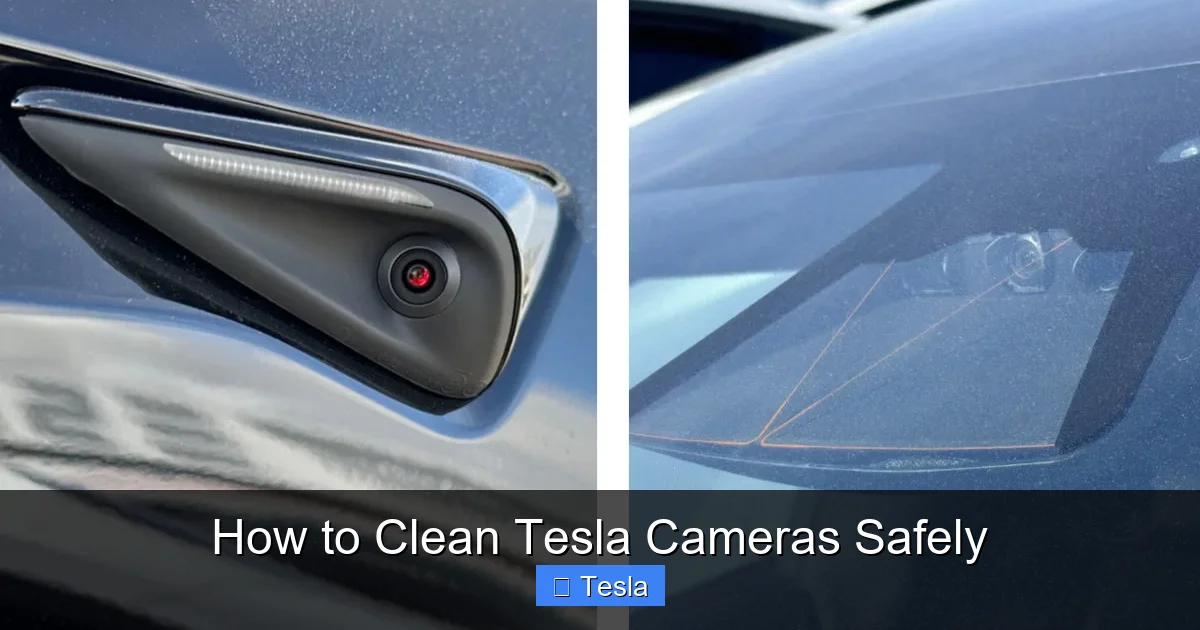
Visual guide about How to Clean Tesla Cameras Safely
Image source: notateslaapp.com
The Front Trio: Windshield Cameras
This is the most important set. The primary forward-facing camera (for Autopilot) and the narrow-angle forward camera are mounted high on the windshield, behind the rearview mirror. They are exposed to everything: bugs, hail, snow, and road spray. The windshield itself should be clean, as a dirty windshield dirties the cameras. For these, the dry-first method is essential. Use your brush to clear debris from the camera housings on the glass. When wiping, be mindful of the windshield wipers—don’t pull them away from the glass unnecessarily. If your windshield has a hydrophobic coating (like Aquapel), use a cleaner compatible with it. A clean windshield and clean cameras work in tandem for clear vision. If you ever need to replace a broken windshield, understanding how much it costs to replace a Tesla window is important, as these cameras are often calibrated as part of that process.
Side Repeater Cameras
Located in the side turn signal repeaters (the small lights on the front fenders). They are small, prone to getting splattered by the tires, and their housings can collect brake dust. The dry brush is your best friend here to get into the crevice around the lens. Be very gentle, as the plastic housing can be brittle in cold weather. A damp cloth on a Q-tip can help clean the very edge of the lens where gunk accumulates.
Rear Camera
The backup camera is exposed to the elements and is a magnet for road dirt, mud, and exhaust soot. It’s often the dirtiest. Start with a thorough dry brush to remove caked-on mud. For stubborn grime, the damp cloth method works well. Pay special attention to the lens’s outer edge where debris collects. Ensure the camera’s “eye” is completely clear; even a small spot in the corner can trigger obstruction warnings.
Pillar Cameras (Model S/X)
On newer Model S and X with the “Cybertruck” style interior, there are cameras in the A-pillars. These are tricky due to their location and the surrounding soft-touch material. Use a very soft brush to clean the area first. Wrap your microfiber cloth around a thin, flexible tool (like a plastic spudger or even a credit card) to reach the lens without pressing hard against the pillar.
Troubleshooting: When Cleaning Isn’t Enough
You’ve followed all the steps, but the camera still looks hazy or the car still reports an obstruction. What now?
Persistent Hazing or Scratches
If you notice a fine haze or swirl marks after cleaning, it’s likely the lens coating has been damaged, possibly from previous improper cleaning or abrasive particles. Unfortunately, this is often permanent. The only fix is to replace the camera module, which can be costly. Prevention is 100% better than cure here. If the lens is physically scratched, it will scatter light and degrade image quality, especially at night. A professional detailer might be able to polish out very light scratches with a specialized optical polish, but this is a risky last resort.
Internal Fog or Condensation
If you see fog or moisture inside the camera housing (you can see it between the lens and the clear plastic cover), this indicates a broken seal. This is not something you can fix with cleaning. The camera unit needs to be replaced, as internal condensation will permanently impair vision and can lead to electronic failure. This is rare but can happen after a car wash or in very high humidity.
Software/Calibration Issues After Cleaning
Sometimes, after a thorough cleaning, the car might still show a “Camera Obstructed” warning. Try rebooting your Tesla (touchscreen > Power Off > wait 2 minutes, then restart). If the warning persists, the system may need to recalibrate. Drive the car on a clear road with well-marked lanes for 15-20 minutes. The system will use this time to “see” and confirm the view is clear. If the warning remains, there may be a deeper fault, and a service appointment is needed.
Prevention and Long-Term Care Strategies
The goal is to minimize the frequency and intensity of deep cleaning. A little prevention goes a long way.
Regular Light Maintenance
Make it a habit to give all cameras a quick once-over with a dry microfiber cloth every 1-2 weeks, especially after driving in bad weather. This removes dust and pollen before it hardens. Incorporate it into your regular car wash routine. When washing your car, avoid high-pressure washers directly on the cameras. Keep the nozzle at a distance and at an angle. It’s better to wash the surrounding areas and then gently wipe the lenses dry.
Protective Coatings
Consider applying a dedicated glass or ceramic coating to your camera lenses (and your windshield). These hydrophobic coatings create a slick surface that causes water to bead and roll off, taking dirt with it. They also make bug guts and bird droppings much easier to remove. Products like GTechniq C4 or similar are popular. Apply very carefully with a microfiber, following the product instructions precisely. This adds a sacrificial layer of protection.
Strategic Parking
Where you park can reduce grime buildup. Parking in a garage is obvious. When outside, try to park facing away from the direction of typical road spray (i.e., not facing oncoming traffic if possible on a busy road). Avoid parking under trees where sap and bird droppings are a constant threat.
Windshield Treatments
A well-maintained windshield coating (like the ones mentioned above) helps immensely. It not only improves visibility for you but also keeps the forward-facing cameras cleaner for longer. Water and grime will sheet off more easily. For more on keeping your glass pristine, our guide on how to clean a car windshield covers techniques that directly benefit your front cameras.
Conclusion: Clarity is Safety
Cleaning your Tesla’s cameras is a simple act of maintenance that yields major safety and functional dividends. It requires no special skills, just the right tools—a few high-quality microfiber cloths and a safe, gentle cleaner—and a gentle, deliberate touch. Remember the core principles: dry first, never spray directly, use gentle circular motions, and always finish with a dry buff. By incorporating a quick camera check into your weekly routine, you ensure that your vehicle’s advanced driver-assistance systems have an unobstructed view of the world. You’re not just keeping a lens clean; you’re maintaining the integrity of your car’s ability to see and protect you. A clear lens is a safe lens, and a safe lens means your Tesla can perform at its very best.
Frequently Asked Questions
Can I use Windex or household glass cleaner on my Tesla cameras?
No. Avoid ammonia-based cleaners like Windex. They can damage the special anti-reflective and hydrophobic coatings on the camera lenses, causing permanent haze and reduced performance. Always use a pH-neutral or dedicated camera lens cleaner.
What happens if I scratch a Tesla camera lens?
A scratched lens will scatter light, causing glare, haze, and reduced image clarity, especially at night. This can trigger “Camera Obstructed” warnings and disable Autopilot and safety features. Scratches are usually permanent and require replacing the entire camera module to fix.
How often should I clean my Tesla’s cameras?
It depends on your driving conditions. As a general rule, do a quick dry wipe-down with a microfiber cloth every 1-2 weeks. Perform a more thorough clean (with damp cloth if needed) monthly or whenever you notice visible dirt, bug splatter, or after a service warning appears.
Is it safe to use a pressure washer near the cameras?
Use extreme caution. Never point a high-pressure nozzle directly at a camera lens or housing, as the force can damage seals or push debris into the lens. If washing, keep the wand at a safe distance and angle, and always finish by gently drying the lenses with a microfiber cloth.
Why does my Tesla say “Camera Obstructed” after I cleaned it?
First, ensure the lens is perfectly dry and streak-free. Then, try a soft reboot (touchscreen > Power Off). If it persists, drive on a clear highway for 15-20 minutes to allow the system to recalibrate. If the warning remains, there may be a residual smear, internal moisture, or a fault requiring service.
Can I apply a ceramic coating to my Tesla camera lenses?
Yes, a dedicated glass or ceramic coating is an excellent way to protect camera lenses. It creates a hydrophobic layer that repels water and dirt, making cleaning easier and offering UV protection. Apply it very carefully according to the product instructions, using a soft microfiber.


