
How to Adjust Side Mirrors in Tesla Model 3
Adjusting your Tesla Model 3 side mirrors is a simple yet critical safety task done primarily through the touchscreen, with a physical backup. Proper adjustment eliminates blind spots and ensures optimal visibility. The vehicle also offers advanced features like auto-dimming and memory settings for a personalized, safe driving experience every time.
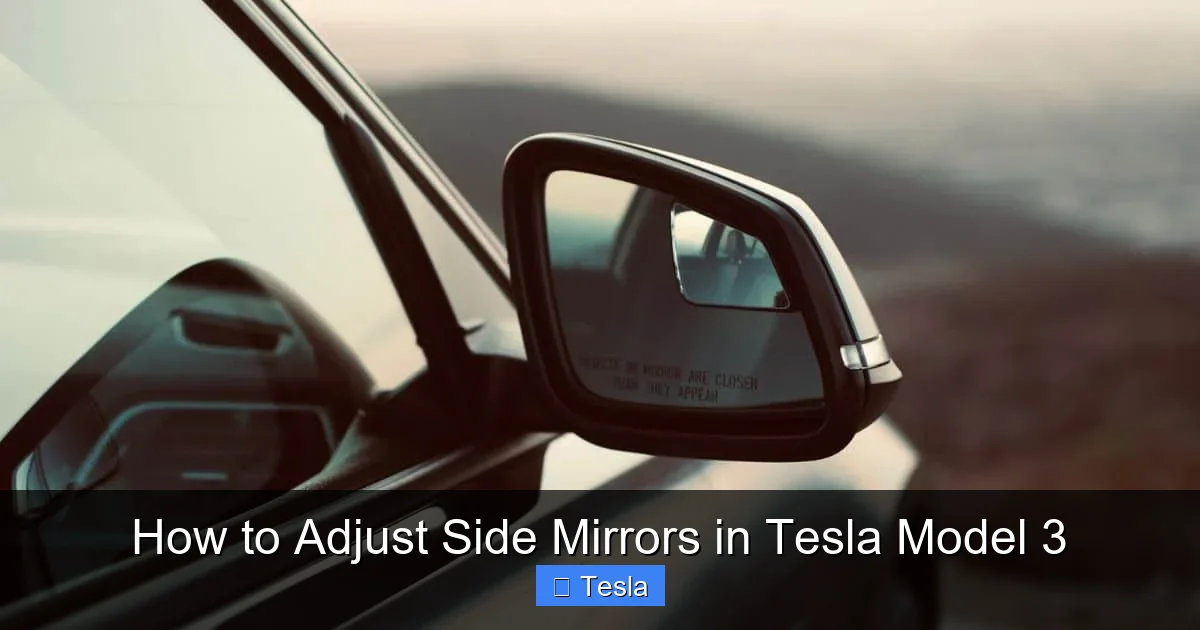
Let’s talk about one of the most overlooked yet vital safety features in your Tesla Model 3: the side mirrors. They’re your second set of eyes, the guardians against blind spot disasters. But in a car as technologically advanced as the Model 3, you won’t find a little joystick on the door. Everything is digital. This might feel strange at first, but once you master it, you’ll wonder how you ever drove without such precise control. Getting your Tesla Model 3 side mirrors perfectly tuned isn’t just about comfort; it’s a non-negotiable responsibility for safe driving. In this complete guide, we’ll walk through every method, from the standard touchscreen adjustments to understanding those clever advanced features. We’ll also troubleshoot common hiccups and share pro-tips to make your driving experience safer and more enjoyable. Forget what you know about manual mirror adjusters; we’re entering the digital age of automotive safety.
Key Takeaways
- Primary Control is the Touchscreen: All mirror adjustments in a Tesla Model 3 are made digitally through the central touchscreen interface, not with traditional joysticks on the door.
- Physical Buttons are for Folding Only: The physical buttons on the driver’s door panel control mirror folding (manual or automatic) and the rear window defroster, not the mirror angle.
- Auto-Dimming is a Key Safety Feature: The Model 3’s side mirrors are electrochromic (auto-dimming), automatically reducing glare from trailing headlights for safer night driving.
- Mirror Positions are Saved to Your Profile: Once you adjust your mirrors, the settings are saved to your driver profile. Switching profiles automatically recalls the correct mirror angles for each driver.
- Incorrect Adjustment Creates Dangerous Blind Spots: Failing to adjust mirrors properly is a leading cause of side-impact collisions. The correct method minimizes blind spots by setting mirrors to see more of adjacent lanes.
- You Can Reset to Defaults: If adjustments go awry, you can reset the mirror positions to factory defaults through the touchscreen service menu.
- Manual Folding is Possible in an Emergency: If the automatic folding fails, you can manually pivot the mirror glass housing inward by hand to prevent damage in tight spaces.
📑 Table of Contents
- Why Perfect Mirror Adjustment is Non-Negotiable for Safety
- The Digital Command Center: Adjusting Mirrors via Touchscreen
- The Physical Backup: Manual Folding and Emergency Adjustment
- Advanced Mirror Features: Auto-Dimming, Memory, and Tilt
- Troubleshooting Common Side Mirror Issues
- Best Practices and Pro-Tips for Model 3 Mirror Care
- Conclusion: Mastering Your Digital Mirrors for a Safer Drive
Why Perfect Mirror Adjustment is Non-Negotiable for Safety
Before we dive into the “how,” let’s hammer home the “why.” Properly adjusted side mirrors are your primary defense against side-impact collisions, especially during lane changes. The goal is to eliminate, or at least drastically reduce, your vehicle’s blind spots. A common mistake drivers make is adjusting the mirrors so they can just see the side of their own car. This creates a huge blind spot right beside you. The correct technique, which we’ll detail later, involves angling the mirrors outward much further than feels natural so that you can see vehicles in adjacent lanes merging into your blind spot zone. In a Tesla Model 3, with its relatively thick A-pillars and futuristic cabin design, achieving this optimal field of view is crucial. Your side mirrors work in concert with the rearview camera and, if equipped, the blind spot monitoring system. But they are your first, always-available line of defense. Taking five seconds to adjust them correctly before you drive off can prevent a costly accident and ensure a stress-free commute.
The Science of Eliminating Blind Spots
So, what does “perfect adjustment” actually look like? It’s a technique often called the “V-formation” or “BGE” (Blind-spot, Glare, and Elimination) setting. Here’s how to visualize it: when you’re driving, a car that is about to merge into your lane should first become visible in your side mirror at roughly the same moment it disappears from your peripheral vision through the rear window. This seamless transition means there is no gap where the car is hidden. To achieve this, you need to set your mirrors much more outward than traditional advice. For a Tesla Model 3, sit in your normal driving position and have someone help you, or use a stationary object. Adjust the left mirror so you can just barely see the rear of your own car on the inner edge of the mirror. Then, pan it outward until a car in the next lane is centered in your view when it’s alongside your rear fender. Repeat for the right side. This wide-angle setup might feel odd at first, but you’ll quickly adapt, and your safety will skyrocket. Remember, your mirrors are for seeing other traffic, not for narcissistically checking out your own car’s paint job.
The Digital Command Center: Adjusting Mirrors via Touchscreen
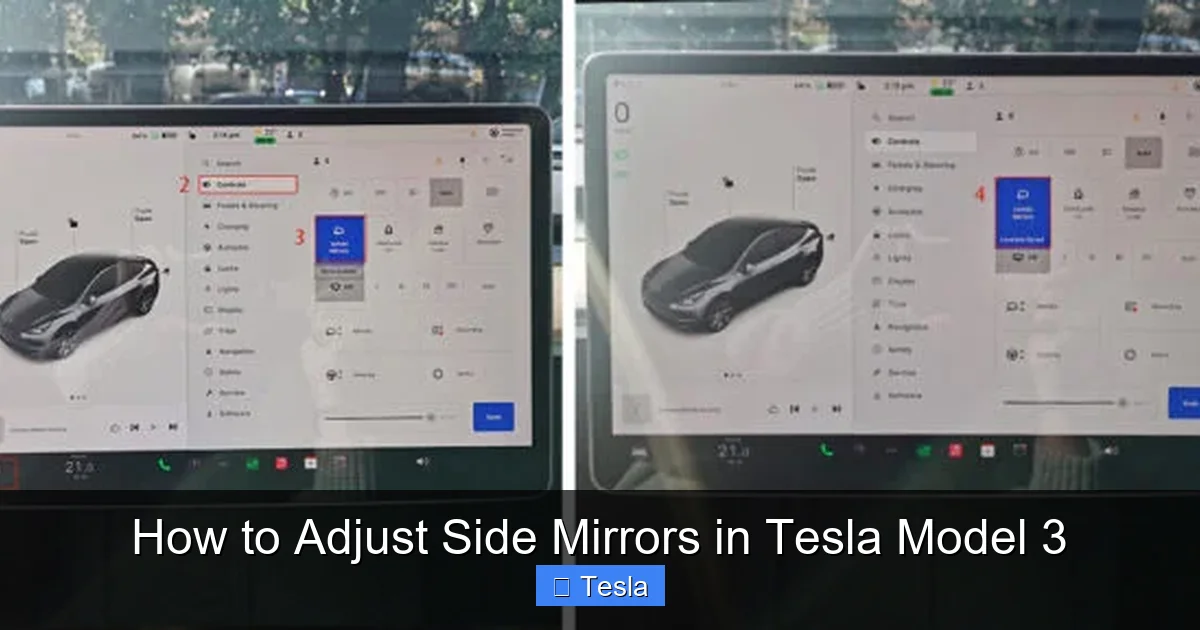
Welcome to the primary method. In the Tesla Model 3, the touchscreen is the absolute brain for almost every vehicle setting, and your side mirrors are no exception. There is no physical adjuster on the door. This might be a culture shock for new owners, but it’s incredibly intuitive once you know where to look. The control is nested within the ‘Controls’ menu, which is the car icon at the bottom left of the screen. This centralization means your mirror settings travel with your driver profile, which is fantastic for shared vehicles.
Visual guide about How to Adjust Side Mirrors in Tesla Model 3
Image source: mirorfame.com
Step-by-Step Touchscreen Navigation
Here is the exact, foolproof process:
- Ensure the car is powered on (foot on the brake or in ‘Park’).
- On the bottom-left of the touchscreen, tap the large ‘Controls’ icon (it looks like a car).
- This opens the main vehicle settings menu. On the left sidebar, you’ll see categories like ‘Locks,’ ‘Lighting,’ ‘Mirrors,’ etc. Tap ‘Mirrors’.
- You are now presented with a clean, digital interface. You’ll see a graphical representation of your Model 3 with two large, circular dials—one for the left mirror and one for the right.
- To adjust a mirror, simply touch and drag the corresponding dial in the direction you want the mirror to move. Drag up to tilt the mirror upward, down to tilt it downward, left or right to pan it horizontally. The on-screen graphic moves in real-time, giving you perfect visual feedback.
- Make fine adjustments until the field of view is optimal, following the blind-spot elimination technique described earlier.
- Tap the ‘X‘ or the ‘Back‘ arrow to exit. The settings are saved automatically.
Pro Tip: Do this adjustment while the car is stationary, with your seat in your normal driving position. Have a passenger stand beside each front fender to help you gauge the outer edge of the mirror’s view. This is also a great time to check your rearview camera cleanliness, as a smudged camera can mimic a poorly adjusted mirror.
Understanding the Touchscreen Interface Icons
Within that ‘Mirrors’ menu, you’ll also see a few other important toggle switches:
- Auto-Dimming: This toggle turns the electrochromic (auto-dimming) feature for the side mirrors and rearview mirror on or off. It’s highly recommended to keep this ON at all times for glare reduction.
- Fold Mirrors: This button commands all four mirrors (the two side mirrors and the rearview camera’s housing, which also folds) to fold inward. You can use this for automatic parking in tight spots or car washes. It’s also tied to the ‘Fold Mirrors’ setting under ‘Vehicle’ locks.
- Mirror Home: This is a crucial one. Tapping this instantly returns all mirrors to their stored “home” position. This is your reset button if you’ve been fiddling with adjustments and want to go back to your saved profile settings. It’s different from the factory reset in the service menu.
These digital controls are responsive and precise. You can make micro-adjustments that would be impossible with a mechanical joystick. It’s a great example of Tesla’s user interface philosophy: consolidate, simplify, and digitize.
The Physical Backup: Manual Folding and Emergency Adjustment
While the touchscreen is king for angular adjustment, the physical world still has a role. On the driver’s door panel, you’ll find a cluster of buttons. The two outer buttons with the mirror icons are for folding the mirrors. Pressing the left button folds the left mirror, the right button folds the right. A quick press of both simultaneously will fold or unfold both mirrors, depending on their current state. This is your manual override if the automatic fold (triggered by locking the car or via the touchscreen) fails or if you want to fold them instantly without waiting for the car to lock.
Visual guide about How to Adjust Side Mirrors in Tesla Model 3
Image source: teslashooters.com
It’s important to understand what these buttons do not do. They do not adjust the angle of the mirror glass up, down, left, or right. That is exclusively a touchscreen function. If your touchscreen is frozen or unresponsive, you are temporarily stuck with your last saved mirror angle. This is a rare but possible scenario, which is why knowing the manual fold is useful—you can at least fold them in to prevent damage if you’re in a tight spot.
Manual Pivoting in a Pinch
There is one more level of manual intervention. The mirror glass housing itself (the part that reflects) is mounted on a pivot. If for some reason—a software glitch, a minor collision, or extreme cold—the mirror motor is jammed and won’t respond to touchscreen commands, you can often physically move it. Gently grasp the mirror housing (the reflective part) and apply light pressure to pivot it inward or outward. Do not force it. You should feel a slight give as it disengages from the motor’s gear. Once you move it manually, the electric motor may need to “re-learn” its position, which usually happens the next time you adjust it via the touchscreen. This is a last-resort trick, but it can get you home if the mirror is stuck pointing at the sky. For persistent issues, a service appointment is required, as this may indicate a failed mirror assembly motor.
Advanced Mirror Features: Auto-Dimming, Memory, and Tilt
Your Tesla Model 3’s side mirrors are smarter than they look. Understanding these features will help you use them to their full potential and troubleshoot when they seem to misbehave.
Visual guide about How to Adjust Side Mirrors in Tesla Model 3
Image source: teslashooters.com
Auto-Dimming (Electrochromic) Glass
This is a fantastic safety and comfort feature. The glass in your side mirrors (and rearview mirror) contains a special electrochromic layer. A rear-facing sensor detects bright light from vehicles behind you, and a small voltage is applied to the glass, causing it to darken automatically. This reduces glare from high beams at night, preventing temporary blindness. As the bright light source passes, the glass returns to its clear state. It’s seamless and works in conjunction with the headlight auto-dimming if your car is so equipped. If you notice your mirrors aren’t dimming at night, first check that the ‘Auto-Dimming’ toggle is ON in the touchscreen ‘Controls > Mirrors’ menu. If it’s on and still not working, the sensor (located on the rear of the mirror housing) might be obstructed by dirt, a dash cam, or a parking pass. Clean it gently. Persistent failure usually means a faulty mirror assembly that needs service.
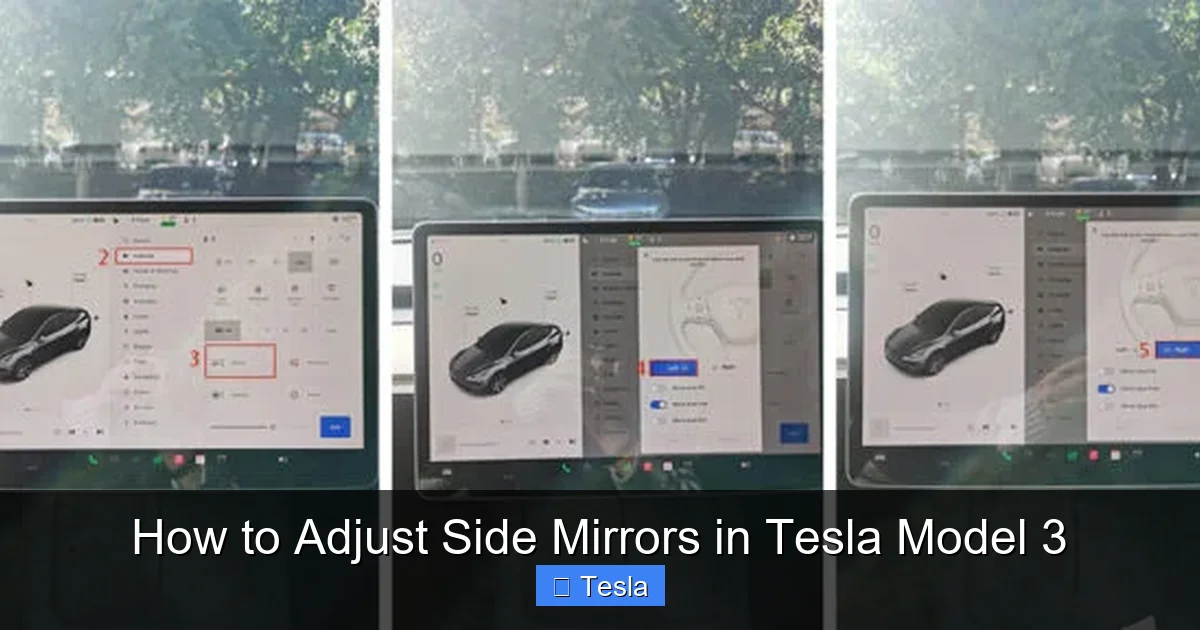
Driver Profile Memory Integration
This is where the digital system shines. When you adjust your side mirrors (and your steering wheel and seat), the Model 3 automatically saves these positions to your selected driver profile (accessed via the top-right profile icon on the touchscreen). When a different driver selects their profile, the car will automatically move the mirrors, steering wheel, and seat to their saved positions. It’s a personalized cockpit every time. If you find your mirrors not moving to your preferred position, ensure you are logged into the correct profile. You can also manually save the current position to your profile by going to ‘Controls > Steering Wheel & Mirrors’ and tapping ‘Save.’ If adjustments feel “off” after a profile switch, it might be because the saved position was set incorrectly. Simply readjust them while in your profile, and they will save over the old setting.
The “Tilt” Function for Reverse (Not Available)
Here’s a critical point of clarification. Many traditional cars, especially luxury brands like BMW and Audi, have a feature where the passenger-side mirror tilts downward when you shift into reverse. This helps you see the curb when parking. The Tesla Model 3 does not have this feature. The mirrors do not tilt automatically in reverse. You must manually adjust them if you need a downward view for curb checking. This is a common point of confusion for owners migrating from other brands. There is no setting to enable it; the functionality simply does not exist in the current Tesla software. Instead, rely on the rearview camera, which provides a wide-angle view and has guidelines that help immensely with parking. Some aftermarket solutions exist, but they are not factory-supported.
Troubleshooting Common Side Mirror Issues
Even with a simple digital system, things can sometimes go wrong. Let’s address the most frequent concerns.
“My Touchscreen is Frozen and I Can’t Adjust the Mirrors!”
This is a rare but panic-inducing moment. First, perform a soft reboot of the touchscreen. Press and hold both scroll wheels on the steering wheel until the screen goes black and the Tesla logo reappears (about 30-60 seconds). This restarts the MCU (Media Control Unit) and usually resolves temporary glitches. After reboot, try adjusting the mirrors again. If the screen remains unresponsive, you can still use the physical fold buttons to at least tuck the mirrors in for protection. Your mirror positions will be stuck at their last known state until the system reboots. Driving with stuck mirrors is unsafe; if a reboot fails, you may need to power cycle the entire vehicle (get out, lock it, wait a few minutes, unlock and try again) or contact Tesla Roadside Assistance.
“One Mirror is Moving Erratically or Making Noise.”
This typically indicates a mechanical issue with the mirror’s gear motor or assembly. The mirror might stutter, move slowly, or make a grinding sound. This is not a software problem you can fix. Common causes include: an object (like a snow/ice chunk) physically jamming the mirror’s range of motion, a minor impact that misaligned the internal gears, or general wear and tear on the motor. The solution is a physical replacement of the mirror assembly. You can try manually pivoting the mirror (as described earlier) to free a jam, but if the noise persists, schedule a service appointment. Tesla service can replace just the motorized mirror assembly without needing to replace the entire door panel.
“My Auto-Dimming Feature Stopped Working.”
As mentioned, first verify the setting is enabled in ‘Controls > Mirrors.’ Next, clean the rear-facing sensor on the mirror housing—it’s a small, dark photodiode, often near the seam. Use a microfiber cloth. Ensure nothing is obstructing it: a dash cam wire, a parking pass, or even a thick layer of dirt or wax from a recent car wash. If it’s clean and unobstructed but still not dimming, the mirror’s electrochromic layer or its controlling module has likely failed. This requires a service visit to replace the faulty mirror assembly. Note that auto-dimming is a feature of the mirror glass itself, so replacing the glass is the fix.
“How Do I Reset Mirror Positions to Factory Defaults?”
The ‘Mirror Home’ button resets to your saved profile position, not the absolute factory default. To perform a true factory reset of all mirror positions (and many other settings), you need to delve into the service menu. Go to ‘Controls > Service > Settings.’ Scroll down to find ‘Reset Mirror Positions’ or similar wording (the exact label can vary by software version). Tapping this will recalibrate the mirror motors to their mechanical zero points. Warning: After doing this, your saved profile positions will be erased, and you will need to readjust all mirrors and steering wheel to your liking and save them to your profile again. Only do this if you suspect a major calibration error, not for minor adjustments.
Best Practices and Pro-Tips for Model 3 Mirror Care
Let’s move from reactive troubleshooting to proactive care. A few simple habits will keep your mirrors functioning perfectly for years.
Regular Cleaning is Essential
The side mirrors are exposed to the elements: road grime, bug splatter, winter salt, and pollen. A dirty mirror is a dangerous mirror. Make it a habit to clean them whenever you wash your car. Use a proper automotive glass cleaner and a soft microfiber cloth. For the mirror housing (the plastic part), use an all-purpose cleaner. Pay special attention to the seam where the glass meets the plastic, as debris can get trapped and interfere with the auto-dimming sensor or the motor’s movement. If you live in an area with harsh winters, be sure to clear ice and snow from the mirrors before driving. The motors are not designed to push through heavy ice, which can strip gears. Use a de-icer spray if needed.
Mind the Folding Mechanism
The folding action is convenient but adds complexity. Avoid folding and unfolding the mirrors excessively throughout the day, as it adds wear to the small motors and gears. Use the automatic fold (set in ‘Controls > Vehicle > Mirror Fold’ to ‘On’) which triggers when you lock the car. This is the intended primary use case. If you frequently need to fold them for tight parking, consider if your parking habits could be adjusted. Also, be mindful when using automatic car washes. The touchless type is safest. If using a brush-type wash, ensure the mirrors are folded in to prevent them from being struck.
Consider Aftermarket Protective Films
The mirror glass on the Model 3 is exposed and vulnerable to chips and scratches from road debris. A cheap and effective solution is to apply a clear, hydrophobic PPF (Paint Protection Film) or a dedicated side mirror protective film to the glass surface. This is a DIY job you can do in 10 minutes per mirror. It won’t affect visibility or the auto-dimming function, but it will absorb small stone impacts, preventing chips. If you get a chip in the mirror glass itself, the entire mirror assembly typically needs replacement, which is costly. A $20 film is excellent insurance. You can find these films online, often sold specifically for the Model 3. While you’re at it, if you’re looking to customize your car’s appearance, you might also be interested in learning about how much it costs to wrap a Tesla Model 3, which can include wrapping the mirror housings for a full custom look.
Check for Software Updates
Tesla frequently pushes over-the-air (OTA) updates that can refine mirror behavior, add new features, or fix bugs. Ensure your car is connected to Wi-Fi at home to receive these updates. While major mirror functionality changes are rare, improvements to the response time of the digital controls or enhancements to the auto-dimming algorithm are possible. Keeping your software current ensures you have the latest, most stable version.
Conclusion: Mastering Your Digital Mirrors for a Safer Drive
Adjusting the side mirrors on your Tesla Model 3 is a straightforward process once you know where to look: the touchscreen. Ditch the search for a non-existent joystick and embrace the digital precision. Remember the core safety principle: adjust them outward to eliminate blind spots, not to see your own car. Take advantage of the brilliant auto-dimming feature and the seamless memory integration with your driver profile. Know the physical fold buttons as your manual backup, and understand that manual pivoting is a last-ditch emergency trick. By incorporating regular cleaning into your car care routine and perhaps adding protective film, you’ll keep these vital safety components functioning perfectly. Your mirrors are your connection to the world behind you. Treat them with care, adjust them correctly, and they’ll repay you with countless safe journeys. Now, go forth, tap that screen, and see the road clearly.
Frequently Asked Questions
Can I adjust Tesla Model 3 side mirrors while driving?
No. For safety, the touchscreen mirror adjustment controls are only active when the vehicle is in ‘Park’ or in a very low-speed ‘Drive’ creep mode (like in a parking lot). The system locks out adjustments at higher speeds to prevent accidental changes while driving. Always adjust them before you start your journey.
Why are my Tesla Model 3 side mirrors not auto-dimming at night?
First, ensure the ‘Auto-Dimming’ toggle is turned ON in Controls > Mirrors. Then, check that the small sensor on the rear of the mirror housing is clean and not obstructed by a dash cam, parking pass, or dirt. If it’s clean and the setting is on but it still doesn’t work, the mirror’s electrochromic layer may have failed and needs service.
How do I manually fold the side mirrors on a Tesla Model 3?
Use the physical buttons on the driver’s door panel. The two outer buttons with the mirror icons control the left and right mirrors independently. Press either button to fold that specific mirror inward. Press both buttons simultaneously to fold or unfold both mirrors at once.
Do Tesla Model 3 side mirrors tilt down when I put the car in reverse?
No. Unlike some traditional vehicles, the Tesla Model 3 does not have an automatic mirror tilt-down function for reversing. You must manually adjust the mirror angle if you need a downward view of the curb. Instead, rely on the excellent rearview camera with its parking guidelines.
What should I do if my Tesla Model 3 mirror is stuck and won’t move via the touchscreen?
First, try a touchscreen reboot by holding both steering wheel scroll buttons until the screen restarts. If that fails, you can attempt to gently pivot the mirror glass housing by hand to free a potential jam. If it remains stuck or makes grinding noises, the mirror motor assembly has likely failed and requires a service appointment for replacement.
How do I reset my saved side mirror positions to factory defaults?
The ‘Mirror Home’ button resets to your last saved profile position. For a true factory reset, go to Controls > Service > Settings and look for ‘Reset Mirror Positions.’ This recalibrates the motors but will erase your saved profile settings, requiring you to readjust and re-save your preferred mirror angles.


