
How to Remove a Tesla Wheel Cover
Contents
- 1 Key Takeaways
- 2 📑 Table of Contents
- 3 Why Would You Need to Remove a Tesla Wheel Cover?
- 4 Understanding Tesla’s Wheel Cover Designs: It’s Not One-Size-Fits-All
- 5 Essential Tools and Your Safety First Checklist
- 6 Step-by-Step: Removing the Wheel Cover on a Model 3 or Model Y
- 7 Step-by-Step: Model S, Model X, and Earlier Models with Screws
- 8 Step-by-Step: The Cybertruck’s Aero Cover
- 9 Reinstallation: Getting That Cover Back On Perfectly
- 10 Maintenance, Damage Assessment, and When to Seek Help
- 11 Conclusion: Confidence Through Knowledge
- 12 Frequently Asked Questions
Removing a Tesla wheel cover is a simple DIY task that requires only basic tools and caution. The process involves locating hidden retaining clips, using plastic pry tools to avoid scratches, and working methodically around the wheel’s circumference. Different Tesla models (Model 3/Y, S/X, Cybertruck) have slight variations in clip design, so identifying your specific setup is key. Always prioritize wheel safety by checking for damage and ensuring proper reinstallation to prevent hazardous loose covers while driving.
Key Takeaways
- Use only plastic or wood pry tools: Metal tools will permanently scratch or gouge the Tesla’s alloy wheel finish and the wheel cover’s painted surface.
- Locate the retaining mechanism first: Tesla wheel covers are typically held by spring clips or small plastic tabs hidden behind the tire’s valve stem or at the 6 o’clock position. Feel for these before prying.
- Apply even, gentle pressure: Work in small sections, prying just enough to disengage one clip at a time. Sudden force can crack the fragile plastic cover.
- Model-specific variations exist: Model 3 and Model Y use a similar clip system, while Model S and X may have additional screws. The Cybertruck’s unique aero covers require a different approach entirely.
- Inspect wheels and covers before reinstalling: Always check for cracks, damaged clips, or wheel debris. A compromised cover can fly off at speed, creating a serious safety risk.
- Reinstallation requires precise alignment: Ensure the cover’s notch aligns perfectly with the valve stem. Hook the clips sequentially around the wheel, listening for firm clicks.
- Professional help is wise for stubborn covers: If a cover is seized due to corrosion or impact damage, forcing it can cause expensive rim scratches. Consider a Tesla service center.
📑 Table of Contents
- Why Would You Need to Remove a Tesla Wheel Cover?
- Understanding Tesla’s Wheel Cover Designs: It’s Not One-Size-Fits-All
- Essential Tools and Your Safety First Checklist
- Step-by-Step: Removing the Wheel Cover on a Model 3 or Model Y
- Step-by-Step: Model S, Model X, and Earlier Models with Screws
- Step-by-Step: The Cybertruck’s Aero Cover
- Reinstallation: Getting That Cover Back On Perfectly
- Maintenance, Damage Assessment, and When to Seek Help
- Conclusion: Confidence Through Knowledge
Why Would You Need to Remove a Tesla Wheel Cover?
So, you’re staring at your sleek Tesla, and you notice the wheel cover—that full-face disc that gives your car such a clean, minimalist look. Maybe you need to check your tire pressure, rotate the tires, or perhaps you just got a flat and need to access the lug nuts. Or maybe you’re a detailing enthusiast who wants to give those beautiful alloy wheels a proper bath and clay bar treatment. Whatever the reason, knowing how to remove that wheel cover without turning it into a crumpled piece of plastic or, worse, scratching your precious rim is an essential skill for any Tesla owner.
Let’s be honest: Tesla’s design philosophy is all about sleek, uncluttered aesthetics. That means hiding the lug nuts and the wheel’s hardware behind that beautiful, seamless cover. It’s a fantastic look from the outside, but it adds a tiny step to basic maintenance. Unlike a traditional wheel with exposed lug nuts, you can’t just start loosening bolts. You have to get past the cover first. This guide will walk you through that process for every Tesla model currently on the road, from the affordable Model 3 to the flagship Model S and the futuristic Cybertruck. We’ll talk about the tools you actually need (spoiler: it’s not a special Tesla tool), the subtle differences between models, and the critical “don’ts” that will save you from a costly mistake.
Think of this as your friendly, detailed instruction manual. We’re going to break it down into simple, actionable steps. By the end, you’ll approach that wheel cover with confidence, not trepidation. And remember, if at any point you feel unsure, there’s no shame in calling Tesla Roadside Assistance or your local service center. It’s better to be safe than to be stranded with a broken cover or a damaged wheel.
Understanding Tesla’s Wheel Cover Designs: It’s Not One-Size-Fits-All
Before you even touch a tool, the most important step is to understand what’s holding your specific Tesla’s wheel cover on. Tesla has used a few different systems over the years, and the method changes depending on your model and year. The core principle is always the same—a series of spring-loaded plastic clips around the wheel’s circumference—but the location of the “starting point” and any secondary retention points vary.
Visual guide about How to Remove a Tesla Wheel Cover
Image source: automotiveglory.com
The Classic System: Model 3 and Model Y
The vast majority of Teslas on the road today are Model 3 and Model Y vehicles. They share an almost identical wheel cover design. The cover is a single piece of molded plastic, painted to match the wheel’s aesthetic (black, silver, or body-colored). It is secured by approximately 8 to 10 small spring steel clips that are molded into the back of the cover. These clips snap into corresponding holes on the aluminum alloy wheel behind it.
The key to removal is finding the “release point.” On these models, there is no single “tab” or screw. Instead, you must start at a specific location where the clip is slightly easier to disengage. This is almost always directly behind the tire’s valve stem. The valve stem hole in the cover creates a small gap, making that the weakest point in the clip’s grip. From there, you work your way around the wheel, releasing each clip one by one.
The Premium System: Model S and Model X (Refresh & Earlier)
The larger Model S and Model X, especially pre-2021 refresh models, have a slightly different story. They also use a clip-on full cover, but the system can feel more robust. Furthermore, on some trims and years, there is an additional small Phillips-head screw located at the very bottom (6 o’clock position) of the wheel cover. This screw is often hidden behind a small rubber or plastic cap that you must peel back to access. You must remove this screw first before the clips can be released. If you try to pry a cover with this screw still in place, you will likely break the plastic near the screw hole.
The newer refreshed Model S and Model X (2021+) may also have a more integrated design where the cover is part of a larger aerodynamic piece. Always consult your owner’s manual for your specific VIN if you are unsure.
The Wild Card: The Cybertruck
The Cybertruck is, as expected, a complete outlier. Its wheel “covers” are not traditional full-face discs. Instead, they are aero covers—large, flat, stainless steel panels that sit over the wheel and tire. They are secured by multiple Torx screws (typically T20 or T25) that are visible from the outside. There are no hidden clips. Removing them is as simple as locating all the screws (usually 5-6 per wheel) and unscrewing them with the appropriate Torx bit. The sheer weight and size of the stainless steel panel mean you need to support it fully as you remove the last screw. This is the easiest Tesla wheel cover to remove in terms of process, but the heaviest in terms of physical handling.
Essential Tools and Your Safety First Checklist
You might be tempted to grab a flathead screwdriver from your toolbox. Stop. That is the single fastest way to scratch your wheel beyond repair. Tesla alloy wheels have a sensitive clear coat finish. A single slip of a metal tool will leave a permanent, ugly scar. The right tools are non-negotiable for a clean, damage-free job.

Visual guide about How to Remove a Tesla Wheel Cover
Image source: automotiveglory.com
The Mandatory Tool: Plastic Trim/Pry Tools
You need a set of plastic automotive trim removal tools. These are usually sold in kits of 5-10 different shapes and thicknesses for around $10-$20 on Amazon or at any auto parts store. They are made of sturdy but flexible plastic that won’t mar finishes. The best ones for this job are the flat, wide “fork” style tools or the thinner, angled “hook” tools. You will use these to get behind the wheel cover and gently lever it outward to disengage the clips.
Pro-Tip: If you don’t have these on hand, a sturdy wooden paint stir stick (the kind you get free at hardware stores) can work in a pinch. Sand the edges smooth if they are rough. Never use a metal tool.
The Helpful (But Not Always Mandatory) Extras
- Flashlight or Work Light: You’ll be looking into the dark cavity behind the wheel cover. A bright light is crucial for seeing the clips and ensuring you’re prying in the right spot.
- Gloves: Mechanic gloves or even disposable nitrile gloves protect your hands from sharp wheel edges and keep them clean.
- Small Mirror: A compact, telescoping inspection mirror can help you see the clip locations, especially behind the valve stem area.
- Magnetic Tray: For Model S/X owners, you’ll have a small screw to remove. Keep it safe in a magnetic tray so it doesn’t roll away.
- Lug Wrench/Tire Iron: You’ll need this after the cover is off to actually remove the lug nuts and wheel. Have it ready.
Safety Precautions You Cannot Skip
Your car’s wheels are its only connection to the road. A mistake here can have catastrophic consequences.
- Park on a LEVEL, solid surface. Never work on a slope. Engage the parking brake firmly.
- Chock the opposite wheels. Place wheel chocks or large blocks of wood behind the tires on the opposite side of the car from the wheel you’re working on. For a front-wheel job, chock the rear passenger-side tire, and vice versa.
- If you are removing the wheel itself (not just the cover), you MUST use jack stands. Never rely on the car’s scissor jack alone to support the vehicle while you’re underneath or applying prying force. The jack can fail. Properly position a hydraulic floor jack at the manufacturer’s designated jacking point (consult your manual), lift the car, and place a certified jack stand under a solid structural point (like the reinforced pinch weld). Lower the car onto the stand. This is non-negotiable for personal safety.
- Do not work on a hot wheel. After driving, wheels and brakes can be extremely hot. Let the car sit for at least an hour.
Step-by-Step: Removing the Wheel Cover on a Model 3 or Model Y
This is the most common procedure. We’ll assume you’re just removing the cover to access the lug nuts for a tire rotation or change. The process is identical whether you’re doing a full wheel removal or just need the cover off temporarily.
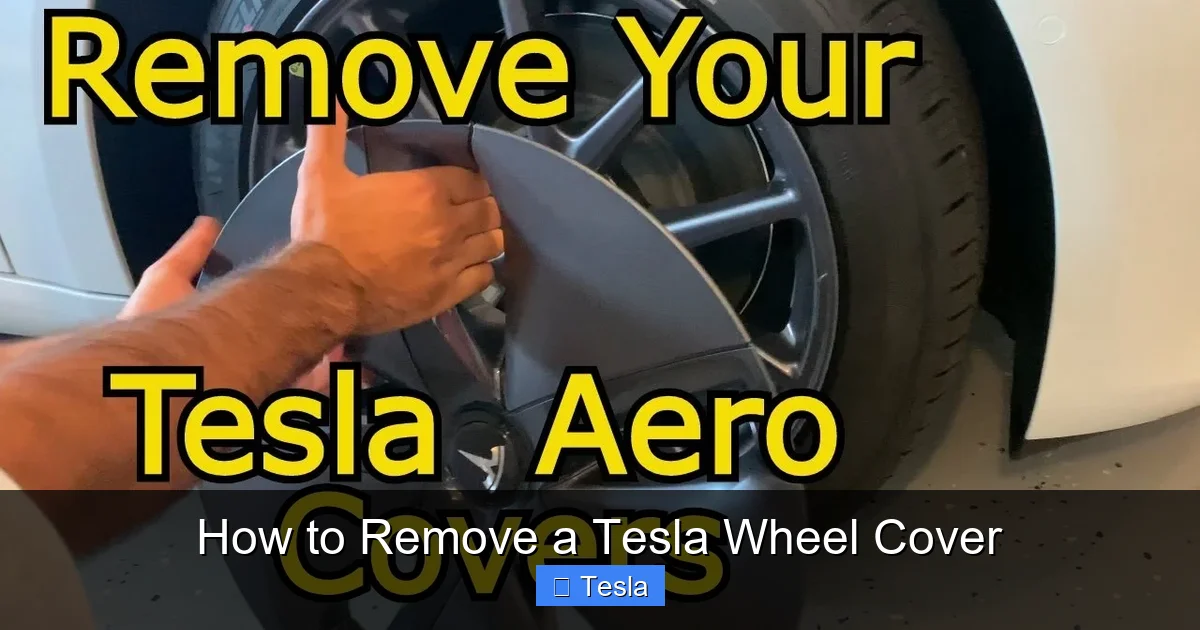
Visual guide about How to Remove a Tesla Wheel Cover
Image source: i.ytimg.com
Step 1: Identify and Prepare
Stand at the side of the car, facing the wheel. Locate the tire’s valve stem. This is your starting point. Have your plastic pry tool and flashlight ready. Ensure your parking brake is on and the car is in “Park” (P).
Step 2: Start at the Valve Stem
Position yourself so you can see the gap between the wheel cover and the wheel behind the valve stem. Take your flat plastic pry tool and gently insert it into this gap. You should feel it slide in about 1-2 inches. The goal here is not to lever the cover off yet, but to disengage the first clip. Gently wiggle and push the tool inward and slightly outward. You should feel and hear a distinct “pop” or “click”. That’s the first spring clip releasing. If you don’t feel it, you may not be in the exact right spot—try adjusting the angle slightly.
Step 3: Work Your Way Around
Once the first clip is out, the cover will have a tiny bit of play. Now, move the pry tool about 4-6 inches clockwise or counter-clockwise from the valve stem. Insert it into the now-slightly-wider gap and repeat the gentle prying/wiggling motion to release the next clip. You will hear/feel another click. Continue this process, moving around the wheel in 4-6 inch increments. Do not try to lever a large section at once. The plastic is designed to flex, but too much force on one area will cause it to crack, especially in cold weather.
Important: As you work, the cover will gradually become looser. You might be able to use your fingers to pull the cover away from the wheel at the points between clips, creating more space for your tool. This is a good sign.
Step 4: The Final Clip and Removal
After releasing all the clips (you’ll usually count 8-10), the cover should be only held on by the last one, directly opposite your starting point near the valve stem. Give it one final, gentle nudge with your hand or tool. The cover should now come free easily. Do not yank on it. Lift it straight off and set it aside on a soft surface (a blanket or towel) to prevent scratches.
Step-by-Step: Model S, Model X, and Earlier Models with Screws
For these models, the process is 90% the same, but you have one critical extra step.
Step 1: Locate and Remove the Hidden Screw
Look at the very bottom of the wheel cover (the 6 o’clock position). You’ll often see a small, round rubber or plastic cap, about the size of a pencil eraser. Carefully peel this cap back using your fingernail or a plastic tool. Underneath, you’ll find a small Phillips-head screw. Use a properly sized Phillips screwdriver (PH0 or PH1 usually) to remove this screw completely. Set it aside in your magnetic tray. If you skip this, you will break the cover.
Step 2: Follow the Model 3/Y Procedure
With the screw removed, the retention system is now the same spring clips. Start at the valve stem and work your way around the wheel as described in the previous section, using your plastic pry tools to release each clip. The screw removal point will now be just another point along the circle where the cover comes off easily.
Step-by-Step: The Cybertruck’s Aero Cover
This is a different beast entirely, but refreshingly straightforward.
Step 1: Locate All Screws
The Cybertruck’s aero covers are held on by visible Torx screws. There is no guessing. You will see 5 or 6 screws per wheel, arranged in a star pattern. They are usually black and blend in, but they are clearly visible. Have your T20 or T25 Torx bit (check your manual for exact size) and a ratchet ready.
Step 2: Unscrew in a Star Pattern
Just like loosening lug nuts, you should loosen the screws in a star or cross pattern. This prevents the cover from warping or binding as you release pressure. Turn each screw counter-clockwise just enough to break it free (about 1/4 to 1/2 turn). Then go around the pattern again to fully remove each screw. Support the heavy cover with your free hand as you remove the last screw. It will drop suddenly once the final point of contact is released.
Place the screws in your magnetic tray. The cover is heavy stainless steel—be prepared for its weight and set it down carefully on a soft surface to avoid scratching your paint or the cover itself.
Reinstallation: Getting That Cover Back On Perfectly
Removal is only half the battle. Putting it back on correctly is crucial for safety and aesthetics. A poorly reinstalled cover can vibrate, make noise, or even detach while driving.
Step 1: Prep and Alignment
Before anything, inspect the back of the wheel cover. Ensure all the plastic clips are intact, undamaged, and not frozen in a released position. Also, inspect the wheel’s mounting surface. It should be clean of dirt, rocks, or old adhesive. Any debris will prevent the clips from seating properly.
Find the notch or hole on the wheel cover that aligns with the tire’s valve stem. This is your key alignment point. Hold the cover up to the wheel and get this notch perfectly aligned with the valve stem. This ensures the cover is centered.
Step 2: The “Hook and Press” Method
Starting at the valve stem notch, bring the cover close to the wheel. You should feel the first clip on the cover “hook” onto the corresponding hole on the wheel. You’ll feel a slight resistance. Once that first clip is engaged, gently press the cover inward toward the wheel all the way around the circumference. You should hear and feel a series of firm, consistent clicks as each subsequent clip snaps into its hole. Work your way around the wheel, pressing firmly but evenly. Do not hammer or force it.
Check your work: Once you’ve gone all the way around, go back and gently try to pull the cover away from the wheel at various points. It should not move. If a section feels loose, that clip didn’t engage. You’ll need to press that specific area more firmly or re-seat the entire cover starting from the valve stem again.
Step 3: Final Check and Torquing (If Wheel Was Removed)
If you removed the entire wheel to change the tire, this is the time to reinstall it. Place the wheel on the hub, hand-tighten all lug nuts in a star pattern, and then torque them to Tesla’s specification (usually around 129 Nm or 95 ft-lbs, but ALWAYS check your owner’s manual for your specific model and year). Do not over-torque. Then, and only then, reinstall the wheel cover following the steps above. A properly torqued wheel is the foundation for a safely installed cover.
Maintenance, Damage Assessment, and When to Seek Help
Your wheel covers, especially on a Tesla that sees all-season use, take a beating from road salt, brake dust, and curbs. Proper care extends their life and keeps your car looking pristine.
Cleaning Your Wheel Covers
Never use harsh wheel cleaners or abrasive brushes on the plastic covers, especially if they are painted or textured. The best method is to wash them with the rest of the car using a normal car shampoo, a soft microfiber mitt, and a soft-bristle brush for the recesses. Rinse thoroughly. For brake dust, a dedicated pH-neutral wheel cleaner sprayed on and left for a minute before gentle agitation is safe. Dry completely. Applying a layer of a high-quality synthetic sealant (like a paint sealant or dedicated plastic protectant) every few months will help repel dirt and make cleaning easier.
Inspecting for Damage
Every time you remove the cover, give it a once-over. Look for:
- Cracks: Especially along the edges or around the valve stem hole. A cracked cover must be replaced; it will fail.
- Broken or Missing Clips: Check the back. If a clip is broken off, the cover will not stay secure. You can sometimes find replacement clip kits online, but often a new cover is the only fix.
- Deep Scratches or Gouges: These are mostly cosmetic but can be a sign of improper removal technique. If the wheel underneath is scratched, that’s a more expensive repair.
- Warping: Hold the cover up and look at it from the side. It should be perfectly flat. Warping can happen from heat or impact and will cause poor fitment and vibration.
When to Call a Professional
There are a few scenarios where your best move is to put the tools down and call for help:
- The Cover is Seized: If it’s been on for years, especially in a corrosive environment (road salt), the clips can rust or freeze. Forcing it will break the plastic.
- You Can’t Find the Release Point: If you’ve searched and can’t locate where to start, don’t guess. A mis-pry can crack the cover immediately.
- You’ve Already Cracked It: If a clip breaks or the cover cracks during removal, stop. Driving with a compromised cover is dangerous. A Tesla service center or a reputable body shop can source and install a correct replacement.
- You’re Just Uncomfortable: If the idea of prying near your expensive wheel makes you nervous, pay for a professional’s time. It’s cheaper than a new wheel or cover.
For those considering more extensive cosmetic upgrades, our guides on how much it costs to wrap a Tesla Model 3 and Tesla Model Y tinting prices offer insights into protecting your vehicle’s factory finish, which is a related but separate consideration from wheel cover maintenance.
Conclusion: Confidence Through Knowledge
Removing a Tesla wheel cover isn’t a mysterious ritual reserved for service technicians. It’s a straightforward mechanical task that boils down to three things: using the right tools (plastic, never metal), understanding your specific model’s retention system, and applying patient, even pressure. The process for the popular Model 3 and Y is a quick, 5-minute job once you’ve done it once. For the S, X, and Cybertruck, it’s just a matter of remembering that extra screw or the different fastening method.
This small piece of knowledge empowers you as a Tesla owner. It means you can check your tire pressure, rotate your tires, and clean your wheels without booking a service appointment. It connects you to the basic maintenance of your vehicle. Just remember the core tenets: plastic tools only, start at the valve stem, and listen for the clicks. If you follow those rules, you’ll preserve both your wheel cover’s finish and your wheel’s pristine condition. Now, go forth and pry with confidence. Your Tesla’s wheels are waiting to be inspected.
Frequently Asked Questions
Can I remove a Tesla wheel cover without any special tools?
Technically yes, but it’s highly discouraged. A metal flathead screwdriver will almost certainly scratch your alloy wheel. The minimum safe tool is a sturdy plastic trim tool or a smooth wooden stick. Using improper tools risks hundreds of dollars in cosmetic damage.
What should I do if my Tesla wheel cover is stuck and won’t pop off?
Do not use brute force. First, ensure you’ve located and removed any hidden screws (common on Model S/X). Apply a small amount of a penetrating lubricant like WD-40 to the seam and let it sit for 10 minutes to help release any corrosion. Try working from different starting points around the wheel. If it remains seized, it’s time to seek professional help to avoid breakage.
Are all Tesla wheel covers removed the same way?
No. Model 3 and Y use a pure clip system starting at the valve stem. Model S and X (pre-refresh) often have a hidden screw at the bottom plus clips. The Cybertruck uses external Torx screws. Always confirm your model’s specific method before starting, using your owner’s manual as the final authority.
How can I tell if I’ve damaged the clips during removal?
After removal, inspect the back of the cover. Each clip should be a solid, intact plastic hook. If any are broken off, missing, or bent flat, the cover will not stay secure when reinstalled. Also, check the corresponding holes on the wheel rim for any cracked plastic or damage.
Is it safe to drive with a wheel cover partially on or loose?
Absolutely not. A loose or partially attached wheel cover can detach at high speed, becoming a dangerous projectile for vehicles behind you. It can also cause severe vibration, damaging wheel bearings and suspension components. Always ensure the cover is fully and securely seated before driving.
Where can I buy replacement Tesla wheel covers if I break mine?
OEM (Original Equipment Manufacturer) wheel covers are best purchased directly from Tesla Service or through their official online parts portal for your specific model, year, and trim. Aftermarket options exist but vary greatly in quality and fit. Ensure any replacement matches your wheel’s exact size and design. For cost comparisons on Tesla parts and services, our article on installing a Tesla charger provides a framework for understanding Tesla ownership expenses.


