
Where Is the Usb Port in Tesla Model 3?
Contents
- 1 Key Takeaways
- 2 📑 Table of Contents
- 3 Unlocking the Charging Secrets of Your Tesla Model 3
- 4 The Front Line: Your Primary Charging Hub
- 5 The Rear Passenger Experience: Simple and Effective
- 6 Wireless Charging Deep Dive and Limitations
- 7 The Design Philosophy: Why Hiding Ports Makes Sense
- 8 Troubleshooting: When Ports Don’t Work
- 9 Practical Integration: Using Ports in Daily Life
- 10 Conclusion: Master Your Model 3’s Connectivity
- 11 Frequently Asked Questions
Finding the USB ports in a Tesla Model 3 is a common question for new owners. The vehicle features multiple strategically placed ports: two USB-A ports in the front center console, a USB-C port in the rear center console, and two wireless charging pads in the front. A hidden 12V power socket is also located in the rear. This design prioritizes a clean interior while providing ample charging options for all passengers.
Key Takeaways
- Front USB Ports: Two USB-A ports are hidden inside the front center console storage bin, accessed by lifting the lid.
- Wireless Charging: Two dedicated Qi wireless charging pads are built into the front center console, usable without opening the storage bin.
- Rear USB Port: A single USB-C port is located in the rear center console storage area, under a small flap.
- 12V Power Socket: A traditional 12V outlet is discreetly placed in the rear trunk, behind a removable cover on the left side.
- No Front Cigarette Lighter: The Model 3 does not have a front 12V socket; charging must be done via USB or wireless pads.
- Data vs. Charging: The front USB ports support data (for Sentry Mode and dashcam) while the rear USB-C is for charging only.
- Clean Design: Tesla hides ports to maintain a minimalist cabin, so knowing their exact locations is key for everyday use.
📑 Table of Contents
- Unlocking the Charging Secrets of Your Tesla Model 3
- The Front Line: Your Primary Charging Hub
- The Rear Passenger Experience: Simple and Effective
- Wireless Charging Deep Dive and Limitations
- The Design Philosophy: Why Hiding Ports Makes Sense
- Troubleshooting: When Ports Don’t Work
- Practical Integration: Using Ports in Daily Life
- Conclusion: Master Your Model 3’s Connectivity
Unlocking the Charging Secrets of Your Tesla Model 3
So, you’ve just stepped into your shiny new Tesla Model 3. The minimalist cabin is stunning—smooth surfaces, a giant screen, and no clutter. But then, a practical question hits: Where in the world do I plug in my phone? You’re not alone. “Where is the USB port in the Tesla Model 3?” is one of the first searches new owners make. Tesla’s design philosophy hides these essential ports to keep the interior sleek, which is brilliant for aesthetics but can be confusing when your phone is at 5%. Let’s pull back the curtain and map out every power and data connection point in your electric sedan.
Understanding your Model 3’s port layout isn’t just about convenience; it’s about maximizing the car’s functionality. These ports power your devices, enable critical features like Sentry Mode, and keep everyone connected on road trips. We’ll explore every nook, from the front console to the rear trunk, with practical tips you can use today.
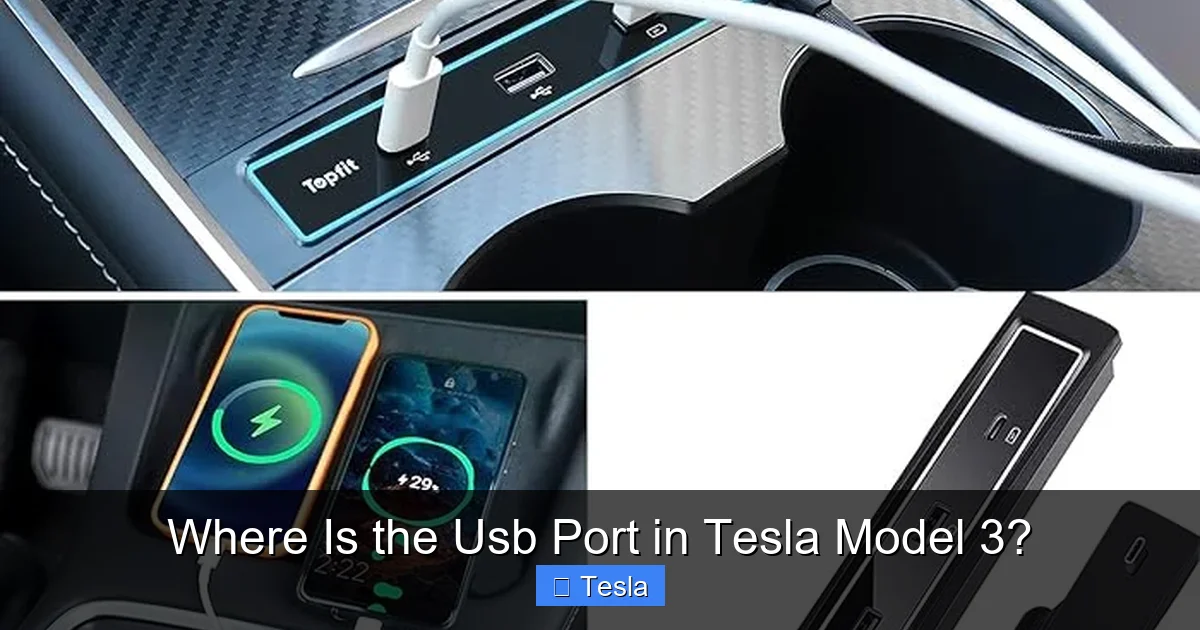
The Front Line: Your Primary Charging Hub
When you think of charging in the Model 3, your eyes should go straight to the center console between the driver and passenger seats. This is the heart of the car’s connectivity, but it’s split into two distinct areas with different purposes.

Visual guide about Where Is the Usb Port in Tesla Model 3?
Image source: i.ytimg.com
The Hidden USB-A Ports Inside the Storage Bin
Lift the sleek, matte-black lid of the front center console storage bin. Inside, you’ll find two standard USB-A ports (the classic rectangular ones). This is the primary data and charging hub for the front seats. These ports are crucial because they provide power and data connectivity to the car’s computer system.
What are they for? Plugging a USB drive into one of these ports is how you enable Sentry Mode and the dashcam. The car continuously records video to the drive, providing security and evidence. They also charge your devices, but with a caveat: their power output is relatively modest (around 5V/1.5A), so they’re best for trickle-charging or powering accessories, not rapid phone charging. If you need faster charging, use the wireless pads or a higher-output adapter in the 12V socket.
Pro Tip: Keep a small, high-quality USB-A flash drive (32GB-128GB) permanently plugged in here for automatic dashcam/Sentry Mode recording. Format it through the Tesla touchscreen first. For charging phones, consider the wireless pads for a cable-free experience.
The Always-Accessible Wireless Charging Pads
Right on the top surface of the center console, behind a soft rubber pad, are two Qi wireless charging zones. You don’t need to open the storage bin to use these. Simply place your compatible smartphone (iPhone 8 and newer, most Androids) on one of the pads, and it begins charging. This is the fastest, most convenient way to charge your phone while driving.
The pads are designed for two phones, but they can also charge other Qi-compatible devices like earbuds cases. The charging power is sufficient for daily use, but if your phone supports very fast wired charging (like 30W+), a wired connection to a 12V adapter will still be faster.
Important Note: The wireless chargers draw power directly from the vehicle’s high-voltage battery, but they are limited to avoid significant drain. They will stop charging if the car’s battery gets very low (<20%) to preserve range. This is a smart safety feature.
The Missing 12V Socket (Up Front)
Here’s a common point of confusion: there is no 12V power socket (cigarette lighter) in the front of the Model 3. Tesla removed it to enhance the clean interior look. All front-seat power needs must be met via the two USB-A ports in the bin or the wireless charging pads. If you need a 12V socket for a dashcam hardwire kit or a high-power device, you must use a USB-C to 12V adapter plugged into one of the front USB-A ports, or better yet, use the dedicated 12V socket in the rear trunk.
The Rear Passenger Experience: Simple and Effective
Rear-seat passengers aren’t left out, but their options are more streamlined. The focus here is on straightforward device charging.
Visual guide about Where Is the Usb Port in Tesla Model 3?
Image source: m.media-amazon.com
The Single USB-C Port in the Rear Console
In the center of the rear seat area, there’s a small storage compartment with a flip-top lid. Under that lid resides a single USB-C port. This port is designed purely for charging devices. It does not support data transfer to the car’s systems. You cannot plug a flash drive here for dashcam use.
The USB-C standard is the modern replacement for USB-A. It’s reversible and supports higher power delivery, so it can charge phones, tablets, and even laptops faster than the front USB-A ports. This is the best spot for a rear-seat traveler’s phone or tablet.
Practical Example: On a family road trip, kids in the back can keep their tablets charged using this port with a USB-C to USB-C cable, ensuring peace for the duration of the drive.
The 12V Power Socket: The Hidden Utility Hub
Now we get to the most overlooked but potentially most useful socket in the entire car. Open the rear trunk (frunk is front, this is the big trunk in back). Look at the left side wall (driver’s side in left-hand drive markets). You’ll see a small, square plastic cover. Pry it off with a fingernail or a plastic tool, and you’ll reveal a standard 12V DC power socket.
This is your go-to for high-power accessories. Use it for:
- Hardwiring a dashcam that needs constant power (even when the car is off).
- Powering a tire inflator.
- Running a small cooler or other 12V accessories on the go.
- Using a high-wattage USB-C adapter to charge multiple devices quickly.
Because it’s in the trunk, it’s out of sight and perfect for permanent installations. The power draw is significant, so Tesla recommends not using it when the car is parked for very long periods to avoid the 12V battery draining.
Wireless Charging Deep Dive and Limitations
The front wireless charging pads are a highlight, but they have specific behaviors and limitations every owner should know to avoid frustration.

Visual guide about Where Is the Usb Port in Tesla Model 3?
Image source: koala.sh
How It Works and What Charges
The pads use the Qi standard, the same as most public wireless chargers. They will charge any device with a Qi receiver. This includes:
- Most modern smartphones (iPhones with MagSafe require a separate MagSafe-compatible case or adapter for optimal alignment).
- Wireless earbuds cases (AirPods Pro, Galaxy Buds, etc.).
- Some portable battery packs that support Qi input.
The charging surface has a subtle texture and alignment guides to help place your phone correctly. If the phone is misaligned, charging may be slow or not start at all.
Why Your Phone Might Not Be Charging
If your phone isn’t charging on the pad, check these common issues:
- Case Thickness: Thick, rugged cases (especially with metal components) can block the electromagnetic field. Try removing the case.
- Alignment: The phone must be centered over the charging coil. The pad has a slight texture; line your phone up with it.
- Phone Compatibility: Ensure your phone actually supports Qi charging. Some older models or specific variants do not.
- Car Battery State: As mentioned, if the main battery is critically low (<20%), the car may disable the wireless chargers to preserve range.
- Temperature: Both the phone and pad can get warm. If the phone overheats, it may stop charging temporarily.
Pro Tip: For the fastest wireless charging, use a phone model and case that support higher Qi power profiles (like 7.5W or 15W). The Model 3 pads are capable of delivering up to 7.5W, which is sufficient for most phones.
The Design Philosophy: Why Hiding Ports Makes Sense
It might seem annoying to hunt for ports, but Tesla’s decision is deliberate and aligns with the brand’s core values. Understanding this helps you appreciate the design.
Minimalism as a Feature
The interior of the Model 3 is a masterclass in minimalism. There are no physical buttons on the dashboard, no clutter of visible cables. Hiding the USB ports inside the console and under flaps eliminates visual noise. The result is a serene, futuristic cabin that feels more like a spaceship than a traditional car. This aesthetic is a major selling point.
Security and Theft Deterrence
Visible ports can be a temptation for thieves. If a potential burglar sees a USB port, they might try to plug in a device to access the car’s systems (though Tesla’s security is robust). By hiding them, Tesla reduces this minor risk. It also keeps the interior looking tidy when the car is empty, which might deter casual opportunistic theft of visible items like a phone left on a visible pad.
Future-Proofing and Flexibility
The hidden design allows Tesla to update the port types in future model years without drastically changing the interior architecture. The storage bin and rear console flap provide a defined space that can house different port standards (USB-A today, maybe USB-C or something else tomorrow) without redesigning the entire dash. It’s a clever, modular approach.
Troubleshooting: When Ports Don’t Work
Most of the time, these ports are rock-solid. But occasionally, you might encounter a non-charging port. Here’s a systematic approach to diagnose the issue.
Step 1: Check Your Device and Cable
This is the most common culprit. Rule out your phone or cable.
- Test the cable with another power source (wall adapter, computer).
- Try a different, known-good cable in the Tesla port.
- Try charging a different device in the same port.
- Clean the charging port on your phone with a dry, soft brush (lint and dust can block connections).
If you’re using the wireless pad, try a different Qi-compatible device to see if the pad is at fault.
Step 2: Check the Vehicle’s State
The car’s software and battery state control port power.
- Reboot the Car: A simple software glitch can disable ports. Park the car, press and hold both scroll wheels on the steering wheel until the screen goes black and reboots (about 30-60 seconds).
- Check 12V Battery: If the 12V auxiliary battery is weak or dead, USB ports may not function. You’ll likely see other warnings on the screen (like “12V System Needs Service”). This requires a service visit.
- Check Main Battery: If the main battery is very low, some convenience features are curtailed. Charge the car.
Step 3: Software Settings and Updates
If all else fails, it’s likely a hardware issue with the port itself or its wiring, which requires a Tesla Service Center appointment.
Practical Integration: Using Ports in Daily Life
Knowing the location is one thing; using them effectively is another. Here’s how to weave these ports into your routine.
The Daily Commuter Setup
For your daily drive, the wireless charging pad is your best friend. Place your phone on it as soon as you get in. Use the front USB-A port for a permanent dashcam flash drive. Keep a short cable in the storage bin for devices that need faster wired charging, plugging it into the USB-A port or, for more power, into a 12V-to-USB-C adapter you’ve installed in the rear trunk socket and run the cable forward.
The Road Trip Configuration
For long journeys, utilize all ports. Driver and front passenger use wireless charging. Rear passengers each have their own USB-C port for devices. If you have a portable battery pack, charge it overnight via the rear 12V socket so it’s ready to boost devices on the go. The front USB-A ports can also power a dual-port USB-C adapter if you need more charging spots upfront.
Security and Sentry Mode
This is a critical use case. For Sentry Mode and dashcam recording to work, you must have a USB drive inserted into one of the front USB-A ports. The car will not record without it. Get into the habit of always having your dedicated dashcam drive plugged in. The rear USB-C port cannot be used for this purpose. If you’re concerned about the drive being visible, use a low-profile, short USB drive that sits flush in the port.
Conclusion: Master Your Model 3’s Connectivity
The USB port layout in the Tesla Model 3 is a lesson in purposeful design. What looks like a lack of ports at first glance is actually a well-considered system that balances minimalist beauty with robust functionality. You now know that your front-center console bin houses the data-critical USB-A ports, the top surface offers convenient wireless charging, the rear console provides a USB-C port for backseat travelers, and the rear trunk holds the versatile 12V socket for high-power needs.
This knowledge transforms your ownership experience. You’ll stop fumbling and start using these ports strategically—keeping your dashcam always recording, your phone always charging, and your interior impeccably clean. The next time someone asks, “Where is the USB port in a Tesla Model 3?” you can confidently give them the full tour. Embrace the hidden design; it’s part of what makes driving a Tesla uniquely modern. Now, go plug in and enjoy the ride.
Frequently Asked Questions
Are the front USB ports in the Model 3 for charging or data?
They serve both purposes. They provide power for charging devices, but more importantly, they are the required ports for connecting a USB drive to enable dashcam and Sentry Mode video recording.
Can I use the rear USB-C port for the dashcam or Sentry Mode?
No. The rear USB-C port is designated for charging devices only. The dashcam and Sentry Mode features must use one of the two front USB-A ports located inside the center console storage bin.
Why isn’t my phone charging on the wireless pad?
First, ensure your phone is Qi-compatible and properly aligned over the charging coil. Remove thick cases if necessary. Also, if the car’s main battery is very low (below ~20%), the wireless chargers may be disabled to preserve driving range.
Is there a 12V socket in the front of the Model 3?
No, there is no front 12V (cigarette lighter) socket in the Tesla Model 3. All front-seat power must come from the hidden USB-A ports or the built-in wireless charging pads. The only 12V socket is located in the rear trunk.
How do I access the 12V socket in the trunk?
Open the rear trunk. On the left side wall (driver’s side), you’ll see a small, square plastic cover. Gently pry it off with a fingernail or a plastic trim tool to reveal the 12V power outlet underneath.
Can I hardwire a dashcam to the 12V socket in the trunk?
Yes, absolutely. The rear trunk 12V socket is the ideal location for a permanent dashcam hardwire installation. It provides constant power (when the car is on or in sleep mode with Sentry active) and is hidden from view. Just ensure your dashcam’s hardwire kit is compatible with the car’s electrical system to prevent battery drain.


