
How to Unstop a Rv Toilet
Contents
Dealing with a clogged RV toilet can be stressful, but it’s a common issue with simple solutions. From using a plunger to chemical treatments and preventive maintenance, this guide walks you through every step to get your toilet working again—without damaging your system.
If you’ve ever been on a peaceful camping trip, miles from civilization, only to discover your RV toilet is completely clogged, you know how quickly a relaxing adventure can turn into a messy nightmare. There’s nothing quite like the sinking feeling of pulling the flush lever and hearing nothing but a sad gurgle—or worse, seeing water rise instead of drain. But don’t panic. A clogged RV toilet is one of the most common issues RV owners face, and with the right knowledge and tools, it’s almost always fixable.
Unlike home toilets, RV toilets operate under different pressures, use less water, and are connected to a complex waste management system involving holding tanks, valves, and vents. This means the solutions for unclogging them aren’t always the same as what you’d use at home. What works in a residential bathroom might actually damage your RV’s plumbing or seals. That’s why it’s essential to understand how your RV toilet works and what methods are safe and effective. The good news? Most clogs are caused by simple issues like too little water, improper waste breakdown, or foreign objects—and they can be resolved quickly with a few smart steps.
In this comprehensive guide, we’ll walk you through everything you need to know about how to unstop a RV toilet. From identifying the type of clog to using the right tools and preventing future problems, you’ll be equipped to handle any bathroom backup with confidence. Whether you’re a full-time RVer or just hitting the road for the weekend, keeping your toilet flowing smoothly is key to a stress-free journey. So grab your gloves, take a deep breath, and let’s get that toilet unclogged—safely and effectively.
Key Takeaways
- Use the right plunger: A flange plunger works best for RV toilets due to the unique seal and bowl shape.
- Never use regular household chemicals: Harsh cleaners can damage rubber seals and plumbing in your RV’s waste system.
- Maintain proper water levels: Always add enough water before flushing to help waste move smoothly through the system.
- Prevent clogs with routine care: Regular use of RV-safe toilet treatments and avoiding non-flushable items reduces blockages.
- Know when to call a pro: Persistent clogs may indicate deeper issues like a blocked vent or damaged valve.
- Empty tanks regularly: Overfilled black water tanks can back up into the toilet, causing stubborn clogs.
- Use a toilet auger for tough blockages: A flexible RV-specific auger can reach deep clogs without harming your pipes.
📑 Table of Contents
Understanding How RV Toilets Work
Before you can effectively unstop a RV toilet, it’s important to understand how these unique fixtures function. Unlike standard home toilets that rely on a large volume of water and gravity to flush waste into a sewer line, RV toilets are designed for efficiency and compactness. They use minimal water—often just a cup or two per flush—and are connected to a sealed waste system that holds everything until you’re ready to dump it at a designated dump station.
Most modern RV toilets are either manual or electric. Manual models require you to pump a handle to open the valve and release water, while electric versions use a button to activate the flush. In both cases, water is released from a small tank above the bowl, and waste flows down through a foot pedal or lever-operated valve into the black water holding tank. This tank is typically located underneath the RV and must be emptied regularly to prevent overflow and odors.
One critical component in this system is the rubber flapper valve. This valve sits between the toilet bowl and the holding tank and opens when you flush, allowing waste to drop into the tank. It then closes to prevent odors and gases from traveling back up into the bathroom. Over time, this valve can wear out, become misaligned, or get stuck—leading to poor flushing or complete blockages. Additionally, because RV toilets use so little water, they rely heavily on proper waste breakdown and consistent use of toilet treatments to keep things moving smoothly.
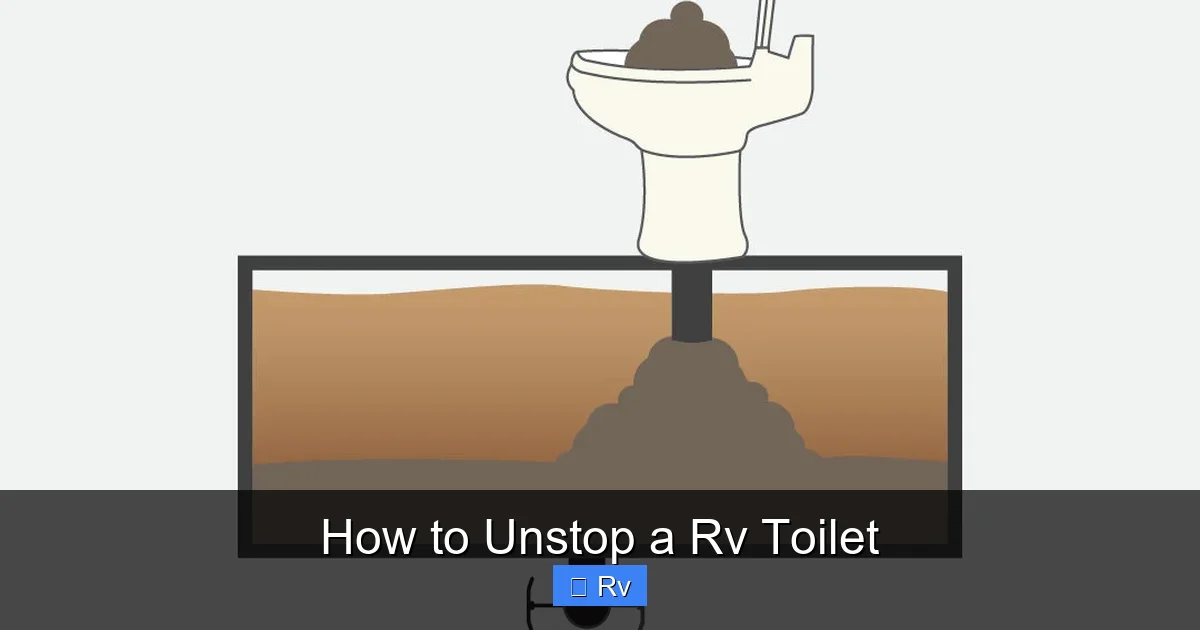
Another key difference is the lack of a traditional P-trap, which you’d find under a home sink or toilet. Instead, RV toilets use a direct drop system, meaning there’s less resistance but also less tolerance for blockages. If something gets stuck—like toilet paper, feminine hygiene products, or even excessive waste—it can quickly lead to a clog that’s hard to dislodge with just water and a plunger.
Understanding these mechanics helps explain why certain unclogging methods work better than others. For example, using too much force with a standard cup plunger can actually damage the flapper valve or push the clog deeper into the line. Similarly, pouring harsh chemicals down the drain might break down waste temporarily but can corrode seals and pipes over time. That’s why knowing your RV toilet’s design is the first step toward solving—and preventing—clogs.
Common Causes of RV Toilet Clogs
Visual guide about How to Unstop a Rv Toilet
Image source: wikihow.com
Now that you understand how your RV toilet operates, let’s look at the most common reasons it might get clogged. Identifying the root cause not only helps you fix the current problem but also prevents it from happening again. Many clogs are avoidable with a little awareness and routine care.
One of the top culprits is insufficient water during flushing. Because RV toilets use so little water, they depend on a proper balance to move waste effectively. If you only add a small amount of water before flushing, the waste may not have enough momentum to clear the valve and enter the holding tank. This can cause it to pile up just below the bowl, creating a partial or complete blockage. Always make sure to add at least 1–2 cups of water before and after using the toilet, especially if you’re flushing solid waste.
Another frequent cause is the use of the wrong type of toilet paper. While it might seem harmless, regular household toilet paper doesn’t break down quickly in a holding tank. It can clump together, wrap around the flapper valve, or form dense mats that block the flow. This is especially true in cold weather or if the tank hasn’t been treated properly. Always use RV-specific, septic-safe toilet paper that’s designed to dissolve rapidly. Look for labels like “fast-dissolving” or “RV-safe” to ensure compatibility.
Foreign objects are another major issue. It might seem obvious, but many people accidentally flush items that don’t belong in the toilet—wet wipes, paper towels, feminine hygiene products, dental floss, or even small toys. These items don’t break down and can create stubborn blockages that are difficult to remove. Even “flushable” wipes are a no-go in RV systems. They may pass through the toilet initially but can accumulate in the tank or clog the valve over time.
Improper use of toilet treatments can also contribute to clogs. Some RV owners use too little treatment, allowing waste to solidify and stick to the tank walls. Others use too much, creating a thick, foamy sludge that’s hard to pump out. Always follow the manufacturer’s instructions for your specific treatment product. Enzyme-based treatments are generally safer and more effective than harsh chemicals, as they break down waste naturally without damaging seals or pipes.
Finally, infrequent dumping of the black water tank can lead to clogs. When the tank gets too full, waste can back up into the toilet bowl, especially if the valve isn’t sealing properly. This not only causes a clog but can also lead to unpleasant odors and potential health hazards. Experts recommend dumping your black water tank when it’s about two-thirds full and always rinsing it thoroughly afterward to remove residual waste.
By being mindful of these common causes, you can significantly reduce your chances of dealing with a clogged RV toilet. Prevention is always easier—and cleaner—than the cure.
Tools and Supplies You’ll Need
Visual guide about How to Unstop a Rv Toilet
Image source: wikihow.com
When it comes to unstopping a RV toilet, having the right tools on hand can make all the difference. Unlike home plumbing, RV systems are more delicate and require specialized equipment to avoid damage. Here’s a list of essential tools and supplies every RVer should keep in their maintenance kit.
First and foremost, you’ll need a **flange plunger**. This type of plunger has a soft rubber flange that extends from the bottom, creating a better seal around the unique shape of an RV toilet bowl. Standard cup plungers often don’t fit properly and can slip or push air instead of creating the suction needed to dislodge a clog. A flange plunger is specifically designed for toilets and works much more effectively in tight, low-water environments like an RV bathroom.
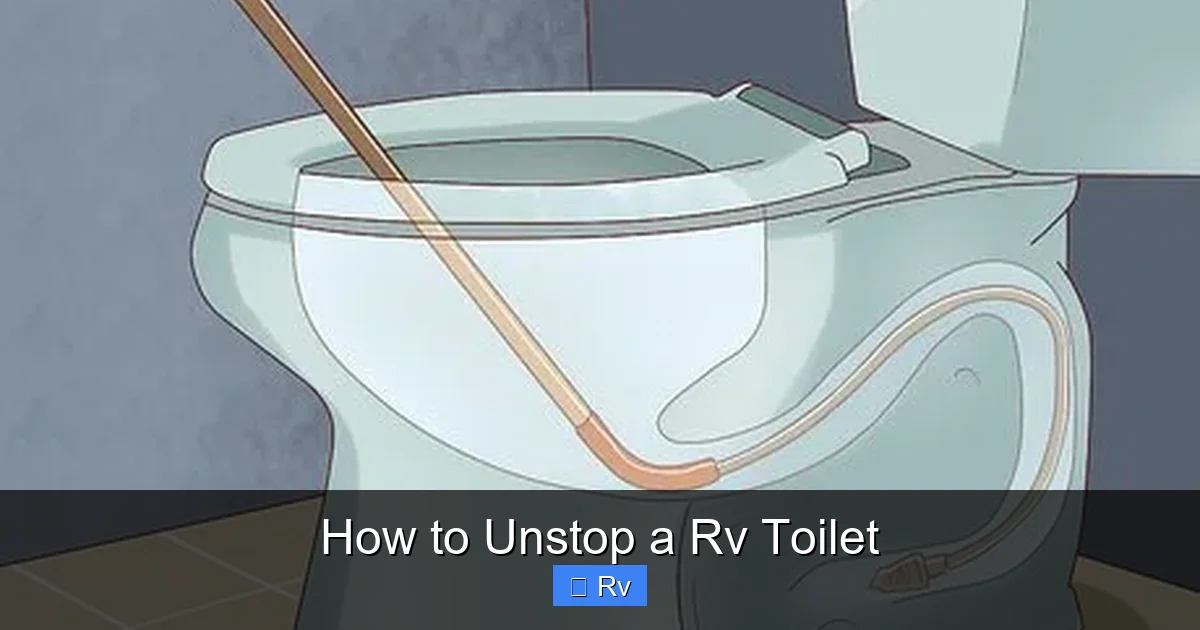
Next, consider investing in a **flexible RV toilet auger**. Also known as a closet auger, this tool has a long, coiled cable that can reach deep into the toilet’s drain and valve area to break up or retrieve stubborn blockages. Unlike a standard drain snake, an RV auger is shorter and more flexible, making it ideal for navigating the tight curves and low-profile design of RV plumbing. Look for one with a protective sleeve to prevent scratching the porcelain.
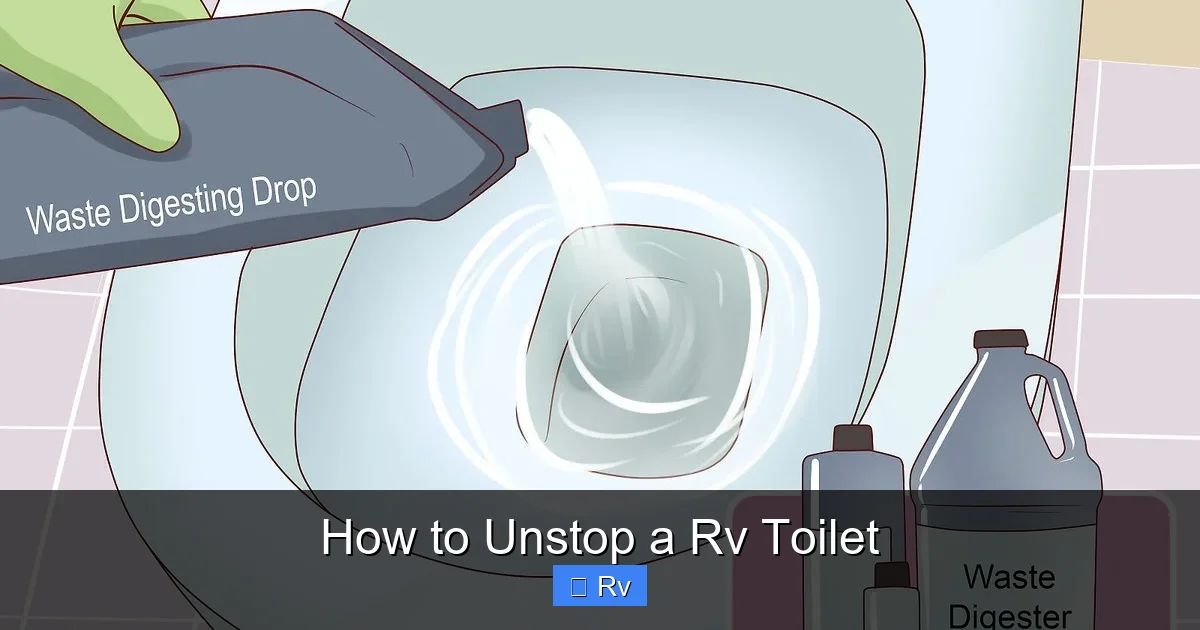
You’ll also want to keep **RV-safe toilet treatments** on hand. These are liquid or drop-in products that use enzymes or bacteria to break down waste and toilet paper in your holding tank. They help prevent clogs by keeping waste liquefied and reducing buildup on tank walls. Popular brands include Thetford Aqua-KEM, Camco TST, and Happy Campers. Avoid household drain cleaners like Drano or bleach, as they can damage rubber seals, corrode pipes, and harm the beneficial bacteria in your tank.
Other useful supplies include **rubber gloves** (always wear them when handling waste systems), a **bucket** for catching water during disassembly, **plumber’s tape** for sealing connections, and a **flashlight** to inspect hard-to-see areas. If you’re dealing with a persistent clog, you might also need a **wrench or pliers** to remove the toilet from the floor for deeper inspection—though this is a last resort.
Finally, keep a **spare flapper valve** in your RV. These rubber components wear out over time and are a common cause of poor flushing and clogs. Replacing a faulty flapper is relatively simple and can solve many flushing issues without needing to call a technician.
Having these tools ready means you won’t be scrambling when a clog strikes. Store them in a labeled bin in your RV so they’re easy to find in an emergency. Remember, the goal is to fix the problem quickly and safely—without causing further damage to your system.
Step-by-Step Guide to Unstop a RV Toilet
Visual guide about How to Unstop a Rv Toilet
Image source: gocarlife.com
Now that you’re equipped with the right tools and knowledge, let’s walk through the actual process of unstopping your RV toilet. Follow these steps carefully to resolve the clog without damaging your plumbing.
Step 1: Assess the Situation
Before doing anything, determine the severity of the clog. Is the water draining slowly, or is it completely backed up? Is there waste in the bowl, or just standing water? If the toilet is overflowing or the water level is rising, stop flushing immediately to prevent a mess. Put on your gloves and assess whether the clog is likely in the toilet itself or further down in the holding tank line.
Step 2: Add Water (If Safe)
If the bowl is empty or nearly empty, add 1–2 cups of water. This helps create the necessary pressure for plunging and prevents the plunger from sticking to a dry surface. Never add too much water—just enough to cover the bottom of the bowl. If the bowl is already full, skip this step to avoid overflow.
Step 3: Use a Flange Plunger
Place the flange plunger over the drain hole, ensuring the soft rubber flange is fully inserted into the opening. Press down gently to create a seal, then pump the plunger up and down with firm, consistent motions. Avoid rapid or aggressive movements, as this can push the clog deeper. Continue for 20–30 seconds, then lift the plunger to check if water begins to drain. Repeat as needed.
Step 4: Try a Toilet Auger (If Plunging Fails)
If plunging doesn’t work, insert the flexible RV toilet auger into the drain. Turn the handle slowly to feed the cable down the pipe. When you feel resistance, rotate the auger to break up or hook the clog. Pull the cable back out carefully, and flush the toilet to see if the blockage is cleared. Be gentle—forcing the auger can damage the valve or pipes.
Step 5: Check the Flapper Valve
If the clog persists, the issue might be a stuck or worn flapper valve. Turn off the water supply to the toilet (usually a valve near the floor), flush to empty the bowl, and inspect the valve. Remove any debris, realign it, or replace it if cracked or brittle. Reassemble and test the flush.
Step 6: Dump and Rinse the Holding Tank
If the toilet flushes but drains slowly, the clog might be in the holding tank. Drive to a dump station, empty the black water tank completely, and rinse it thoroughly with a tank rinser or spray wand. Add fresh water and a treatment, then test the toilet again.
Step 7: Prevent Future Clogs
Once the toilet is working, take preventive measures. Use only RV-safe toilet paper, add water before and after flushing, and treat your tank regularly. Avoid flushing anything other than waste and approved paper.
Preventing Future RV Toilet Clogs
The best way to deal with a clogged RV toilet is to avoid it altogether. With a few simple habits, you can keep your system running smoothly for years.
First, **always use RV-safe toilet paper**. This type dissolves quickly and won’t clog your system. Keep a roll in your bathroom and educate all passengers on what can and cannot be flushed.
Second, **add water with every use**. Before and after flushing, pour in 1–2 cups of water to help waste move through the valve and into the tank. This is especially important in cold weather when waste can thicken.
Third, **treat your tank regularly**. Use enzyme-based treatments weekly or after each dump to break down waste and prevent buildup. Follow the product instructions carefully.
Fourth, **dump your tank at the right time**. Don’t wait until it’s full—dump when it’s about two-thirds full and always rinse it out. This prevents solids from settling and clogging the outlet.
Finally, **inspect your system periodically**. Check the flapper valve, seals, and connections for wear or damage. Replace parts as needed to maintain optimal performance.
By following these tips, you’ll spend less time unclogging toilets and more time enjoying the open road.
When to Call a Professional
Most RV toilet clogs can be resolved with DIY methods, but sometimes the problem is more serious. If you’ve tried plunging, augering, and tank rinsing with no success, it may be time to call a professional.
Signs you need expert help include:
– Repeated clogs despite proper maintenance
– Sewage backup into the bathroom
– Foul odors that won’t go away
– Visible damage to pipes or valves
– A clog that returns immediately after clearing
A certified RV technician can inspect your entire waste system, including the vent stack, tank sensors, and drain lines, to identify hidden issues. They may also use specialized cameras to locate blockages deep in the system.
Don’t ignore persistent problems—they can lead to costly repairs or health hazards. When in doubt, seek professional assistance.
Conclusion
Unstopping a RV toilet doesn’t have to be a dreaded chore. With the right tools, techniques, and preventive habits, you can handle most clogs quickly and safely. Remember to use a flange plunger, avoid harsh chemicals, and treat your tank regularly. By understanding how your RV toilet works and what causes blockages, you’ll keep your bathroom functioning smoothly on every adventure. Stay prepared, stay clean, and enjoy the journey—one flush at a time.
Frequently Asked Questions
Can I use a regular plunger on my RV toilet?
No, a standard cup plunger often doesn’t create a proper seal on an RV toilet bowl. Use a flange plunger instead, which is designed for toilets and fits the unique shape of RV drains.
Is it safe to use Drano or other chemical drain cleaners in an RV toilet?
No, harsh chemicals like Drano can damage rubber seals, corrode pipes, and harm the waste treatment process. Always use RV-safe, enzyme-based treatments instead.
How often should I dump my black water tank?
Dump your black water tank when it’s about two-thirds full, or every 3–5 days with regular use. Always rinse the tank thoroughly after dumping to prevent buildup.
Can I flush wet wipes in an RV toilet?
No, even “flushable” wipes can clog your system. Only flush human waste and RV-safe toilet paper to avoid blockages.
Why does my RV toilet keep clogging?
Frequent clogs may be due to insufficient water, wrong toilet paper, infrequent tank dumping, or a worn flapper valve. Check your habits and inspect the valve for damage.
Do I need to add water every time I use the RV toilet?
Yes, adding 1–2 cups of water before and after flushing helps move waste through the valve and prevents clogs, especially with solid waste.


