When Jump Starting a Car Connect All Cables Directly to the Battery
Contents
- 1 Key Takeaways
- 2 📑 Table of Contents
- 3 When Jump Starting a Car Connect All Cables Directly to the Battery
- 4 Why Connecting Directly to the Battery Is the Safest Option
- 5 Step-by-Step Guide to Jump-Starting with Cables Connected Directly to the Battery
- 6 Common Mistakes to Avoid When Jump-Starting
- 7 When Direct Connection Isn’t Possible (And What to Do Instead)
- 8 How to Maintain Your Battery to Avoid Future Jump-Starts
- 9 Jump-Starting Safety Tips and Best Practices
- 10 Final Thoughts: Confidence Comes from Knowing the Right Way
- 11 Frequently Asked Questions
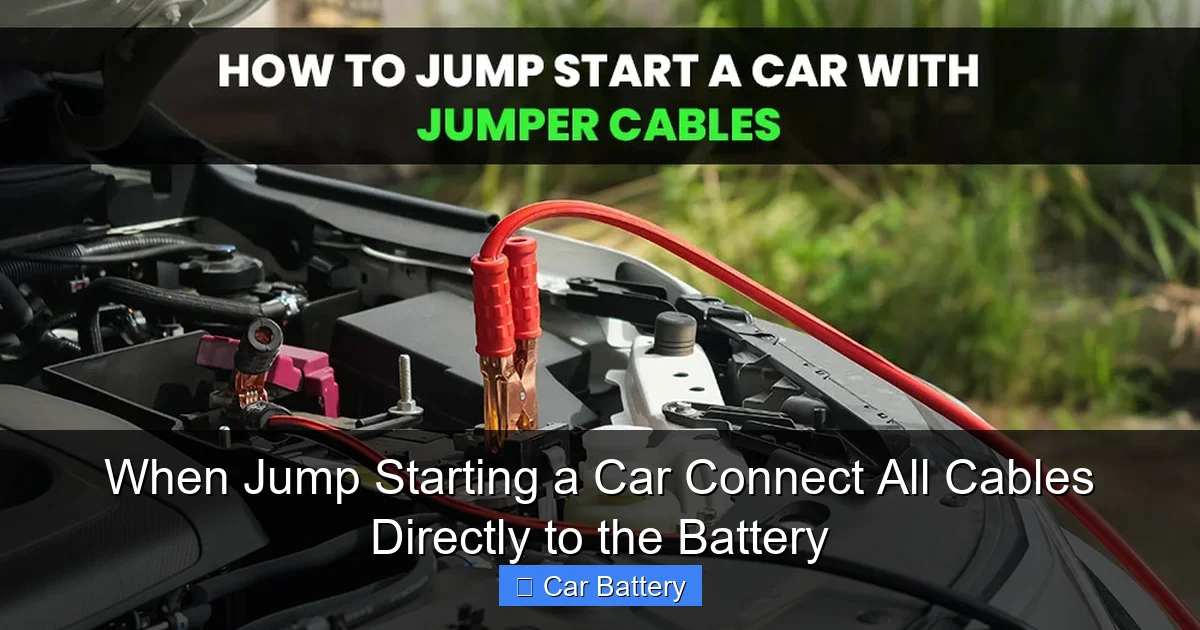
When jump starting a car, always connect all cables directly to the battery terminals—positive to positive, negative to negative—to ensure a safe and effective charge. Avoid connecting the negative cable to the engine block or other metal parts, as this can cause dangerous sparks near the battery, where flammable gases may be present. Direct battery connections minimize risk and provide the most reliable power transfer, helping you get back on the road quickly and safely.
Key Takeaways
- Connect cables directly to the battery terminals to ensure a stable and safe electrical connection.
- Attach red clamp to the positive terminal first to avoid sparks near the battery.
- Ground the black clamp on the engine block instead of the negative terminal to reduce risk.
- Never let clamps touch each other while connected to a live battery to prevent short circuits.
- Start the donor car before the dead one to provide maximum charging power.
- Remove cables in reverse order after jump starting to ensure safety and prevent damage.
📑 Table of Contents
- When Jump Starting a Car Connect All Cables Directly to the Battery
- Why Connecting Directly to the Battery Is the Safest Option
- Step-by-Step Guide to Jump-Starting with Cables Connected Directly to the Battery
- Common Mistakes to Avoid When Jump-Starting
- When Direct Connection Isn’t Possible (And What to Do Instead)
- How to Maintain Your Battery to Avoid Future Jump-Starts
- Jump-Starting Safety Tips and Best Practices
- Final Thoughts: Confidence Comes from Knowing the Right Way
When Jump Starting a Car Connect All Cables Directly to the Battery
Picture this: It’s a cold winter morning, you’re running late for work, and you turn the key in your ignition—only to hear a weak, clicking sound. Your car won’t start. Panic sets in. You’ve been here before, and you know what’s likely to blame: a dead battery. You grab your jumper cables, pop the hood, and look at the battery terminals. Now comes the big question: Where exactly do I connect these cables?
It’s a moment every driver dreads, but with the right knowledge, it doesn’t have to be stressful. One of the most common—and safest—ways to jump-start a car is by connecting all cables directly to the battery terminals. While some guides suggest alternative grounding points or remote jump posts, connecting directly to the battery offers the most reliable and straightforward method, especially in older vehicles or in emergency situations. This guide will walk you through why, when, and how to do it safely, so you can get back on the road with confidence.
Why Connecting Directly to the Battery Is the Safest Option
When your car battery is dead, it means it no longer has enough charge to power the starter motor. Jump-starting gives it a temporary boost using power from another vehicle’s battery. But where you connect the cables matters—especially when it comes to safety and effectiveness.

Visual guide about When Jump Starting a Car Connect All Cables Directly to the Battery
Image source: thumbs.dreamstime.com
Minimizing Risk of Sparks Near Flammable Gases
Car batteries produce hydrogen gas during charging, especially when they’re being recharged quickly. This gas is highly flammable. If a spark occurs near the battery while connecting or disconnecting cables, it could ignite the gas and cause an explosion. By connecting the cables directly to the battery terminals—following the correct sequence—you reduce the chance of sparks forming in dangerous areas.
For example, some people try to ground the negative cable to a metal part of the engine block instead of the negative terminal. While this can work, it increases the risk of a spark occurring away from the battery, where hydrogen gas may have accumulated. Connecting directly to the negative terminal keeps all electrical activity near the source, where any spark is less likely to ignite gas.
Ensuring a Solid Electrical Connection
Batteries are designed with specific terminals for a reason. The positive and negative posts are made to handle high current flow during jump-starting. When you connect jumper cables directly to these terminals, you ensure maximum conductivity and minimize resistance. This means the donor battery can deliver power more efficiently to the dead battery.
Think of it like plugging a phone charger directly into a wall outlet instead of using a long, daisy-chained extension cord. The direct connection is cleaner, faster, and more reliable. The same principle applies to your car’s electrical system.
Avoiding Damage to Sensitive Electronics
Modern cars are packed with electronics—ECUs, sensors, infotainment systems, and more. A poor jump-start connection can cause voltage spikes or surges that damage these components. By connecting directly to the battery, you create a stable pathway for current, reducing the risk of electrical noise or backflow that could harm your car’s computer systems.
In one real-world case, a driver tried to jump-start their 2018 sedan by connecting the negative cable to a suspension bolt. The connection was loose, causing intermittent arcing. The resulting voltage fluctuation fried the car’s onboard navigation system—a repair that cost over $800. Connecting directly to the battery could have prevented this costly mistake.
Step-by-Step Guide to Jump-Starting with Cables Connected Directly to the Battery
Now that you understand why direct connection is best, let’s walk through the process step by step. Follow these instructions carefully to ensure a safe and successful jump-start.
Visual guide about When Jump Starting a Car Connect All Cables Directly to the Battery
Image source: batteriesstore.ca
Gather Your Tools and Prepare the Vehicles
Before you begin, make sure you have:
- High-quality jumper cables (at least 4-gauge, 10–15 feet long)
- A working vehicle with a charged battery
- Safety gloves and goggles (optional but recommended)
- A clean cloth or wire brush (to clean terminals if needed)
Position the working vehicle so the batteries are as close as possible—ideally within 18–24 inches—but ensure the vehicles are not touching. Turn off both engines, remove the keys, and engage the parking brakes.
Identify the Battery Terminals
Open the hoods of both vehicles and locate the batteries. Most batteries have clearly marked positive (+) and negative (-) terminals. The positive terminal is usually red and may have a plastic cover. The negative is typically black and connected to the car’s chassis.
If the terminals are corroded (covered in a white or green powder), clean them gently with a wire brush and a damp cloth. Corrosion can interfere with the connection and reduce the effectiveness of the jump.
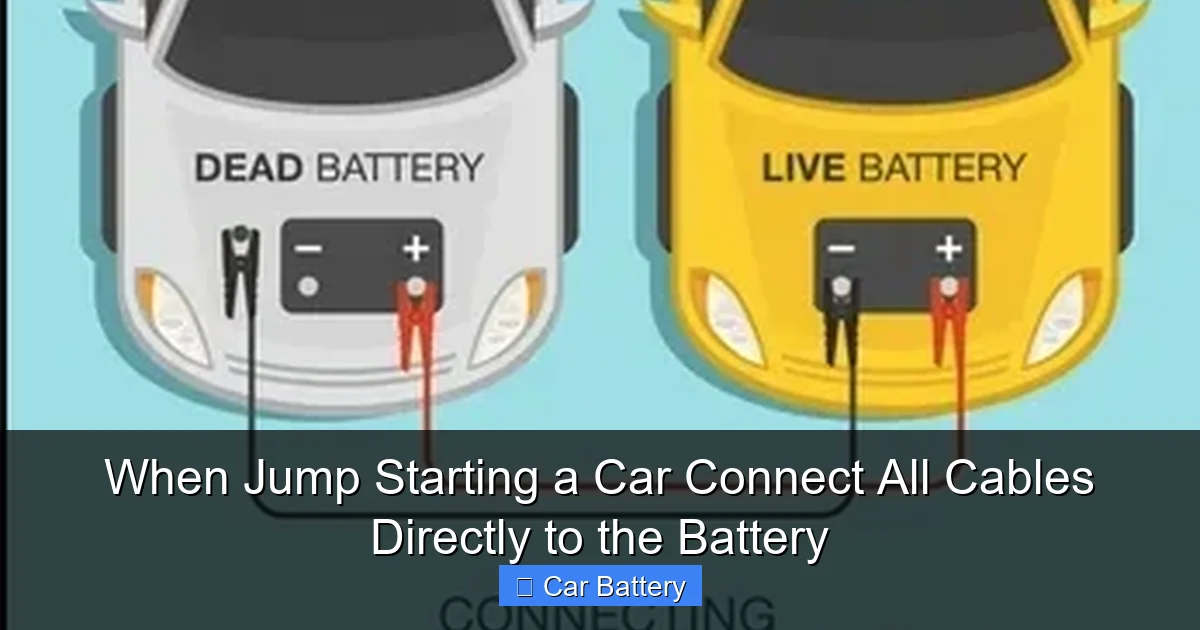
Connect the Cables in the Correct Order
This is the most critical part. Follow this sequence exactly:
- Connect the red (positive) cable to the positive terminal of the dead battery.
- Connect the other end of the red cable to the positive terminal of the working battery.
- Connect the black (negative) cable to the negative terminal of the working battery.
- Connect the other end of the black cable to the negative terminal of the dead battery.
Yes—you read that right. Connect the negative cable directly to the dead battery’s negative terminal, not to a remote grounding point. This completes the circuit safely and reduces the risk of sparking away from the battery.
Start the Vehicles and Monitor the Process
Start the engine of the working vehicle and let it run for 3–5 minutes. This allows the alternator to begin charging the dead battery. Then, try starting the dead vehicle. If it doesn’t start right away, wait another minute or two and try again.
Once the dead car starts, let both vehicles run for at least 10–15 minutes to allow the alternator to recharge the battery further. Do not turn off the jumped car immediately—this could leave you stranded again.
Disconnect the Cables in Reverse Order
When you’re ready to disconnect, reverse the connection sequence:
- Remove the black cable from the previously dead battery.
- Remove the black cable from the working battery.
- Remove the red cable from the working battery.
- Remove the red cable from the previously dead battery.
This order prevents accidental short circuits and reduces sparking. Always keep the cables from touching each other or any metal parts while disconnected.
Common Mistakes to Avoid When Jump-Starting
Even experienced drivers make mistakes when jump-starting. Here are some common errors and how to avoid them.
Visual guide about When Jump Starting a Car Connect All Cables Directly to the Battery
Image source: blog.moto4x.com
Connecting Cables in the Wrong Order
Reversing the positive and negative connections can cause a short circuit, damage electronics, or even start a fire. Always double-check the colors and markings before attaching cables. Red is positive, black is negative—simple, but easy to mix up when you’re in a hurry.
Using Damaged or Low-Quality Jumper Cables
Thin, frayed, or corroded cables can’t carry enough current to start a car. They may overheat or fail mid-jump. Invest in a good set of heavy-duty cables with thick copper wires and secure clamps. A $30 set now can save you from a $500 tow later.
Letting the Vehicles Touch
When positioning the cars, make sure they’re close but not touching. Metal-to-metal contact can create a ground path that bypasses the cables, leading to unpredictable current flow and potential damage.
Jumping a Swollen or Leaking Battery
If the battery is bulging, cracked, or leaking fluid, do not attempt to jump-start it. These are signs of internal damage or overcharging. Jump-starting could cause the battery to explode. Call a professional instead.
Turning Off the Jumped Car Too Soon
After a successful jump, many people shut off the engine right away. But if the battery is old or deeply discharged, it may not hold a charge. Drive the car for at least 20–30 minutes to allow the alternator to recharge it fully.
When Direct Connection Isn’t Possible (And What to Do Instead)
While connecting directly to the battery is ideal, there are situations where it’s not practical—especially in modern vehicles with covered batteries or hard-to-reach terminals.
Vehicles with Battery Access Covers
Some cars, especially newer models, have plastic covers over the battery or terminal access panels. In these cases, look for remote jump points—often labeled “+” and “-” near the engine bay. These are designed for jump-starting and are connected internally to the battery.
For example, many BMW and Mercedes models have jump posts under the hood. Connect the positive cable to the remote positive post and the negative to a solid, unpainted metal surface (like a bracket or engine block) away from the battery. This reduces sparking near the battery while still providing a safe ground.
Hybrid and Electric Vehicles
Hybrid and electric cars often have high-voltage battery systems that require special handling. Never attempt to jump-start a hybrid or EV using traditional jumper cables unless you’re certain you’re working with the 12V auxiliary battery (not the main traction battery). Consult your owner’s manual or call roadside assistance.
Extreme Weather Conditions
In freezing temperatures, batteries lose capacity and may not accept a charge easily. If your car won’t start after a proper jump, the battery may be too cold or too old. Use a battery warmer or consider replacing it before winter hits.
How to Maintain Your Battery to Avoid Future Jump-Starts
The best way to avoid jump-starting is to keep your battery in good condition. A little maintenance goes a long way.
Check Battery Health Regularly
Most auto parts stores offer free battery testing. Have your battery checked once a year, especially before winter. A healthy battery should read around 12.6 volts when the car is off and 13.7–14.7 volts when running.
Clean Terminals and Connections
Corrosion builds up over time and can prevent proper charging. Clean terminals with a mixture of baking soda and water, then rinse and dry. Apply a thin layer of petroleum jelly or terminal protector to prevent future buildup.
Avoid Short Trips and Parasitic Drain
Short drives don’t give the alternator enough time to recharge the battery. If you only drive a few minutes at a time, consider using a battery maintainer or trickle charger. Also, check for parasitic drain—lights, phone chargers, or aftermarket devices left on can slowly drain the battery.
Replace Old Batteries Proactively
Car batteries typically last 3–5 years. If yours is approaching that age, don’t wait for it to fail. Replace it before you’re stuck in the cold with a dead car.
Jump-Starting Safety Tips and Best Practices
Safety should always come first. Here are some essential tips to keep in mind.
Wear Protective Gear
While not always necessary, wearing gloves and safety glasses protects you from acid splashes, sparks, or broken components.
Never Smoke or Use Open Flames
Hydrogen gas is invisible and odorless. Even a small spark from a lighter or cigarette can ignite it. Keep all ignition sources away from the battery area.
Use a Portable Jump Starter as a Backup
Consider investing in a portable jump starter (also called a jump box). These battery-powered devices let you jump-start your car without another vehicle. They’re compact, safe, and perfect for emergencies. Just make sure to charge them regularly.
Know When to Call for Help
If you’re unsure, uncomfortable, or the battery shows signs of damage, don’t risk it. Call a professional. It’s better to pay for a tow than to cause injury or damage.
| Step | Action | Safety Tip |
|---|---|---|
| 1 | Turn off both engines and engage parking brakes | Prevents accidental movement |
| 2 | Connect red cable to dead battery’s positive terminal | Double-check polarity |
| 3 | Connect red cable to working battery’s positive terminal | Ensure tight connection |
| 4 | Connect black cable to working battery’s negative terminal | Avoid loose clamps |
| 5 | Connect black cable to dead battery’s negative terminal | Direct connection reduces spark risk |
| 6 | Start working vehicle, then attempt to start dead vehicle | Let it charge for 3–5 minutes first |
| 7 | Disconnect cables in reverse order | Prevents short circuits |
Final Thoughts: Confidence Comes from Knowing the Right Way
Jump-starting a car doesn’t have to be intimidating. By connecting all cables directly to the battery, you follow the safest, most effective method supported by mechanics and automotive experts. It minimizes risk, ensures a solid connection, and protects your vehicle’s electronics.
Remember, preparation is key. Keep a set of quality jumper cables in your trunk, know your battery’s location, and practice the steps at home before you need them in an emergency. And if you’re ever in doubt, don’t hesitate to call for help—there’s no shame in prioritizing safety.
With this guide, you’re now equipped to handle a dead battery with confidence. Whether it’s a chilly morning or a late-night breakdown, you’ll know exactly what to do: connect directly, stay safe, and get back on the road.
Frequently Asked Questions
Why should I connect all jump start cables directly to the battery?
Connecting all cables directly to the battery ensures a stable and reliable electrical connection, minimizing the risk of sparks or voltage drops. This method is recommended by most vehicle manufacturers for safe and effective jump starting.
Is it safe to connect jumper cables directly to a car battery?
Yes, it is safe when done correctly—always connect the red clamp to the positive terminal and the black clamp to the negative terminal. Following proper sequence reduces the risk of short circuits or battery damage.
Can I connect jump cables to any metal part instead of the battery?
While some guides suggest grounding to the engine block, connecting directly to the battery terminals is more reliable and ensures full power transfer. For safety and effectiveness, always connect cables directly to the battery when jump starting a car.
What happens if I don’t connect the cables directly to the battery?
Connecting to remote or grounded points may result in poor conductivity or incomplete charging, especially in modern vehicles with sensitive electronics. Direct battery connection provides the most consistent power flow.
Do I need to turn off the car before connecting jump cables to the battery?
Yes, always turn off both vehicles before connecting the cables to prevent electrical surges or damage to the vehicle’s systems. This step is crucial for safety when jump starting a car.
Should the battery be removed to connect jump cables directly?
No, the battery does not need to be removed—just ensure the terminals are clean and accessible. Connecting jumper cables directly to the battery in place is standard practice and perfectly safe.