

What Size Screws for a Tesla License Plate?
Contents
- 1 Key Takeaways
- 2 📑 Table of Contents
- 3 The Tesla Standard: Decoding the M4 Metric Screw
- 4 Model-Specific Considerations: S, 3, X, Y, and Cybertruck
- 5 Front vs. Rear: The Great Installation Divide
- 6 Your Essential Toolkit: Tools and Parts
- 7 Installation Guide: Step-by-Step for Both Plates
- 8 Common Problems and Troubleshooting
- 9 Why This Matters: Beyond Just Screws
- 10 Conclusion: You’ve Got This!
- 11 Frequently Asked Questions

Car Shampoo Concentrate

Pressure Washer for Car

LED Indicator Light

Radiator Coolant
Finding the right screws for your Tesla license plate is simpler than you think, but there are critical details. The standard size is M4x10mm or M4x12mm screws with a 0.7mm thread pitch for most models. However, the front and rear plates often use different screw types and lengths, and some models require removing plastic trim covers. Always verify with your owner’s manual, as a one-size-fits-all approach can damage your vehicle’s finish or lead to a loose plate.
So, you’ve got your shiny new Tesla, or maybe you’re just moving to a state that requires a front license plate. You go to install it, hold the plate up, and… nothing seems to fit. The screws from your old car are wrong, the holes don’t line up, and you’re left scratching your head. It’s a common moment of confusion for new Tesla owners. The good news? Solving the “what size screws for a Tesla license plate” puzzle is straightforward once you know the secrets Tesla built into its design. Let’s dive in and get your plates mounted securely and correctly.
Unlike many traditional gasoline cars that use a mix of imperial or oddball metric sizes, Tesla largely standardized on one simple, elegant metric screw size across its lineup. This consistency is a blessing for owners. However, the devil is in the details—specifically, the details of screw length, the type of screw head, and the installation process, which varies between the front and rear of the car and between different Tesla models. Getting any of these wrong can lead to stripped threads, scratched paint, or a plate that rattles loose.
This guide will become your definitive handbook. We’ll cover the exact screw specifications for every Tesla model, from the original Model S to the futuristic Cybertruck. We’ll walk through the step-by-step installation for both front and rear plates, highlighting the tricky parts like removing those stubborn plastic trims. We’ll also talk about aftermarket kits, tools you’ll need, and answer all the burning questions. By the end, you’ll approach your license plate with the confidence of a Tesla service technician, armed with the precise knowledge of what size screws for a Tesla license plate you actually need.
Key Takeaways
- Standard Size is M4: The vast majority of Tesla models use M4 metric screws (4mm diameter) with a standard 0.7mm thread pitch.
- Length Varies by Location: Front plate screws are typically shorter (10mm), while rear screws are often longer (12mm) to accommodate different bracket depths.
- Front vs. Rear Differences: Many Teslas have a hidden front license plate bracket behind a cover, requiring specific screws and tools for access, unlike the straightforward rear mount.
- Trim Removal is Common: For front plate installation on models without a pre-mounted bracket, you must carefully pry off plastic trim pieces to access the mounting points.
- Universal Kits Work: Aftermarket “Tesla license plate screw kits” are reliable and include all necessary screws, spacers, and sometimes tools for a complete installation.
- Check Your Manual: Your vehicle’s owner manual is the final authority on specifications and installation procedures for your specific model year and trim.
- Aftermarket Plates May Need Different Hardware: If using a custom or novelty plate, verify its pre-drilled hole spacing matches Tesla’s standard metric holes or be prepared to use different screws.
📑 Table of Contents
- The Tesla Standard: Decoding the M4 Metric Screw
- Model-Specific Considerations: S, 3, X, Y, and Cybertruck
- Front vs. Rear: The Great Installation Divide
- Your Essential Toolkit: Tools and Parts
- Installation Guide: Step-by-Step for Both Plates
- Common Problems and Troubleshooting
- Why This Matters: Beyond Just Screws
- Conclusion: You’ve Got This!
The Tesla Standard: Decoding the M4 Metric Screw
Let’s cut to the chase. If you need to buy one screw size to try, make it an M4 x 10mm or M4 x 12mm screw with a 0.7mm thread pitch. This is the workhorse size for Tesla license plates. “M4” means the screw’s outer diameter is 4 millimeters. The “0.7” is the distance between each thread. This is a standard coarse thread for metric screws. The length (10mm or 12mm) is the measurement from under the head to the tip.
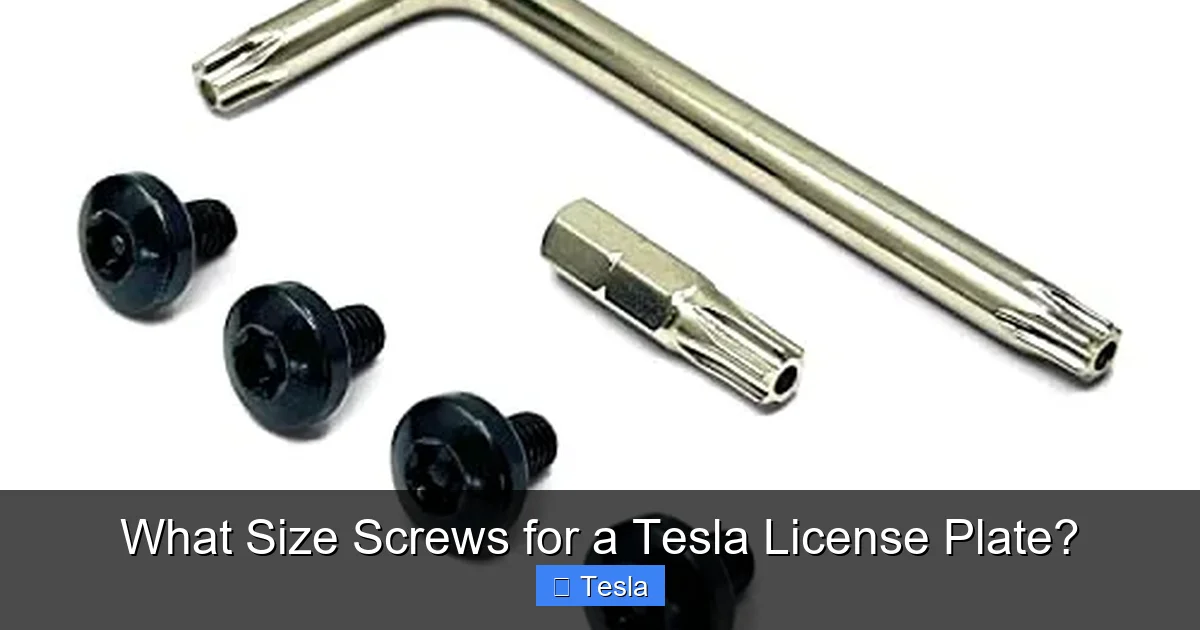
Why does Tesla use this? It’s a clean, modern, globally standard metric size. It provides a strong hold without being overly large, preserving the sleek, unibody design of the car. The screws themselves are typically stainless steel to resist corrosion, and they almost always feature a Torx (star) head, not a Phillips or hex. The most common Torx size is T25, but it’s always wise to confirm. Using the wrong driver bit can easily strip the head, turning a 5-minute job into a major headache.
You might be wondering about the difference between 10mm and 12mm. The rule of thumb is: front plates usually need the shorter 10mm screw, while rear plates often require the longer 12mm screw. This is because the rear license plate bracket is typically deeper, sitting further out from the body panel to accommodate the plate and any rear sensors or cameras. The front bracket, especially on models with a hidden bracket behind a cover, is shallower. We’ll break down front vs. rear specifics in the next section.
A Note on Thread Pitch and screw types
While the standard is M4x0.7, it’s possible—though rare—to encounter a different thread pitch on an aftermarket bracket or a very early model. A mismatch in thread pitch means the screw won’t screw in properly; it will feel loose or cross-thread immediately. If you’re buying screws separately, ensure the listing specifies “M4x0.7” or “standard metric thread.” Most universal kits marketed for Teslas get this right.
Also, be aware of screw head style. Tesla uses several types:
- Button Head Torx: Very common. Has a low-profile, rounded head with a Torx drive.
- Flange Head Torx: Has a built-in washer-like flange under the head to distribute pressure and protect the paint.
- Hex Head (less common): Some older models or specific markets might use Allen (hex) key screws.
When in doubt, look at the existing screw (if you have one) or consult your manual. A flange head is preferable as it prevents the screw head from marring the plate or the car’s paint if overtightened.
Model-Specific Considerations: S, 3, X, Y, and Cybertruck
One of Tesla’s strengths is platform sharing. The Model 3 and Model Y share a vast majority of their components, as do the Model S and Model X (to a lesser extent). This extends to the license plate mounting. Here’s the breakdown:

Visual guide about What Size Screws for a Tesla License Plate?
Image source: cdn11.bigcommerce.com
- Tesla Model 3 & Model Y: These are identical for our purposes. The rear plate uses two M4x12mm flange head Torx screws. The front plate is the tricky one. It does not have a permanent bracket on the bumper. Instead, there is a small, rectangular plastic cover on the lower front bumper. Prising this cover off reveals two threaded holes. These require M4x10mm screws (often button head). The cover is held by plastic clips, so a plastic pry tool is essential to avoid cracking it.
- Tesla Model S & Model X: These larger vehicles are simpler. The rear plate is a straightforward, exposed bracket using two M4x12mm screws. The front plate, on newer models (post-2016 refresh), also uses a hidden bracket behind a plastic cover similar to the 3/Y, requiring M4x10mm screws. Older Model S/X (pre-refresh) may have an exposed front bracket. Always check your specific model year.
- Tesla Cybertruck: As with everything Cybertruck, it’s different. The rear plate is mounted on a large, exposed stainless steel panel and uses standard M4x12mm screws. The front plate, however, is integrated into the massive front “frunk” (front trunk) lid. There is no separate front bumper cover. The plate mounts directly to the underside of the frunk lid using special captive nut inserts and typically requires M4x10mm or M4x12mm screws, but the access and procedure are unique. Consult the Cybertruck manual specifically.
For all models, the rear is almost always the easier installation. The front, with its hidden bracket, is where 90% of the questions and problems arise. If you own a Model 3 or Y and dread the front plate, you’re not alone. But with the right tool and a gentle touch, it’s a perfectly doable DIY job.
Front vs. Rear: The Great Installation Divide
Understanding the fundamental difference between front and rear plate mounting is the key to a successful installation. Think of the rear as “exposed hardware” and the front as “hidden hardware.”

Visual guide about What Size Screws for a Tesla License Plate?
Image source: m.media-amazon.com
Rear License Plate: The Simple Mount
The rear license plate bracket on every Tesla is permanently attached to the vehicle’s body. It’s right there, visible, usually with two threaded studs or holes protruding. Installation is a simple affair:
- Align your license plate with the bracket.
- Place the plate against the bracket.
- Insert the M4x12mm screw through the plate’s hole and hand-turn it into the threaded stud or hole on the bracket.
- Using your Torx bit (T25), tighten it just until snug. Do not overtighten! The plastic of the plate and the thin metal of the bracket can crack or warp under excessive force. Snug is secure.
That’s it. No trim removal, no hidden secrets. This is why the rear is always installed first—it builds your confidence.
Front License Plate: The Trim Removal Dance
The front is where Tesla’s design philosophy—clean lines, no ugly protrusions—creates a small obstacle. On Model 3, Y, and newer S/X, the front bumper cover has a small, often color-matched, rectangular panel. This is not the license plate bracket itself; it’s a cover hiding the actual bracket and its two threaded bolts.
To install the front plate:
- Locate the Cover: It’s at the very bottom center of your front bumper, just above the air intake. It’s about 4-5 inches wide and 2 inches tall.
- Pry it Off: This is the critical step. Use a plastic pry tool or a flat-head screwdriver wrapped in several layers of masking tape to avoid scratches. Starting at one corner, gently work the tool between the cover and the bumper. The cover is held by several plastic clips. Apply steady, even pressure. You will hear a series of pops as the clips release. Work your way along the top and sides. The bottom may be glued slightly; be extra gentle there.
- Reveal the Bracket: Once the cover is off, you’ll see two Torx-head bolts (likely T25) threaded into a bracket. These are the M4x10mm screws you need.
- Remove the Bolts: Unscrew these two bolts completely and set them aside safely. They are your mounting points.
- Position the Plate: Hold your license plate up to the now-exposed holes. You may need to use the included plastic spacers/washers from an aftermarket kit if your plate’s holes are larger than the bracket holes.
- Mount the Plate: Insert your clean, new M4x10mm screws through the plate holes and into the bracket holes. Hand-tighten first.
- Final Tighten: Using your Torx bit, tighten each screw evenly until snug. Again, do not crush the plastic.
- Replace the Cover: Snap the plastic cover back into place. It’s best to start at the top and press down along the edges to reseat all the clips. Ensure it’s flush and secure.
The entire process should take 10-15 minutes with the right tools. The fear of breaking the clips is real, but they are designed to be removable. Go slow, and you’ll be fine.
Your Essential Toolkit: Tools and Parts
Before you start, gather your tools. Having everything at hand prevents a mid-job scramble that could lead to damage.
Visual guide about What Size Screws for a Tesla License Plate?
Image source: m.media-amazon.com
Tools You’ll Need
- Torx Bits (T25 most common): A good quality, magnetic-tip Torx bit set is non-negotiable. Cheap bits will strip the screw heads. A 1/4″ drive ratchet with an extension makes it much easier to reach the front plate bolts.
- Plastic Pry Tool(s): At least one, preferably a set. You can use a old credit card in a pinch, but purpose-made tools are safer and more effective for the front bumper cover.
- Flat-Head Screwdriver: Wrapped in tape, as a backup pry tool.
- Flashlight/Headlamp: The area under the front bumper is dark. A light is essential to see what you’re doing.
- Small Parts Tray: To catch the tiny screws you remove so they don’t roll under the car.
Screws, Spacers, and Kits
You have two main options: buy individual screws or a complete kit.
1. Individual Screws: You can buy M4x10mm and M4x12mm Torx screws from a hardware store or online (Amazon, McMaster-Carr). Ensure they are stainless steel (grade 304 or 18-8). You’ll also likely need plastic washers/spacers. These are crucial if your license plate’s holes are larger than the bracket holes (common with European-style plates or thick metal plates). The spacer fills the gap, ensuring the screw head presses against the plate, not through the hole. Tesla’s original screws often have an integrated flange, but aftermarket kits provide separate plastic spacers.
2. Universal Tesla License Plate Kit (Recommended): This is the easiest path. Companies like “Tesla Model 3 Front License Plate Kit” sell everything you need in one package. A typical kit includes:
- 2x M4x10mm button/flange head Torx screws (front)
- 2x M4x12mm flange head Torx screws (rear)
- 4-6 plastic spacers/washers (to fit various plate thicknesses)
- Sometimes a plastic trim removal tool
- Often a small Torx bit
These kits are inexpensive ($10-$20) and take all the guesswork out. They are designed specifically for Tesla’s bracket hole size and common plate thicknesses. For the vast majority of owners, buying a reputable universal kit is the smartest, most convenient choice.
If you’re considering other modifications to protect your Tesla’s finish, you might also be looking into things like paint protection film (PPF) cost for a Tesla. It’s a great way to keep your car looking new, but it doesn’t change the license plate screw requirements.
Installation Guide: Step-by-Step for Both Plates
Let’s put it all together. Here is a consolidated, model-agnostic (for Model 3/Y/S/X) guide.
Part 1: The Rear Plate (5 minutes)
- Clean the area around the rear license plate bracket with a microfiber cloth.
- Hold your license plate against the bracket. Note the alignment. The plate should sit flush against the car body.
- Insert the two M4x12mm screws through the plate’s top and bottom holes. If the holes are large, place a plastic spacer on each screw first, then the plate.
- Hand-tighten each screw until it catches the threads.
- Using your Torx bit, tighten each screw alternately (a little on the top, a little on the bottom) until the plate is snug against the vehicle. Stop when you feel resistance. You have now successfully mounted the rear plate.
Part 2: The Front Plate (15 minutes)
- Locate and remove the front bumper cover panel. Refer to the detailed steps in the previous section. Use your plastic pry tool. Work slowly from the corners. The cover will pop off. Set it aside carefully, preferably on a soft surface.
- You will see two Torx-head bolts. These are the factory bolts that secure the hidden bracket. Use your Torx bit to remove them. Set them aside.
- Check the bracket holes. If there are any burrs or debris, clean them gently.
- Take your new M4x10mm screws (from your kit). If your kit includes spacers, decide if you need them. Place a spacer on each screw if your plate’s holes are oversized.
- Position your license plate. The holes must align with the bracket holes. You may need to angle the plate slightly to get the holes to match. This is normal.
- Insert the screw through the plate hole and into the bracket hole. Hand-tighten both screws.
- Using your Torx bit, tighten each screw alternately until snug. Again, do not overtighten. The plastic bracket has limited strength.
- Snap the plastic cover panel back into place. Press firmly along all edges until you hear/feel all clips engage. Ensure it is flush and secure.
- Step back and admire your work. The front plate is now installed cleanly, with no visible screws from the outside when the cover is on (for states that require it).
Common Problems and Troubleshooting
Even with the best instructions, you might hit a snag. Here’s how to solve the most common issues.
The Screws Are Too Long/Short or Won’t Thread
If your new screws bottom out too early (too short) or protrude too far (too long), you have the wrong length. Remember: front = 10mm, rear = 12mm. If they won’t thread at all, you likely have the wrong thread pitch (e.g., M4x0.5 instead of M4x0.7). The threads will feel sloppy and not engage. The solution is to source the correct screws. Buying a universal Tesla kit eliminates this problem entirely.
The Front Cover Won’t Come Off / I’m Scared to Break It
This is the #1 fear. The clips are robust but can be stubborn. Ensure you are prying at the top edge where the clips are. Use a tool with a good angle. Apply firm, steady pressure inward and upward. Do not use excessive force that would bend the bumper. If it’s really stuck, warm the area slightly with a hairdryer (low heat) to soften any adhesive. Go slow. The clips are designed to be reusable; they will break if you use a metal tool or leverage against the wrong point.
The Plate Rattles or Is Loose
A snug installation should be silent. If you hear rattling:
- Check that all screws are fully tightened.
- Ensure you used the correct length screw. A screw that is too long might not tighten fully against the bracket.
- Check for missing spacers. If the plate’s holes are large, the screw head can pass through, leaving the plate loose against the bracket. Adding the correct plastic spacer fixes this.
- On the rear, ensure the plate is sitting flush against the rubber gasket/seal. Sometimes a misaligned plate will vibrate.
I Stripped the Torx Head!
This is a bummer, but it happens. If the screw is still mostly in, you can try:
- Using a Torx bit one size larger (e.g., T30) to see if it can grip the damaged corners.
- Using needle-nose pliers to grip the screw head and unscrew it.
- As a last resort, carefully drill a small slot into the head and use a flat-head screwdriver.
Prevention is key: use a high-quality, perfectly fitting Torx bit and don’t apply excessive torque. If the screw is already out and you’re installing a new one, you’re fine. If it’s stuck in the bracket, you may need to seek professional help to avoid damaging the threaded hole.
It’s also worth noting that Tesla’s design philosophy prioritizes aesthetics and aerodynamics. This sometimes means less intuitive access compared to traditional cars. If you run into a problem unique to your model year, a quick search for “2021 Model 3 front license plate installation” on a Tesla owner forum will yield model-specific tips and photos from thousands of owners who have done it before you.
Why This Matters: Beyond Just Screws
Installing your license plate correctly isn’t just about obeying the law. It’s about protecting your investment. A loose plate can vibrate, causing stress on the mounting points and potentially leading to cracks in the plastic bumper cover or the metal bracket. Overtightened screws can crush the plastic or, worse, penetrate through to wiring behind the bumper (a risk with the front camera and sensor suite). Using the wrong screws can lead to corrosion from dissimilar metals or simply fall out.
Moreover, for many Tesla owners, this is their first hands-on interaction with their vehicle’s bodywork. Doing it correctly builds confidence for future, more complex projects. It reinforces the idea that with the right information and tools, you can maintain and modify your Tesla yourself, saving money and time at the service center.
This principle of knowing the exact specifications for your vehicle extends to other areas of car ownership. For instance, understanding the correct wiper blade size for a 2013 Honda Civic is just as important for clear visibility. Or knowing the right battery size for a 2012 Nissan Versa ensures reliable starts. Every component has a spec, and getting it right is the hallmark of a savvy car owner.
Conclusion: You’ve Got This!
The mystery of Tesla license plate screw size is now solved. The standard is M4 metric screws—10mm for the front, 12mm for the rear—with a Torx (likely T25) head and 0.7mm thread pitch. The front installation requires carefully removing a plastic bumper cover, but it’s a manageable DIY task with plastic pry tools and a gentle touch.
Your best bet is to purchase a universal Tesla license plate installation kit. It’s the most cost-effective and foolproof way to get the correct screws, spacers, and sometimes even the tool you need in one package. Always hand-tighten first and use a ratchet for final snugging—never force it. When in doubt, your owner’s manual is your ultimate guide.
Now, go forth and mount those plates! You’re not just attaching a piece of metal; you’re engaging with your Tesla’s design, understanding its architecture, and taking a small but satisfying step in making it truly yours. Welcome to the world of Tesla ownership, where even the little things are engineered with a specific, elegant purpose.
Frequently Asked Questions
Can I use the license plate screws from my old car on my Tesla?
Almost certainly not. Tesla uses standard M4 metric screws, while many older American or Asian cars use different sizes (like 1/4″ or M6). Using the wrong size will not thread properly and can damage the threaded holes in your Tesla’s bracket. Always use the specified M4 size.
What if I don’t have a Torx bit? Can I use a Phillips or flat-head?
No. Tesla’s license plate screws are designed for Torx drivers. Using any other type of screwdriver will almost certainly strip the screw head, making it impossible to remove or tighten properly. A basic Torx bit set is a necessary and inexpensive investment for any Tesla owner.
Do I need to remove the front bumper to install the front plate?
No, you do not need to remove the entire bumper. You only need to carefully pry off the small, rectangular plastic cover panel on the lower front bumper. This reveals the hidden mounting bracket and its bolts. Removing the whole bumper is a major undertaking and is not required.
Will installing the front plate myself void my warranty?
No. License plate installation is considered a basic owner-maintenance task. As long as you use the correct hardware and do not cause damage (like cracking the bumper cover from excessive force), it will not affect your vehicle’s warranty. If you damage something during installation, that specific damage may not be covered.
Are the screws different for a Model 3 vs. a Model Y?
No. The Model 3 and Model Y share the same license plate mounting hardware. They use identical M4x10mm front screws and M4x12mm rear screws. The process for accessing the front bracket is also identical between these two models.
Where can I buy the exact Tesla license plate screws?
You can buy them from Tesla’s own parts department (online or at a service center), from any auto parts store (specify M4x10mm or M4x12mm Torx), or most conveniently, from an online universal kit sold on Amazon or automotive accessory sites specifically marketed for Tesla models. These kits are the simplest solution.


