
Sharp Edges Tearing Car Cover: Causes, Fixes, and Prevention

Quick Answer
If sharp edges are tearing your car cover, the fabric is probably catching or being stretched over a protruding part such as a license plate corner, antenna, spoiler, mirror, trim piece, roof accessory, or damaged body panel. Stop forcing the cover over the problem area, inspect the vehicle and fabric, protect safe protrusions with a smooth padded barrier, and correct the cover fit before reinstalling it. Cover manufacturers also recommend keeping vehicle-cover material away from conditions that create rubbing and cover movement.
Most likely causes
- Exposed corners: License plates, brackets, trim, or body edges can concentrate force into a tiny section of fabric.
- Wrong cover size: A cover stretched too tightly presses harder against mirrors, antennas, spoilers, and corners.
- Wind movement: Repeated flapping can make one contact point rub through otherwise healthy fabric.
- Damaged hardware: Broken trim, bent brackets, or cracked accessories can expose edges that were previously smooth.
- Weak cover fabric: Aging, sun exposure, worn seams, and previous tears can make material easier to puncture.
What to do first
- Remove the cover carefully, find the exact contact point, and fix that cause before patching or replacing the fabric.
When I see the same hole appear in a car cover twice, I stop blaming the fabric. Something on the vehicle is usually concentrating tension in one spot.
The good news is that most sharp-edge problems are easy to diagnose without special tools. This guide shows you where to inspect, what you can safely protect, and when the vehicle itself needs repair.
In This Guide
- Why Do Sharp Edges Tear a Car Cover?
- Where Should You Check for the Sharp Edge?
- How Do You Stop Sharp Edges From Tearing a Car Cover?
- Should You Repair or Replace a Torn Car Cover?
- Can the Wrong Fit or Wind Make the Tear Worse?
- How Can You Prevent the Cover From Tearing Again?
- Frequently Asked Questions
Why Do Sharp Edges Tear a Car Cover?
A sharp or narrow contact point puts the cover’s tension into a small area. Pulling, wind, and repeated installation can then turn that pressure point into a puncture or longer tear.
A car cover is a removable fabric barrier designed to reduce exposure to dust, sunlight, moisture, debris, and other environmental contamination while a vehicle is parked.
It may not look sharp enough to cause damage
The problem doesn’t need to be a knife-like piece of metal. A squared license plate corner or stiff plastic trim can be enough when fabric is pulled tightly across it.
I usually run my hand carefully around the area beneath a new tear. The culprit is often directly below the hole or a few inches away where the cover shifts during installation.
- License plate corners: Thin metal edges can create concentrated pressure.
- Antenna bases: Fixed antennas and mounts can stretch unsupported fabric.
- Spoiler corners: Aftermarket and factory spoilers change the vehicle’s profile.
- Mirror edges: Tight mirror pockets can become high-tension areas.
- Roof accessories: Racks, crossbars, mounts, and cargo accessories require extra clearance.
- Broken trim: Cracked plastic can expose a surprisingly sharp edge.
The issue gets worse when the cover is pulled instead of lifted into position. Each installation can drag the same fabric section over the same contact point.
Covercraft’s published care guidance also tells owners to keep cover material away from sharp edges to prevent tears. That makes physical contact worth checking before assuming the material simply failed.
Section Takeaway: A cover usually tears at a sharp point because tension, movement, or repeated handling concentrates stress in one small section of fabric.
Where Should You Check for the Sharp Edge?
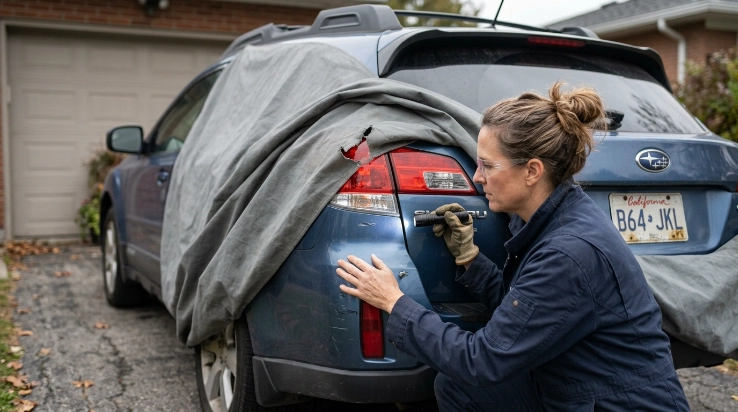
Start directly beneath the tear, then inspect nearby parts that the fabric crosses while you install or remove the cover. The final hole may appear slightly away from the original snag.
Inspect these high-contact areas first
| Area | What to Look For | Likely Cover Damage | Best Response |
|---|---|---|---|
| License plates | Exposed corners, bent plate, protruding screws | Small puncture or straight cut | Correct loose hardware and protect the contact point |
| Side mirrors | Tight pocket, cracked housing, trim edge | Stretching or seam tear | Correct fit and inspect mirror condition |
| Antenna | Rigid mast or narrow mounting point | Round puncture | Follow cover maker’s antenna instructions |
| Spoiler | Sharp corners or excessive cover tension | Long tear or worn patch | Use a cover sized for the vehicle profile |
| Roof rack | Bar ends, mounting hardware, accessory brackets | Puncture or abrasion | Provide proper clearance or compatible cover |
| Body or trim | Crash damage, rust, broken clips, cracked plastic | Irregular tear | Repair the vehicle component first |
Look at the shape of the damage
A clean puncture often points to one concentrated object. A fuzzy worn area suggests the fabric has rubbed repeatedly rather than being pierced once.
- Single small hole: Check screws, antenna points, brackets, and corners.
- Long straight rip: Look for an edge that catches during removal.
- Thin worn patch: Suspect rubbing from wind or poor fit.
- Split seam: Look for excessive stretching or incorrect sizing.
- Several unrelated tears: Inspect the overall fabric condition for aging.
Don’t ignore a damaged vehicle part just because the cover hides it. Kelley Blue Book’s maintenance resources emphasize keeping vehicle components in sound condition rather than treating symptoms around them.
Mechanic Alert: If the sharp area is damaged sheet metal, a loose body component, severe corrosion, or a part you cannot safely secure, have a qualified repair professional inspect it.
How Do You Stop Sharp Edges From Tearing a Car Cover?
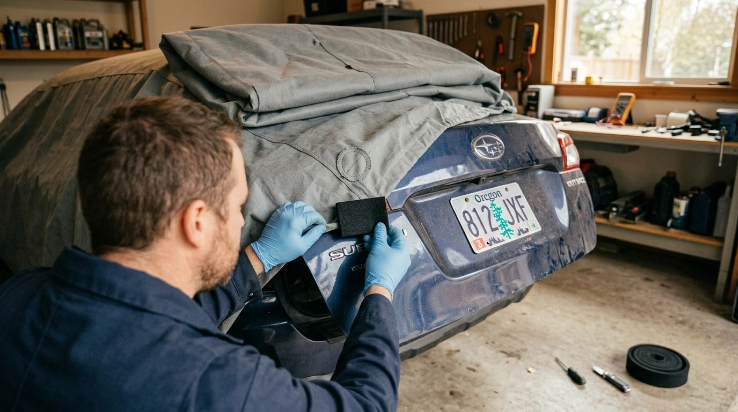
Fix the contact point before repairing the cover. Otherwise, a patch or replacement cover can tear in exactly the same place.
1. Remove the cover without dragging it
Lift the fabric away from the damaged area before pulling it toward the center of the vehicle. Don’t yank a snagged cover free.
2. Find the exact contact point
Match the hole’s location to the vehicle. Then inspect that area while imagining how the cover moves during installation.
3. Correct damaged or protruding hardware
Tighten only simple exterior hardware you can safely service. Bent plates, protruding fasteners, or loose accessories should not remain pointed into the fabric.
Don’t grind, cut, or reshape structural or safety-related vehicle components just to accommodate a cover.
4. Protect legitimate protrusions
Some parts cannot simply disappear. Depending on the cover manufacturer’s instructions, a smooth padded protector can help prevent concentrated pressure.
- Use a purpose-made protector when supplied by the cover manufacturer.
- Choose smooth material that cannot scratch paint.
- Make sure padding cannot blow loose beneath the cover.
- Avoid adhesive directly on painted surfaces unless its manufacturer approves that use.
- Never cover hot exhaust components immediately after driving.
RV-cover makers commonly use padded corner, ladder, and gutter protectors for exactly this reason. The same principle applies to car-cover contact points: spread the load instead of letting fabric rest against one narrow edge.
5. Recheck the cover size
The cover should fit securely without requiring excessive stretching over mirrors, spoilers, antennas, or other exterior equipment.
If installation feels like you’re forcing a fitted sheet onto a mattress that’s too large, stop. That tension will eventually find the weakest point.
Section Takeaway: Remove the sharp contact, spread unavoidable pressure safely, and eliminate excessive fabric tension before putting the cover back into service.
Should You Repair or Replace a Torn Car Cover?
A small isolated tear may be repairable if the surrounding fabric remains flexible and strong. Replace the cover when deterioration extends beyond one local damaged area.
Repair may make sense when:
- The tear is small and clearly caused by one identified object.
- The surrounding fabric still feels strong.
- The seams and straps remain intact.
- The manufacturer provides or approves a compatible repair patch.
- You have already eliminated the cause of the damage.
Replacement is safer when:
- New holes keep appearing.
- The fabric feels brittle, thin, stiff, or powdery.
- Several seams are opening.
- Straps or elastic sections are failing.
- The inner surface has become rough or contaminated.
- The cover no longer fits the vehicle correctly.
I wouldn’t put a fresh patch over weak material and call the job done. If you can gently pull near the tear and see neighboring fabric deform or split, the cover has a larger durability problem.
Covercraft’s care instructions advise inspecting covers for tears and wear, while its storage guidance recommends repairing damage before it worsens.
If the cover has been dragging dirt across the finish, clean the vehicle before reinstalling it. Consumer Reports’ car maintenance and repair guidance is a useful reference for general exterior-care practices.
Can the Wrong Fit or Wind Make the Tear Worse?
Yes. A poor fit can turn a harmless body contour into a high-stress point, while wind can make the fabric rub the same location hundreds of times.
A cover can be too tight
An undersized cover has to stretch farther over every projection. Mirrors, spoilers, bumper corners, and roof accessories then carry extra load.
- Mirror pockets may pull at their seams.
- Antenna areas may become puncture points.
- Spoiler corners may stretch the fabric.
- The elastic hem may pull too hard against bumper edges.
A cover can also be too loose
Excess material can flap, lift, and slide when wind gets underneath it. Covercraft specifically warns that loose or flapping covers can rub against paint.
The movement can damage the cover too. A mildly rough edge becomes more destructive when fabric moves back and forth across it.
Cleanliness matters at the same time
Dirt trapped between the vehicle and cover adds another abrasive layer. That is why I inspect the paint and the inside surface whenever I find unexplained cover wear.
- Remove sand and road grit before covering.
- Keep the cover’s inner surface clean.
- Don’t drag the cover across pavement.
- Let a wet cover dry before storing it.
Consumer Reports notes that abrasive contamination can damage vehicle finishes during cleaning. The principle matters here too: dirt plus movement is a poor combination for clear coat.
Section Takeaway: Correct sizing limits tension, secure installation limits wind movement, and clean surfaces reduce the chance that cover wear also becomes paint damage.
How Can You Prevent the Cover From Tearing Again?
A five-minute inspection before installation can prevent repeated tears. I focus on the vehicle, the cover, and how the two surfaces meet.
Use this pre-cover inspection
- Walk around the car: Look for bent plates, loose trim, broken clips, or new accessories.
- Check mirrors: Make sure housings and mirror pockets aren’t creating excessive tension.
- Inspect antennas: Follow the cover maker’s specific antenna instructions.
- Check accessories: Roof racks, spoilers, cameras, brackets, and mounts can change required clearance.
- Inspect the fabric: Look for thinning, holes, stressed stitching, or previous repairs.
- Check the inner surface: Remove grit, leaves, or other abrasive debris.
- Test the fit: The cover should install without aggressive stretching.
Install from a controlled position
I prefer to unfold the cover over the roof and work toward the ends rather than dragging a loose bundle along the paint. Keep the fabric lifted around known protrusions.
Coverstore similarly advises taking care around license plates, exhaust areas, and other sharp locations during vehicle-cover installation and removal.
Inspect after strong wind
Outdoor covers deserve another check after storms or unusually strong wind. Look for fresh tension marks before they become open tears.
Long-term vehicle storage also deserves periodic inspection rather than a set-it-and-forget-it approach. NHTSA remains an authoritative resource when a vehicle defect or safety-related component creates a concern beyond ordinary cover maintenance.
As of 2026, the basic prevention strategy hasn’t changed: use the correct cover, keep it controlled, protect appropriate contact points, and repair damaged vehicle parts instead of allowing fabric to hide them.
Section Takeaway: Preventing repeat tears is mostly about inspection and fit. A healthy cover should not be repeatedly stretched or rubbed across a concentrated edge.
Frequently Asked Questions
Why does my car cover keep tearing in the same place?
A repeat tear usually means the underlying cause is still present. Check directly beneath and around the damaged area for a license plate corner, screw, antenna, spoiler edge, cracked trim, roof accessory, or excessive fabric tension.
Can I put foam over a sharp edge under a car cover?
A smooth, secure protector can help on some non-hot, non-moving protrusions, especially when the cover manufacturer recommends that method. Make sure the material cannot scratch paint, absorb harmful contamination, or come loose beneath the cover.
Can a tight car cover cause holes?
Yes. Excessive stretching can put concentrated pressure on mirrors, spoilers, antennas, seams, and body corners. A properly sized cover should fit securely without needing aggressive force to reach the bumpers.
Can wind cause a car cover to tear?
Yes. Wind can lift loose fabric and repeatedly rub it against a narrow or rough contact point. Secure the cover using its intended fastening system, and inspect it after severe wind for fresh abrasion or stressed seams.
Should I tape a sharp car part before installing the cover?
Avoid placing ordinary adhesive tape directly on automotive paint or sensitive trim unless the product maker specifically approves that use. A proper repair or removable, paint-safe protector is usually a better solution.
Can I patch a car cover with duct tape?
I prefer the repair method recommended by the cover manufacturer. General-purpose tape may leave adhesive, stiffen the fabric, or fail outdoors, while manufacturer-approved patches are more likely to match the cover material and intended repair method.
When should I replace a torn car cover instead of repairing it?
Replace it when tears keep returning, fabric has become brittle or thin, seams are failing, the inner surface is rough, or the cover no longer fits securely. One small isolated tear in otherwise healthy material may be repairable.
The bottom line: sharp edges tearing a car cover are usually a contact-and-fit problem before they’re a fabric problem. Find the exact snag, correct it, inspect the cover’s overall condition, and only then repair or reinstall the cover.
Take a few minutes to check the mirrors, license plates, antennas, spoilers, trim, and accessories today. Fixing one pressure point now can save the next cover from developing the same hole.
