
How to Remove Rv Valance
Contents
- 1 Key Takeaways
- 2 📑 Table of Contents
- 3 What Is an RV Valance and Why Remove It?
- 4 Tools and Materials You’ll Need
- 5 Step-by-Step Guide to Removing an RV Valance
- 6 Common Challenges and How to Overcome Them
- 7 What to Do After Removing the Valance
- 8 Safety Tips and Best Practices
- 9 Conclusion
- 10 Frequently Asked Questions

Car Trash Can
Power Steering Fluid

Car Floor Mats (Universal)

Windshield Cleaning Tool
Removing an RV valance is a straightforward DIY project that can refresh your interior and improve access to wiring or insulation. With the right tools and a little patience, you can complete this task in under an hour, whether you’re upgrading décor or performing repairs.
Key Takeaways
- Understand the purpose of an RV valance: It covers the top of windows and hides mounting hardware, wiring, or insulation.
- Gather essential tools: You’ll need a screwdriver, drill, putty knife, and possibly a utility knife or pliers.
- Work carefully to avoid damage: RV walls and trim are often made of lightweight materials that can crack or tear easily.
- Label screws and parts: Keep track of hardware and components to make reinstallation or replacement easier.
- Inspect for hidden issues: Once removed, check for moisture, pests, or damaged wiring behind the valance.
- Plan your next steps: Decide whether you’ll replace, paint, or upgrade the valance before removal.
- Take safety precautions: Wear gloves and eye protection, especially when dealing with old adhesives or sharp edges.
📑 Table of Contents
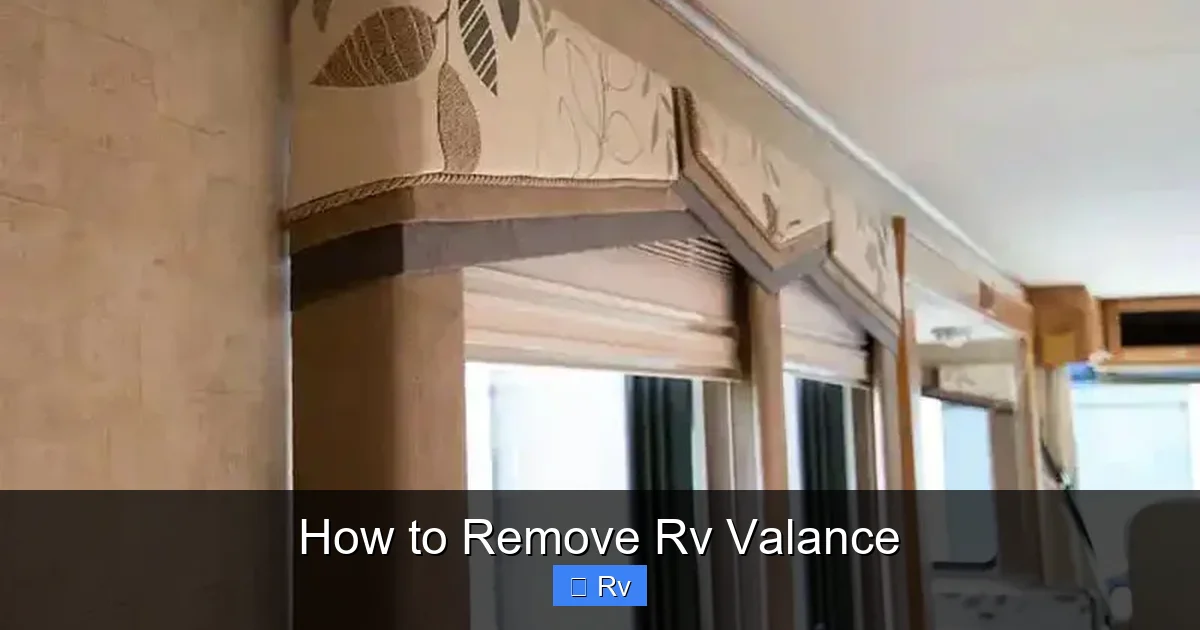
What Is an RV Valance and Why Remove It?
An RV valance is a decorative trim piece that runs along the top of windows, typically mounted just below the ceiling. It serves both functional and aesthetic purposes. Visually, it gives your RV interior a finished, polished look by covering the gap between the window frame and the wall. Functionally, it hides mounting brackets, curtain rods, wiring for lighting, or insulation gaps. Many RVs also use valances to conceal air conditioning units or ductwork near the ceiling.
Over time, these valances can become outdated, damaged, or simply in the way during renovations. You might want to remove an RV valance to repaint the wall, install new window treatments, upgrade lighting, or access hidden components for repairs. Some RV owners also remove valances to create a more open, modern look with exposed beams or painted ceilings.
Removing an RV valance is a common DIY task, but it’s not always as simple as it looks. Because RVs are built with lightweight materials and tight spaces, you need to be careful to avoid damaging the surrounding walls, ceiling, or window frames. With the right approach, however, this project is manageable for most RV owners—even those with limited experience.
Tools and Materials You’ll Need

Visual guide about How to Remove Rv Valance
Image source: musthavemom.com
Before you start, gather all the necessary tools and materials. Having everything ready will save time and reduce frustration. Here’s a list of what you’ll likely need:
- Screwdriver set: Both flathead and Phillips head screwdrivers are essential. Many valances are held in place with screws, and you’ll need the right type to avoid stripping them.
- Cordless drill with screwdriver bit: This makes removing screws faster and easier, especially if there are many of them.
- Putty knife or plastic scraper: Useful for gently prying the valance away from the wall if it’s glued or sealed.
- Utility knife: Helps cut through caulk or adhesive along the edges.
- Pliers or needle-nose pliers: Handy for removing stubborn screws or clips.
- Flashlight or work light: RV interiors can be dim, especially near the ceiling. Good lighting helps you see what you’re doing.
- Masking tape and labels: Use these to mark screws, brackets, or sections of the valance so you can reassemble everything correctly.
- Drop cloth or towel: Protects your floor or furniture from dust, debris, or falling hardware.
- Safety gear: Wear gloves to protect your hands and safety glasses to shield your eyes from dust or loose particles.
Optional but helpful tools include a stud finder (to locate mounting points), a vacuum (for cleanup), and a small container to hold screws and small parts. If your valance is glued down, you might also need a heat gun or hairdryer to soften the adhesive.
Step-by-Step Guide to Removing an RV Valance

Visual guide about How to Remove Rv Valance
Image source: musthavemom.com
Now that you’re prepared, let’s walk through the actual removal process. Follow these steps carefully to avoid damage and ensure a smooth experience.
Step 1: Prepare the Area
Start by clearing the space around the window. Move any furniture, curtains, or decorative items out of the way. Lay down a drop cloth or towel to catch dust and debris. This is also a good time to turn on your work light and put on your safety gear.
Next, inspect the valance closely. Look for visible screws along the top, bottom, or sides. Some valances are attached with hidden brackets or clips, so you may need to look carefully. If you see caulk or sealant along the edges, note where it’s applied—you’ll need to cut through it later.
Step 2: Remove Window Treatments
If your valance covers curtains, blinds, or shades, remove them first. Take down curtain rods, unclip blinds, or detach any mounting hardware. This gives you better access to the valance and prevents accidental damage to your window treatments.
For example, if you have pleated shades mounted inside the valance cavity, gently lift them out or unscrew the brackets. Label each component as you go so you know where everything goes when it’s time to reinstall.
Step 3: Locate and Remove Screws
Most RV valances are secured with screws driven into the wall or ceiling. These are often spaced every 12 to 18 inches along the length of the valance. Use your screwdriver or drill to remove them one by one.
Work from one end to the other, and keep track of each screw. Place them in a labeled container or tape them to a piece of paper with notes like “left end” or “center bracket.” This makes reassembly much easier.
If you encounter a stripped screw, try using a rubber band between the screw head and the screwdriver for extra grip. Alternatively, use pliers to gently turn the screw counterclockwise.
Step 4: Cut Through Caulk or Adhesive
Once the screws are out, the valance may still be stuck to the wall due to caulk, construction adhesive, or sealant. Use a utility knife to carefully cut along the top and sides where the valance meets the wall.
Hold the knife at a shallow angle to avoid gouging the wall surface. Work slowly and patiently—rushing can lead to scratches or tears in the wallpaper or paneling.
If the valance is glued down with strong adhesive, you may need to use a heat gun or hairdryer to soften it. Apply heat for 10–15 seconds at a time, then gently pry with a putty knife. Be cautious not to overheat the area, as this can damage the wall or release harmful fumes.
Step 5: Gently Pry the Valance Away
With the screws removed and adhesive cut, you can now start prying the valance away from the wall. Insert a putty knife or plastic scraper between the valance and the wall, and apply gentle pressure.
Work your way along the length of the valance, loosening it bit by bit. If it resists, stop and check for hidden screws or clips. Some valances have spring-loaded clips that need to be depressed or twisted to release.
Once the valance is free, carefully lift it away from the wall. Have a helper hold it if it’s long or heavy. Set it aside on a flat surface to avoid warping or damage.
Step 6: Inspect and Clean the Area
With the valance removed, take a close look at the exposed area. Check for signs of moisture, mold, pests, or damaged wiring. This is your chance to address any hidden issues before installing a new valance or finishing the wall.
Use a vacuum or damp cloth to clean dust, debris, or old adhesive from the wall and ceiling. If there are holes from screws, you can fill them with spackle or wood filler later.
Common Challenges and How to Overcome Them

Visual guide about How to Remove Rv Valance
Image source: musthavemom.com
Even with careful planning, you might run into a few hurdles during the removal process. Here are some common issues and practical solutions.
Hidden Screws or Clips
Some RV manufacturers use concealed mounting systems. You might not see screws at first glance. Look for small access holes, removable caps, or seams in the valance that indicate hidden hardware.
If you suspect clips, gently press or wiggle the valance to see if it moves. Use a flashlight to peer into gaps. Once located, use a flathead screwdriver or clip removal tool to release them.
Stuck or Brittle Valance
Older valances can become brittle or warped over time, making them prone to cracking. If your valance starts to break as you remove it, stop immediately. Support it from underneath with a board or piece of cardboard to distribute the weight.
For extremely fragile valances, consider cutting them into smaller sections with a saw or utility knife. This reduces stress on the material and makes handling easier.
Damaged Wall or Ceiling
Prying off a valance can sometimes damage the surrounding surface, especially if it was glued down tightly. Small scratches or dents are normal, but larger tears may need repair.
Use spackle or lightweight filler to patch holes or gouges. Sand smooth once dry, then repaint or re-wallpaper as needed. If the damage is extensive, you might consider installing a new valance that covers the imperfections.
Electrical Wiring Behind the Valance
In some RVs, lighting or fan wires run behind the valance. If you encounter wires, do not cut or disconnect them unless you’re qualified to do so.
Turn off the power at the breaker panel before touching any wiring. Use a voltage tester to confirm the circuit is dead. If you’re unsure, consult an electrician or RV technician.
What to Do After Removing the Valance
Once the valance is off, you have several options depending on your goals.
Replace with a New Valance
If you’re upgrading your RV’s look, now is the time to install a new valance. Measure the opening carefully and choose a style that matches your décor—wood, laminate, or painted MDF are popular choices.
Pre-drill holes in the new valance to prevent splitting, then secure it with screws. Use construction adhesive for extra hold, but avoid over-applying, as it can squeeze out and stain the surface.
Paint or Refinish the Wall
Removing the valance exposes the wall above the window. This is a great opportunity to repaint or add a decorative finish. Use a roller or brush to apply paint, and consider adding a contrasting color or stencil for visual interest.
If your RV has wallpaper, check for damage along the edges. Re-glue loose sections or replace the wallpaper if necessary.
Install New Window Treatments
With the valance gone, you might want to switch to modern blinds, shades, or curtains. Measure the window opening and choose treatments that fit without the valance for support.
For example, you could install tension rods inside the window frame or mount brackets directly to the wall. This gives a cleaner, more open look.
Improve Insulation or Ventilation
The space behind the valance often contains gaps that allow heat loss or air leaks. Use foam board or spray foam to insulate the area, especially in older RVs.
You can also install a small vent or fan to improve airflow, particularly if the valance covered an air conditioning unit.
Safety Tips and Best Practices
Safety should always come first when working on your RV. Here are some key tips to keep in mind:
- Turn off power: If you’re near electrical components, shut off the breaker to prevent shocks.
- Wear protective gear: Gloves and safety glasses protect against cuts, dust, and debris.
- Work in good lighting: A bright work light helps you see screws, wires, and potential hazards.
- Use gentle force: RVs are built with lightweight materials—avoid prying too hard or using excessive force.
- Keep parts organized: Label screws and components to avoid confusion during reassembly.
- Ask for help: Long or heavy valances are easier to remove with two people.
Taking these precautions will help ensure a smooth, injury-free experience.
Conclusion
Removing an RV valance is a practical and rewarding DIY project that opens up new possibilities for customization and repair. Whether you’re updating your interior design, fixing hidden damage, or improving insulation, this task gives you greater control over your RV’s comfort and style.
By following the steps outlined above—preparing the area, using the right tools, working carefully, and planning your next steps—you can remove your valance safely and efficiently. Remember to inspect the exposed area for issues, keep hardware organized, and take your time to avoid mistakes.
With a little effort, you’ll not only enhance the look of your RV but also gain valuable experience in RV maintenance. So grab your tools, put on your gloves, and get started—your refreshed interior is just a valance removal away.
Frequently Asked Questions
Can I remove an RV valance without damaging the wall?
Yes, with careful technique. Use a utility knife to cut through caulk and a putty knife to gently pry the valance away. Avoid excessive force to prevent tearing lightweight wall materials.
Do I need to remove curtains before taking off the valance?
It’s recommended. Removing curtains, blinds, or rods gives you better access and reduces the risk of damaging your window treatments during the process.
What if my valance is glued down with strong adhesive?
Use a heat gun or hairdryer to soften the adhesive, then carefully pry with a plastic scraper. Work slowly to avoid damaging the wall or valance.
How do I know if there are hidden screws or clips?
Look for small access holes, seams, or slight movement when you press the valance. A flashlight can help reveal hidden mounting points.
Can I reinstall the same valance after removal?
Yes, if it’s in good condition. Clean off old adhesive, check for damage, and reattach using the original screws or new ones if needed.
Should I replace the valance or leave the wall exposed?
It depends on your goals. A new valance can refresh the look, while leaving the wall exposed creates a more open, modern feel—especially if you paint or finish the area nicely.


