How to Remove a Bmw X5 Door Handle
Removing a BMW X5 door handle is a detailed but manageable DIY task with the right tools and knowledge. The process varies significantly between exterior and interior handles and across different X5 generations (E53, E70, F15, G05). Critical steps include disconnecting the battery, using proper trim tools, and understanding hidden fasteners. This guide provides comprehensive, generation-specific instructions to help you complete the job correctly and safely.
So, your BMW X5’s door handle is sticking, cracked, or just plain ugly, and you’ve decided it’s time for a change. Maybe you’re repainting the door, replacing a broken mechanism, or finally tackling that annoying rattle. Whatever the reason, taking on the job of removing a BMW X5 door handle yourself can save you a significant chunk of change. But let’s be clear: this isn’t a simple “unscrew and pull” job like on an old truck. BMWs, especially the X5, are engineered with precision, which means their door handles are secured with a mix of hidden screws, delicate plastic clips, and integrated wiring. One wrong move can scratch your beautiful paint, break a costly trim piece, or even trigger an airbag warning light.
The good news? With the right preparation, a calm mindset, and this comprehensive guide, you can successfully remove your X5’s door handle. We’ll walk you through every step, from identifying your specific model generation to the final gentle pull. We’ll cover both the exterior and interior handles, highlight the common pitfalls, and give you the pro tips that mechanics wish you knew. Think of this as a friendly conversation over the hood of your X5. Let’s pop the toolbox open and get started.
Key Takeaways
- Safety First: Always disconnect the vehicle’s battery before starting to prevent electrical shorts, airbag deployment, or lock system malfunctions.
- Generation Matters: Your BMW X5’s generation (E53, E70, F15, G05) dictates the exact handle design, fastener types, and removal sequence.
- Tool Choice is Key: Use plastic trim removal tools to avoid paint damage and have a full set of Torx bits (T20-T45) and standard screwdrivers ready.
- Exterior vs. Interior: Exterior handle removal is more complex, involving door panel and lock mechanism access. Interior handles are generally simpler but can hide tricky clips.
- Patience Prevents Damage: Rushing can break plastic retainers or scratch paint. Work slowly, feel for hidden clips, and label screws meticulously.
- Know When to Stop: If you encounter seized bolts, broken internal components, or are uncomfortable with the process, seeking professional help is the smart choice to avoid costly repairs.
📑 Table of Contents
- Essential Tools and Safety Measures: Your Prep Checklist
- Knowing Your X5: Generation Differences in Door Handles
- Step-by-Step: Removing the Exterior Door Handle
- Step-by-Step: Removing the Interior Door Handle
- Troubleshooting Common Problems and Mistakes
- Reinstallation and Final Checks: Doing It Right the First Time
- When to Call a Professional: Knowing Your Limits
- Conclusion: Empowerment Through Understanding
Essential Tools and Safety Measures: Your Prep Checklist
Before you even glance at the door, a proper setup is non-negotiable. Jumping in unprepared is the fastest route to a frustrating, expensive mistake. This section is your foundation. Skipping these steps risks damaging your vehicle or, in rare cases, causing personal injury.
The Core Toolkit: What You’ll Actually Need
Gather these items before you begin. Having them within arm’s reach will save you from frantic searching mid-job.
- Plastic Trim Removal Tools: A set of varying widths and thicknesss. These are your best friends. They pry open clips without marring paint or cracking plastic. Never use a flathead screwdriver directly on painted surfaces.
- Torx Bit Set: BMW loves Torx screws. You’ll need a range from T20 to T45. A ratcheting Torx driver with a long, flexible shaft is ideal for reaching into deep door cavities.
- Standard Screwdrivers: A small flathead (for prying and releasing wire connectors) and a small Phillips.
- Socket Set: Often, a 10mm or 8mm socket is needed for the door latch bolts inside the panel.
- Flashlight or Headlamp: The interior of a car door is dark and shadowy. A good light is essential for seeing screw holes and clip locations.
- Magnetic Tray or Small Containers: For screws and clips. Label them with masking tape if you have multiple sizes.
- Microfiber Cloths: To protect the door frame and window when you’re working.
- Gloves: Nitrile gloves protect your hands from sharp metal edges inside the door and keep your car clean.
Safety First: The Non-Negotiable Precautions
Your BMW’s door is not just a hunk of metal; it’s a complex system with wiring for locks, mirrors, and sometimes even speakers. It’s also connected to the vehicle’s safety systems.
1. Disconnect the Battery: This is the single most important step. Locate your X5’s battery (in the engine bay for most models, but some have it in the trunk). First, disconnect the negative (-) terminal. This eliminates all power to the door’s wiring harness, preventing accidental short circuits that can blow fuses or damage control modules. It also disables the airbag system in the door panel, which is crucial for your safety. If you’ve ever read about an airbag deploying during interior work, it’s almost always because the battery wasn’t disconnected. For more on BMW electrical system safety, you can refer to guides on disabling a BMW car alarm, which covers similar precautions.
2. Protect Your Paint and Glass: Before you start prying, place microfiber cloths over the door’s leading edge (where it meets the frame) and the window glass. A slipped tool can instantly create a deep scratch. Consider applying painter’s tape to the immediate work area for an extra layer of defense.
3. Work in a Clean, Well-Lit Area: A cluttered garage or dim driveway is your enemy. Ensure you have ample space to open the door fully and lay out your tools. Good lighting will help you spot those tiny, hidden screws.
4. Mind the Wiring: Once the panel is off, you’ll see a wiring harness connecting to the door lock, mirror adjuster, and possibly a speaker or courtesy light. These connectors have locking tabs. Do not yank on wires. Press the tab and pull gently on the connector itself, not the wires.
Knowing Your X5: Generation Differences in Door Handles
Assuming all BMW X5s are the same is a rookie error. The model has evolved through five distinct generations since its 1999 debut, and each has a unique door handle design and attachment method. Identifying yours is the first real step in the process.

Visual guide about How to Remove a Bmw X5 Door Handle
Image source: stokesandrenk.com
Generation Breakdown (E53, E70, F15, G05)
- E53 (1999-2006): The original X5. The exterior handle is a traditional lever style with a key cylinder on the handle itself. Removal involves removing the inner door panel to access two Torx screws behind the handle. The interior handle is a simple pull-cup with a single hidden Torx screw at its base.
- E70 (2007-2013): This generation introduced the more modern, flush-mounted exterior handle with a push-button. The button itself may need to be pried off to access a screw. The interior handle is a small rectangular paddle. Both require extensive interior panel removal to access the main fasteners.
- F15 (2014-2018): The “Sports Activity Vehicle” era. The exterior handle is similar to the E70 but with a different key system (keyless entry). It often has a small cap on the rear edge covering a Torx screw. The interior handle is a sleek, vertical paddle. The door panel design is more complex with numerous plastic clips.
- G05 (2019-Present): The current model. Features a very sleek, almost seamless exterior handle with a touch-sensitive button. Removal is the most complex, often requiring special tools to release the handle from the door skin after all internal fasteners are removed. The interior paddle is similar to the F15 but with updated wiring for comfort features.
How to Identify Your X5: Check the driver’s side door jamb for a sticker with the model year and VIN. The VIN’s 7th character can indicate the body style (E, F, G). The overall shape—boxier for E53/E70, more streamlined for F15/G05—is also a giveaway.
Step-by-Step: Removing the Exterior Door Handle
The exterior handle is the most common point of failure (cracks, worn mechanism) and the most complex to remove. This process will almost always require you to remove the interior door panel. Here is a generalized process that we’ll tailor for key generations.
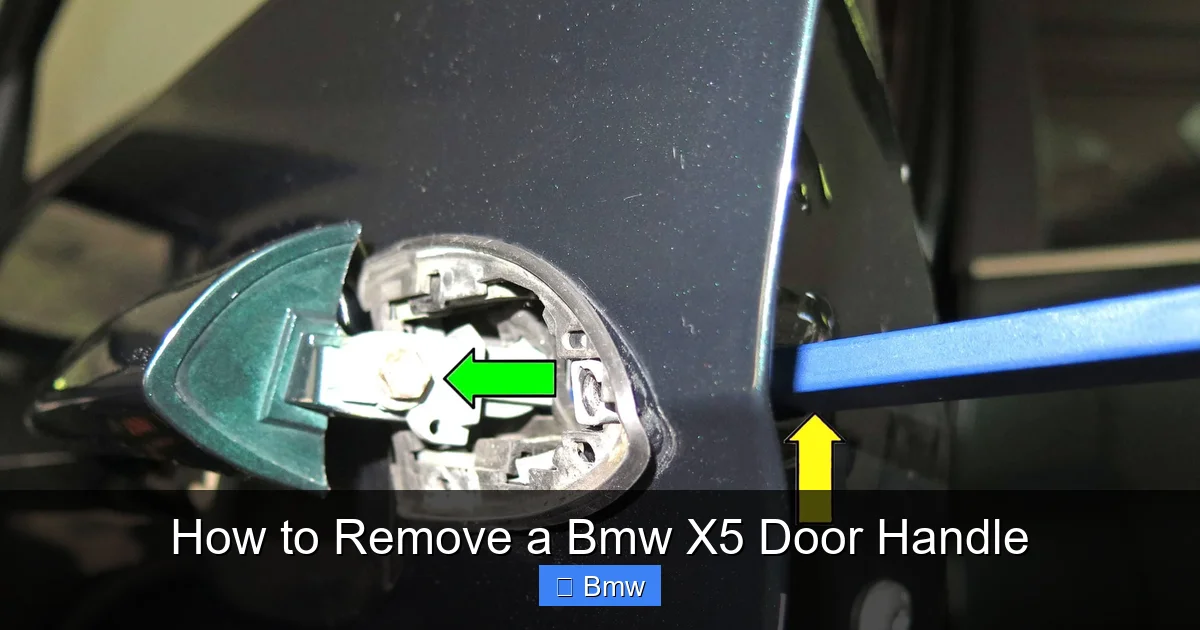
Visual guide about How to Remove a Bmw X5 Door Handle
Image source: cdn4.pelicanparts.com
Universal First Steps (All Generations)
- Disconnect the Battery. Yes, we’re saying it again. It’s that important.
- Open the Window. Roll the window all the way down. This gives you clearance to work on the interior panel and prevents the window regulator arms from hitting you.
- Remove the Interior Door Panel. This is the gateway. The process varies, but the principles are the same.
To remove the panel: Start by prying off the plastic cover behind the interior door handle (the “ash tray” or pull-cup cover). Underneath, you’ll find one or two Torx screws (often T20 or T25). Remove them. Next, pry off the switch panel (for locks and windows) if your model has it integrated. It usually pops out with firm, even pressure from trim tools. Behind it, you may find more screws. Then, along the bottom edge of the door panel, pry up the plastic sill cover. Underneath, you’ll find additional Torx or Phillips screws securing the panel’s bottom. Finally, gently pry the entire panel upward to disengage the plastic retainers from the door frame. Be patient—there are many. Once free, tilt the panel outward carefully. Do not let it hang by the wiring harness. Before completely separating, reach behind and unplug all electrical connectors (lock, mirror, light). Press the tab and pull.
Accessing and Removing the Handle (E70/F15 Example)
With the panel off, you can see the back of the exterior handle mechanism.
- Locate the Fasteners: You’ll see the handle’s rod connected to the latch. There will be one or two Torx screws (commonly T30 or T40) securing the handle’s bracket to the inner door frame. Remove these.
- Disconnect the Lock Rods: Carefully pry the plastic clip or metal rod that connects the handle to the door lock mechanism. These can be brittle. Note their orientation for reassembly.
- Disconnect the Wiring: If your handle has an integrated keyless entry antenna or button, a small wiring connector will be clipped to its back. Unplug it.
- The Final Release: This is the tricky part. The handle is now only held by its front clips against the outer door skin. Go to the exterior of the car. Look at the gap between the handle and the door. You may see a small plastic cap on the rear edge of the handle. Pry it off with a trim tool to reveal a third Torx screw (a common hidden fastener on E70/F15). Remove it. Now, from behind the handle (inside the door cavity), use your fingers or a tool to gently push the handle outward. It should pivot slightly and then release from its front clips. Do not force it. If it’s stuck, double-check for any missed screws or rods.
Special Consideration for the G05
The G05’s handle is more integrated. After removing all internal fasteners (often two Torx screws and the lock rod), the handle may not pop out. There is a special retaining clip on the front edge. You typically need to insert a special trim tool or a carefully wrapped flathead screwdriver into the gap at the front of the handle and pry inward while simultaneously pulling the handle rearward. It’s a precise motion. Consult a model-specific diagram if possible.
Step-by-Step: Removing the Interior Door Handle
Thankfully, the interior handle (the paddle or cup you pull to open the door) is much simpler. However, it’s not without its tricks.
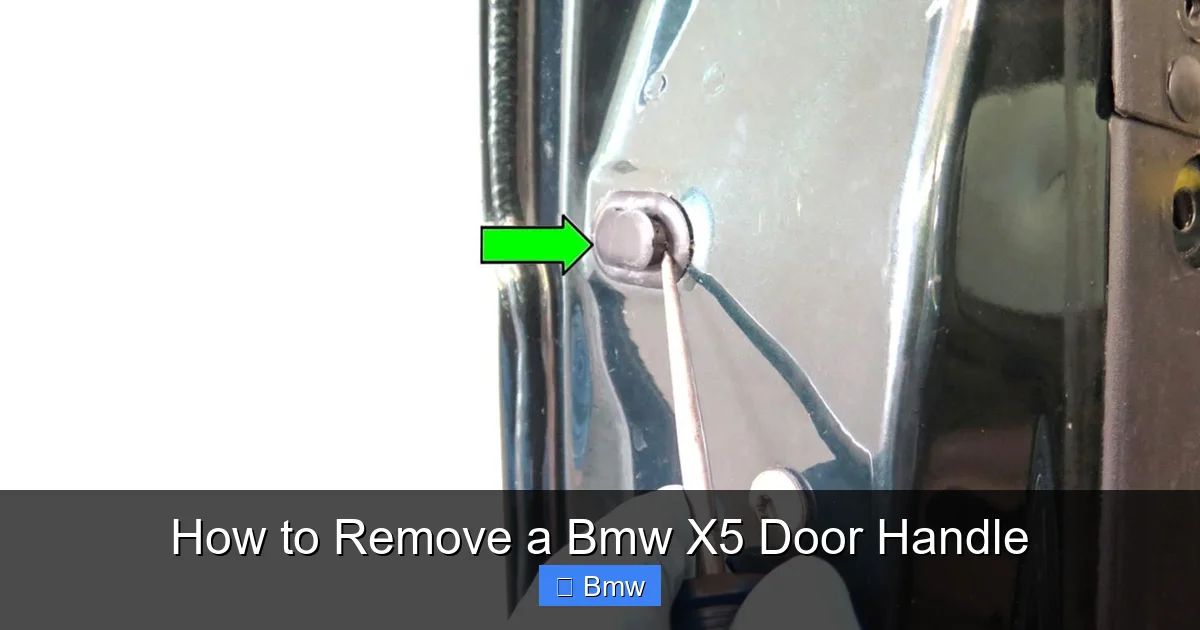
Visual guide about How to Remove a Bmw X5 Door Handle
Image source: cdn4.pelicanparts.com
General Process for Most X5s
- Locate the Hidden Screw: Usually, there is one Torx screw (T20 or T25) hidden at the base of the handle, behind a small plastic cap or inside a recessed hole. Prying off the cap or reaching into the hole with a flexible Torx bit is the key.
- For “Pull-Cup” Styles (E53): The entire cup pulls off. First, remove any screws behind the ashtray cover as described in the exterior panel removal section. Then, grip the cup firmly and pull it directly outward. It’s held by several plastic clips. They will pop one by one. Use a trim tool behind the cup to gently lever it if it’s stuck.
- For “Paddle” Styles (E70, F15, G05): Once the base screw is removed, the paddle should pivot forward on top hinges. Gently pry the rear edge outward. It will disengage from its top clips and lift off.
What’s Behind It?
Once the interior handle is off, you’ll see the door’s internal mechanism. This is a great time to inspect the rods and latch for wear, corrosion, or broken plastic bushings. If your reason for removal was a loose or non-functional handle, the problem is likely here. Lubricate moving parts with a white lithium grease or silicone spray. If a bushing is cracked, you can often buy a repair kit instead of the entire expensive latch assembly.
Troubleshooting Common Problems and Mistakes
Even with this guide, you might hit a snag. Here’s how to handle the most frequent issues without causing a disaster.
“The Screw is Stripped or Missing!”
This happens. If the head is stripped, you have options. Use a precision flathead screwdriver and tap it in gently with a hammer to get a better bite. An impact driver with the correct bit can also work. As a last resort, carefully drill a small hole into the screw and use an easy-out extractor. If the screw is completely missing, you must find its threaded hole in the door frame. Use a flashlight and a bent wire hook to feel for the threads. You’ll need to source an identical replacement screw from a dealer or parts specialist.
“The Plastic Clips Are Broken Everywhere!”
This is the most common damage. When you pry a panel, the plastic retainers can snap off the door frame. Don’t panic. The panel will still hold with the remaining clips. For reassembly, you can buy generic plastic retainer clips (measure the diameter and pin height). Apply a tiny dab of RTV silicone to the new clip’s pin for a more secure hold. If many are broken, consider having a professional replace the door panel seals or using a strong adhesive sparingly on the clip backs.
“My Door Locks/Windows Stopped Working!”
This usually means you forgot to reconnect a wiring harness or you damaged a connector. Double-check that all plugs are fully seated until you hear the click. If a function still doesn’t work, you may have blown a fuse. Check your fuse box. If a fuse is blown, there may be a short in the wiring you pinched. Inspect all wires for nicks. If problems persist after checking fuses, it might be a deeper electrical issue. For context, electrical gremlins in BMWs can sometimes relate to broader systems; resources on fixing a BMW driver restraint system malfunction illustrate how door-mounted sensors are interconnected.
“The Handle is Still Stuck After Removing All Screws!”
You missed something. Go back to the beginning. For exterior handles, check for a hidden screw under the key cap (if applicable) or at the front edge near the mirror. For interior handles, ensure the base screw is fully out. Sometimes a handle is seized due to age and dirt. A gentle, strategic tap with a rubber mallet on the handle’s body (not the plastic) can free it. Apply a small amount of penetrating lubricant (like PB Blaster) to the seam and let it sit for 10 minutes.
Reinstallation and Final Checks: Doing It Right the First Time
Removal is only half the battle. A sloppy reinstall leads to rattles, water leaks, and premature failure.
Reassembly in Reverse, But Smarter
Before putting the door panel back, test the new or refurbished handle. Connect its wiring and rod linkages, then manually operate the handle to ensure it smoothly pulls the latch. Do this with the window down. Once confirmed, disconnect everything again. Now, place the door panel near the door and connect all wiring harnesses first. This is much easier than trying to plug them in with the panel dangling. Seat the panel carefully over the door frame, ensuring all plastic retainers align with their holes. Start at the top and gently press around the perimeter until all clips snap. Do not use excessive force. Finally, reinstall all screws in their correct locations—this is where your labeled tray pays off. Reattach the switch panels and covers.
The All-Important Final Test
Before declaring victory:
- Reconnect the Battery.
- Test the Door: Open and close the door from both inside and outside 10 times. Listen for rattles or unusual noises.
- Check the Lock: Test central locking, key fob, and manual lock/unlock.
- Inspect for Water Leaks: During the next rain or car wash, check the interior of the door for moisture. A misaligned panel or damaged seal can cause leaks.
- Window Operation: Ensure the window rolls up and down smoothly and seals properly against the weatherstrip.
When to Call a Professional: Knowing Your Limits
There is absolutely no shame in paying for expertise. Here are clear signs you should stop and call a BMW specialist:
- You’ve removed the panel but cannot locate or access the exterior handle fasteners.
- The handle mechanism is broken internally, and you need to replace parts within the door cavity.
- You’ve drilled out a screw and damaged the threaded hole in the door frame.
- After reassembly, the door latch does not fully engage, or the window is misaligned.
- You feel uncomfortable working with the airbag system or complex wiring.
Professional labor costs for this job can range from $200 to $600 depending on the shop and your X5’s generation. While that seems high, it’s often cheaper than the $1,000+ cost of a damaged door panel, scratched paint, or a broken window regulator. Remember, a job done right the first time is the only job that saves you money.
Conclusion: Empowerment Through Understanding
Removing a BMW X5 door handle is a perfect example of a task that seems daunting but is conquered through methodical preparation and patience. The core principles—disconnect power, protect surfaces, identify your model, and work slowly—apply to almost any complex automotive repair. By following this guide, you’ve not only learned a specific skill but also gained a deeper appreciation for the engineering in your vehicle. You’ve saved money, avoided a dealership markup, and earned a genuine sense of accomplishment. The next time a minor issue arises, you’ll approach it with confidence. Just remember: when in doubt, consult a factory manual or a trusted forum for your specific X5 generation, and never let pride override practicality. Your X5 is a precision machine; treat it with the respect it deserves, and it will reward you with years of driving pleasure.
Frequently Asked Questions
What are the absolute must-have tools for this job?
You absolutely need a set of plastic trim removal tools and a comprehensive Torx bit set (T20-T45). A ratcheting driver with flexible shafts makes reaching screws inside the door much easier. Without these, you risk damaging your car’s interior.
How long should I expect this repair to take a first-timer?
For a first-timer on an E70 or F15, budget 2 to 3 hours. The E53 is simpler (maybe 1.5 hours), while the G05 can take 3+ hours due to its more complex, integrated handle. Rushing will lead to mistakes, so take your time.
Can I remove just the exterior handle without taking the door panel off?
On no modern BMW X5 (E70 and later) can you fully remove the exterior handle without removing the interior door panel. The primary retaining screws and linkage rods are only accessible from inside the door. Attempting it from the outside will result in broken clips and frustration.
My interior handle pull-cup is broken. Can I just replace that part?
Yes, often you can. The pull-cup itself is usually a separate plastic component that clips onto the underlying mechanism. Once you remove the cup (by pulling or prying), you can often source just the cup from BMW or a parts supplier, which is much cheaper than a full handle assembly.
Do I really need to disconnect the battery for just the interior handle?
While the risk is lower for the interior handle, it’s still a mandatory safety practice. Disconnecting the battery prevents any accidental short circuit when your tools might touch metal parts inside the door. It also disables the airbag system mounted in the door panel, protecting you from accidental deployment.
My X5 has keyless entry. Does that complicate the handle removal?
It adds a step. The exterior handle houses the antenna and button for the keyless system. You must carefully disconnect its wiring harness after removing the main fasteners. The connector is small and fragile; press the locking tab gently and pull straight out. Do not pull on the wires.