
How to Flush Rv Water Heater
Contents
- 1 Key Takeaways
- 2 📑 Table of Contents
- 3 Why Flushing Your RV Water Heater Matters
- 4 When Should You Flush Your RV Water Heater?
- 5 Tools and Supplies You’ll Need
- 6 Step-by-Step Guide to Flushing Your RV Water Heater
- 7 Tips for Maintaining a Healthy RV Water Heater
- 8 Common Mistakes to Avoid
- 9 Conclusion
- 10 Frequently Asked Questions
Flushing your RV water heater is essential for maintaining performance and preventing damage from sediment buildup. This step-by-step guide walks you through the entire process, from safety prep to final checks, ensuring your system runs smoothly all season long.
Key Takeaways
- Regular flushing prevents sediment buildup: Minerals and debris accumulate over time, reducing heating efficiency and potentially damaging the tank.
- Turn off power and water supply first: Always shut off electricity (gas and electric models) and close the water inlet valve before starting.
- Use the drain valve or flush wand: Most RVs have a drain valve; for deeper cleaning, a flush wand helps remove stubborn sediment.
- Flush at least once per season: Experts recommend flushing your RV water heater before and after long trips or seasonal storage.
- Inspect the anode rod during maintenance: This sacrificial rod protects the tank from corrosion—check and replace it if worn down.
- Never operate a dry water heater: Always ensure the tank is full before turning on power to avoid burning out heating elements.
- Use RV-safe antifreeze in winter: If storing in cold climates, properly winterize your system to prevent freezing damage.
📑 Table of Contents
Why Flushing Your RV Water Heater Matters
If you’ve ever turned on the hot water in your RV only to get lukewarm trickles or strange gurgling sounds, sediment buildup might be the culprit. Over time, minerals like calcium and magnesium from hard water settle at the bottom of your water heater tank. This sediment acts as an insulator, forcing the heating element to work harder to warm the water. The result? Higher energy use, longer wait times for hot water, and eventually, premature failure of your unit.
Flushing your RV water heater isn’t just a good idea—it’s essential maintenance. Think of it like changing the oil in your car. Skipping it might not cause immediate problems, but over time, the damage adds up. A clean water heater heats faster, lasts longer, and saves you money on repairs or replacements. Plus, it ensures you have reliable hot water for showers, dishwashing, and cleaning while on the road.
Many RV owners overlook this simple task, assuming their water heater will just keep working. But even if you use your RV only occasionally, mineral deposits can still accumulate. Whether you’re a weekend warrior or a full-time traveler, making time to flush your water heater at least once per season is one of the smartest things you can do for your rig.
When Should You Flush Your RV Water Heater?
Visual guide about How to Flush Rv Water Heater
Image source: truckcampermagazine.com
Timing is everything when it comes to water heater maintenance. The general rule is to flush your RV water heater at least once every six months—ideally before and after long trips or seasonal storage. But there are other signs that it’s time to flush, even if it hasn’t been six months.
One telltale sign is reduced hot water output. If you notice your showers getting shorter or the water taking longer to heat up, sediment may be insulating the heating element. You might also hear popping, cracking, or rumbling noises coming from the tank—these are bubbles of steam trying to escape through layers of built-up minerals.
Another clue is discolored water. If your hot water runs cloudy, rusty, or has a metallic taste, sediment or corrosion could be contaminating the supply. And if you’ve recently filled up at a campground with hard water, that’s a good reason to schedule a flush sooner rather than later.
Seasonal changes are also a great reminder. Before winterizing your RV, always flush the water heater to remove any debris that could freeze and expand. Similarly, when de-winterizing in spring, a flush ensures your system starts the season clean and efficient.
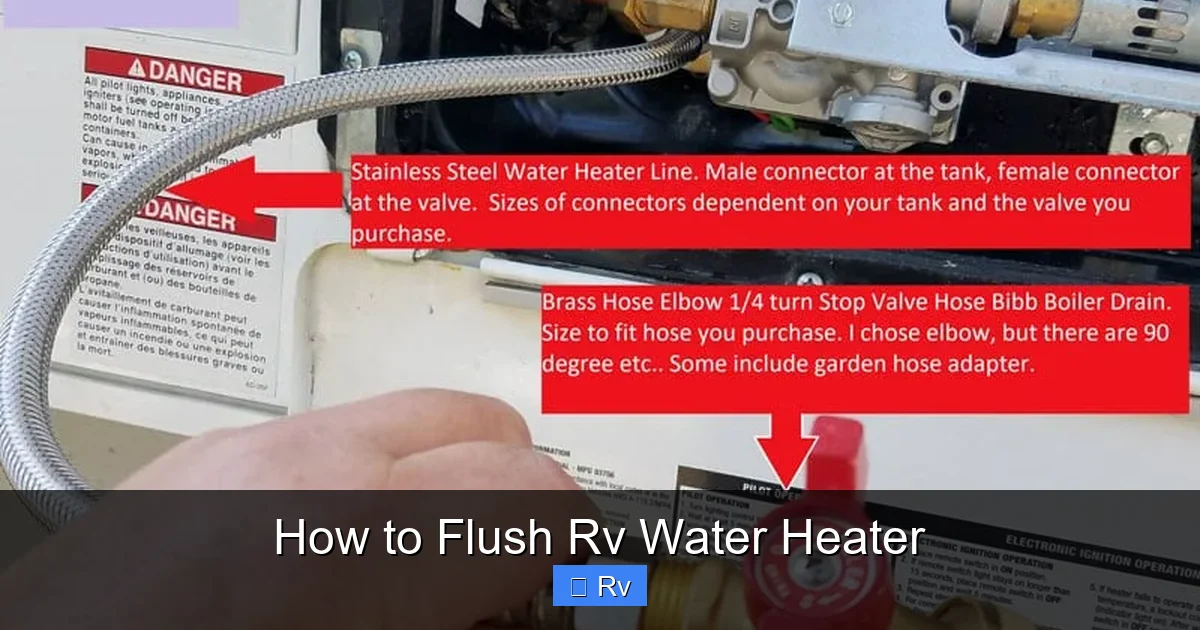
Tools and Supplies You’ll Need
Visual guide about How to Flush Rv Water Heater
Image source: i.pinimg.com
Before you begin, gather all the necessary tools and supplies. Having everything ready will make the process smoother and safer. Here’s a checklist of what you’ll need:
- Adjustable wrench or pliers: For loosening the drain valve and anode rod.
- Garden hose: A standard 5/8-inch hose connects to the drain valve or flush wand.
- Flush wand or descaling kit (optional): A long, flexible wand with a spray nozzle helps blast away stubborn sediment.
- Bucket or drain pan: To catch any residual water when opening the drain valve.
- Safety gloves and goggles: Protect your hands and eyes from hot water and debris.
- Teflon tape: For resealing threaded connections if needed.
- Replacement anode rod (if worn): Check the condition during flushing and replace if necessary.
- RV antifreeze (for winterizing): Only needed if you’re preparing for cold weather storage.
Most of these items are inexpensive and available at hardware stores or RV supply shops. If you’re new to RV maintenance, consider investing in a basic toolkit designed for water heater care. It’ll save you time and frustration down the road.
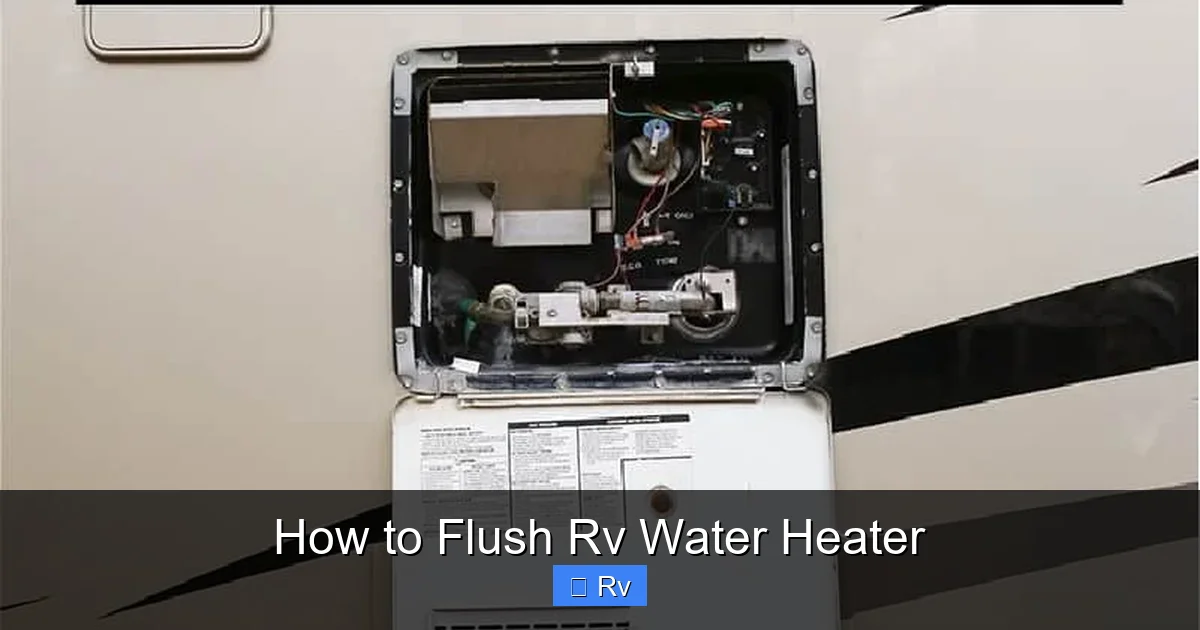
Step-by-Step Guide to Flushing Your RV Water Heater

Visual guide about How to Flush Rv Water Heater
Image source: i.pinimg.com
Now that you’re prepared, let’s walk through the flushing process step by step. This method works for both gas and electric water heaters, though electric models require an extra safety step.
Step 1: Turn Off Power and Water Supply
Safety first. Before touching anything, make sure the water heater is completely off. For electric models, go to your RV’s breaker panel and switch off the water heater circuit. For gas models, turn off the gas supply valve—usually located near the water heater or on the propane tank.
Next, close the water inlet valve. This valve is typically found on the cold water line leading into the water heater. It may be labeled “Inlet” or “Cold.” Closing it prevents new water from entering the tank while you drain it.
If your RV has a bypass valve (common in winterizing setups), make sure it’s set to “bypass” so water doesn’t flow back into the heater during the process.
Step 2: Let the Water Cool Down
Never attempt to flush a hot water heater. The water inside can be scalding—over 120°F in many cases. Allow the system to cool for at least 2–3 hours, or overnight if possible. This prevents burns and reduces pressure inside the tank.
You can speed up cooling by turning on a hot water faucet inside the RV. This relieves pressure and allows cooler water to circulate slightly. Just don’t open the drain valve until the water is lukewarm to the touch.
Step 3: Open a Hot Water Faucet
Before draining, open a hot water faucet somewhere in your RV—like the kitchen sink or shower. This breaks the vacuum inside the tank and allows air to enter, making drainage faster and smoother. Without this step, water may trickle out slowly or stop altogether.
Leave the faucet open throughout the draining process. You can close it once the tank is empty.
Step 4: Locate and Open the Drain Valve
Find the drain valve on your water heater. It’s usually a brass or plastic valve at the bottom of the tank, often with a hose connection. Some models have a built-in hose bib; others require you to attach a garden hose.
Place your bucket or drain pan underneath to catch any initial spillage. Then, slowly open the drain valve by turning it counterclockwise. If it’s stiff, use your wrench—but don’t force it. Over-tightening can damage the valve.
Let the water flow out completely. You’ll likely see cloudy or rusty water at first, which is normal. This is the sediment being flushed out.
Step 5: Flush with Fresh Water (Optional but Recommended)
For a deeper clean, use a garden hose to flush the tank. Attach the hose to the drain valve (if it has a threaded connection) or use a flush wand if you have one.
Turn on the water at full pressure and let it run for 2–3 minutes. The force of the water will stir up and wash away remaining sediment. You’ll see the water run clearer as the process continues.
If you’re using a flush wand, insert it into the tank through the drain opening and move it around to dislodge buildup on the sides and bottom. This is especially helpful if you’ve noticed reduced performance or hear rumbling sounds.
Step 6: Inspect and Replace the Anode Rod
While the tank is empty, take the opportunity to check the anode rod. This rod is screwed into the top of the water heater and sacrifices itself to protect the tank from corrosion.
Use your wrench to carefully remove the rod. If it’s less than ½ inch thick or coated in calcium, it’s time to replace it. A worn anode rod means your tank is at risk of rust and leaks.
When installing a new rod, wrap the threads with Teflon tape to ensure a tight seal. Hand-tighten first, then give it a gentle turn with the wrench—don’t overtighten.
Step 7: Close the Drain Valve and Refill the Tank
Once flushing is complete, close the drain valve by turning it clockwise. Make sure it’s snug but not over-tightened.
Now, reopen the water inlet valve and turn on the water supply. Let the tank fill completely—this may take a few minutes. You’ll know it’s full when water flows steadily from the hot water faucet you left open earlier.
Close the faucet once the tank is full.
Step 8: Restore Power and Test
For electric models, turn the breaker back on. For gas models, relight the pilot light or turn on the electronic ignition.
Allow the water heater to heat up for 30–60 minutes before using hot water. This gives the element or burner time to warm the entire tank.
Test the water at a faucet to ensure it’s heating properly. If everything works, you’re done!
Tips for Maintaining a Healthy RV Water Heater
Flushing is just one part of water heater care. To keep your system running smoothly year-round, follow these best practices:
- Use a water softener if you have hard water: Install an inline water softener or use a filtration system to reduce mineral buildup.
- Install a sediment filter: A whole-RV filter can catch debris before it reaches the water heater.
- Avoid leaving the heater on when the tank is empty: Always ensure the tank is full before turning on power. Running a dry heater can burn out the element in minutes.
- Check the pressure relief valve annually: Lift the lever on the T&P valve to release a burst of water. If it doesn’t work, replace it.
- Keep the area around the water heater clean: Dust and debris can clog vents on gas models, reducing efficiency and safety.
- Monitor water quality: If you notice odd smells or tastes, flush the system and consider using a water treatment solution.
These small habits go a long way in preventing problems and extending the life of your water heater.
Common Mistakes to Avoid
Even experienced RVers can make mistakes when flushing their water heater. Here are a few to watch out for:
- Flushing a hot tank: Always let the water cool to avoid burns and pressure issues.
- Forgetting to open a faucet: This can create a vacuum and slow drainage.
- Over-tightening the drain valve: This can crack the valve or strip the threads.
- Skipping the anode rod check: A worn rod can lead to tank corrosion and leaks.
- Not refilling before restoring power: Running a dry heater damages the element and voids warranties.
- Using household cleaners: Never pour vinegar or chemical cleaners into the tank unless specified by the manufacturer. They can damage seals and components.
Avoiding these errors ensures a safe, effective flush every time.
Conclusion
Flushing your RV water heater might not be the most exciting part of RV ownership, but it’s one of the most important. A clean tank means better performance, longer appliance life, and fewer headaches on the road. By following this guide, you’ll keep your water heater in top shape season after season.
Remember, regular maintenance is always easier—and cheaper—than emergency repairs. Set a reminder on your calendar to flush your water heater twice a year, and consider adding it to your pre-trip checklist. Your future self (and your hot showers) will thank you.
With the right tools, a little patience, and these simple steps, you can tackle this task like a pro. So next time you’re parked at a scenic overlook or cozy campground, you can enjoy a hot shower knowing your RV’s water system is running at its best.
Frequently Asked Questions
How often should I flush my RV water heater?
It’s recommended to flush your RV water heater at least once every six months—ideally before and after long trips or seasonal storage. If you use your RV frequently or have hard water, consider flushing it more often.
Can I flush my water heater while it’s still hot?
No, never flush a hot water heater. The water inside can cause severe burns, and the pressure may make draining difficult. Always let the system cool for 2–3 hours before starting.
Do I need special tools to flush my RV water heater?
Basic tools like an adjustable wrench, garden hose, and bucket are usually sufficient. A flush wand can help with deeper cleaning but isn’t required for routine maintenance.
What if my drain valve is stuck or leaking?
If the valve is stuck, try gently tapping it with a rubber mallet or applying penetrating oil. If it’s leaking after closing, it may need replacement. Consult your owner’s manual or a professional if unsure.
Can I use vinegar to clean my RV water heater?
Some manufacturers allow a vinegar flush for descaling, but it’s not recommended for all models. Check your owner’s manual first. Never use harsh chemicals unless specified.
What happens if I don’t flush my water heater?
Over time, sediment buildup reduces heating efficiency, increases energy use, and can damage the tank or heating element. In severe cases, it may lead to leaks or complete failure.


