
How to Disconnect a Jeep Door Wiring Harness
Disconnecting your Jeep’s door wiring harness is essential for door removal, repairs, or upgrades. This guide provides clear, step-by-step instructions to do it safely, avoiding electrical damage. Learn about the necessary tools, safety precautions like battery disconnection, and how to handle common issues. Whether you’re a DIY enthusiast or prepping for professional help, master this key skill for Jeep maintenance.
Hey there, fellow Jeep enthusiasts! Whether you’re a seasoned Wrangler owner or new to the Jeep family, there comes a time when you’ll need to work on your vehicle’s doors. Maybe you’re planning a fresh paint job, installing aftermarket speakers, or fixing a stubborn power window. Whatever the reason, one critical step you can’t skip is disconnecting the door wiring harness. Get this wrong, and you might face frustrating electrical gremlins, blown fuses, or even damage to sensitive modules. But don’t worry—I’m here to walk you through it, step by step, in plain English. By the end of this guide, you’ll confidently disconnect and reconnect your Jeep door wiring harness like a pro, all while keeping your rig’s electronics safe and sound.
First things first: what exactly is a door wiring harness? Think of it as your Jeep’s nervous system for the doors. It’s a bundled collection of wires, connectors, and protective sheathing that links the door’s components—like power windows, locks, mirrors, and speakers—back to the vehicle’s main electrical system. In Jeeps, especially the Wrangler with its removable doors, this harness runs through the door hinge area and connects via a robust plug typically hidden behind a rubber boot or access panel. Over time, these connectors can get sticky, corroded, or just plain stubborn. That’s where knowing the proper technique saves the day. We’ll cover everything from locating the harness to safely pulling it apart, troubleshooting snags, and making sure everything works when you put it all back together.
Key Takeaways
- Always disconnect the battery first: Prevent shorts and damage by removing the negative terminal before touching any wiring.
- Identify the correct harness connector: Jeep door harnesses vary by model; consult your service manual to locate the primary connector near the door hinge.
- Use proper tools to avoid damage: Trim removal tools and connector picks prevent broken clips and bent pins during disconnection.
- Secure loose wires: After disconnection, tape or zip-tie wires to prevent them from dangling or snagging.
- Test before reinstallation: Reconnect the battery and check all door functions (locks, windows, mirrors) to ensure proper operation.
- Know when to call a pro: If you encounter corroded connectors or damaged wires, seek professional help to avoid costly repairs.
📑 Table of Contents
- Understanding Your Jeep’s Door Wiring Harness
- Tools and Preparation: Setting Up for Success
- Safety First: The Critical Battery Disconnect
- Step-by-Step: Disconnecting the Door Wiring Harness
- Common Issues and Troubleshooting
- Reconnection and Testing: Making It All Work Again
- When to Seek Professional Help: Knowing Your Limits
- Conclusion: You’ve Got This!
Understanding Your Jeep’s Door Wiring Harness
Before we grab any tools, let’s get familiar with what we’re dealing with. The door wiring harness isn’t just one wire—it’s a complex assembly designed to handle multiple functions while surviving the elements. Jeep doors see a lot of action: they open, close, get rained on, and endure temperature swings. So the harness is built tough, with weather-sealed connectors and flexible sheathing. However, that same exposure can lead to issues like moisture ingress, which causes corrosion on connector pins. That’s often the reason you’re here—your door locks stopped working, or the window motor is dead, and you suspect the harness connection.
Harness Components and Location
A typical Jeep door wiring harness consists of:
- The main connector: This is the primary plug that attaches the door’s wiring to the vehicle’s chassis harness. It’s usually located in the door jamb, tucked behind a rubber boot that protects it from water and dirt. On a Jeep Wrangler (JK, JL, or TJ models), you’ll find it on the frame side of the hinge, often accessible with the door open. For Jeep Cherokee or Grand Cherokee models, the location might be similar but could require removing a small interior panel.
- Individual component wires: These branch off inside the door to power the window regulator, lock actuator, mirror motors, and any speakers or switches.
- Seals and boots: Rubber grommets and boots prevent water from traveling along the wire bundle into the vehicle’s interior.
Knowing your specific Jeep model is key. A Wrangler’s harness is designed for frequent door removal, so it has a more accessible connector. A Grand Cherokee’s might be more integrated into the door panel. If you have your owner’s manual or a service manual (like a Chilton or Haynes guide), it will have a diagram. If not, a quick online search for “Jeep [your model year] door wiring harness location” often yields forum posts with photos—those are gold mines for visual learners.
Why Would You Disconnect It?
You might need to disconnect the door harness for several reasons:
- Door removal: Taking the door off the hinges for paint, bodywork, or to install full-frame doors.
- Component replacement: Fixing a failed power window motor, door lock actuator, or mirror.
- Aftermarket upgrades: Installing new speakers, adding a secondary switch panel, or running additional wires for accessories.
- Diagnosing electrical issues: Sometimes the problem is a loose or corroded connection. Disconnecting and reconnecting can clean the contacts.
No matter the reason, the process is fundamentally the same. But remember: every Jeep is a little different. What holds true for a 2020 Wrangler JL might not apply exactly to a 2015 Cherokee. We’ll focus on general principles that work across most models, with tips for common variations.
Tools and Preparation: Setting Up for Success
Rushing into this job without the right tools or prep is a recipe for frustration. You’ll likely bend a connector tab, break a plastic clip, or lose a screw. Let’s avoid that. Gather these items before you start:
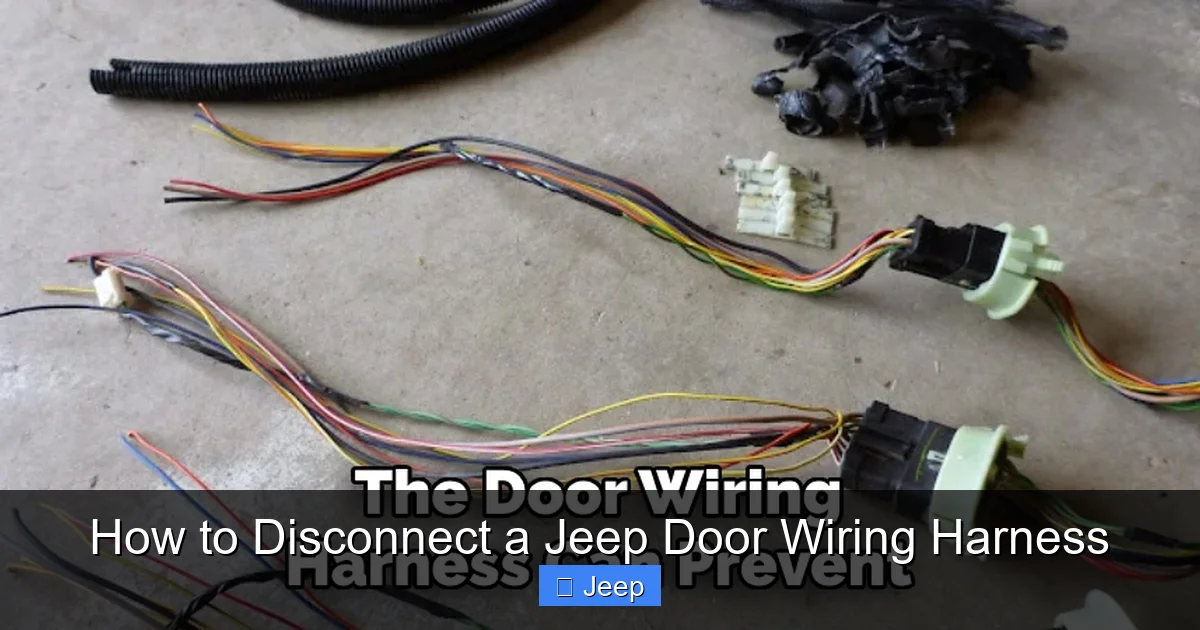
Visual guide about How to Disconnect a Jeep Door Wiring Harness
Image source: jeepfixes.com
- Basic hand tools: A set of socket wrenches (usually 10mm or 13mm for door hinge bolts), screwdrivers (flathead and Phillips), and maybe a Torx set if your Jeep uses those for interior panels.
- Trim removal tools: Plastic pry tools are essential for removing door panels without scratching paint or cracking plastic. You can get a set cheap online or at auto parts stores. Never use a metal screwdriver directly on interior trim—it will mar surfaces.
- Connector picks or small flathead screwdriver: For releasing stubborn connector locks. A dedicated pick set is ideal, but a small, thin flathead can work in a pinch.
- Flashlight or headlamp: The area behind the door panel is often dark. A bright light makes a huge difference.
- Mirror or inspection camera: Sometimes the connector is awkwardly placed. A small mirror on a stick helps you see what you’re doing.
- Multimeter (optional but helpful): To test for continuity or voltage if you’re troubleshooting.
- Zip ties, electrical tape, or a small container: To secure loose wires and keep screws organized.
Now, prep your Jeep:
- Park on a flat surface and set the parking brake. If you’re removing the door entirely, you’ll need a stable way to support it once the hinges are unbolted—a sturdy work stand or a helper with a firm grip.
- Clean the door jamb area. Dirt and debris can fall into the connector when you separate it. A quick vacuum or brush-off helps.
- Have your service manual ready. If you don’t have a physical copy, many manufacturers offer digital versions, and forums like JeepForum.com have user-uploaded PDFs.
- Work in good lighting. Daylight is best. If you’re in a garage, set up a work light.
One more prep step: mentally walk through the process. Visualize each move. This reduces mistakes. Remember, patience is your best tool here. Rushing can lead to broken parts that cost time and money to fix later.
Safety First: The Critical Battery Disconnect
Before you touch a single wire, there’s one non-negotiable safety step: disconnect the battery. Why? Because modern vehicles, including Jeeps, have complex electrical systems that are always partially “live.” Even with the key out, certain circuits—like the memory for your radio or the alarm system—can have voltage present. Accidentally shorting a wire against the door frame could blow a fuse, damage a control module, or even start a fire. Plus, if your Jeep has side curtain airbags in the door (some models do), you absolutely must avoid any accidental triggering during work.
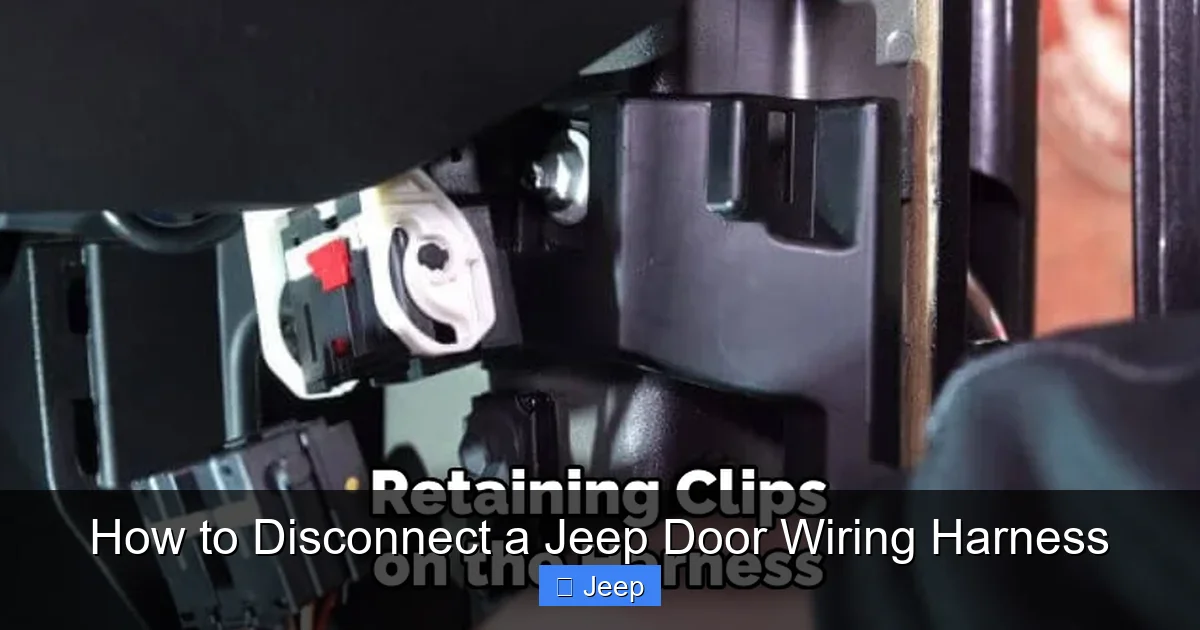
Visual guide about How to Disconnect a Jeep Door Wiring Harness
Image source: jeepfixes.com
Here’s how to do it safely:
- Locate the battery. In most Jeeps, it’s under the hood. Some Wranglers have it in the trunk ( JL models with the optional subwoofer might have it there). Consult your manual if unsure.
- Identify the terminals. The negative terminal is marked with a “-” symbol and is usually connected to the chassis. The positive is “+”.
- Loosen the negative terminal clamp. Use the appropriate socket (often 10mm) to break the bolt free. Once loose, carefully lift the clamp off the post.
- Secure the cable away from the battery. Tuck it into a non-metallic part of the engine bay or use a zip tie to keep it from accidentally touching the terminal. Some people use a non-conductive cap or even a plastic bag to cover the post.
- Wait a few minutes. This allows residual power in capacitors (like those for the radio or airbag systems) to drain.
That’s it! You’ve now eliminated the risk of electrical shorts. Always, always do this before disconnecting any wiring harness. It’s a habit that will save you from expensive mistakes. For a more detailed walkthrough on battery safety, including tips for modern vehicles with sensitive electronics, check out this guide on how to safely disconnect a car battery.
Once the battery is disconnected, you can proceed with confidence. But note: if your Jeep has a memory function for seats, radio, or steering wheel controls, you may need to reset those after reconnecting the battery. Keep any codes or settings in mind.
Step-by-Step: Disconnecting the Door Wiring Harness
Now for the main event. We’ll break this down into clear, sequential steps. I’ll describe the process for a typical Jeep Wrangler (JL/JK) since it’s the most common, but I’ll note variations for other models.
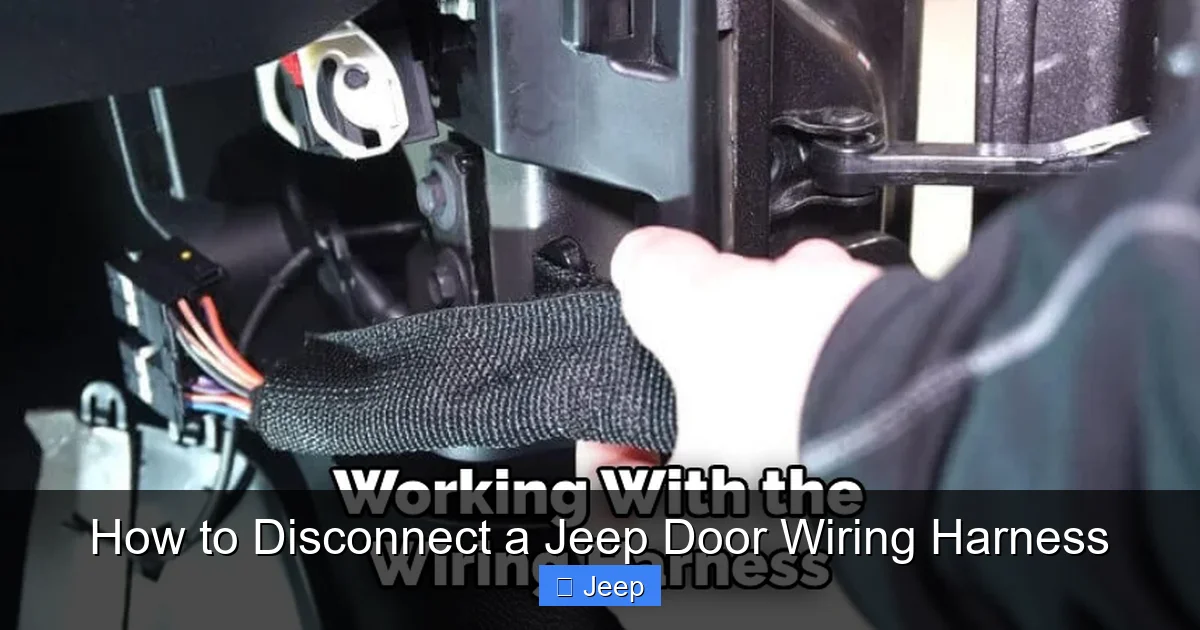
Visual guide about How to Disconnect a Jeep Door Wiring Harness
Image source: jeepfixes.com
Step 1: Access the Harness Connector
The connector is almost always located in the door jamb—the gap between the door and the vehicle’s frame when the door is closed. With the door open, look along the hinge side. You’ll see a rubber boot or sleeve that covers the wiring as it passes from the door to the frame. That boot protects the wires from flexing and weather. Behind that boot, near the hinge, is the main plug.
Sometimes the plug is tucked inside a small plastic cover or clip. Gently pry away any covers using your trim tools. If it’s behind the boot, you may need to peel the boot back slightly. Be careful not to tear the rubber—it’s reusable and important for weatherproofing. On some Grand Cherokees, the connector might be behind an interior door panel piece, so you may need to remove the door’s interior trim panel first. That’s a bigger job, but we’ll cover that in a moment.
Pro tip: If you’re having trouble seeing, use a mirror or a flexible inspection camera (like a borescope) to peek behind the boot without over-stretching it.
Step 2: Remove the Door Panel (If Necessary)
On many Jeeps, you can access the harness connector without removing the entire door panel. But if your connector is inside the door (common on some models or if you’re working on the interior side), you’ll need to take off the panel.
Here’s how:
- Remove any screws. Check around the armrest, door handle, and behind the pull cup. There are often hidden screws under plastic caps or plugs. Use a flathead to pop out the caps.
- Pry the panel off. Starting at the bottom, use your plastic trim tools to gently pop the retaining clips. Work your way around the perimeter. The panel is usually held by a series of plastic clips that snap into the door frame. Be firm but gentle—you don’t want to break the clips.
- Disconnect any electrical connectors on the panel. Once the panel is loose, you’ll see wires for the door switch panel, speaker, and maybe courtesy light. Press the tab and pull these connectors apart before lifting the panel away.
- Lift the panel upward and off. It may have hooks at the top that need to be disengaged.
Place the panel on a soft surface (like a blanket) to avoid scratches. Now you should have clear access to the door’s inner workings, including the harness connector that attaches to the door-side wiring.
Step 3: Locate and Inspect the Connector
With access gained, find the connector. It’s a plastic plug with multiple pins, usually black or gray. There will be a locking mechanism—a tab, slide, or lever—that keeps it from vibrating apart. Inspect the connector closely:
- Look for corrosion. Greenish/white crust on the metal pins indicates moisture intrusion. This is common and can make the connector hard to separate.
- Check for broken locks. If the locking tab is already broken, the connector might be loose, causing intermittent electrical issues.
- Ensure you’re pulling the right connector. There might be multiple plugs (for the mirror, speaker, etc.). The main harness connector is usually the largest with the most pins.
If you see corrosion, you’ll want to clean it later with a contact cleaner and a small brush. But first, let’s get it disconnected.
Step 4: Release the Connector Lock and Separate
This is the delicate part. Every connector design is slightly different, but the principle is the same: you must depress or slide the lock while pulling the two halves apart.
Common Jeep connector types:
- Push-and-slide lock: You press a tab on the top or side, then slide the outer sleeve backward while pulling the plug apart.
- Lever lock: A small plastic lever flips up to release. Lift it, then pull.
- Tab-and-pull: A simple tab that you press down while pulling the connectors straight apart.
How to do it:
- Position yourself for good leverage. Sometimes you need to push the lock with one hand while pulling the connector with the other. Use a pick if your fingers can’t reach.
- Apply steady pressure. Don’t yank. If it’s stuck, wiggle it very gently side-to-side while maintaining pressure on the lock. Forcing it can break the plastic housing.
- If corroded, use a penetrating lubricant. A tiny drop of WD-40 or a dedicated electrical contact cleaner on the connector seams can help. Let it sit for a minute.
- Once separated, immediately cover the exposed pins. Use electrical tape or a small plastic bag to prevent dirt or moisture from getting in. Do this for both the door-side and chassis-side connectors.
Important: Never pull on the wires themselves. Always grip the plastic connector body. Pulling wires can break internal connections or damage the harness.
Step 5: Secure the Loose Harness
With the connector separated, you now have a bundle of wires dangling from the door (if you’re removing the door) or just loose inside the jamb. You must secure these so they don’t get pinched, snagged, or accidentally shorted against the frame.
- If leaving the door on: Gently coil the door-side harness and secure it with a zip tie or Velcro strap to the door’s inner structure. Make sure it’s not in the way of the hinge movement when you close the door.
- If removing the door: You’ll need to support the door after unbolting the hinges. Before unbolting, make sure the harness is tucked safely away from the hinge area. You can tape it to the door frame or use a zip tie to keep it from dangling. Once the door is off, you might want to unplug the harness completely from the door’s internal components if you’re doing extensive work.
Some Jeep owners like to label the connectors with tape and a marker, especially if there are multiple plugs. It saves reconnection headaches later.
Step 6: Proceed with Your Door Work
Now the harness is safely disconnected, you can proceed with whatever project brought you here—whether it’s removing the door, replacing a window motor, or installing new speakers. Keep in mind that with the harness unplugged, none of the door’s electrical functions will work. That’s expected. Just remember to avoid drilling or cutting near where the wires run.
If you’re removing the door entirely, after unbolting the hinges, have a helper support the door’s weight. The wiring harness is not designed to hold the door! Once the door is off, you can place it on a padded surface.
Common Issues and Troubleshooting
Even with the best preparation, you might hit a snag. Here are common problems and how to solve them.
Connector Won’t Release
Symptom: You’ve located the lock tab, but the connector won’t budge.
Causes: Corrosion, debris, or a broken lock mechanism.
Solutions:
- Inspect the lock mechanism closely. Sometimes a small piece of plastic debris or a broken tab is jamming it. Use a pick to gently remove any foreign material.
- Apply penetrating oil. A tiny amount of PB Blaster or similar on the connector seams can loosen corrosion. Avoid spraying directly into the pins; just around the housing.
- Use more force—carefully. If you’re sure the lock is fully disengaged, try wiggling the connector while pulling. Sometimes they stick due to age.
- As a last resort, cut the connector. If it’s severely corroded or broken, you may need to cut off the old connector and install a new one. This requires soldering or crimping skills and a replacement connector part (available from dealerships or auto parts stores).
Corroded Pins
Symptom: Green/white crust on metal pins, or the connector feels gritty.
Solution: After disconnection, clean both sides with a contact cleaner spray and a small wire brush or cotton swab. Let it dry completely before reconnecting. For severe corrosion, you might need to replace the connector or the entire harness section.
Broken Locking Tab
Symptom: The tab that you press to release is missing or snapped off.
Solution: If the tab is broken, the connector may still separate if you can get a pick behind the locking mechanism to manually release it. However, a broken tab means the connector won’t stay locked when reconnected. You’ll need to replace the connector. This is a common failure point, and replacement connectors are often sold as part of a harness repair kit.
Wires Damaged or Frayed
Symptom: Exposed copper, cuts in the sheathing, or wires pulled from their terminals.
Solution: Damaged wires should be repaired immediately. Cut out the damaged section and splice in new wire using heat-shrink butt connectors or soldering with heat-shrink tubing. Ensure the repair is weatherproof. If multiple wires are damaged, consider replacing the entire harness section or the whole harness—it might be easier and more reliable.
Reconnection and Testing: Making It All Work Again
Once your door work is done, it’s time to reconnect the harness. This step is just as important as disconnecting. A poor connection will cause the same problems you were trying to fix.
Reconnecting the Harness
- Inspect both connectors again. Make sure they’re clean and dry. If you cleaned them, ensure no debris remains.
- Align the connectors. They are keyed—they only fit one way. Look for the tabs or shapes that match. Don’t force it.
- Push together firmly until you feel a click. You should hear/feel the locking mechanism engage. Give it a gentle tug to confirm it’s secure.
- Check the lock. Visually verify that the locking tab is in the closed position.
- Route the harness properly. Make sure it’s not pinched by the door or frame. The rubber boot should sit correctly over the wires to maintain the seal.
If you removed the door panel, reinstall it now, reconnecting any switch or speaker connectors before snapping the panel back into place. Reinstall any screws you removed.
Testing All Functions
Before you celebrate, you must test everything:
- Reconnect the battery. Tighten the negative terminal clamp securely.
- Turn the ignition on. Don’t start the engine yet.
- Test each door function: Operate the power window (up/down), door locks (both from the switch and the key fob if applicable), power mirrors, and any other switches. Listen for unusual noises (grinding, clicking) that might indicate a misalignment or binding.
- Check for warning lights. Look at the dashboard. If you see an airbag light or a general electrical warning, something is wrong. Double-check the connection.
- If something doesn’t work: Reopen the connector and inspect again. A pin might be bent or not making contact. Use a multimeter to check for continuity if you’re comfortable.
Once all functions work, give the door a few open/close cycles to ensure the wiring isn’t getting pinched in the hinge area. Listen for any rubbing sounds.
When to Seek Professional Help: Knowing Your Limits
DIY is rewarding, but some situations call for a pro. Here’s when to hang up your tools and call a specialist:
- Severe corrosion or water damage: If the connector is completely eaten away or wires are green and brittle, a simple reconnection won’t fix it. You likely need a harness repair or replacement, which requires soldering and sealing skills.
- Airbag system involvement: If your Jeep has side-curtain airbags in the door, tampering with the harness can trigger the system or cause it to fail. A dealer or auto electrician has the tools to safely handle airbag circuits.
- Persistent electrical gremlins after reconnection: If you’ve reconnected everything but the windows or locks still don’t work, the problem might be elsewhere—a blown fuse, a failed motor, or a deeper wiring issue. Diagnosing this requires experience and tools like a scan tool to read body control module codes.
- Broken connector tabs that require harness modification: Replacing a connector isn’t as simple as plug-and-play; you might need to splice wires and ensure proper weatherproofing. A mistake here can lead to future failures.
Professional repairs on Jeep electrical systems can vary in cost. For context, replacing a Jeep windshield averages between $400 and $900 depending on the model and whether it’s an OEM or aftermarket part. Similarly, door-related electrical repairs often fall in the $200-$600 range if it’s just a connector or short wire repair, but full harness replacements can exceed $1000. If you’ve accidentally damaged the door panel during removal, the cost to paint a Jeep can add another $500 to $3000 to your bill, especially if you need a full repaint to match. That’s why taking your time and using the right technique is so valuable—it prevents small mistakes from becoming expensive ones.
If you decide to go pro, choose a reputable shop with Jeep experience. Independent mechanics who specialize in Jeeps or a dealership service department are good bets. Get an estimate upfront and ask about warranties on their work.
Conclusion: You’ve Got This!
Disconnecting a Jeep door wiring harness might seem intimidating at first, but breaking it down into simple steps makes it totally manageable for any DIYer with basic mechanical skills. Remember the golden rules: always disconnect the battery first, use the right tools, work slowly and deliberately, and test everything before calling it a day. With practice, you’ll find this becomes a routine part of your Jeep maintenance toolkit.
Jeeps are meant to be tinkered with, modified, and enjoyed. There’s a special satisfaction in fixing something with your own two hands. So next time you need to remove a door, replace a speaker, or chase down an electrical issue, you’ll know exactly how to handle that wiring harness safely and effectively. And if you ever hit a snag, the Jeep community is full of forums and videos where owners share their hard-won knowledge. Don’t be afraid to search for your specific model year—chances are someone has documented the exact same job.
Now go forth, disconnect with confidence, and keep your Jeep rolling—top down, doors off, and all systems go!
Frequently Asked Questions
How do I know which connector to disconnect on my Jeep?
The main door harness connector is usually the largest plug located in the door jamb behind a rubber boot. It’s the only connector that attaches the door’s wiring to the vehicle’s main harness. If you’re unsure, consult your service manual or look for online diagrams specific to your Jeep model and year.
What if the connector is stuck and won’t release?
First, ensure the locking tab is fully depressed. Use a trim tool or connector pick to help. If corrosion is the culprit, apply a small amount of penetrating oil or contact cleaner around the connector seams and let it sit for a minute. Gently wiggle the connector while pulling. Never force it, as you risk breaking the plastic housing.
Can I disconnect the harness with the battery still connected?
No, you should never disconnect any wiring harness with the battery connected. Even with the key off, voltage can be present in certain circuits, risking shorts, blown fuses, or damage to electronic modules. Always disconnect the negative battery terminal first and wait a few minutes before starting work.
How do I prevent damage to the wiring during disconnection?
Always grip the plastic connector body, never the wires. Use proper trim removal tools to access the connector without scratching paint. Work slowly, and if a connector is stuck, address the cause (corrosion, debris) rather than using brute force. Secure loose wires immediately with zip ties to prevent snagging.
What should I do after reconnecting the harness?
After reconnecting, first visually confirm the lock tab is engaged. Then reconnect the battery and test every door function: windows, locks, mirrors, and any switches. Listen for unusual noises and watch for dashboard warning lights. Operate the door several times to ensure the wiring isn’t pinched in the hinge area.
When should I consider professional help for a door harness issue?
Seek professional help if you encounter severe corrosion that damages pins, broken connector tabs requiring harness modification, airbag system involvement, or persistent electrical issues after reconnection. Also, if you’re uncomfortable with any step or lack the proper tools, a pro can save you time and prevent costly mistakes.


