
How to Activate Trailer Lights on a Jeep Grand Cherokee
Contents
- 1 Key Takeaways
- 2 📑 Table of Contents
- 3 Understanding Your Grand Cherokee’s Towing Electrical System
- 4 Pre-Activation Checklist: Don’t Skip This!
- 5 The Activation Process: Step-by-Step Connection
- 6 Troubleshooting Common Trailer Light Issues
- 7 Advanced Considerations: Aftermarket Harnesses and OEM Packages
- 8 Maintenance and Best Practices for Long-Term Reliability
- 9 Conclusion: Confidence in Every Connection
- 10 Frequently Asked Questions
Activating trailer lights on your Jeep Grand Cherokee is a straightforward process that ensures your safety and compliance on the road. This guide covers everything from locating your vehicle’s towing connector to performing a pre-flight check and troubleshooting common issues like blown fuses or poor grounding. By following these clear steps, you can confidently connect any trailer and verify all lights—brakes, turns, and running lights—are functioning perfectly before you hit the road.
So, you’ve got your trusty Jeep Grand Cherokee hitched up to a shiny new boat, a cozy camper, or a utility trailer full of gear for the weekend. You’re ready to roll, but a nagging question pops up: “Are all those trailer lights actually working?” It’s a critical safety check, and one that’s easier to handle yourself than you might think. Activating and verifying your trailer lights isn’t about complex auto-electrical wizardry; it’s a methodical process of connection, verification, and basic troubleshooting. This guide will walk you through every single step, from popping that bumper cover to understanding what that faint buzzing sound might mean. We’ll talk you through locating the connector, the essential pre-check ritual, the exact sequence to power things up, and how to solve the most common hiccups. By the end, you’ll approach every towing situation with the confidence of a pro, knowing your brake lights will flash and your running lights will glow exactly when they should. Let’s get that trailer lit up and get you on the road safely.
Key Takeaways
- Locate Your Connector: The standard 7-pin trailer wiring connector is typically found behind a removable panel in the rear bumper on most Grand Cherokee models.
- Always Pre-Flight Check: Before connecting a trailer, inspect your vehicle’s fuses and the trailer’s own wiring harness for any visible damage or corrosion.
- Test Before You Drive: Use a simple trailer light tester or have a helper to verify every light function—tail lights, brake lights, turn signals, and reverse lights—is working.
- Ground is Everything: A poor ground connection is the #1 cause of trailer light failures. Ensure the connector’s ground pin and the trailer’s ground strap are clean and secure.
- Know Your Fuses: The trailer light fuses are located in the Power Distribution Center (PDC) under the hood. Consult your owner’s manual for exact locations and amperage.
- Model Year Matters: While the core process is similar, connector location and fuse IDs can vary slightly between Grand Cherokee generations (WK2 vs. WL).
- Professional Help is Available: If problems persist after checking fuses and grounds, a certified 12V automotive electrician can diagnose complex wiring or module issues.
[FEATURED_IMAGE_PLACEHOLDER]
📑 Table of Contents
- Understanding Your Grand Cherokee’s Towing Electrical System
- Pre-Activation Checklist: Don’t Skip This!
- The Activation Process: Step-by-Step Connection
- Troubleshooting Common Trailer Light Issues
- Advanced Considerations: Aftermarket Harnesses and OEM Packages
- Maintenance and Best Practices for Long-Term Reliability
- Conclusion: Confidence in Every Connection
Understanding Your Grand Cherokee’s Towing Electrical System
Before we start connecting things, it helps to have a mental map of what’s happening under the surface. Your Jeep Grand Cherokee is already equipped with a sophisticated electrical system designed to “talk” to a trailer. This system isn’t just a simple wire; it’s a network that includes the vehicle’s Body Control Module (BCM), a dedicated fuse block, and the physical wiring harness that runs to the rear bumper. When you plug in a trailer, you’re essentially extending this system’s circuit to the lights on the trailer. The BCM sends signals based on your vehicle’s own light switches—when you press the brake pedal, it sends power down the brake wire in the connector; when you use a turn signal, it pulses that corresponding wire. Understanding this helps in troubleshooting: if your vehicle’s own brake lights work but the trailer’s don’t, the problem is almost certainly in the connection, the trailer’s wiring, or the vehicle’s dedicated trailer fuses, not your Jeep’s main brake light circuit.
The Standard 7-Pin Connector: Your Primary Interface
For modern Grand Cherokees (2014-present, WK2 and WL platforms), the industry-standard is the 7-pin round connector. This single plug carries all the necessary signals: tail/clearance lights, left/right turn signals and brakes (often combined on one wire per side), a reverse light signal (for trailer brake controllers), a 12V constant feed (for interior trailer lights or battery charging), and a ground. The connector is usually protected by a rubber flap or a small plastic panel integrated into the rear bumper fascia. On most models, you’ll find it on the driver’s side (left side) of the bumper, roughly at the height of the license plate. Gently pry or unsnap the protective cover to reveal the socket. It’s a good idea to periodically check this area for dirt, moisture, or corrosion, especially if you tow in wet conditions. A quick spray with a contact cleaner and a cover replacement can prevent many future headaches.
Fuse Protection: The First Line of Defense
Your Jeep’s trailer circuits are protected by specific fuses located in the engine compartment’s Power Distribution Center (PDC). These fuses are separate from the fuses for your vehicle’s own lights. Blowing one of these is a common reason for “no trailer lights.” The exact location and amperage (typically 10A or 15A) will be listed on the fuse box cover diagram in your owner’s manual. Common fuse labels include “Trailer Tow,” “Trailer Lights,” or “Trailer Stop/Turn.” Always use a fuse of the exact amperage specified. Using a higher-amp fuse is a fire risk and can damage the wiring. If a fuse blows immediately upon plugging in a trailer, it indicates a severe short circuit in the trailer’s wiring that must be fixed before re-attempting. A fuse that blows after a few minutes might point to an overloaded circuit or a wire rubbing against metal.
Pre-Activation Checklist: Don’t Skip This!
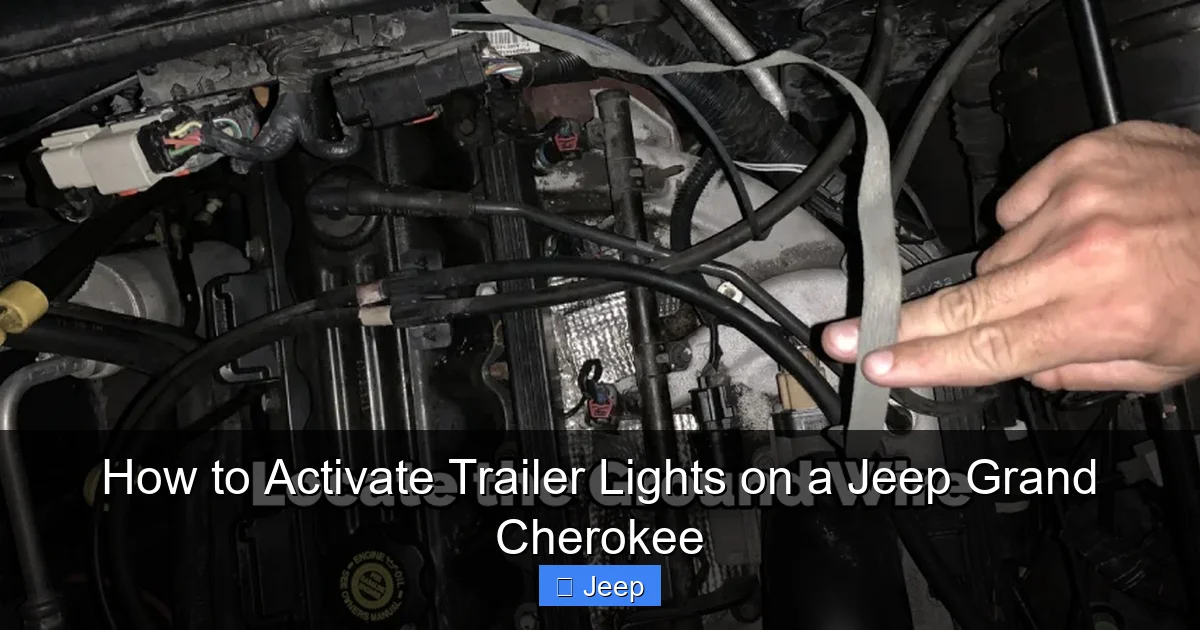
Plugging in a potentially faulty trailer into your Jeep’s pristine electrical system is like plugging a mystery appliance into your home wall socket—it’s risky. A proper pre-flight check protects both your vehicle and ensures your safety. This 5-minute routine is non-negotiable for smart towing.
Visual guide about How to Activate Trailer Lights on a Jeep Grand Cherokee
Image source: jeepfixes.com
Step 1: Inspect the Trailer’s Wiring Harness
Give the trailer’s plug and the first few feet of its wiring a close visual inspection. Look for cracked or frayed insulation, exposed copper wires, and signs of corrosion (white/green crust) on the metal pins inside the plug. Use a small wire brush to clean any corrosion from the pins. Check that the wires are securely bundled and not pinched or rubbing against the trailer’s frame. A single bare wire touching the trailer frame can create a short circuit that will blow your Jeep’s fuse the moment you connect. This is the most common point of failure and the easiest to fix yourself.
Step 2: Verify the Trailer’s Ground Connection
The trailer’s ground is usually a bare copper wire or a braided strap that bolts directly to the trailer’s frame. This connection must be clean and tight. Locate this ground point—it’s often near the coupler or along the main frame rail. Remove any paint, rust, or dirt from the metal surface where the ground attaches. Tighten the bolt or nut securely. A poor ground causes erratic light behavior: one side dim, lights flickering, or all trailer lights being unusually bright. Remember, electricity needs a complete loop back to the battery; the trailer frame is part of that loop.
Step 3: Check Your Jeep’s Fuses
Open the hood and locate the PDC. With the ignition OFF, pull the fuse for the trailer lights (refer to your manual). Visually inspect the thin metal strip inside the plastic housing. If it’s broken or blackened, replace it with a new fuse of the same amperage. It’s wise to carry a few spare fuses of the correct size in your glove box. While you’re here, a quick visual check of all other fuses doesn’t hurt—you might spot another issue preemptively. If you’re unsure which fuse is which, your owner’s manual diagram is your best friend. For specific Jeep Grand Cherokee models, you might also find helpful diagrams in online forums dedicated to your generation.
The Activation Process: Step-by-Step Connection
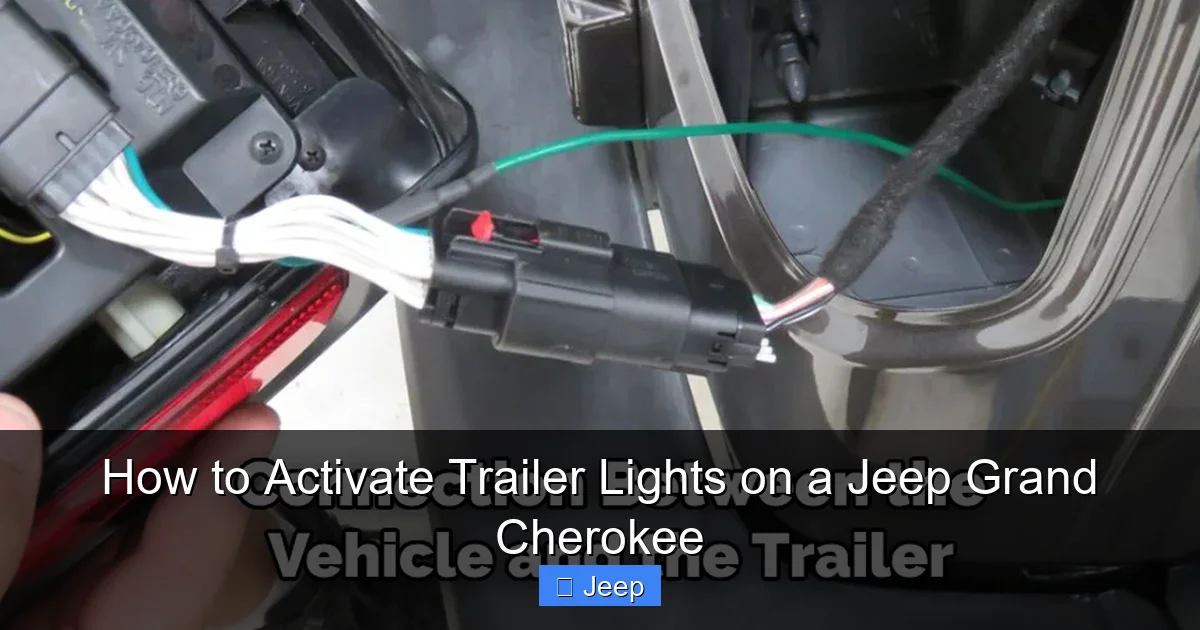
With both the tow vehicle and trailer inspected, it’s time to make the connection. This process is simple but requires a specific sequence to test properly.
Visual guide about How to Activate Trailer Lights on a Jeep Grand Cherokee
Image source: jeepfixes.com
1. Prepare the Connectors
Ensure both the Jeep’s 7-pin socket and the trailer’s plug are clean and dry. If it’s been raining, wipe any moisture from the plug with a rag. Align the plug with the socket. The 7-pin connector has a keying notch that prevents incorrect insertion. Don’t force it; it should slide in smoothly with a slight twist sometimes required. Push the plug in firmly until you hear/feel a click, indicating the locking tab has engaged. Many plugs have a small locking ring or clip that should be rotated or snapped to secure the connection and prevent it from vibrating loose on the road.
2. Initial Power-Up Check
Before starting the engine, turn your Jeep’s ignition to the “ON” or “RUN” position (do not start the engine yet). This powers up all the vehicle’s lighting circuits without engaging the starter. Now, manually operate each light function on your Jeep:
- Tail/Parking Lights: Turn on your headlights. Both your Jeep’s and the trailer’s running lights (tail lights, marker lights) should illuminate immediately.
- Left Turn Signal/Brake: Activate the left turn signal. The trailer’s left turn signal (which is also the left brake light on most setups) should flash in sync with your Jeep’s signal.
- Right Turn Signal/Brake: Repeat for the right side.
- Brake Lights: Have a helper press the brake pedal while you watch the trailer lights. Both left and right brake lights on the trailer should glow solidly (not flash).
- Reverse Lights (if equipped): Put the transmission in Reverse (with your foot firmly on the brake). The trailer’s reverse light (usually the white wire/pin) should illuminate. This is also the signal that triggers a trailer brake controller.
Check each function individually. If one side doesn’t work, note which one. This systematic check is crucial for accurate troubleshooting later.
Troubleshooting Common Trailer Light Issues
Even with a perfect pre-check, you might encounter issues. Don’t panic. Most problems are simple fixes. Here’s a diagnostic flowchart for the most common scenarios.
Visual guide about How to Activate Trailer Lights on a Jeep Grand Cherokee
Image source: jeepfixes.com
“All Trailer Lights Are Out”
If nothing on the trailer lights up when your Jeep’s lights are on:
- Re-check the connection: Unplug and firmly re-plug the connector. Listen for the click.
- Verify Jeep fuses: Double-check the trailer light fuse(s) in the PDC. If it’s blown, replace it. If it blows again instantly, there’s a short in the trailer wiring.
- Test the trailer alone: Use a known-good, powered trailer light tester (available at auto parts stores). Plug it into your Jeep’s socket. If the tester’s lights come on, your Jeep’s system is fine, and the problem is 100% in the trailer’s wiring or bulbs. If the tester doesn’t light up, the problem is in your Jeep’s wiring, connector, or fuses.
“One Side (Left or Right) Is Out”
This is the most frequent issue and usually points to a ground or wiring problem specific to that side.
- Check the trailer’s ground: A bad ground often affects both sides, but a partial ground can cause one side to be dim or out. Ensure the trailer’s main ground strap is clean and tight.
- Inspect the trailer’s side-specific wiring: Check the wire that runs from the plug to the lights on the non-working side for damage, corrosion, or loose connections at the light housing itself.
- Check the Jeep’s connector pins: With the connector unplugged, look inside the Jeep’s socket. The pins for the left turn/brake (pin 2, typically) and right turn/brake (pin 3) should be straight and clean. Use a small pick to gently straighten any bent pins.
“Lights Are Dim or Flickering”
Dimming lights, especially when other accessories are on, signal a high-resistance connection, almost always a ground issue.
- Primary suspect: Ground. Clean both the Jeep’s connector ground pin (pin 1) and, more importantly, the trailer’s main frame ground. Scrape away all paint and rust to bare metal.
- Corroded connector: Corrosion inside the plug or socket adds resistance. Clean all metal contact surfaces with electrical contact cleaner and a brush.
- Undersized wiring: Very long trailer wiring runs with thin-gauge wire can cause voltage drop. This is a trailer design flaw, not a Jeep issue.
“Buzzing or Clicking Sound from Jeep”
An audible buzz or click from the general area of the rear tailgate or under the vehicle when lights are on can indicate:
- A relay is cycling: This often means a circuit is drawing too much current or has a short. Unplug the trailer immediately. Check for a short in the trailer wiring (wires touching each other or the frame).
- A flasher module issue: Less common, but if the Jeep’s own turn signals work normally but the trailer’s flash too fast or not at all with a buzz, the vehicle’s trailer flasher module might be faulty.
Advanced Considerations: Aftermarket Harnesses and OEM Packages
Your Grand Cherokee likely came with a simple wiring harness ready for a 7-pin plug. However, some owners, especially those with older models or specific trims, may need additional hardware. If your vehicle did not come with a factory-installed towing package, you might have only a 4-pin flat connector or no connector at all. In these cases, you have two paths:
OEM (Factory) Towing Package
If your Grand Cherokee was built with the factory towing package, the 7-pin connector is already wired and fused. It’s a plug-and-play system. The only thing you might need is the physical connector cover if it’s missing. This is the ideal setup, as it’s designed and guaranteed by Jeep to work seamlessly with the vehicle’s BCM.
Aftermarket Wiring Harnesses
For models without the OEM package, a quality aftermarket harness is the solution. These harnesses are designed to tap into your vehicle’s existing tail light wiring without cutting or splicing (using “T-tap” or quick-connect methods). Brands like Curt, Hopkins, and Draw-Tite are reputable. Installation typically involves removing tail light assemblies to access the wiring harness behind them. Important: When installing an aftermarket harness, it’s critical to ensure it’s compatible with your specific Grand Cherokee’s year and trim. A poor-quality or incorrectly installed aftermarket harness is a leading cause of persistent lighting problems and blown fuses. For the best results, professional installation is recommended if you’re not comfortable with automotive electrical work.
The Role of the Brake Controller
If you’re towing a trailer with electric brakes, you’ll need a brake controller. This device plugs into your Jeep’s 12V constant and reverse light circuits (pins 4 and 5 on the 7-pin). When you press the brake pedal, the controller sends a variable voltage back to the trailer’s brakes. Activating the brake controller is separate from activating the lights, but they share the same wiring connector. The reverse light signal (pin 5) tells the controller you’re in reverse, which is useful for some trailer functions. Ensure your brake controller is properly calibrated for your trailer’s weight; an uncalibrated controller can cause trailer brakes to lock up or be ineffective.
Maintenance and Best Practices for Long-Term Reliability
Getting your lights working is the goal, but keeping them working is the mark of a responsible owner. A little periodic maintenance goes a long way.
Seasonal Connector Care
After every trip, especially in wet, muddy, or snowy conditions, unplug the trailer and inspect both ends of the connector. Wipe away any moisture, dirt, or road salt. Apply a thin coat of dielectric grease to the metal pins of both the plug and the socket. This non-conductive grease repels moisture and prevents corrosion, ensuring a solid electrical connection for years. Store your trailer plug with its protective cap on. Consider a small connector cover for the Jeep’s socket when not in use.
Regular System Audits
Make it a habit to test your trailer lights at the start of each towing season, even if you haven’t used the trailer recently. Bulbs can burn out, and wiring can develop faults from vibration. Perform the full pre-flight and activation test described above. Also, while driving, occasionally glance in your mirrors to ensure all lights are functioning, especially after going through a deep puddle or heavy vibration.
Load Distribution and Wiring Stress
How you load your trailer can indirectly affect wiring. An excessively heavy load that causes the trailer to sag can put tension on the wiring harness near the coupler, potentially leading to broken wires or connectors over time. Ensure your trailer is properly loaded and the coupler height is correct to maintain a level ride and minimize stress on the safety chains and wiring loop.
When to Seek Professional Help
If you’ve methodically checked the trailer’s wiring and ground, verified all fuses, cleaned the connector, and the problem persists—particularly if a fuse blows with no trailer connected or the issue is intermittent and complex—it’s time to consult a professional. A certified automotive electrician or a reputable RV/trailer service center has advanced diagnostic tools like circuit testers and multimeters to trace voltage drops and identify faults within the Jeep’s wiring harness or Body Control Module. They can also correctly install and integrate an aftermarket wiring harness if you need one. For complex electrical issues, this investment saves time and prevents potential damage to your vehicle’s sensitive electronics.
Conclusion: Confidence in Every Connection
Mastering the activation of your Jeep Grand Cherokee’s trailer lights transforms a routine chore into a point of pride. It’s about more than just making bulbs glow; it’s about taking full, competent ownership of your towing experience. You’ve moved from hoping the lights work to knowing they do, because you’ve inspected, connected, and verified every circuit yourself. This knowledge is powerful. It saves you money on unnecessary shop visits, prevents dangerous roadside breakdowns, and ensures that every journey—whether it’s a short haul to the dump or a cross-country adventure with a camper—is underpinned by safety and reliability. The process reinforces a core Jeep owner ethos: capability through understanding. So next time you back up to that trailer, do so with confidence. You’ve got this. The lights are on, the brakes will signal, and the open road awaits. For any other maintenance questions on your Grand Cherokee, from resetting the oil change light to understanding your lease options, our library of guides is always here to help you get the most out of your adventure machine.
Frequently Asked Questions
Why are my trailer lights not working even though my Jeep’s lights are fine?
This is almost always an issue with the trailer’s wiring, its ground connection, or your Jeep’s dedicated trailer light fuses. Start by checking the trailer’s ground strap and inspecting its wiring harness for damage. Then, verify the correct fuses are good in your Jeep’s Power Distribution Center.
What does it mean if only one side of my trailer’s lights work?
A single side not working typically points to a broken wire, a poor connection at the light fixture on that side, or a faulty ground. Since the left and right turn/brake circuits are separate, the problem is isolated to that side’s wiring path or its shared ground point.
Can a bad trailer ground blow my Jeep’s fuse?
Yes. A severely poor ground can create excessive resistance, which can cause a circuit to overheat and blow its protective fuse. Always ensure the trailer’s main ground strap is clean, tight, and attached to bare metal.
Do I need a special adapter or module for my Jeep Grand Cherokee?
For most Grand Cherokees from 2014 onward with the factory towing package, a standard 7-pin to 7-pin connection is all you need. If your vehicle lacks a factory 7-pin socket, you will need a complete aftermarket wiring harness that properly integrates with your Jeep’s lighting system.
My trailer lights work but are very dim. What’s wrong?
Dim lights are a classic symptom of a high-resistance connection, with the prime suspect being a poor ground. Clean both the trailer’s frame ground and the ground pin in the connector. Corrosion inside the plug/socket can also cause voltage drop, so clean all metal contacts.
How often should I check my trailer wiring and connectors?
You should perform a full light test before every towing trip. A quick visual inspection and wipe-down of the connector after each trip, especially in wet conditions, is a best practice. Applying dielectric grease to the pins twice a year will greatly extend the life and reliability of your connection.


