
Why Is My Tesla Coil Not Working?
Contents
- 1 Key Takeaways
- 2 📑 Table of Contents
- 3 Introduction: The Silence of the Spark
- 4 Section 1: Safety First – The Unbreakable Rule
- 5 Section 2: The Power Supply – The Heart of the System
- 6 Section 3: The Spark Gap – The Master Switch
- 7 Section 4: Primary Circuit & Tuning – Finding Resonance
- 8 Section 5: The Secondary Coil & Topload – The Resonator
- 9 Section 6: Advanced Troubleshooting & Common Pitfalls
- 10 Conclusion: The Methodical Path to the Arc
- 11 Frequently Asked Questions
Frustrated because your Tesla coil won’t spark? The problem is usually a simple oversight or a failed component, not a fundamental flaw in the design. Common culprits include inadequate power supply, incorrect spark gap settings, poor connections, or damaged components. Always prioritize safety first, as these devices operate at lethal voltages. A methodical, step-by-step troubleshooting approach, starting from the power source and moving to the output, will almost always identify the issue.
Key Takeaways
- Safety is non-negotiable: Always assume all components are live and lethal. Use proper PPE, grounding, and maintain a safe distance during operation.
- Start with the basics: Over 50% of “failures” are due to incorrect power input, loose connections, or improperly set spark gaps.
- The power supply is king: An underpowered or faulty transformer (NST, MOT, etc.) is the single most common reason for a weak or non-existent spark.
- Spark gap geometry matters: The gap distance, alignment, and electrode material/condition are critical for efficient oscillation and spark production.
- Environmental factors play a role: High humidity, dust, and improper grounding can silently sabotage performance.
- Listen and watch: A buzzing sound without sparks often points to a power or primary circuit issue, while a weak, intermittent spark suggests tuning or secondary problems.
- When in doubt, simplify: Remove extra toploads, use a single spark gap, and verify the basic oscillator circuit before adding complexity.
📑 Table of Contents
- Introduction: The Silence of the Spark
- Section 1: Safety First – The Unbreakable Rule
- Section 2: The Power Supply – The Heart of the System
- Section 3: The Spark Gap – The Master Switch
- Section 4: Primary Circuit & Tuning – Finding Resonance
- Section 5: The Secondary Coil & Topload – The Resonator
- Section 6: Advanced Troubleshooting & Common Pitfalls
- Conclusion: The Methodical Path to the Arc
Introduction: The Silence of the Spark
You’ve spent hours—maybe days—winding that perfect secondary coil, painstakingly crafting the topload, and wiring up your primary circuit with pride. You flip the switch, heart pounding in anticipation of that majestic, crackling arc of electricity… and nothing happens. Or worse, you get a pathetic little buzz and a wisp of smoke. The question echoes in your mind: “Why is my Tesla coil not working?”
First, take a breath. This is an almost universal rite of passage for Tesla coil builders, from absolute beginners to seasoned hobbyists. Tesla coils are complex, resonant systems where dozens of factors must align perfectly for a sustained, powerful spark. The good news is that the vast majority of issues are diagnosable and fixable with a calm, systematic approach. This guide will walk you through every conceivable reason your coil might be silent, from the glaringly obvious to the subtly obscure. We’ll start with the most critical element of all: your safety.
Section 1: Safety First – The Unbreakable Rule
Before you even think about touching a probe to a terminal, internalize this: a Tesla coil is not a toy. It generates hundreds of thousands of volts at high frequency. The current, while often microamps, is more than enough to stop your heart, cause severe burns, or ignite flammable materials. The “not working” problem is secondary to the “not killing yourself” problem.
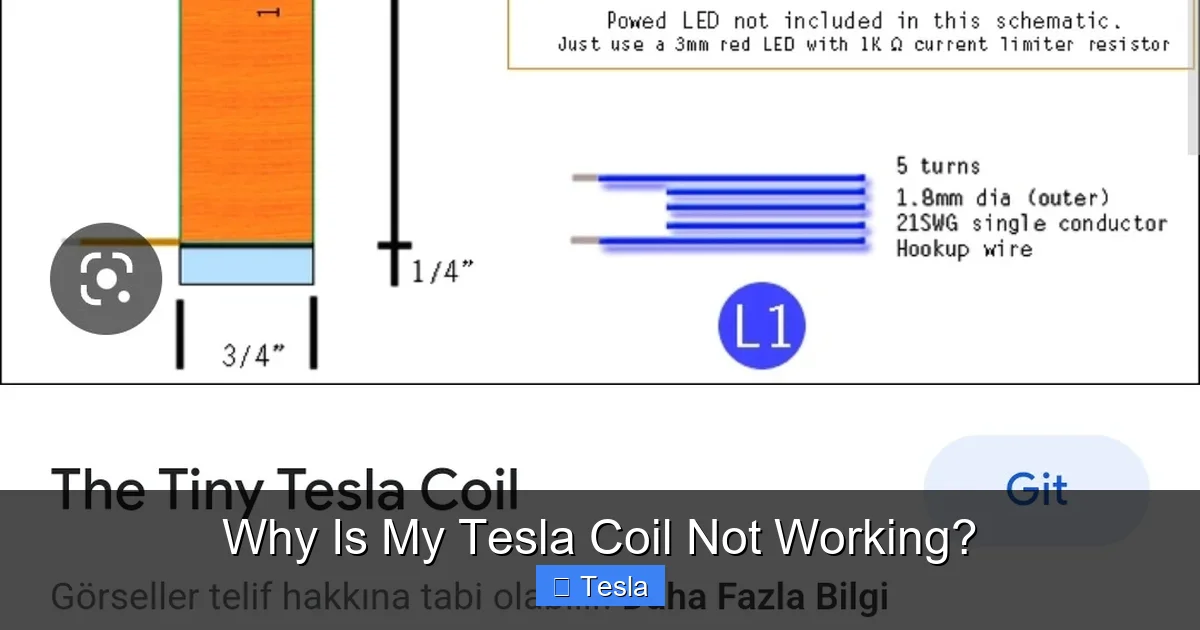
Visual guide about Why Is My Tesla Coil Not Working?
Image source: i.stack.imgur.com
Essential Personal Protective Equipment (PPE)
Never operate your coil without:
- Insulated Gloves: Rated for high voltage (at least 20kV). Do not use cheap rubber gloves; they can have microscopic holes.
- Safety Glasses: To protect eyes from UV arcs and any potential debris from exploding capacitors.
- One Hand in Pocket Rule: When making adjustments or measurements, keep one hand in your pocket or behind your back to prevent current from crossing your chest.
- Non-Conductive Footwear & Surface: Stand on a dry wooden board or rubber mat. Never work on a damp floor or while barefoot.
Workspace & Grounding
Your coil must be properly grounded to a true earth ground (a copper rod driven into the soil, connected to the ground terminal of your power supply and the secondary coil base). A “ground” to a water pipe or electrical outlet ground is often insufficient and dangerous. Keep your workspace clear of conductive objects, metal tools, and flammable liquids. Use a Faraday cage or at least a grounded screen around the coil to contain radio frequency interference (RFI) and protect nearby electronics. This is not just for others’ devices; your coil’s own performance can be degraded by stray capacitance.
If you are troubleshooting and the coil is powered, maintain a minimum distance of 6 feet (2 meters) when it is arcing. Use a long, insulated pole (like a wooden broom handle) to make any necessary adjustments to the spark gap. For more on general electrical safety in DIY projects, understanding common failure modes in other systems, such as car key mechanisms, can underscore the importance of reliable switches and connections, though the voltages involved are orders of magnitude different.
Section 2: The Power Supply – The Heart of the System
If your coil produces no sound, no light, no buzz, the problem is almost certainly in the power chain. The power supply must deliver the correct voltage and current to the primary circuit. This is your first and most important check.
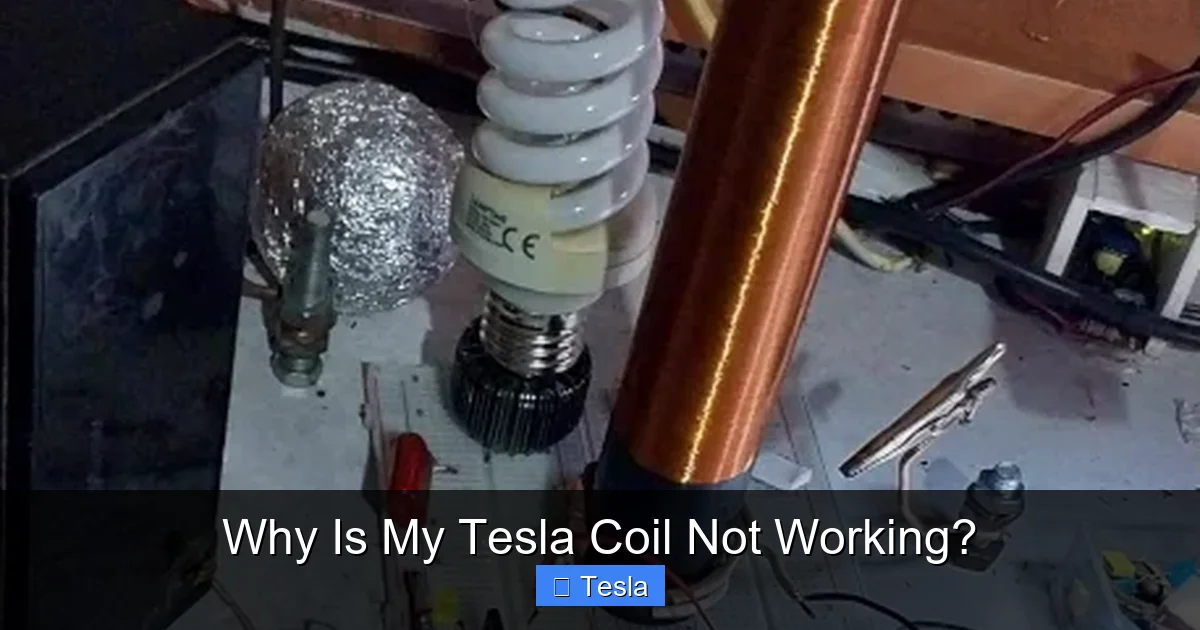
Visual guide about Why Is My Tesla Coil Not Working?
Image source: i.stack.imgur.com
Step 1: Verify Input Power
Is your wall outlet or generator actually supplying the rated voltage (e.g., 120V/240V)? Use a multimeter to confirm. A sagging voltage under load can cause a neon sign transformer (NST) or microwave oven transformer (MOT) to fail to strike. Check all fuses and circuit breakers in your input circuit. A tripped GFCI outlet is a common and frustrating culprit.
Step 2: Inspect the Transformer
Listen. Does your transformer hum when powered? A healthy NST will emit a deep 60Hz hum. A silent transformer means no power is getting to its primary winding—check your input wiring and switch. A high-pitched squeal or intermittent buzzing suggests the transformer is struggling, possibly due to an overloaded secondary (your coil’s primary is drawing too much current) or an internal fault. Smell. A burnt odor is a dead giveaway. Feel. Is it excessively hot after a few seconds? Overheating can cause thermal cutouts or failure. This thermal stress is a common theme in electrical systems, much like the reasons explored in articles about why a car overheats, where cooling system failures lead to component damage.
Step 3: Check the Ballast (if used)
For NSTs, a ballast (like a 6A filament transformer) is often used to limit current. Is it wired correctly? Is it faulty? A failed ballast will behave like an open circuit. Test it for continuity on the secondary side.
Step 4: Measure Output Voltage
CAUTION: This requires extreme care. Using a properly rated high-voltage probe and a multimeter, you can check the open-circuit voltage of your transformer’s secondary. If it’s significantly lower than the rating (e.g., an “9kV” NST putting out 4kV), it’s likely faulty. Never attempt this without proper training and equipment.
Section 3: The Spark Gap – The Master Switch
The spark gap is the rhythmic “chopper” that injects energy into the primary tank circuit. If your power supply is good but you get a loud buzz or hum with no spark, the spark gap is the prime suspect.
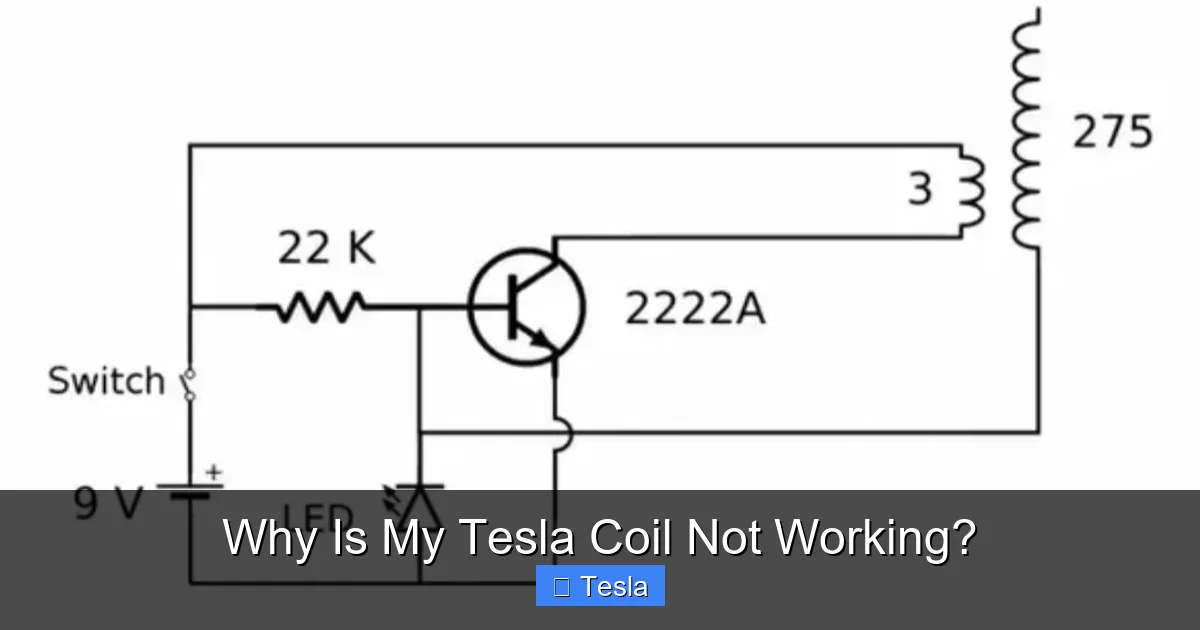
Visual guide about Why Is My Tesla Coil Not Working?
Image source: i.stack.imgur.com
Gap Distance & Setting
The gap must be set correctly for your input voltage. Too wide, and the voltage can’t jump it. Too narrow, and the coil may not “strike” into a stable spark, or it can quench the oscillation. For a 9kV NST, a typical starting gap is 1-2mm. Start with a very small gap (a piece of paper) and slowly widen it until the spark just fails to jump. Then back off slightly. Use feeler gauges for precision.
Electrode Condition & Material
Electrodes must be smooth, clean, and made of a good conductor (copper, tungsten, or brass). Pitting, oxidation, or carbon tracking from previous sparks creates rough, high-resistance points that prevent a clean spark. File or sand electrodes smooth between uses. The shape matters too: rounded ends create a more uniform field and last longer than sharp points, which erode quickly.
Gap Alignment & Number
For a static gap, the electrodes must be perfectly parallel. A misaligned gap will spark at the closest point first, causing uneven wear and erratic performance. For a rotary gap, ensure the motor spins smoothly and the stationary and rotating electrodes are aligned. Too many gaps in series (e.g., a multi-stage rotary gap) require proportionally more voltage to fire.
Section 4: Primary Circuit & Tuning – Finding Resonance
Once the spark gap fires, energy must transfer efficiently between the primary capacitor (Cpri) and primary inductor (Lpri) and then to the secondary. This is a tuned radio frequency (RF) circuit. If you get weak, intermittent, or stubby sparks, your primary circuit is likely out of tune.
Primary Capacitor (Cpri)
This is typically a high-voltage capacitor bank made from series/parallel combinations of capacitors (like MJDs or doorknob caps). Symptoms of a bad capacitor bank:
- No spark, but gap fires: Capacitance may be too high or too low for the primary inductance. The circuit is detuned.
- Spark only at one gap setting: Tuning is extremely narrow, indicating a poor Q-factor (low efficiency) from capacitor losses or incorrect size.
- Capacitor failure: A shorted capacitor will kill oscillation. An open capacitor (dielectric breakdown) will prevent energy storage. Visually inspect for bulging, leaks, or cracks. Test with a capacitance meter if possible.
Primary Inductor (Lpri) – The “Helix” or “Flat Spiral”
The primary coil must be physically separated from the secondary by a sufficient distance (coupling) to prevent flashover. Its inductance must match the capacitance. The most common tuning method is to change the number of turns on the primary. If your spark is weak:
- Add or remove turns. More turns = higher inductance = lower resonant frequency. Fewer turns = lower inductance = higher frequency.
- Check connections. All connections must be massive, short, and tight. A loose connection is a high-resistance point that kills Q and causes heating.
- Verify geometry. The primary should be a single, continuous, non-overlapping loop. Overlaps or crossed wires create unwanted capacitance.
The Tuning Process
1. Start with a small spark gap (1-2mm).
2. Power on briefly. Listen for a loud, sharp “bang” from the gap, not a continuous buzz.
3. If it sparks, try widening the gap in small increments.
4. If sparking stops, adjust primary turns by adding/removing a turn or two.
5. Repeat. The goal is the widest possible spark gap that still fires reliably, as this indicates maximum voltage and power transfer. This process is iterative. For a deeper dive into optimizing electronic systems, understanding troubleshooting complex electronic control units shares a similar methodology of isolating variables.
Section 5: The Secondary Coil & Topload – The Resonator
If your primary is tuned and sparking, but the output is still weak or nonexistent, the issue lies with the secondary system. This is the high-voltage resonator.
Secondary Coil Integrity
The secondary is a long solenoid of fine wire (e.g., #20 AWG enameled wire) on a PVC or acrylic form.
- Short Circuits: A single point where the insulation is nicked and the wire touches itself or the form will kill the coil. Inspect visually and with a megohmmeter (insulation tester). A reading below 100 Megohms indicates a problem.
- Loose Windings: Windings must be tight and evenly spaced. Gaps or loose sections disrupt the distributed inductance.
- Form Material: PVC is common but can track (carbonize) if dirty or humid. Acrylic is better. Ensure the form is clean and dry.
Topload (Toroid or Sphere)
The topload acts as a capacitor, completing the resonant circuit and controlling the voltage gradient to prevent corona discharge (hissing) from the secondary.
- Size & Shape: A larger diameter toroid reduces the voltage stress and allows for bigger sparks. A smooth, round shape is best. Sharp edges or seams will cause corona, robbing energy from the spark.
- Connection: The connection from the secondary top to the topload must be massive, short, and smooth. A poor connection is a high-resistance loss point. Use a large braid or wide copper strip.
- Clearance: The topload must be sufficiently far from any grounded objects (including the primary) to prevent flashover. Rule of thumb: distance to ground >= secondary coil height.
Environmental Factors
High humidity is the silent killer of Tesla coil performance. It causes corona discharge all over the secondary, sapping energy. It can also create conductive paths on dirty surfaces. Operate in a dry environment. Dust on the coil can do the same. Clean with compressed air before operation. This sensitivity to the environment is a key difference from many solid-state automotive systems, though issues like engine overheating also have environmental dependencies (coolant, ambient temperature).
Section 6: Advanced Troubleshooting & Common Pitfalls
When the basics are all correct, we look at more subtle issues.
RF Grounding & Stray Capacitance
The coil’s RF ground must be a single, short, massive connection from the secondary base to earth. Multiple grounds or long, thin wires create inductance and can cause “ground loops,” ruining performance. All other grounds (power supply ground, safety ground) should connect to this single point. Stray capacitance to nearby objects (metal tables, walls) can detune the coil. Keep the workspace clear.
Suppression & Filtering
Your coil is a powerful radio transmitter. It can interfere with its own power supply (causing NST current limiting) or nearby electronics. You may need:
- Ferrite chokes on the input power line to the NST.
- Bypass capacitors (e.g., 0.1uF, 2kV) across the NST’s input terminals to absorb RF.
- An EMI filter on the wall outlet side.
If your NST buzzes loudly but doesn’t spark, RF feedback might be causing its internal current limiter to activate. These filters can help.
Component Failure Modes
- Failed Capacitors: As mentioned, they can short or open. A short is catastrophic. An open just detunes the circuit.
- Transformer Aging: Old NSTs or MOTs can have weakened insulation or windings, causing internal arcing under load.
- Wire Breakage: A broken connection in the primary or secondary, often at a solder joint due to vibration or thermal stress, is an open circuit. Flex the wires while powered (carefully!) to see if sparking momentarily returns.
Conclusion: The Methodical Path to the Arc
Diagnosing a non-working Tesla coil is a lesson in patience and systematic elimination. The thrill of the first big spark is earned by walking through this checklist: Safety → Power → Spark Gap → Primary Tuning → Secondary Integrity → Environment. Do not jump to conclusions. “My coil is broken” is almost always preceded by “I haven’t checked X yet.” Start simple: verify input voltage, hear for the transformer hum, confirm the gap fires with a screwdriver (from a safe distance!), and then begin the tuning dance. Each adjustment is a data point. The process of building and debugging a Tesla coil teaches more about high-frequency resonant circuits, impedance matching, and electromagnetism than any textbook. When you finally see that blue-white ribbon of electricity leap to your finger (through a grounded object, of course!), the frustration will melt away. Remember, every failed attempt is just the coil teaching you its language. Listen carefully, respect the power, and you will be rewarded.
Frequently Asked Questions
Is it normal for my Tesla coil to make a buzzing sound but not produce sparks?
Yes, a loud 60Hz buzz usually means your power supply and spark gap are working—the gap is firing. The problem is likely in the primary tank circuit (bad capacitor, incorrect inductance) or severe detuning. It can also be caused by RF feedback shutting down the transformer. Start by re-checking your primary capacitor values and connections.
Can I use a multimeter to test the secondary coil for shorts?
You can use a multimeter in continuity mode to check for a dead short between the wire and the form (which should be infinite resistance). However, this won’t find a short between adjacent turns. For that, you need a megohmmeter (insulation tester) that applies a high DC voltage (500V-1000V) to detect weak insulation. A standard multimeter’s low voltage won’t reveal these faults.
Why does my spark only come from one point on the toroid?
This is usually due to an uneven or dirty topload. A sharp edge, seam, or piece of dust on the toroid creates a high electric field point, so all the sparking occurs there. Sand the entire topload smooth and clean. It can also be caused by a poor connection between the secondary top and the topload—ensure that connection is massive and solid.
My coil works for a second, then stops. What gives?
This classic symptom points to an overheating component. The most likely culprit is your power supply transformer (NST/MOT) going into thermal protection. It needs more cooling. Check for blocked vents. It could also be a capacitor in the primary circuit overheating and changing value or failing. Ensure all components are rated for the duty cycle and have adequate ventilation.
Is it safe to touch the secondary coil after it’s been running?
NO. Even after power is off, the secondary coil and topload can store a lethal charge for hours or even days. The capacitor formed by the topload and earth ground can hold thousands of volts. Always discharge the coil before touching anything. Use a properly insulated discharge tool—a wire with a high-value resistor (e.g., 1MΩ, 5W) in series—connected from the topload to a true earth ground. Leave it connected for 30 seconds. Never short it directly with a screwdriver, as this can damage the coil and create a dangerous spark.
Why do I get a lot of corona (hissing) from the secondary but no big sparks?
Corona is a sign of high voltage leaking off the secondary due to sharp edges, dirt, or humidity. It robs energy that should go into the output spark. First, clean the entire secondary coil and topload thoroughly. Ensure there are no sharp points or rough solder joints. Operate in a dry environment. If corona persists, your topload may be too small for the secondary’s voltage, or your primary tuning may be off, causing excessive secondary voltage. Try a slightly larger topload.


