
How to Turn on Night Vision on a Jeep Grand Cherokee
Night vision on a Jeep Grand Cherokee is a driver-assistance feature that uses infrared cameras to detect pedestrians and animals beyond your headlights, displaying a monochrome image on your dashboard screen. It is not a standalone system and requires your full attention; you must manually activate it via a dedicated button or touchscreen menu, and its availability depends on your vehicle’s model year and trim level. Always remember, this technology is a supplementary aid, not a replacement for your headlights or safe driving practices.
Picture this: You’re driving your trusty Jeep Grand Cherokee down a winding, unlit country road late at night. The only light comes from your headlights, cutting a lonely path through the darkness. Suddenly, a deer steps from the treeline 200 yards ahead, far beyond the reach of your high beams. Your heart skips a beat, but your foot is already moving from the accelerator to the brake. How did you see it? If your Grand Cherokee is equipped with the available Night Vision system, you had a technological guardian watching the darkness for you. This isn’t science fiction; it’s a real, available feature that can add a critical layer of safety during those dark, lonely drives. But it’s not as simple as flipping a switch like your high beams. Understanding how to properly turn on and use this sophisticated system is key to reaping its benefits without developing a dangerous reliance on it. In this complete guide, we’ll walk through everything you need to know about activating and using Night Vision on your Jeep Grand Cherokee, from the exact button presses to the important safety caveats every driver must hear.
First, let’s set the stage. Jeep’s Night Vision system, officially called Night Vision with Pedestrian and Animal Detection, is not a standard feature on the Grand Cherokee. It’s typically found as part of an optional safety package (like the Advanced Safety Group) on higher trims such as Limited, Overland, Summit, and SRT models, and its availability can vary by model year. For instance, it became more common in the fourth generation (WL platform, 2021+) but was also available on select late third-generation (WK2, 2014-2020) models. If you’re not sure if your vehicle has it, look for a small, discreet infrared camera housing, usually located in the upper grille area behind the Jeep badge or in the front bumper. Inside, you’ll either have a dedicated button on the steering wheel or dash, often marked with a symbol resembling a nighttime landscape with a person, or you’ll find the control within the Uconnect infotainment system’s vehicle settings menus. Assuming your Grand Cherokee is equipped, let’s get it powered up.
Key Takeaways
- Night Vision is an Optional Safety Aid: It uses a forward-facing infrared camera to project a thermal-like, monochrome image of the road ahead onto your instrument cluster or central display, highlighting warm objects like people and large animals.
- Activation is Manual and Model-Dependent: You must press a specific button (often on the steering wheel or dash) or navigate the Uconnect touchscreen menu to turn it on. It is not standard on all Grand Cherokee models or trims.
- It Has Significant Limitations: The system can be impaired by severe weather (heavy rain, fog, snow), dirty camera lenses, and bright oncoming headlights. It does not see through solid objects.
- It Complements, Never Replaces, Your Headlights: Night vision extends your *perception* range but provides no illumination of the road itself. Your standard headlights (low and high beams) must always be used at night.
- Driver Responsibility is Paramount: The system is designed for alerting you to potential hazards. You must remain fully engaged, monitor all mirrors, and be prepared to take immediate control of the vehicle at all times.
- System Health is Linked to General Maintenance: A clean windshield and camera housing, along with a healthy battery and software, are crucial for optimal performance. Issues like an illuminated oil light can sometimes indicate broader electrical concerns.
- The Display Location Varies: On most Grand Cherokees, the night vision feed appears in the digital instrument cluster behind the steering wheel or on the central Uconnect screen, depending on the model year and user settings.
📑 Table of Contents
- How to Activate Night Vision: The Step-by-Step Process
- Understanding What You’re Seeing: The Display and Alerts
- Model Year and Trim Level Compatibility: Does My Jeep Have It?
- Critical Limitations and Safety Considerations: It’s a Tool, Not a Crystal Ball
- Maintenance, Troubleshooting, and System Health
- Conclusion: A Powerful Ally, Not an Autopilot
How to Activate Night Vision: The Step-by-Step Process
The method for turning on Night Vision differs between the older Grand Cherokee models with physical buttons and the newer ones that rely heavily on the Uconnect touchscreen. Don’t worry; we’ll cover both. The fundamental principle is the same: you are commanding the system to start processing the infrared camera feed and display it for you.
For Models with a Dedicated Button (Typically 2014-2020 WK2)
If your Grand Cherokee has a physical button, the process is delightfully straightforward. Look for a button on the lower part of the dashboard, to the left of the steering wheel, or sometimes integrated into the steering wheel itself. The button will have a distinct icon—a dark blue or black circle representing a nighttime scene with a stylized human figure inside it. It might also be labeled “N/V” or “Night Vision.”
- Step 1: Start your vehicle. The system requires the ignition to be in the “ON” or “RUN” position, with the engine started.
- Step 2: Ensure your headlights are turned on. While the Night Vision system may activate with the headlights off in some model years, it is designed to work in conjunction with them, and for safety and legal compliance, your headlights must be on at night.
- Step 3: Press the dedicated Night Vision button firmly. You should hear an audible chime or see a message appear on your instrument cluster or the small driver information screen between the speedometer and tachometer.
- Step 4: The monochrome (typically green-hued or black-and-white) feed from the infrared camera will appear, usually in the center of the digital gauge cluster, replacing the standard speedometer/tachometer layout or appearing in a dedicated window. The system is now active and scanning the road ahead for heat signatures.
Pro Tip: On some earlier models, the system may have a slight warm-up period of 5-10 seconds after activation before the image becomes clear and stable.
For Models with Uconnect Touchscreen Control (2021+ WL Platform)
The latest Grand Cherokee and Grand Cherokee L models integrate Night Vision control into the Uconnect 5 system. This means no physical button—it’s all menu-driven. Here’s how to navigate:
- Step 1: Start your vehicle. The Uconnect system will power on.
- Step 2: Using the touchscreen, tap the “Apps” button on the bottom toolbar.
- Step 3: Find and select the “Vehicle” or “Settings” app. The exact name varies slightly by software version.
- Step 4: Within the Vehicle Settings menu, look for a tab or option labeled “Safety & Security” or “Driver Assistance.”
- Step 5: Scroll through the list of available driver-assist features until you find “Night Vision”. Toggle the switch to the “ON” position.
- Step 6: The system will activate. The feed will appear on the central Uconnect screen (typically the 10.1-inch or larger display), or it may be configured to show in the digital instrument cluster in front of the driver. You can often adjust the display preference in the same settings menu.
Important Note: In the newer models, the Night Vision display is often part of a larger “Driver Display” or “Full Screen” view. If you don’t see it immediately after toggling on, check your instrument cluster settings to ensure the Night Vision feed is assigned to a visible screen. You may need to cycle through cluster views using buttons on the steering wheel.
Understanding What You’re Seeing: The Display and Alerts
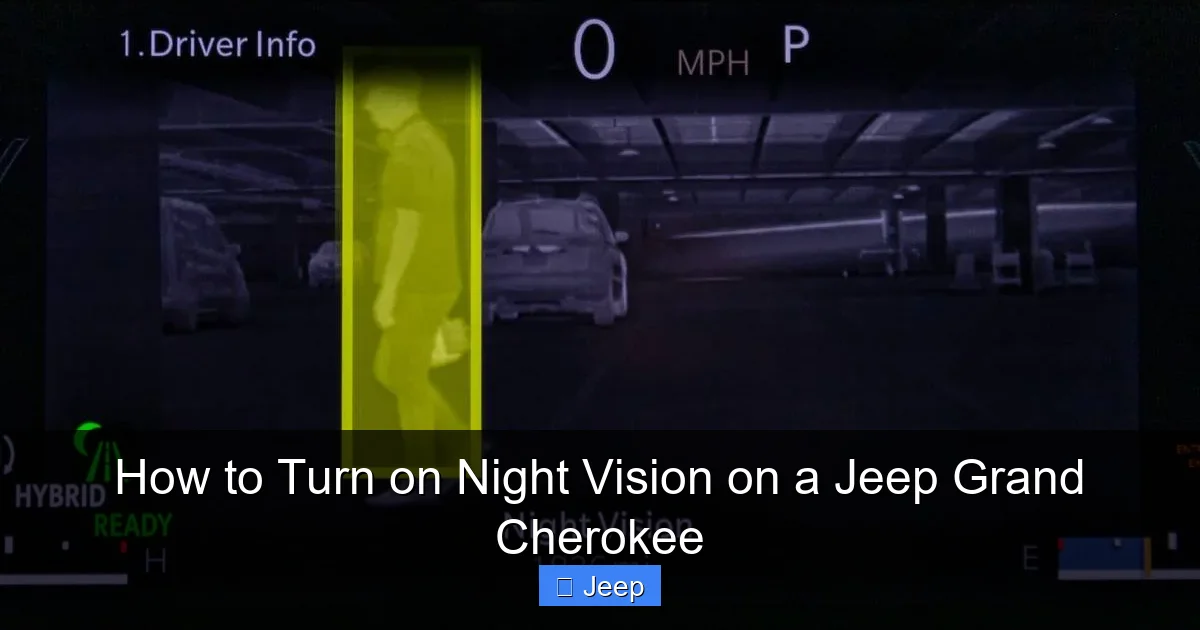
Once activated, the screen will show a real-time, monochromatic video feed. It’s crucial to understand the visual language of this feed. The image is not like a normal camera; it’s a representation of heat. Objects that emit more heat (like humans, animals, and vehicle engines) will appear brighter—often as white or light gray shapes—against a darker, cooler background (roads, trees, buildings).

Visual guide about How to Turn on Night Vision on a Jeep Grand Cherokee
Image source: vehiclers.com
Recognizing the Icons and Alerts
The system doesn’t just show you a picture; it actively analyzes it. When it detects a potential hazard—typically a pedestrian or large animal within a certain distance and trajectory—it will overlay a visual icon on the screen. You’ll see a yellow or orange triangular warning symbol around the detected object. If the risk is deemed more immediate and a collision is possible without driver action, the icon will turn red, and you may also hear an audible chime. These alerts are your cue to scan the road with your eyes, locate the object with your headlights, and take appropriate evasive action, such as slowing down or braking.
Example: You’re driving at 55 mph on a rural highway. Night Vision is on. On the display, you see a faint, bright white shape partially obscured by trees on the right shoulder about 150 feet ahead. A yellow triangle appears around it. You look up, see the headlights of an oncoming car momentarily illuminate the back of a cow standing near the edge of the road. You ease off the gas, giving the animal a wide berth as you pass. This is the system working as intended—as an early warning.
Customizing Your Experience
Within the settings menu (especially on Uconnect models), you can often adjust the brightness and contrast of the Night Vision display to suit your preference and reduce glare from oncoming headlights. Some systems also allow you to set the sensitivity of the alerts or choose whether alerts appear on the main screen or the cluster. Spend a few minutes in a safe, familiar parking lot to explore these settings and find what works best for you. Familiarity with where the image appears and what the icons mean is critical before you rely on it in a real-world scenario.
Model Year and Trim Level Compatibility: Does My Jeep Have It?
This is the most common point of confusion. You can’t turn on a feature your vehicle doesn’t possess. Here’s a general breakdown, but your definitive source is always your owner’s manual or a visual inspection for the grille-mounted camera.
Visual guide about How to Turn on Night Vision on a Jeep Grand Cherokee
Image source: jeepfixes.com
- Third Generation (WK2: 2014-2020): Night Vision was not widely available. It was primarily offered as part of the Advanced Safety Group on the 2018-2020 Limited, Overland, Summit, and SRT models. Earlier models (2014-2017) rarely had it unless equipped with a very specific, rare package.
- Fourth Generation (WL: 2021-Present): The system became more prevalent. It is standard on the top-tier Summit and SRT trims. It is often a key component of the Advanced Safety Group available on Limited and Overland trims. The new Grand Cherokee L (the three-row model) follows a similar availability pattern.
How to Confirm: The surest way is to check your window sticker (Monroney label) if you have it. Look for the “Advanced Safety Group” or a specific “Night Vision” line item. If the sticker is gone, search your Uconnect settings menu thoroughly for “Night Vision.” If it’s not there, and there’s no physical button, your vehicle is not equipped. You can also call a Jeep dealer with your VIN; they can tell you exactly which packages your vehicle was built with.
Critical Limitations and Safety Considerations: It’s a Tool, Not a Crystal Ball
This section is the most important in this guide. Misunderstanding the limitations of Night Vision is more dangerous than not having it at all. You must internalize these points.
Visual guide about How to Turn on Night Vision on a Jeep Grand Cherokee
Image source: adventurejeep.com
Weather and Environmental Factors
The infrared camera can be severely hampered by:
- Heavy Precipitation: Rain, snow, and especially fog scatter and absorb infrared light, drastically reducing range and clarity. The system may show a blank or noisy screen in thick fog.
- Dirty Lens: The camera is behind a transparent cover in the grille. A buildup of mud, snow, ice, bugs, or even a thorough washing with a greasy cloth can obscure the lens. Regularly check and clean this area gently with a soft cloth and appropriate cleaner.
- Extreme Cold/Heat: Very low temperatures can slightly affect camera response time.
- Glare: The intense heat from the exhaust of a large truck directly in front of you or the reflection of your own headlights off a sign can cause temporary “blindness” for the camera.
It Does Not See What Your Eyes See
The camera sees *heat*, not light. It cannot see:
- Non-Heating Objects: A plastic construction barrier, a metal sign, a stalled car with its engine off, or a bicycle are very difficult for the system to detect until the rider or brakes generate heat.
- Objects in Total Darkness: If an object is the same temperature as its surroundings (cold-blooded animal on a cold night, a well-insulated car), it may not register.
- Through Obstructions: It cannot see through other vehicles, dense foliage, or curves in the road. Its range is also limited, typically 150-200 feet ahead of your high beams.
Your Headlights Are Still Your Primary Light Source
The Night Vision image is a supplement. It does not illuminate the road for you. You must still use your high beams on dark roads where appropriate (and legal) to see the lane markings, signs, and road surface. The system might even automatically dim your high beams when it detects oncoming traffic, so you must be prepared to manually switch to low beams.
Never, Ever, Become Complacent
The biggest danger is “automation complacency.” Because the system provides an alert, drivers can subconsciously begin to rely on it and reduce their own scanning intensity. This is a recipe for disaster. The system can fail, be fooled, or miss something. Your eyes and brain are your most advanced sensors. Use Night Vision as an extra pair of eyes, not a replacement for your own.
Maintenance, Troubleshooting, and System Health
Like any technology, your Night Vision system requires care to function correctly. Problems are often simple to fix.
Routine Care
- Clean the Camera Lens: This is the #1 maintenance task. Periodically (especially after winter driving or bug season), inspect the small transparent cover in the grille. Clean it with a soft microfiber cloth and a mild glass cleaner. Avoid abrasive materials.
- Maintain a Clear Windshield: The camera’s field of view is through your windshield. A heavily soiled or cracked windshield will degrade its performance.
- Address Dashboard Warnings: If you see a message like “Night Vision Unavailable” or a camera-with-slash icon, the system has disabled itself. Common causes are a dirty lens, a temporary software glitch, or an issue with the camera’s heating element (which prevents fogging). Clean the lens first, then restart the vehicle.
- Keep Software Updated: Dealerships can perform software updates for the Night Vision control module during routine service, which can improve detection algorithms and fix bugs.
When to Seek Professional Help
If cleaning the lens and restarting the vehicle doesn’t restore function, there may be a hardware issue. The camera itself, its wiring, or the processing module could be faulty. A dealer technician with the proper diagnostic tools (like the wiTECH system) can read fault codes from the Night Vision control module to pinpoint the problem. This is not typically a DIY repair.
Connection to Overall Vehicle Health: A weak or failing battery can sometimes cause erratic behavior in sensitive electronic modules. If you’re experiencing multiple electrical gremlins along with Night Vision issues, a battery test is a good first step. Keeping up with fundamental maintenance, like knowing how to reset your oil change light, ensures your vehicle’s electrical system is less likely to be strained by unrelated problems, creating a more stable environment for all advanced features to operate correctly.
Conclusion: A Powerful Ally, Not an Autopilot
Turning on the Night Vision system in your Jeep Grand Cherokee is a simple button press or a few screen taps. That ease of activation, however, belies the complexity of the technology and the gravity of the responsibility that comes with using it. This system is a testament to modern automotive engineering, giving you a glimpse into the infrared spectrum and potentially providing those precious extra seconds to avoid a nighttime collision with a pedestrian or animal. But its power is finite. It is bound by physics, weather, and the need for a clean lens. It is a tool for the alert driver, not a crutch for the distracted one.
As you drive your Grand Cherokee into the night, treat Night Vision as a silent co-pilot. Activate it on dark, rural routes. Keep the camera lens clean. Understand what the display shows and what it misses. Let its alerts reinforce your own observations, not replace them. Combine the technological advantage of this system with the timeless virtues of defensive driving: reduced speed, heightened awareness, and a firm grip on the wheel. When used with wisdom and respect for its limits, Night Vision can truly be a game-changer for your safety and peace of mind on those dark, unfamiliar roads. Now that you know how to turn it on, go forth and drive safely—with your eyes, your mind, and your technology all working together.
Frequently Asked Questions
Does every Jeep Grand Cherokee have Night Vision?
No. Night Vision is an optional feature that was not standard on most trims. It was primarily available on higher trims (Limited, Overland, Summit, SRT) as part of an optional safety package, especially in model years 2018-2020 (WK2) and 2021+ (WL). You must confirm your specific vehicle’s equipment.
Can I use Night Vision while driving on the highway?
Yes, you can and should activate it on any dark road, including highways. However, its effectiveness on a highway is limited because objects of interest (like animals) are less common, and the high speed means you have very little time to react to an alert. It is most beneficial on rural, two-lane roads with dense tree lines or wildlife crossings.
Where exactly does the Night Vision image appear?
It depends on your model year. On older models (2014-2020), it typically appears in the center of the digital instrument cluster behind the steering wheel. On newer models with Uconnect 5 (2021+), you can often choose to have it display on the large central touchscreen or in the digital driver display cluster. Check your vehicle settings for display preferences.
Will Night Vision work in heavy rain or fog?
Its effectiveness is severely reduced in heavy precipitation and fog. The infrared light is scattered by water droplets, which can make the screen appear noisy, blurry, or completely blank. You should never rely on Night Vision in such conditions and must use your headlights and driving skills as usual.
Can I turn Night Vision off once it’s on?
Yes, you can deactivate it by pressing the same dedicated button again or by toggling the setting off in the Uconnect menu. Some drivers find the monochrome display distracting and prefer to turn it off when traffic is heavy or they are in well-lit urban areas.
Does the Night Vision camera need professional calibration?
Generally, no. The system is designed to be self-calibrating. However, if the camera is physically displaced (e.g., after a front-end collision) or if a software update is performed, a dealer may need to run a calibration procedure using specialized equipment to ensure accurate alignment and detection zones. Routine use does not require calibration.


