
How to Remove Mold From a Car Cover: Safe Step-by-Step Guide

Quick Answer
To remove mold from a car cover, take it off the vehicle, move it to a well-ventilated outdoor area, and check the manufacturer’s cleaning instructions. Gently clean the affected fabric with an approved mild detergent, rinse thoroughly, and let the cover dry completely before reuse. The safest cleaner depends on the fabric and its protective coating, so follow the cover manufacturer’s guidance and consult the EPA’s basic mold cleanup guidance for additional precautions.
Steps to remove mold safely
- Check the label: Confirm which cleaners, water temperatures, and washing methods the cover allows.
- Protect yourself: Wear gloves and avoid breathing in dust or mold particles.
- Remove loose dirt: Work gently outdoors without shaking or brushing contaminated fabric aggressively.
- Wash carefully: Apply an approved cleaner and use a soft sponge or brush.
- Rinse completely: Remove cleaning residue from the fabric, seams, and lining.
- Dry thoroughly: Air-dry the cover fully before folding, storing, or reinstalling it.
Important precautions
- Do not automatically use bleach, vinegar, strong solvents, or a washing machine without checking material compatibility.
- Never store a damp cover or put it back over a wet vehicle.
Mold on a car cover can leave dark spots, a musty smell, and residue that makes an otherwise useful cover look ruined. The good news is that some affected covers can be cleaned without replacing them.
When deciding how to remove mold from a car cover, I recommend starting with the material rather than reaching for the strongest household cleaner. This guide explains how to clean affected fabric, choose an appropriate washing method, protect your vehicle’s paint, and prevent the problem from returning.
In This Guide
Why Does Mold Grow on a Car Cover?
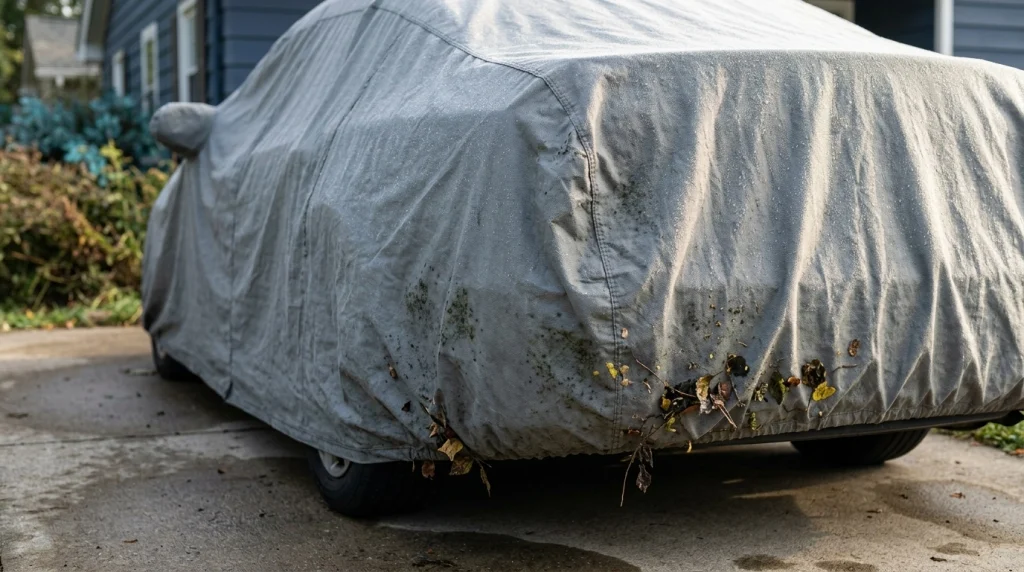
Mold is a type of fungus that can grow when moisture remains on a suitable surface. A car cover can collect moisture from rain, dew, condensation, and damp storage conditions.
Moisture alone does not explain every case. Dirt, pollen, leaves, and other organic debris can provide material that supports fungal growth, particularly when a cover stays damp for extended periods.
What causes mold on a car cover?
- Putting away a wet cover: Folding damp fabric traps moisture between layers and inside creases.
- Covering a wet vehicle: Water left on the paint or windows can contribute to a persistently damp environment.
- Storing it in a humid garage: Poor airflow and humid conditions slow drying.
- Leaving dirt on the fabric: Dust, pollen, and organic debris can accumulate and encourage surface growth.
- Using a poorly ventilated cover: Some materials release moisture less readily than others, depending on their construction.
The EPA emphasizes that moisture control is essential to preventing mold from returning. Cleaning visible growth without correcting the conditions that caused it may only provide temporary relief.
How can you tell whether the marks are mold?
Mold or mildew may appear as scattered black, green, gray, or white patches. A musty odor can also indicate a moisture-related problem, although neither smell nor color alone identifies the specific fungus.
Ordinary dirt, tree sap, and other stains can resemble mold. If the marks remain after gentle cleaning, avoid repeatedly increasing the cleaner’s strength without confirming that the material can tolerate it.
Section takeaway: Mold usually indicates that moisture has remained too long. Identify the moisture source before cleaning so the same conditions do not damage the cover again.
What Supplies Do You Need to Remove Mold From a Car Cover?
You can often clean a lightly affected cover with basic supplies. The important part is choosing products and tools that are compatible with its fabric, backing, seams, and water-resistant treatment.
- Protective gloves: Reduce direct contact with contaminated fabric and cleaning solutions.
- Suitable respiratory protection: Consider a properly fitted N95 respirator when mold exposure is possible, especially when handling loose contamination.
- Mild detergent: Choose a product specifically permitted by the cover manufacturer.
- Soft sponge or brush: Helps lift residue without aggressive abrasion.
- Garden hose: Provides gentle rinsing where outdoor washing is appropriate.
- Clean water and a bucket: Allow you to prepare and rinse cleaning solutions according to their labels.
- A clean drying area: Gives the cover enough room and airflow to dry completely.
Work outside when practical, away from open windows, people, and pets. Avoid forcefully shaking a moldy cover, which can release particles into the surrounding air.
Before applying any product, inspect the cover’s care label. If the instructions are missing, check the manufacturer’s website or contact its support team, especially when the cover is expensive or has multiple bonded layers.
How Do You Remove Mold From a Car Cover Step by Step?
The safest general approach is to remove loose contamination, wash with a manufacturer-approved cleaner, rinse thoroughly, and dry every part of the cover. Do not assume every cover can tolerate the same washing method.
Step 1: Remove the cover and inspect it
Take the cover off carefully and place it in an outdoor cleaning area. Avoid dragging its dirty surface across the vehicle’s paint.
Inspect the exterior, inner lining, seams, elastic hems, and attachment points. Look for brittle fabric, peeling coatings, damaged stitching, or areas where the material has started to separate.
Step 2: Remove loose dirt gently
Follow the manufacturer’s instructions for removing loose debris. If dry brushing is permitted, use a soft brush with light strokes rather than scrubbing hard enough to force particles deeper into the weave.
Do not use a household vacuum or compressed air in a way that spreads mold particles through your garage or living space. Keep the work area away from the vehicle until the cover has been cleaned.
Step 3: Prepare an approved cleaning solution
Mix a suitable detergent with water at the dilution and temperature specified by its manufacturer. If the car-cover maker recommends a dedicated cleaner, use that product instead of experimenting with household chemicals.
Test the solution on a small, inconspicuous area if the care instructions allow it. Check for color changes, tackiness, coating damage, or unusual changes in the fabric before cleaning a larger section.
Step 4: Clean the affected areas
Apply the approved solution gently with a soft sponge or brush. Work in manageable sections, paying attention to seams and folds where dirt and moisture may accumulate.
Do not scrub aggressively to remove a dark stain in one pass. If the fabric’s surface starts to fray or its coating changes, stop and contact the manufacturer for further instructions.
Step 5: Rinse the cover thoroughly
Use the rinsing method specified by the manufacturer to remove loosened contamination and cleaning residue. Pay particular attention to seams, hems, and the inner lining if those areas can be safely rinsed.
Avoid pressure washers unless the cover manufacturer explicitly permits their use. High-pressure water may stress stitching, force contamination into other areas, or damage delicate layers.
Step 6: Dry the cover completely
Spread the cover fully open in a clean, ventilated area. Use the drying method recommended for its material, avoiding prohibited heat sources or conditions that could damage its coating.
Check thicker sections, folded edges, hems, and seams before putting it away. The cover should be completely dry throughout, not just dry to the touch on its outer surface.
Step 7: Inspect before reinstalling
Look for remaining visible growth, persistent musty odors, weakened fabric, and damaged protective layers. Cleaning can remove contamination, but it cannot necessarily reverse permanent staining or restore a failed coating.
Only reinstall the cover when it is clean enough for safe use and completely dry. Make sure the vehicle is dry, too.
Section takeaway: Gentle cleaning and thorough rinsing help protect the cover’s construction. Complete drying is essential to reducing the chance of recurring mold.
Which Cleaners and Washing Methods Are Safest?
The right cleaning method depends on the cover’s fabric and protective treatments. A method that works on an ordinary washable textile may damage a waterproof, laminated, or multi-layer automotive cover.
| Cleaning option | Best use | Important caution |
|---|---|---|
| Manufacturer-approved mild detergent | Routine washing and light contamination | Use the specified dilution and washing method. |
| Dedicated car-cover cleaner | Covers with specific cleaning requirements | Confirm compatibility with the exact fabric. |
| Oxygen-based stain remover | Some stubborn stains, when expressly permitted | Not automatically safe for coatings, dyes, or elastic. |
| White vinegar | Not a default choice for automotive covers | Check material compatibility before considering it. |
| Household chlorine bleach | Only where the manufacturer explicitly approves it | May discolor fabric or damage protective treatments. |
| Machine washing | Only covers approved for machine washing | Agitation and poor rinsing may damage large or layered covers. |
Can you use dish soap?
A mild dish detergent may be suitable for certain covers, but it is not universally safe. Use it only if the manufacturer permits it, and rinse thoroughly to avoid leaving residue behind.
Can you use bleach or vinegar?
Neither product should be your automatic first choice. Bleach can damage some fibers, dyes, elastic, and coatings, while vinegar may be unsuitable for particular materials and finishes.
Never mix bleach with vinegar, ammonia, or other cleaning products. Dangerous gases or chemical reactions can result from mixing incompatible cleaners.
Can you machine-wash a car cover?
Only machine-wash the cover when its care instructions specifically allow it. Some lightweight covers tolerate gentle washing, while others require hand cleaning because they contain bonded layers, special backings, or fitted components.
Use only the permitted cycle, detergent, and water temperature. Never assume a tumble dryer is safe; follow the manufacturer’s drying instructions instead.
For an example of product-specific cleaning guidance, consult CarCover.com’s car-cover cleaning guide and compare its recommendations with the instructions for your own cover.
Section takeaway: Choose cleaners based on material compatibility, not cleaning strength. When the instructions are unclear, ask the manufacturer before using chemicals or a machine.
What If the Mold Stains or Musty Smell Remain?
Persistent marks do not always mean the cover still has active mold, and removing visible stains does not prove that every trace of contamination is gone. Mold can leave permanent discoloration even after cleaning.
First, check whether the cover was cleaned according to its care instructions and rinsed completely. If the manufacturer permits another cleaning cycle, repeat the approved process rather than increasing the chemical concentration yourself.
When should you stop cleaning?
- Widespread growth: Large areas of mold may require professional assessment or replacement.
- Persistent odor: A musty smell that remains after appropriate cleaning and complete drying warrants further inspection.
- Fabric deterioration: Tears, brittle fibers, peeling layers, or damaged seams can indicate that the cover is no longer dependable.
- Repeated mold growth: Recurrence suggests that moisture or contamination remains unresolved.
- Health concerns: Anyone with asthma, mold allergies, or other relevant health concerns should avoid handling contaminated material and seek appropriate advice.
The EPA advises considering professional help when mold problems are extensive or the material is difficult to clean safely. Its general indoor-cleanup guidance uses approximately 10 square feet as one reference point for larger affected areas, but that is not a validated cutoff specifically for car covers.
For a valuable custom-fit cover, contacting the manufacturer may be more useful than attempting repeated home treatments. If the fabric has deteriorated or its protective performance has been compromised, replacement may be the more practical option.
How Do You Prevent Mold From Returning?
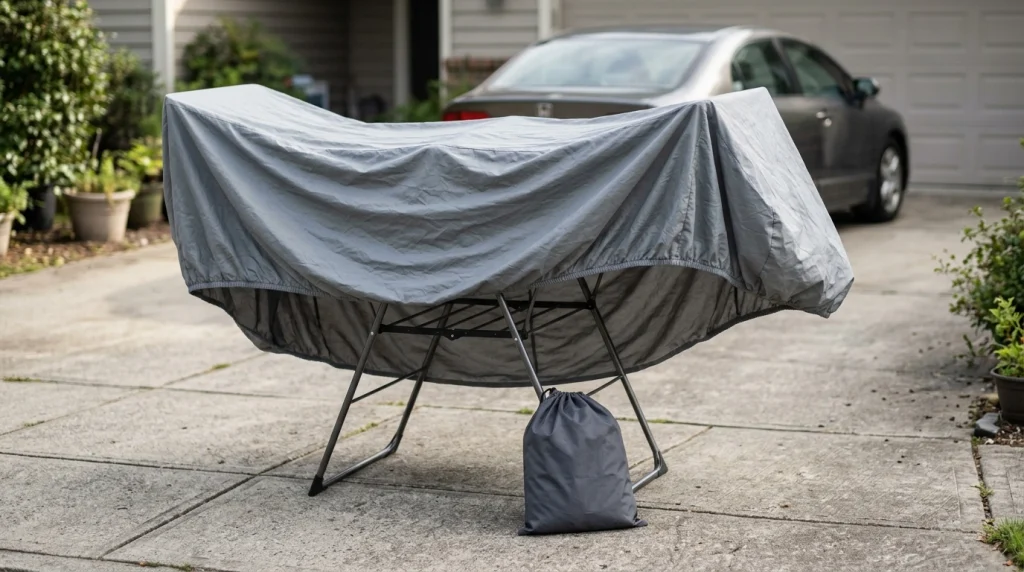
Preventing mold is easier when the cover dries quickly and stays clean between uses. The goal is to avoid prolonged dampness rather than relying on repeated chemical treatments.
Build these habits into your car-care routine
- Dry the vehicle first: Let rainwater and wash water drain or evaporate before covering the car.
- Clean the cover regularly: Remove dirt, leaves, and pollen before they build up.
- Dry after rain: Inspect the cover after prolonged wet weather and follow its care instructions if it needs cleaning.
- Store it loosely: Put the cover away only when fully dry, using its recommended storage bag or container.
- Improve airflow: Choose a storage area that does not remain persistently damp or poorly ventilated.
- Inspect the lining: Check the side that contacts the vehicle for dirt, moisture, and developing stains.
- Check the cover’s condition: Replace a damaged cover when cleaning can no longer restore dependable protection.
Why does moisture control matter so much?
Mold can return when the original moisture problem remains. A clean cover stored damp in a closed bag can develop the same issue again, even after the visible marks have disappeared.
The EPA’s guide to mold and moisture explains why removing mold and correcting the source of moisture must go together. Although the guidance addresses indoor environments, the moisture-control principle is relevant to damp items such as stored fabric covers.
When choosing a replacement, consider where you park, how humid the environment gets, and whether the cover’s material suits your intended use. A breathable design may help moisture escape, but no cover eliminates the need to keep the vehicle and fabric appropriately dry.
Section takeaway: Dry the car and cover before storage, keep the fabric free of accumulated dirt, and address damp storage conditions. Those habits help prevent repeat growth.
Frequently Asked Questions
1. Can I remove mold from a car cover without washing the entire cover?
Possibly. If the manufacturer’s instructions allow spot cleaning, use an approved cleaner and a soft sponge on the affected area. Rinse away residue as directed and dry the cover completely. Extensive growth may require broader cleaning or professional assessment.
2. Does vinegar kill mold on a car cover?
Vinegar is not a universally suitable treatment for automotive covers. Its acidity may affect certain materials, dyes, or coatings, and effectiveness depends on the conditions. Follow the manufacturer’s cleaning guidance instead of assuming vinegar is safe or sufficient.
3. Will bleach remove black mold from a car cover?
Bleach may discolor fabric or damage some protective coatings and elastic components. Do not use it unless the cover manufacturer specifically approves that treatment. Dark stains may remain after cleaning, so color alone cannot confirm whether contamination has been removed.
4. Can mold on a car cover damage car paint?
A moldy cover may also hold dirt and other abrasive debris that can mark paint when the cover moves against the vehicle. Remove and clean the cover carefully, and inspect the vehicle’s surface. Avoid dragging dirty fabric across the paint or reinstalling a contaminated cover.
5. How long does a car cover take to dry after cleaning?
Drying time depends on fabric thickness, humidity, temperature, airflow, and how much water the cover retains. There is no reliable fixed drying time for every cover. Check seams, hems, folds, and the inner lining to ensure the entire cover is completely dry before storage.
6. Should I throw away a car cover that has mold?
Not necessarily. Light contamination may be removable when the material remains in good condition and the manufacturer permits cleaning. Consider replacement if growth is widespread, the odor persists, the fabric has deteriorated, or the cover’s protective performance has been compromised.
Final Takeaway: Keep Your Car Cover Clean and Dry
Removing mold from a car cover starts with identifying the material and following the manufacturer’s cleaning instructions. Gently remove contamination, use an approved cleaner, rinse thoroughly, and dry the cover completely before putting it back on the vehicle.
Avoid aggressive scrubbing and unapproved chemicals that could damage the fabric or protective coating. If the growth is extensive or the cover has deteriorated, seek professional advice or consider replacing it.
Most importantly, correct the moisture problem that caused the mold in the first place. A clean, dry cover stored in suitable conditions is better prepared to protect your vehicle without creating another maintenance problem.