
How to Patch a Car Cover: Step-by-Step Repair Guide

Quick Answer
To patch a car cover, first identify the cover material, clean and completely dry the damaged area, then reinforce the tear from the inside with a compatible repair patch. Avoid heat, strong solvents, or permanent modifications until you check the manufacturer’s instructions and car cover warranty requirements.
Quick repair steps
- Remove the cover: Never repair it while stretched tightly over the vehicle.
- Identify the material: Check the sewn label or manufacturer’s care instructions.
- Clean the area: Remove dirt and let both sides dry completely.
- Align the tear: Lay the damaged fabric flat without stretching it.
- Apply the patch: Use a compatible adhesive-backed or sew-on patch with generous overlap.
- Check the repair: Let adhesives cure fully before putting the cover back outside.
A small rip doesn’t always mean your car cover belongs in the trash. Many punctures, straight tears, and worn spots can be reinforced if the surrounding material is still strong.
My rule is simple: match the repair to the fabric instead of reaching for whatever tape happens to be in the garage. This guide shows you how to patch a car cover without creating a bigger problem.
In This Guide
When Is a Car Cover Worth Patching?
A car cover is usually worth patching when the damage is localized and the surrounding material remains flexible and strong. Small punctures, short tears, and isolated abrasion spots are the best candidates.
A car cover patch is a piece of compatible material placed over damaged cover fabric to reinforce it and prevent the opening from spreading. The patch may be adhesive-backed, bonded with a compatible repair adhesive, or sewn into place.
Good candidates for repair
- Small punctures: Nail-size or branch-tip holes with strong fabric around them.
- Short straight tears: Damage that can be laid flat without missing fabric.
- Minor abrasion: A thinning area that hasn’t spread across a large panel.
- Single damaged spot: One problem area on an otherwise healthy cover.
- Accessible seam damage: A short opening where the surrounding stitching remains secure.
Location matters as much as size. A one-inch hole in the middle of a roof panel is usually easier to reinforce than a one-inch split beside a buckle.
Strap anchors, elastic hems, mirror pockets, and sharp body contours experience repeated tension. Repairs there need more reinforcement.
Check the warranty before making a permanent repair
If the cover is relatively new, check its warranty first. A manufacturer may inspect or replace a cover when material or workmanship has failed.
For example, Covercraft publishes different warranty periods by cover fabric and may inspect damaged products before determining whether repair or replacement applies. Cutting, gluing, or sewing first could complicate that process.
Take clear photos before modifying anything. Keep your order confirmation or proof of purchase too.
Section Takeaway: Patch isolated damage when the surrounding fabric is healthy. Investigate warranty coverage first if the failure seems premature.
What Type of Car Cover Material Do You Have?
You should identify the cover material before choosing a patch. Polyester, woven fabrics, vinyl-like materials, and specialty coated fabrics can react differently to heat and adhesives.
Start with the label sewn into the hem. If that doesn’t identify the material, look up the exact model using your receipt or order history.
Manufacturer instructions matter here. Covercraft, for example, publishes material-specific cover care information because cleaning and drying requirements can differ between fabrics.
| Cover Type | Common Repair Approach | Main Caution |
|---|---|---|
| Woven synthetic fabric | Compatible fabric repair patch or sewing | Heat can damage some synthetic fibers or coatings |
| Multi-layer cover | Flexible patch that supports all damaged layers | A surface-only patch may leave inner layers torn |
| Vinyl or vinyl-like material | Compatible flexible vinyl repair patch | Rigid glue may crack when the cover folds |
| Specialty coated outdoor fabric | Manufacturer-approved patch or professional repair | Wrong adhesive may affect coating performance |
Why I wouldn’t automatically use an iron-on patch
Many car covers contain synthetic fibers or specialized finishes. High heat can distort, melt, or weaken materials that were never designed for ironing.
Don’t assume an ordinary clothing patch is safe. Use heat only when the cover manufacturer and patch maker both permit it for that exact material.
Also check the condition around the tear
Pinch and gently flex the fabric several inches away from the damaged spot. Healthy material should not crumble, split, or continue tearing under light handling.
If new cracks appear easily, you’re dealing with material deterioration rather than one isolated hole. A patch won’t restore the rest of the panel.
How Do You Patch a Small Tear or Hole?
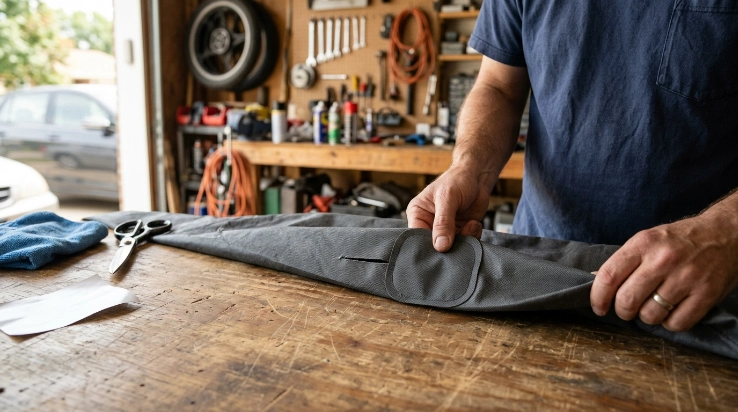
For most small tears, the safest general approach is an inside patch that overlaps healthy material on every side. Working from the inside also keeps the repair less exposed to weather and debris.
1. Remove and inspect the cover
Take the cover completely off the vehicle. Lay the damaged section on a clean, flat work surface.
Check both sides for grit before working. Dirt trapped against your paint can contribute to scratching when the cover moves.
That same contamination principle is why Consumer Reports recommends removing loose dirt before rubbing automotive paint during washing.
2. Clean the damaged area
Follow the cover manufacturer’s cleaning instructions rather than automatically using alcohol, solvent, or household detergent. Some coatings can react badly to aggressive cleaners.
Remove loose dust and contamination from both sides. Let the fabric dry completely before applying an adhesive patch.
3. Lay the tear back into its natural position
Place the cover inside-out and flatten the damaged section. Bring the torn edges together without overlapping them or stretching the panel.
Don’t pull so hard that you distort the original shape. The patch should reinforce the cover in its relaxed position.
4. Prepare a large enough patch
Use material compatible with your cover and repair system. The patch should extend beyond the damaged area onto solid fabric.
For a small tear, about an inch or more of healthy overlap on each side gives the repair considerably more surface area than covering only the opening. Round the patch corners when possible so there are no sharp points that easily lift.
5. Apply the patch from the inside
Remove the backing from an adhesive patch without touching the adhesive more than necessary. Center it over the damage and press outward from the middle.
Firm, even pressure helps reduce bubbles and lifted edges. Follow the patch manufacturer’s instructions for pressure, temperature, and application time.
6. Allow the repair to cure
Don’t immediately stretch the cover back over the car. Some repair adhesives need significant time to reach their intended bond strength.
Keep the repair flat, clean, and dry during that period. Follow the product’s stated cure time instead of guessing.
7. Inspect the outside
Turn the cover right-side out and check the repaired area. The edges of the original tear should remain aligned without obvious pulling.
Flex the fabric gently around the repair. Stop if the tear begins spreading beyond the patch.
Section Takeaway: A durable patch depends more on correct material preparation, generous overlap, and proper curing than on simply covering the visible hole.
Should You Use Repair Tape, Adhesive, or Sewing?
No repair method is best for every car cover. Your choice depends on the fabric, damage location, and amount of tension the repaired area receives.
| Repair Method | Best For | Advantage | Limitation |
|---|---|---|---|
| Adhesive repair patch | Small tears and punctures | Simple and flexible | Adhesion depends on fabric and coating |
| Repair tape | Quick reinforcement | Fast application | Edges may lift after folding or weather exposure |
| Sewn patch | High-stress fabric areas | Strong mechanical attachment | Needle holes may affect weather resistance |
| Professional repair | Large or complex damage | Better control of seams and reinforcement | May cost enough to make replacement attractive |
Can you use duct tape on a car cover?
Duct tape may temporarily close a tear, but I wouldn’t treat it as a reliable permanent repair. Heat, water, folding, dirt, and fabric movement can weaken the bond.
Old adhesive residue can also complicate a better repair later. A purpose-made flexible fabric patch is usually the cleaner solution.
Can you sew a torn car cover?
Yes, some fabric covers can be sewn, especially around seams or high-load areas. The repair should spread tension rather than pulling directly against the tear.
However, every needle hole passes through the fabric. On weather-resistant covers, ask the manufacturer whether the repaired stitching needs compatible seam sealing.
How Do You Repair Seams, Hems, and Strap Areas?
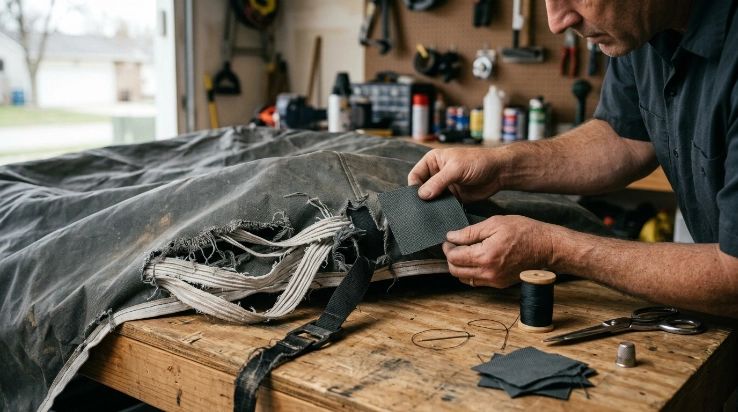
Damage at seams, elastic hems, buckles, and straps needs more than a basic surface patch. These parts repeatedly carry tension when the cover is installed or exposed to wind.
Torn seam
If the fabric is intact and only the stitching opened, resewing the original seam may be enough. Use thread and techniques suitable for outdoor fabric.
If the fabric itself tore beside the seam, reinforce the surrounding panel too. Sewing only through weakened material can make the new stitch line the next failure point.
Damaged elastic hem
A stretched or broken elastic hem affects fit around the bumpers. Patching the outer fabric won’t restore the lost tension.
Elastic replacement usually requires opening and resewing part of the hem. An upholstery or canvas-repair shop may be the better choice for an expensive cover.
Strap or buckle pulled through the fabric
Don’t reconnect a strap directly to torn material. The attachment needs reinforcement over a much larger area.
Wind movement can put repeated stress on retention points. Car and Driver’s 2026 car cover testing and buying guidance also emphasizes proper fit and secure outdoor-cover design.
A correctly fitted cover should not depend on one damaged attachment point to control large amounts of loose fabric. Fix the underlying fit problem before relying on the repair.
After the repair, keep the car and cover clean
Inspect the inside of the repaired area for exposed adhesive, rough stitching, or hardened edges. Nothing abrasive should sit against painted body panels.
Regular cleaning also helps reduce contamination between the cover and finish. Kelley Blue Book’s car-care recommendations likewise stress gentle cleaning materials and avoiding abrasive products on vehicle exteriors.
Section Takeaway: Repairs near straps and hems must handle repeated tension. Reinforce the structure, not just the visible opening.
When Should You Replace Instead of Patch a Car Cover?
Replace the cover when deterioration extends beyond one repairable area. A patch can reinforce local damage, but it can’t restore weakened fabric across the whole cover.
Replacement usually makes more sense when you find:
- Multiple tears: New holes keep appearing in different panels.
- Brittle material: The fabric cracks when folded or lightly pulled.
- Large missing sections: There isn’t enough intact material for strong overlap.
- Failed attachment points: Several straps, hems, or seams are deteriorating.
- Rough inner surfaces: Damaged lining could rub against the vehicle’s paint.
- Poor fit: The cover continually balloons, shifts, or flaps even when secured correctly.
- Repeated repair failure: Patches won’t remain bonded because the underlying material is worn out.
Fit deserves special attention. A patched cover that remains too loose may continue moving in the wind and create new stress around the repair.
Don’t keep adding patches simply because replacing the cover feels wasteful. Once the base material has lost strength, every repair depends on fabric that may fail next.
How do you prevent another tear?
Start by finding what caused the first one. A sharp antenna, rough trim edge, incorrect fit, dragging during installation, or wind movement can damage the replacement too.
- Center the cover: Don’t stretch one end excessively to reach the bumper.
- Use mirror pockets correctly: Misalignment can pull against nearby seams.
- Secure outdoor covers: Use the intended retention system.
- Avoid dragging: Lift and unfold the fabric instead of pulling it across sharp edges.
- Store it dry: Clean and dry the cover before folding it away.
- Inspect regularly: Repair a small opening before repeated movement makes it larger.
Section Takeaway: Patching is for localized damage. Widespread brittleness, recurring tears, or structural failure usually means the cover has reached replacement territory.
Frequently Asked Questions
What is the best way to patch a torn car cover?
The best method is a flexible patch compatible with the cover’s specific material. Clean and dry the area, align the tear, apply the patch from the inside with generous overlap, and allow the adhesive to cure according to its instructions.
Can I use Gorilla Tape or duct tape on a car cover?
You can use general-purpose tape as a temporary emergency repair, but it may leave residue or lift after weather exposure and folding. A purpose-made fabric or vinyl repair product is normally a better long-term choice.
Can I put an iron-on patch on a car cover?
Only if both the cover manufacturer and patch manufacturer say the material can handle the required temperature. Many covers contain synthetic fibers or coatings that can be damaged by uncontrolled heat.
Should I patch a car cover from the inside or outside?
For many small tears, an inside patch gives a cleaner appearance and protects the patch edges from direct exposure. The correct side can vary by repair product, so follow its application instructions.
How large should a car cover patch be?
The patch should extend well beyond the damaged fabric and bond to strong material on every side. For a small tear, roughly an inch or more of surrounding overlap is a useful starting point unless the repair-product instructions require more.
Can a ripped waterproof car cover still be waterproof after repair?
Possibly, but closing the hole doesn’t automatically restore the original weather resistance. Coated fabrics, seams, and needle holes may require a manufacturer-compatible repair or seam treatment to maintain their intended performance.
Is it cheaper to repair or replace a torn car cover?
A small isolated tear is usually worth trying to repair when the surrounding material is healthy. Replacement makes more sense when the cover has multiple tears, weakened fabric, failing seams, poor fit, or extensive weather deterioration.
The Bottom Line
Learning how to patch a car cover is mostly about choosing the right repair for the material. Clean preparation and a flexible, compatible patch matter more than making the repair look perfect.
Check the warranty first, reinforce healthy fabric around the tear, and avoid uncontrolled heat. If the entire cover is deteriorating, replacement will protect the vehicle better than another temporary patch.
