
How to Get a Check Engine Code Without a Toyota Scanner
Contents
- 1 Key Takeaways
- 2 📑 Table of Contents
- 3 Understanding the Language: What is an OBD-II Code?
- 4 Method 1: The Classic Paperclip/Jumper Wire Trick
- 5 Method 2: The Modern, Reliable Smartphone Adapter
- 6 Method 3: Built-In Dashboard Tricks (Rare & Model-Specific)
- 7 What to Do After You Get the Code: Interpretation vs. Diagnosis
- 8 When to Clear the Code and When to See a Pro
- 9 Beyond the Check Engine: Other Useful Toyota Self-Checks
- 10 Frequently Asked Questions

Car Vacuum Cleaner (Portable)

Car GPS Navigator

Steering Wheel Cover

Car Seat Cover (Universal Fit)
You don’t need an expensive professional scanner to find out why your Toyota’s check engine light is on. By using basic household items like a paperclip, a simple OBD2 Bluetooth adapter, or even your car’s built-in dash display tricks, you can retrieve the diagnostic trouble code (DTC) yourself. This guide walks you through every safe, step-by-step method to get that code, interpret its meaning, and understand the critical next steps before you clear it.
That ominous glow of the check engine light on your Toyota’s dashboard. It’s a moment every driver dreads. Your mind races with worst-case scenarios—is it a costly engine repair? A simple gas cap issue? The first, most crucial step is to find out what your car is actually trying to tell you. The secret is a little alphanumeric code, a Diagnostic Trouble Code (DTC). Many people assume they need a fancy, expensive Toyota scanner or a trip to the dealer to get it. But what if you could get that code yourself, right now, with items you probably already have? You absolutely can. This isn’t about performing complex repairs; it’s about empowering you with information. Knowing the code transforms that scary light from an unknown mystery into a specific, researchable clue. It saves you time, money, and the anxiety of walking into a repair shop blind. Let’s explore every practical, safe method to pull your Toyota’s check engine code without a proprietary scanner.
Key Takeaways
- The OBD-II port is your gateway: All post-1996 Toyotas have a standardized 16-pin OBD-II connector, usually under the dash, which is the access point for all these methods.
- The “paperclip method” works on some older models: For specific Toyota models from the late 90s/early 2000s, you can use a paperclip to jump TE1 and E1 terminals in the diagnostic box to make the check engine light flash the code.
- Smartphone adapters are the modern, easiest solution: A cheap Bluetooth/Wi-Fi OBD2 dongle paired with a free app on your phone is the most reliable way to read codes on virtually any 1996+ Toyota.
- A code is a starting point, not a diagnosis: A code like P0171 (System Too Lean) tells you *what* system is affected, not *which specific part* is bad. Diagnosis requires further testing.
- Never clear a code without addressing the problem: Simply turning off the light doesn’t fix the issue. The light will return, and you may fail emissions tests or cause further damage.
- Some issues require a professional: While you can get the code yourself, complex problems like internal transmission failures or advanced electrical gremlins often need a technician’s expertise and advanced tools.
- Safety first: Always ensure the vehicle is parked, in park/neutral, with the parking brake set before working under the dash or connecting devices.
📑 Table of Contents
- Understanding the Language: What is an OBD-II Code?
- Method 1: The Classic Paperclip/Jumper Wire Trick
- Method 2: The Modern, Reliable Smartphone Adapter
- Method 3: Built-In Dashboard Tricks (Rare & Model-Specific)
- What to Do After You Get the Code: Interpretation vs. Diagnosis
- When to Clear the Code and When to See a Pro
- Beyond the Check Engine: Other Useful Toyota Self-Checks
Understanding the Language: What is an OBD-II Code?
Before we dive into the “how,” let’s quickly understand the “what.” Since 1996, all cars sold in the U.S., including every Toyota, have been required to have an On-Board Diagnostics II (OBD-II) system. This is a standardized computer system that monitors your engine, transmission, and emissions controls. When it detects a problem it can’t correct, it stores a code and turns on the check engine light (officially the Malfunction Indicator Lamp or MIL).
The Anatomy of a Code
These codes are alphanumeric and follow a strict format: P0XXX. The first letter is always “P” for Powertrain (other letters like C, B, U exist for other systems but are less common for the check engine light). The first digit indicates if it’s a generic (0) or manufacturer-specific (1) code. The second digit points to the system (e.g., 0 for fuel/air, 1 for emissions, 2 for injector circuit, etc.). The last two digits are the specific fault number. So, P0301 means: P=Powertrain, 0=Generic, 3=Misfire, 01=Cylinder 1. Knowing this helps you research later.
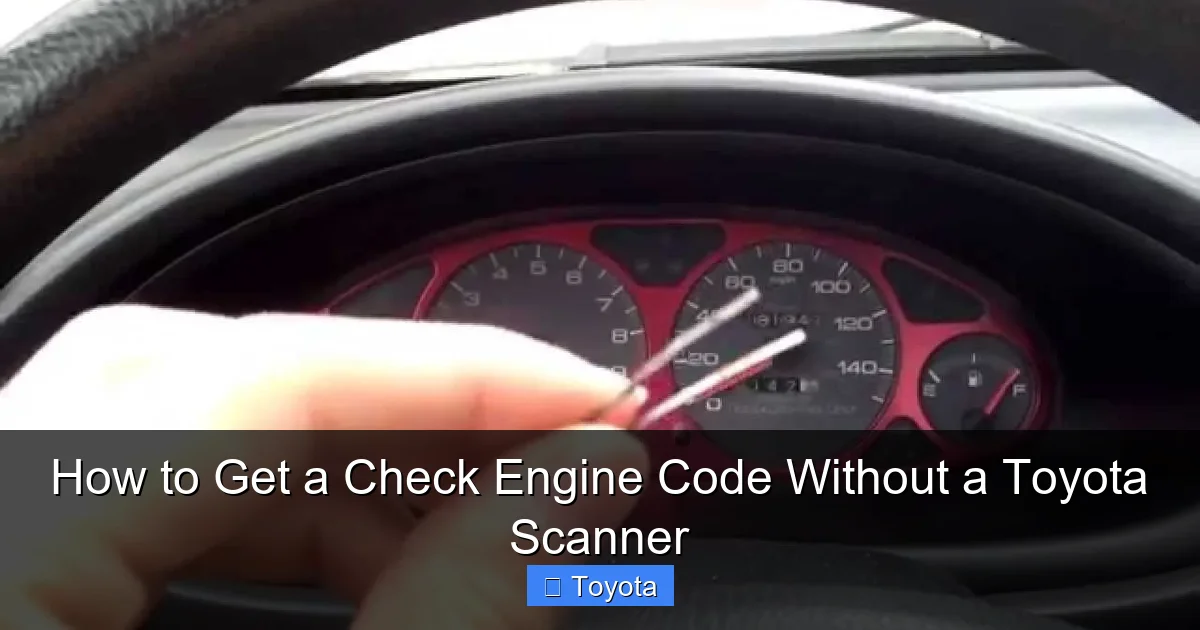
Method 1: The Classic Paperclip/Jumper Wire Trick
This is the most famous DIY method, often called the “blinking light” or “paperclip method.” It’s important to note: this does not work on all Toyotas. It primarily applies to models from the late 1990s through the early-to-mid 2000s that have a separate, physical diagnostic box (often in the engine bay) with easily accessible terminals, not just the standard OBD-II port under the dash.
Visual guide about How to Get a Check Engine Code Without a Toyota Scanner
Image source: enginelightfixers.com
Finding the Diagnostic Box
Open the hood and look for a small, usually black or gray, rectangular plastic box. It’s often labeled “DIAGNOSTIC” or has a picture of an engine. It’s commonly located near the firewall, the strut towers, or the battery. On many Tacomas, 4Runners, and Camrys of this era, it’s right there. Open the lid. You’ll see a row of metal terminals with labels like TE1, E1, T1, T2, etc.
Performing the Jumper
You need a small piece of wire or a bent paperclip. Ensure the ignition is OFF. Carefully insert one end of the wire into the terminal labeled TE1 and the other end into E1. These are the two key terminals for accessing the OBD-I style codes on these older systems. Now, turn the ignition key to the “ON” position (do not start the engine). The check engine light will illuminate solidly for a few seconds, then begin to flash. The flashes represent the code(s).
- A flash sequence like “blink-blink-pause-blink-blink-blink” means Code 23.
- The light will flash the first code, pause, then flash any stored codes. It will repeat the sequence.
- Long flashes (about 1 second) represent the tens place (e.g., one long flash = 10). Short flashes represent the ones place (e.g., two short flashes = 2). So, one long + two short = 12.
- Code 12 or 13 is often a “system normal” or no-code indicator on some models. Real trouble codes start higher.
Example: For a P0301 (Cylinder 1 Misfire) on a compatible 2000 Toyota Camry, you might see: three flashes (3), pause, one flash (0), pause, one flash (0), pause, one flash (1). That’s 3-0-0-1. The code 301 is then translated to the standardized P0301.
Critical Warning: This method is for reading codes only. Never attempt to clear codes by disconnecting the battery on these older models without knowing the code, as you may erase radio presets and other memory, and it won’t always clear the light on all systems. Always note the code first.
Method 2: The Modern, Reliable Smartphone Adapter
For any Toyota from 1996 onward (which is almost all on the road today), this is the gold standard DIY method. It’s cheap, effective, and gives you much more data than just the blinking light.

Visual guide about How to Get a Check Engine Code Without a Toyota Scanner
Image source: m.media-amazon.com
What You Need
1. A basic OBD-II Bluetooth or Wi-Fi adapter. These are widely available online and at auto parts stores for $15-$40. Popular brands include OBDLink, Veepeak, and generic ELM327-based adapters.
2. A smartphone (Android or iOS) or a tablet.
3. A free OBD2 scanner app. Top choices are Torque (Android), OBD Fusion (iOS), or Car Scanner ELM OBD2 (cross-platform).
Step-by-Step Connection
- Locate the OBD-II port under your Toyota’s dashboard, usually just above the driver’s knees. It’s a trapezoidal 16-pin connector. Remove any plastic cover.
- Plug the OBD2 adapter firmly into the port.
- Turn your car’s ignition to the “ON” position (the position where the dashboard lights come on, but don’t start the engine).
- On your phone/tablet, go to Settings > Bluetooth (if using a Bluetooth adapter) and pair with the adapter (it often has a name like “OBDII” or “Veepeak”). For Wi-Fi adapters, connect to its network.
- Open your chosen OBD2 app. It should automatically connect to the adapter and communicate with your car’s computer.
Reading the Codes
In the app, look for a button or menu option that says “Read Codes,” “Diagnostics,” or “DTCs.” Tap it. The app will query all the vehicle’s computers and display any stored trouble codes. It will usually show both the generic code (P0171) and, if available, a more detailed description (“Fuel System Too Lean (Bank 1)”). This is infinitely more helpful than just a number. You can also often clear the codes from here, but we’ll discuss that later.
Pro Tip: These apps also show real-time data—engine RPM, coolant temperature, oxygen sensor voltages, and more. This is invaluable for diagnosing the problem after you have the code. For instance, if you have a code for an oxygen sensor, you can watch its voltage switch between rich and lean in real-time.
Method 3: Built-In Dashboard Tricks (Rare & Model-Specific)
A handful of Toyota models from the early 2000s have a hidden, undocumented “dash-cycling” method to read codes without any tools. This is the exception, not the rule. It’s most famously documented for some Toyota Tacoma (2005-2015) and Toyota 4Runner (2003-2009) models. The process is finicky and not guaranteed.
Visual guide about How to Get a Check Engine Code Without a Toyota Scanner
Image source: i.ytimg.com
The Hypothetical Tacoma/4Runner Method
This involves a specific sequence of turning the ignition on/off and depressing the odometer reset button. The exact sequence varies and is often found on enthusiast forums for your specific year and model. Typically, it involves:
1. Turn ignition OFF.
2. Press and hold the odometer/trip meter reset button.
3. While holding the button, turn ignition ON (but don’t start).
4. Continue holding for 5-10 seconds until the odometer display changes to show diagnostic mode or code letters.
5. Release the button and the codes may scroll or be displayed.
Important Caveat: Do not rely on this. If you have a 2006-2015 Tacoma or similar, search online for “your exact year, make, model read check engine codes no scanner” to see if a verified method exists. The OBD2 adapter is still a more reliable and universal solution.
What to Do After You Get the Code: Interpretation vs. Diagnosis
So, you have a code. P0420. Now what? This is where most DIY journeys hit a wall, and it’s crucial to understand the difference.
The Code Tells You the “What,” Not the “Why”
A code like P0420 means “Catalyst System Efficiency Below Threshold.” That’s it. It tells you the computer has detected that the catalytic converter isn’t cleaning the exhaust as efficiently as it should. It does not tell you if the problem is:
– A faulty oxygen sensor giving a bad reading?
– A cracked exhaust manifold leaking before the cat?
– A clogged or melted catalytic converter?
– An engine misfire that’s dumping unburned fuel into the exhaust and poisoning the cat?
Your Research Toolkit
Now is the time to use your code as a search key. Go to reputable automotive forums like ToyotaNation or Tacoma4WD. Search for “P0420 Toyota [Your Model Year].” Read through dozens of threads. You’ll discover the most common causes for your specific vehicle. For a 2005 Toyota Corolla, it might be a bad front O2 sensor. For a 2010 Toyota Tundra, it might be a known issue with the pre-cat oxygen sensors. This research is your free, expert-level diagnosis guide.
Basic Physical Inspection
Before assuming the worst, do a simple check:
– Is the gas cap tight? A loose cap is the #1 cause of EVAP codes (P0440, P0455, etc.).
– Are all the engine air intake hoses connected and intact? A disconnected hose can cause lean codes (P0171, P0174).
– Visually inspect for obvious leaks (hoses, exhaust) or damaged wiring under the hood.
When to Clear the Code and When to See a Pro
To Clear or Not to Clear? That is the Question.
Once you’ve identified and fixed the problem (e.g., replaced the faulty gas cap, tightened the intake hose), you’ll want to clear the code to turn off the light and see if the problem is truly resolved. The smartphone adapter method makes this easy—there’s usually a “Clear Codes” button in the app.
However, DO NOT clear the code if:
– You haven’t diagnosed or addressed the issue. The light is your only warning.
– Your vehicle is due for an emissions/smog test. The test will fail if the system detects recently cleared codes (it sets a “not ready” status). You must drive the car under specific conditions (called drive cycles) to reset all monitors, which can take 50-100 miles of mixed driving.
– The code is for a serious issue like an engine misfire (P0300-P0304) or a transmission solenoid problem. Driving with these can cause catastrophic damage.
The Limits of DIY and When to Call a Mechanic
Getting the code is step one. If your research points to:
– Complex electrical gremlins (intermittent sensor failures, wiring harness issues).
– Internal engine or transmission problems (low compression, solenoid pack failure).
– Codes you cannot replicate or diagnose with basic tools.
…then it’s time to take your code (and your research notes!) to a trusted mechanic. Giving them the exact code saves them diagnostic time and saves you money. You’ve already done the first 30 minutes of their job.
For specific Toyota models, resetting the light after a repair is a common next step. Our guides on how to reset the check engine light on a Toyota Highlander or resetting it on a Toyota Corolla detail the post-repair procedures for those popular vehicles.
Beyond the Check Engine: Other Useful Toyota Self-Checks
Mastering your Toyota’s health doesn’t stop at the check engine light. Modern Toyotas are filled with electronic systems that can be checked without a scanner, saving you from unnecessary trips to the shop for simple maintenance items. Checking your fluid levels and system statuses manually is a cornerstone of good car ownership.
For example, knowing how to check your engine oil percentage on a newer Toyota with an electronic oil life monitor is essential. Our detailed guide on how to check oil percentage in a Toyota RAV4 walks you through the precise button presses on the steering wheel to see exactly how much useful life is left in your oil, which is often more accurate than the old-school dipstick method on these models. Similarly, being able to verify your tire pressure via the dash display, as shown in how to check tire pressure on a 2021 Toyota Corolla, ensures your TPMS system is functioning correctly and your tires are properly inflated for safety and fuel economy. These simple, no-tool checks complement your new ability to read engine codes, giving you a much more complete picture of your vehicle’s condition.
Frequently Asked Questions
Is it safe to drive with the check engine light on?
It depends on the code. If the car is running smoothly, has no strange noises, and you’ve checked basics like the gas cap, short-distance driving to a safe location or repair shop is usually okay. However, if the light is flashing, you have a misfire (P0300 series), or you notice severe performance loss, smoking, or overheating, stop driving immediately and have it towed to prevent major engine damage.
Will a cheap OBD2 scanner/adapter work on my Toyota?
Yes, for reading and clearing basic engine/transmission codes. Most generic ELM327-based adapters work fine on 1996+ Toyotas for standard P0XXX codes. However, they may not access manufacturer-specific codes (P1XXX) or advanced systems like ABS, SRS airbags, or hybrid components. For those, you often need a more expensive, brand-specific scan tool.
What’s the difference between a generic code and a manufacturer-specific code?
Generic codes (starting with P0, P2, P3) are standardized across all OBD-II vehicles and cover common emissions-related faults. Manufacturer-specific codes (starting with P1) are unique to a brand and provide more detailed information about systems that aren’t fully standardized. For example, a Toyota-specific code might point directly to a known issue with the VVT-i system that a generic code would only hint at.
Can I use the paperclip method on my 2012 Toyota Camry?
Almost certainly not. The paperclip/jumper wire method only works on older Toyotas (generally pre-2003-2005) that have a separate, physical diagnostic box with TE1 and E1 terminals in the engine bay. Your 2012 Camry only has the standard OBD-II port under the dash, which requires an electronic scanner or adapter to communicate with.
After fixing the problem, how do I turn off the check engine light?
The light will often turn off on its own after the computer runs a few successful drive cycles (typically 10-50 miles of mixed driving). To turn it off immediately, you must clear the stored codes. The easiest way is with a smartphone OBD2 adapter and app, which has a “Clear Codes” function. You can also disconnect the car’s battery for a few minutes, but this may also reset radio presets and other memory, and it doesn’t always clear all codes on all systems.
I got code P0420. Does that mean I need a new catalytic converter?
Not necessarily. While P0420 means the catalytic converter’s efficiency is below threshold, the cause is often something else poisoning or failing the converter, like faulty oxygen sensors, an exhaust leak before the cat, or a chronic engine misfire. Replacing the catalytic converter is expensive. Always diagnose the root cause first by checking sensor data, looking for exhaust leaks, and verifying your engine is running perfectly before concluding the cat itself is bad.


