
How Often Should You Change the Cabin Air Filter on a Toyota Corolla?
Contents
- 1 Key Takeaways
- 2 📑 Table of Contents
- 3 Breathing Easy: Why Your Corolla’s Cabin Air Filter is a Big Deal
- 4 The Golden Question: What’s the Official Replacement Interval?
- 5 5 Unmistakable Signs Your Cabin Air Filter is Past Its Prime
- 6 The Great Debate: DIY Replacement vs. Professional Service
- 7 A Step-by-Step Peek at the Replacement Process (General Guide)
- 8 Maintaining Your Investment: Beyond the Filter Change
- 9 Conclusion: A Simple Habit for a Healthier, Happier Corolla
- 10 Frequently Asked Questions
Changing your Toyota Corolla’s cabin air filter regularly is crucial for clean in-car air and HVAC system health. Toyota typically recommends replacement every 15,000-30,000 miles, but your driving environment plays a major role. Ignoring a clogged filter reduces airflow, strains the system, and lets pollutants into your cabin. Learn the signs and decide between a quick DIY job or a professional service.
Key Takeaways
- Standard Interval: Toyota recommends changing the cabin air filter every 15,000-30,000 miles, but always check your owner’s manual for your specific model year.
- Environment Matters Most: Driving in heavy traffic, dusty areas, or regions with high pollen drastically shortens filter life, sometimes needing changes every 12 months.
- Key Warning Signs: Reduced HVAC airflow, persistent musty odors, and visible debris on the filter are clear indicators it’s time for a replacement.
- DIY is Usually Simple: For most Corolla model years, the cabin filter is behind the glovebox and can be replaced in 15-30 minutes with basic tools.
- Professional Service is an Option: A quick service at a dealership or shop can handle it during an oil change, often for a reasonable labor fee plus part cost.
- Don’t Confuse Filters: The cabin air filter cleans air you breathe inside; it is different from the engine air filter, which has a separate replacement schedule.
- Use Quality Filters: Opt for OEM Toyota filters or reputable aftermarket brands (like Denso or Purolator) to ensure proper fit and filtration efficiency.
📑 Table of Contents
- Breathing Easy: Why Your Corolla’s Cabin Air Filter is a Big Deal
- The Golden Question: What’s the Official Replacement Interval?
- 5 Unmistakable Signs Your Cabin Air Filter is Past Its Prime
- The Great Debate: DIY Replacement vs. Professional Service
- A Step-by-Step Peek at the Replacement Process (General Guide)
- Maintaining Your Investment: Beyond the Filter Change
- Conclusion: A Simple Habit for a Healthier, Happier Corolla
Breathing Easy: Why Your Corolla’s Cabin Air Filter is a Big Deal
You might not think about it much, but that little panel behind your glovebox is one of your Toyota Corolla’s unsung heroes. The cabin air filter is your first line of defense against the world outside. It traps dust, pollen, soot, mold spores, and even some exhaust fumes before they can enter your car’s interior through the heating and air conditioning vents. Think of it as the lungs of your car’s HVAC system. When it’s clean and functioning, you and your passengers breathe easier. When it’s clogged, it doesn’t just affect air quality—it can put real strain on your blower motor and reduce the efficiency of your entire climate control system. Keeping up with this simple maintenance task is a small effort that pays off in big ways for your health, your comfort, and your vehicle’s longevity.
What Exactly Does a Cabin Air Filter Do?
Unlike the engine air filter that feeds clean air to your motor, the cabin air filter—sometimes called a pollen filter—is dedicated to you. It’s usually a pleated, fibrous material, often treated with activated charcoal to absorb odors. As your Corolla’s fan pulls outside air into the HVAC housing, this filter scrubs it clean. In heavy city traffic, it captures brake dust and soot. During spring, it’s a barrier against tree and grass pollen. For allergy sufferers, a high-quality, clean cabin filter is non-negotiable. It also protects the delicate internals of your HVAC system from dust buildup, which can lead to costly repairs down the line. A neglected filter becomes a barrier, forcing your fan to work harder and potentially burning it out prematurely.
The Golden Question: What’s the Official Replacement Interval?
So, how often should you actually change it? The answer isn’t a single number, but a range with a strong emphasis on your personal circumstances. Toyota’s general maintenance schedule for the Corolla provides a baseline, but it’s written as a guideline for “normal” driving conditions. Understanding what “normal” means is key.
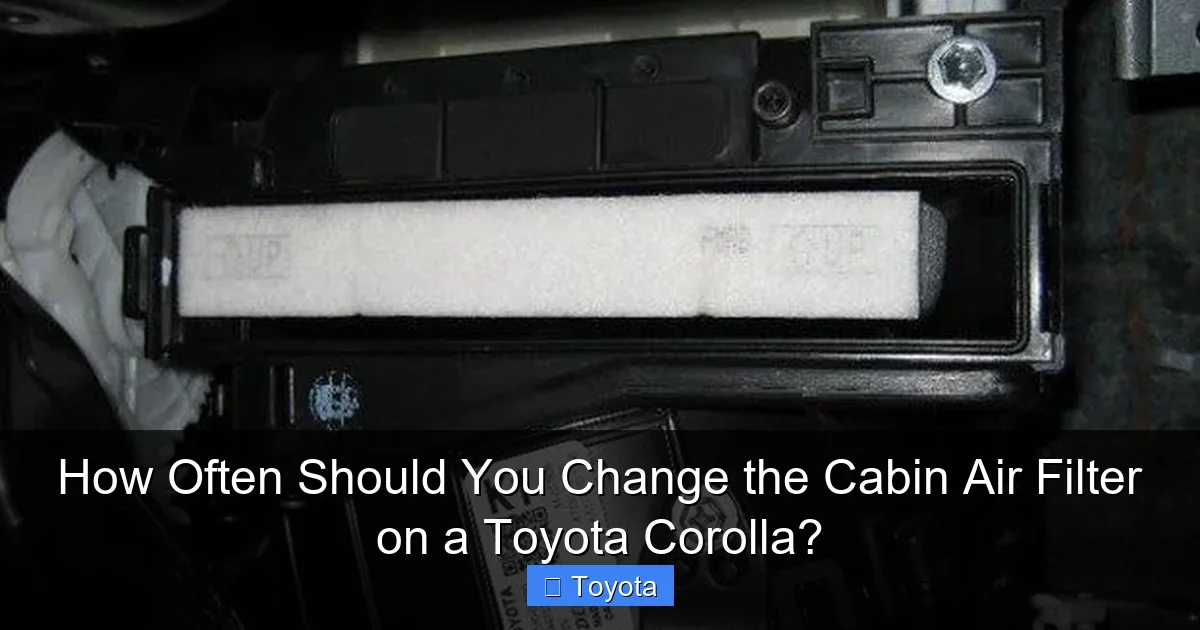
Visual guide about How Often Should You Change the Cabin Air Filter on a Toyota Corolla?
Image source: s3.amazonaws.com
Toyota’s Factory Recommendations
For most recent Toyota Corolla models (2014 and newer), the official recommendation found in the owner’s manual is to inspect the cabin air filter every 15,000 miles and replace it as needed. Many manuals then suggest a replacement interval of every 30,000 miles under normal operating conditions. However, for earlier models, you might see a 15,000-mile interval. The most critical step is to consult your specific vehicle’s owner’s manual. It will have the definitive schedule and often includes a maintenance checklist specific to your model year and engine type. If you don’t have the physical manual, Toyota often provides digital copies on their owner’s portal website.
The “Normal vs. Severe” Service Schedule Reality
This is where many drivers get confused. Automakers define “severe” service much more broadly than you might think. For the cabin air filter, your driving environment is the primary factor. Your driving habits are secondary. You are likely operating under “severe” conditions if you:
- Frequently drive in heavy stop-and-go traffic (high concentrations of exhaust fumes).
- Live in or often drive through areas with high dust, dirt, or construction zones.
- Reside in regions with high seasonal pollen counts (spring/fall).
- Drive in very cold climates where road salt and sand are heavily used in winter.
- Often drive on unpaved roads.
If any of these apply to you, you should lean toward the lower end of the mileage range—closer to 15,000 miles—or even set an annual rule. For a driver with a long highway commute in a clean, rural area, stretching to 30,000 miles might be acceptable. But for a city dweller with allergies, 12-15 months is a safer bet, regardless of mileage. It’s better to replace it early than to suffer with poor air quality and a struggling HVAC system.
5 Unmistakable Signs Your Cabin Air Filter is Past Its Prime
Even if you’re not a mileage-counter, your Corolla will give you clear warning signs that the filter is clogged and needs attention. Don’t ignore these symptoms.
Visual guide about How Often Should You Change the Cabin Air Filter on a Toyota Corolla?
Image source: img.toyotask.com
1. Noticeably Weaker Airflow from the Vents
This is the most common and obvious symptom. Turn your fan to the highest setting. If the air coming from the dashboard, floor, or defroster vents feels feeble and weak compared to how it used to be, a clogged cabin filter is the prime suspect. The filter is so packed with debris that it physically blocks air from passing through efficiently. You might notice this most on the “outside air” setting versus “recirculate.” This reduced airflow makes your heating and cooling slower and less effective, especially on hot summer days or frosty mornings.
2. Persistent, Musty or “Dirty Sock” Odor
A cabin filter that’s saturated with moisture, pollen, and organic matter becomes a breeding ground for mold and mildew. When your HVAC system runs, it blows this musty, stale odor throughout the cabin. You might smell it most prominently when you first start the car or turn on the AC. This isn’t just unpleasant; it’s a sign of biological growth that can aggravate allergies and respiratory issues. Replacing the filter is the first and most crucial step to eliminating this smell. If the odor persists after a new filter, your HVAC drain tube may be clogged, but the filter is always step one.
3. Visible Debris When You Check It
If you’re the type who likes to peek under the hood, you can often access the cabin filter housing with minimal effort. Once you remove the cover (usually a few screws or clips), you can pull out the filter. If it looks dark gray or black, caked with a thick layer of dust, leaves, seeds, or pollen, it’s clearly overdue. A new filter is typically white or a very light gray. A quick visual inspection once a year is a great proactive habit.
4. Foggy Windows That Won’t Defog Quickly
Your Corolla’s defroster works by blowing warm, dry air onto the windshield. A severely clogged cabin filter restricts this airflow dramatically. On cold, humid days, you’ll find your windows fog up on the inside much more easily, and the normal defroster cycle takes significantly longer to clear the glass. This is a safety issue, as it impairs your visibility. While other issues can cause fogging (like a bad heater core), a clogged filter is a simple, common fix.
5. Increased HVAC System Noise
When the blower motor has to strain to push air through a packed filter, it often sounds different. You might hear a louder whirring, a strained motor noise, or even a whistling sound from the vents. The fan is essentially working overtime. Replacing the filter should restore the normal, quieter hum of your HVAC system.
The Great Debate: DIY Replacement vs. Professional Service
For the Toyota Corolla, replacing the cabin air filter is widely considered one of the easiest DIY maintenance tasks you can undertake. It requires no special tools, rarely involves any dirty engine bay work, and typically takes less time than an oil change. But is it right for you?

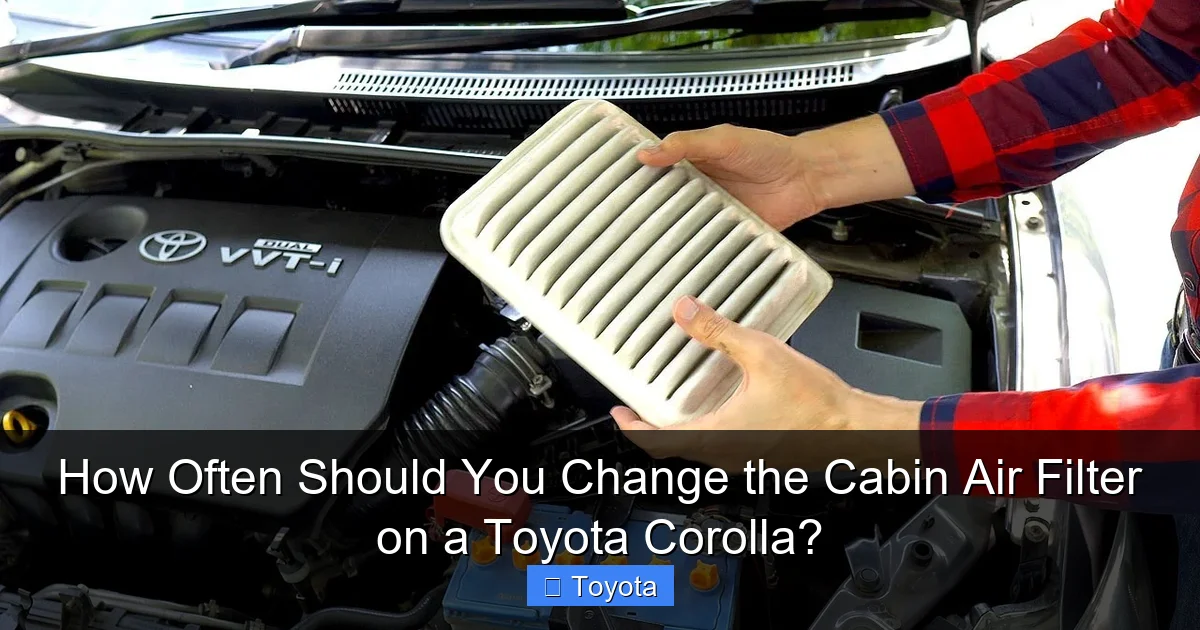
Visual guide about How Often Should You Change the Cabin Air Filter on a Toyota Corolla?
Image source: diycarexpert.com
Why You Should Consider the DIY Route
The primary benefits are cost savings and satisfaction. A quality OEM or aftermarket cabin air filter for a Corolla usually costs between $15 and $35. When you do it yourself, that’s your only cost. A dealership or repair shop will charge you for the part plus at least 30-60 minutes of labor, which can easily bring the total to $75-$150. The process is straightforward: access the glovebox (often by removing two bolts and lowering it), locate the filter housing cover (usually rectangular, held by 2-4 screws or clips), remove the old filter, and install the new one with the airflow arrow pointing in the correct direction. If you can follow simple instructions and aren’t afraid to remove a few interior panels, you can do this. Many online guides and videos, including our very own guide on changing a Toyota RAV4’s cabin filter, show the nearly identical process on other Toyota models, which can build your confidence.
When to Call in a Professional
There are valid reasons to let a pro handle it. If your Corolla’s glovebox or filter housing design is particularly tricky for your model year (some later years have more complex clips), you might risk breaking plastic tabs. If you have physical limitations or simply don’t want to get inside the footwell, a quick service is convenient. Many quick-lube shops and dealerships offer very affordable cabin filter replacements, especially if bundled with an oil change. Finally, if you replace the filter and the musty odor returns quickly, a professional can check the HVAC drain tube for clogs, which is a more involved job. It’s also a chance to have them inspect the overall health of your HVAC system while they’re in there.
A Step-by-Step Peek at the Replacement Process (General Guide)
While exact steps vary slightly by generation, here’s the universal process for most Corollas (2014-2023). Always refer to your manual for specifics.
- Step 1: Purchase the Correct Filter. Use your VIN or a parts store lookup to get the exact part number (e.g., Toyota Genuine Part 87139-0J010).
- Step 2: Prepare the Vehicle. Park on a level surface, set the parking brake, and disconnect the negative battery terminal for safety (optional but recommended).
- Step 3: Access the Glovebox. Open the glovebox. You’ll typically find two bolts or nylon pins at the top of the glovebox door. Remove them. The glovebox door will then drop down, revealing the filter housing behind it.
- Step 4: Remove the Filter Housing Cover. The housing is a rectangular plastic box. It’s secured by either screws or spring-loaded clips. Carefully remove these and set them aside.
- Step 5: Extract the Old Filter. Note the orientation—there is an airflow arrow printed on the side of the filter. Slide the old filter out. You’ll likely see a mess of debris. Dispose of it.
- Step 6: Install the New Filter. Place the new filter in the housing, ensuring the airflow arrow points in the same direction as the old one (usually toward the center of the car, not the firewall).
- Step 7: Reassemble. Snap or screw the cover back on, lift the glovebox into place, and reinsert the bolts/pins. Reconnect the battery if you disconnected it.
- Step 8: Test. Turn the ignition on and run the fan on high with the AC on. You should immediately notice stronger airflow and possibly a cleaner smell.
If you own an older Corolla (pre-2014) or a specific trim, the process might differ. Some older models have the filter under the cowl (near the windshield wipers), which is a slightly different but still manageable procedure. For those, a general civic-style under-hood replacement guide can offer a conceptual parallel, though part locations differ.
Maintaining Your Investment: Beyond the Filter Change
Replacing the filter is the core task, but it’s part of a larger HVAC maintenance picture. To maximize the life of your new filter and your system:
- Use the Recirculate Setting Wisely: In heavy pollution or heavy traffic, switch to “recirculate” mode. This reuses the already-filtered cabin air instead of constantly pulling in dirty outside air, reducing the load on your filter. Just remember to switch back to fresh air periodically to avoid stuffiness.
- Check the Cabin Filter During Seasonal Transitions: Make it a habit to inspect your filter when you swap between winter and summer tires, or at the start of allergy season. This proactive check prevents you from forgetting.
- Consider Your Cabin Air Quality Holistically: A clean filter is your main tool, but keeping your car’s interior clean (vacuuming regularly) reduces the amount of dust and dander that gets pulled into the system. Also, if you smoke in the car, be aware that tobacco smoke will saturate the filter much faster.
- Don’t Forget the Engine Air Filter: While you’re thinking about filters, remember your engine air filter has its own schedule (often 15,000-30,000 miles). It’s a separate, equally important filter. Confusing the two is a common mistake. Our article on how often to change oil filters and other routine filters helps keep all your maintenance schedules straight.
Conclusion: A Simple Habit for a Healthier, Happier Corolla
In the grand scheme of Toyota Corolla maintenance, the cabin air filter is a minor player in terms of cost and complexity, but a major player in terms of daily impact. There’s no universal “every X miles” rule that fits every driver. The correct answer is a blend of Toyota’s factory guidance and your personal reality. Start with the 15,000-30,000 mile guideline from your manual, then adjust based on your environment. If you drive through dust storms, city smog, or thick pollen, shorten that interval. Learn to recognize the signs—weak airflow, bad smells—and don’t hesitate to act. Whether you choose the satisfying 20-minute DIY project or a convenient professional service, making this a regular part of your car care routine ensures you’re breathing the cleanest air possible. It protects your investment in your Corolla’s HVAC system and makes every drive more comfortable. It’s a small task with a big payoff, and it’s one you can easily master.
Frequently Asked Questions
Can a dirty cabin air filter affect my Toyota Corolla’s fuel economy?
Yes, but indirectly. A severely clogged filter restricts airflow to your HVAC system, causing the blower motor to work harder. This increased electrical load places a small extra strain on the alternator, which in turn places a tiny additional load on the engine. The effect on MPG is usually negligible (less than 1%), but it’s a real, if minor, efficiency loss.
Is there a “service engine soon” or dashboard warning for a bad cabin filter?
No. The Toyota Corolla does not have a dedicated dashboard warning light for cabin air filter service. The indicators are performance-based: weak airflow, strange odors, or foggy windows. Some newer vehicles with advanced air quality sensors might alert you, but the Corolla does not. You must rely on scheduled maintenance and sensory clues.
Can I clean and reuse my cabin air filter instead of replacing it?
Generally, no. Most cabin air filters are made of pleated paper or fabric with a fine media that is not designed to be cleaned. Vacuuming may remove loose debris but will not restore its filtration capacity or remove embedded contaminants and potential microbial growth. Attempting to wash a standard filter will damage it. Always replace it with a new, correct filter for your model.
Does the cabin air filter affect the heating system?
Absolutely. The cabin filter is in the path of all air entering the HVAC system, whether it’s for cooling, heating, or ventilation. A clogged filter will severely restrict the volume of air that can pass over the heater core (for heat) or the evaporator (for AC), making both systems less effective at warming or cooling the cabin quickly.
My Corolla has a weird smell after I changed the cabin filter. Why?
This can happen if the new filter is of poor quality, has a manufacturing residue, or if the HVAC system itself has mold/mildew in the ducts or drain tube. First, ensure the new filter is installed correctly with the airflow arrow pointing the right way. If the smell persists, the source is likely in the HVAC housing or drain line, which may require a professional cleaning with antimicrobial agents.
Where is the cabin air filter located on a Toyota Corolla?
On nearly all modern Corolla models (2014-present), it is located behind the glovebox. You access it by opening the glovebox, removing the two bolts or pins at the top of the door, and letting the door drop down. The filter housing is a rectangular plastic box directly behind it. On some very early models (like 2009-2013), it might be located under the hood, behind the cowl panel near the windshield wipers, but the glovebox location is far more common. Always confirm for your specific year.


