
How Do You Reset the Dashboard Lights on a Toyota Corolla?
Contents
- 1 Key Takeaways
- 2 📑 Table of Contents
- 3 Understanding Your Toyota Corolla’s Dashboard: More Than Just a Light
- 4 Resetting the “MAINT REQD” (Maintenance Required) Light
- 5 Resetting the Check Engine Light (MIL – Malfunction Indicator Lamp)
- 6 Resetting Other Common Dashboard Lights
- 7 What to Do When a Reset Doesn’t Work or the Light Returns
- 8 Proactive Maintenance: Preventing Unnecessary Dashboard Lights
- 9 Conclusion: Knowledge is Power Under the Hood
- 10 Frequently Asked Questions

Car Bumper Protector

Carburetor Cleaner

Car Cleaning Brush Set
Reflective Safety Triangle
Resetting dashboard lights on a Toyota Corolla is often a simple, do-it-yourself task. Most common warnings, like the maintenance required light or a loose gas cap trigger for the check engine light, can be cleared by following specific procedures. However, always diagnose the underlying issue first; resetting a light without fixing the problem is unsafe and can lead to serious damage. This guide provides clear, model-specific instructions for the most frequent dashboard alerts.
Key Takeaways
- Safety First: Never reset a dashboard warning light without first identifying and repairing the cause, especially for critical lights like the check engine, ABS, or airbag lights.
- Simple Resets: The “MAINT REQD” (maintenance required) light and sometimes the tire pressure warning are designed for easy driver reset after routine service.
- Check Engine Complexity: Resetting the check engine light requires fixing the stored trouble code first. A simple gas cap tightening may be the fix, but a diagnostic scan is often needed.
- Model Variations: Reset procedures can differ between model years and trim levels (e.g., older models vs. newer models with digital dashboards). Always consult your owner’s manual.
- Tool Needs: Most basic resets need no tools, but resetting some systems may require an OBD-II scanner, especially after certain repairs.
- Persistent Lights: If a light resets but returns immediately or after a short drive, the problem was not correctly fixed and requires professional diagnosis.
- Battery Disconnect: As a last resort for non-critical lights, disconnecting the car battery can reset the ECU, but it may also reset other systems like radio presets and clock settings.
📑 Table of Contents
- Understanding Your Toyota Corolla’s Dashboard: More Than Just a Light
- Resetting the “MAINT REQD” (Maintenance Required) Light
- Resetting the Check Engine Light (MIL – Malfunction Indicator Lamp)
- Resetting Other Common Dashboard Lights
- What to Do When a Reset Doesn’t Work or the Light Returns
- Proactive Maintenance: Preventing Unnecessary Dashboard Lights
- Conclusion: Knowledge is Power Under the Hood
Understanding Your Toyota Corolla’s Dashboard: More Than Just a Light
That little icon glowing on your Toyota Corolla’s dashboard is your car’s way of talking to you. It’s not just an annoyance; it’s a vital communication tool from your vehicle’s complex network of computers and sensors. Knowing how to respond is key to keeping your Corolla reliable and safe. The term “resetting dashboard lights” covers a wide range of scenarios, from the simple, routine “maintenance required” light after an oil change to the potentially serious check engine light. The process and, more importantly, the reason for the light, vary dramatically. This guide will walk you through each common scenario, ensuring you reset lights correctly and, most crucially, understand when a reset is appropriate and when it’s a sign to visit a mechanic. We’ll focus on the most frequent dashboard alerts owners encounter.
The Golden Rule: Diagnose Before You Reset
Before we dive into button combinations and key turns, let’s establish the most critical rule. You should only reset a dashboard warning light after you have positively identified and corrected the problem that triggered it. Resetting a light without fixing its cause is like turning off a smoke alarm while a fire is still burning—it’s dangerous and leads to costly, preventable damage. For example, resetting a check engine light that’s on because of a misfiring cylinder will allow that misfire to continue, potentially destroying your catalytic converter. For critical safety systems like ABS, SRS (airbag), or brake system warnings, never attempt a simple reset; these require immediate professional diagnosis with specialized tools. This guide primarily covers resets for maintenance reminders and post-repair notifications where the issue is already resolved.
Resetting the “MAINT REQD” (Maintenance Required) Light
This is by far the most common and straightforward reset. The “MAINT REQD” light on your Corolla is not an emergency warning. It’s a simple mileage- or time-based reminder that your scheduled maintenance (usually an oil change) is due. It illuminates after a set number of miles driven since the last reset. Once you’ve completed the required service—be it an oil change, tire rotation, or filter replacement—you can manually turn this light off. The procedure is a manual sequence using your odometer/trip meter button and your ignition key. It works for most Corolla models from the early 2000s through the current generation, though the exact steps can vary slightly.

Visual guide about How Do You Reset the Dashboard Lights on a Toyota Corolla?
Image source: alquilercastilloshinchables.info
Step-by-Step for Most Models (2009-2023)
For the vast majority of modern Corollas, here is the standard procedure:
- Start with your car turned OFF. Do not start the engine.
- Locate the trip/odometer button on your dashboard, usually on the instrument cluster near your speedometer. It’s often labeled “ODO/TRIP”.
- Press and hold this button down.
- While still holding the button, turn your ignition key to the “ON” position (the position right before starting, where all dashboard lights come on). Do not start the engine.
- Continue holding the trip button. The odometer display will change. You’ll see a series of dashes “—–” or a message like “MAINT REQD” blinking.
- After about 5-10 seconds, the display will change to show your normal odometer reading, and the “MAINT REQD” light should be off.
- Release the button and turn the ignition off. Start the car to confirm the light stays off.
Pro Tip: If the light doesn’t reset, ensure you are in the correct display mode. Some models require you to cycle the odometer to the “ODO” (total miles) display, not a trip meter “A” or “B” setting, before starting the sequence.
For Older Models (Pre-2009) and Variations
Older Corollas (early 2000s, 2005-2008) sometimes use a slightly different method involving the trip meter reset button. The principle is the same: turn key to “ON,” hold the trip reset button until the light blinks and goes out. If your manual procedure doesn’t work, your owner’s manual is the ultimate authority. For models with a multi-information display (MID) in the gauge cluster, the reset might be done through a menu accessed via steering wheel buttons. Look for a “Settings” or “Vehicle Settings” menu, then “Maintenance” or “Service Reminder.”
Resetting the Check Engine Light (MIL – Malfunction Indicator Lamp)
The check engine light is the most serious and misunderstood dashboard light. It indicates the engine computer (ECU) has detected a problem affecting emissions or engine performance. Resetting this light without addressing the root cause is strongly discouraged. However, there are legitimate scenarios where you need to reset it after a repair:

Visual guide about How Do You Reset the Dashboard Lights on a Toyota Corolla?
Image source: i.ytimg.com
- You or a mechanic replaced a faulty oxygen sensor.
- You tightened or replaced a loose or damaged gas cap (a very common trigger).
- A mechanic cleared a diagnostic trouble code (DTC) after fixing an issue like a bad spark plug or coil.
- It will reset all electronic systems: radio presets, clock, power window/mirror memory, and sometimes the steering angle sensor (requiring a recalibration).
- On some newer cars, it can cause issues with the vehicle’s security system or require a “relearn” process for the engine idle.
- It does not fix the problem. The light will simply come back on if the fault persists, often within a few minutes of driving.
- Direct TPMS (Sensors in each wheel): Often resets automatically after driving for 15-20 minutes at speeds above 30 mph once the correct pressure is sensed. Some models have a “TPMS” or “SET” button under the dash or in the glovebox. Consult your manual.
- Indirect TPMS (Uses ABS wheel speed sensors): This system often requires a recalibration via a menu in the MID. Look for “TPMS Calibration” or “Tire Pressure” in the vehicle settings on your steering wheel controls. You must initiate this after adjusting tire pressure.
Method 1: The “Drive Cycle” Method (Automatic Reset)
Modern vehicles are designed to self-check systems. After the problem is fixed, the ECU will run monitors. If all monitors pass successfully during your normal driving, the check engine light will automatically turn off after a few drive cycles (typically 1-3 trips of specific driving conditions: highway speeds, stop-and-go, idle time). This is the preferred method. Simply drive the car normally for a week or two. If the light was triggered by a loose gas cap that you tightened, it will often go out on its own within 50-100 miles of driving.
Method 2: Using an OBD-II Scanner (The Correct Way)
This is the most reliable and professional method. An OBD-II scanner plugs into the port under your driver’s side dash (the same port mechanics use). After repairing the issue, you connect the scanner, turn the ignition to “ON,” and use its menu to “Clear Codes” or “Erase DTCs.” This tells the ECU to wipe its memory of the fault and restart its monitoring process. You can buy a basic Bluetooth OBD-II scanner for $20-$50 that works with a smartphone app, or a standalone tool. This is the only proper way to reset the light after most repairs. If you don’t have a scanner, many auto parts stores (like AutoZone, Advance Auto Parts) will scan your codes and often clear the light for free as a service.
Method 3: The “Battery Disconnect” Method (A Last Resort)
Disconnecting the negative battery terminal for 10-15 minutes will cut power to the ECU, clearing its memory, including stored trouble codes. Use this method with extreme caution:
This method is generally not recommended for a check engine light unless you have no other option and understand the consequences. It’s more effective for clearing non-critical, transient codes that may have been set erroneously.
Resetting Other Common Dashboard Lights
Beyond the maintenance and check engine lights, your Corolla has other indicators that may require a reset after service.

Visual guide about How Do You Reset the Dashboard Lights on a Toyota Corolla?
Image source: i.ytimg.com
Tire Pressure Monitoring System (TPMS) Light
If you’ve inflated your tires to the correct PSI (found on a sticker inside the driver’s door jamb) and the light remains on, the system may need a manual reset. The process varies:
Important: A persistent TPMS light after inflation could indicate a faulty sensor or a slow leak. Don’t just reset it; find and fix the leak.
Oil Pressure Light & Charging System Light
These are CRITICAL warning lights, NOT reminder lights. They indicate an immediate, dangerous condition: no oil pressure or a failed charging system (alternator). You should NEVER see these lights under normal operation after starting the car. If they come on while driving, pull over safely and shut off the engine immediately to prevent catastrophic engine damage. These lights are designed to go out automatically when the condition is resolved (e.g., after adding oil or replacing the alternator). There is no “reset” button. They are self-testing at startup and will illuminate briefly when you turn the key to “ON” as a bulb check, then go out when the engine starts. If they stay on or come on while running, it’s an emergency, not a reset situation. If the light stays on after a repair, the problem persists.
What to Do When a Reset Doesn’t Work or the Light Returns
You’ve followed the steps, but the dashboard light is back. This is your car’s most important clue. A light that resets but returns after a short drive (e.g., 10-50 miles) means the fault is still present. The ECU has detected the same issue again. Here is your action plan:
Step 1: Perform a Basic Visual Inspection
For the check engine light, start with the simplest fixes. Ensure the gas cap is tightened until it clicks. Listen for obvious exhaust leaks. Check for damaged engine wiring or hoses. For the maintenance light, confirm the service was actually performed (oil change, filter change).
Step 2: Scan for Diagnostic Trouble Codes (DTCs)
This is non-negotiable for a persistent check engine light. You need to know the specific code(s) stored. Use an OBD-II scanner yourself or get a free scan at an auto parts store. A code like “P0171” (System Too Lean) points to a vacuum leak or fuel issue, while “P0300” (Random Misfire) points to spark plugs, coils, or fuel injectors. The code is your roadmap to the repair. For other lights like ABS or SRS, a standard OBD-II scanner may not be enough; you’ll need a more advanced scan tool, signaling the need for a professional.
Step 3: Seek Professional Diagnosis
If the code points to a complex component (e.g., catalytic converter, internal engine issue) or if the light is for a safety system (ABS, SRS, Brake System), take your Corolla to a trusted mechanic or dealership. Explain that you’ve attempted a reset after addressing the initial issue, but the light returned, providing them with the specific DTC if you have it. This saves them diagnostic time and you money.
Proactive Maintenance: Preventing Unnecessary Dashboard Lights
The best way to deal with dashboard lights is to avoid them in the first place. Adhering to your Toyota Corolla’s maintenance schedule is the single most effective strategy.
Follow the Factory Maintenance Schedule
Your owner’s manual outlines precise intervals for oil changes, tire rotations, filter replacements, and inspections. Sticking to this schedule prevents the “MAINT REQD” light from coming on unexpectedly and addresses wear items before they trigger other warnings. For example, neglecting spark plugs can eventually cause a misfire and illuminate the check engine light.
Address Small Issues Immediately
That slight hesitation when accelerating, the faint whiff of fuel smell, or a tire that seems a bit low? Don’t ignore them. These are often the early symptoms that eventually set a diagnostic code. Catching a small exhaust leak or a failing sensor early is cheaper than waiting for it to damage the catalytic converter. A quick check of your tire pressures monthly can prevent TPMS alerts and improve fuel economy and tire wear. If you need to know how to properly open your hood to check fluids or components, refer to a dedicated guide like how to open the hood on a Toyota Corolla.
Use Quality Parts and Fuel
Using the correct oil viscosity and a quality oil filter during changes keeps your engine running smoothly. Using top-tier gasoline with adequate detergent additives helps keep fuel injectors and intake valves clean, preventing lean conditions that trigger check engine lights. When replacing sensors or emission components, opt for OEM or high-quality aftermarket parts. Cheap components can fail prematurely, causing the light to return.
Understand Your Vehicle’s Systems
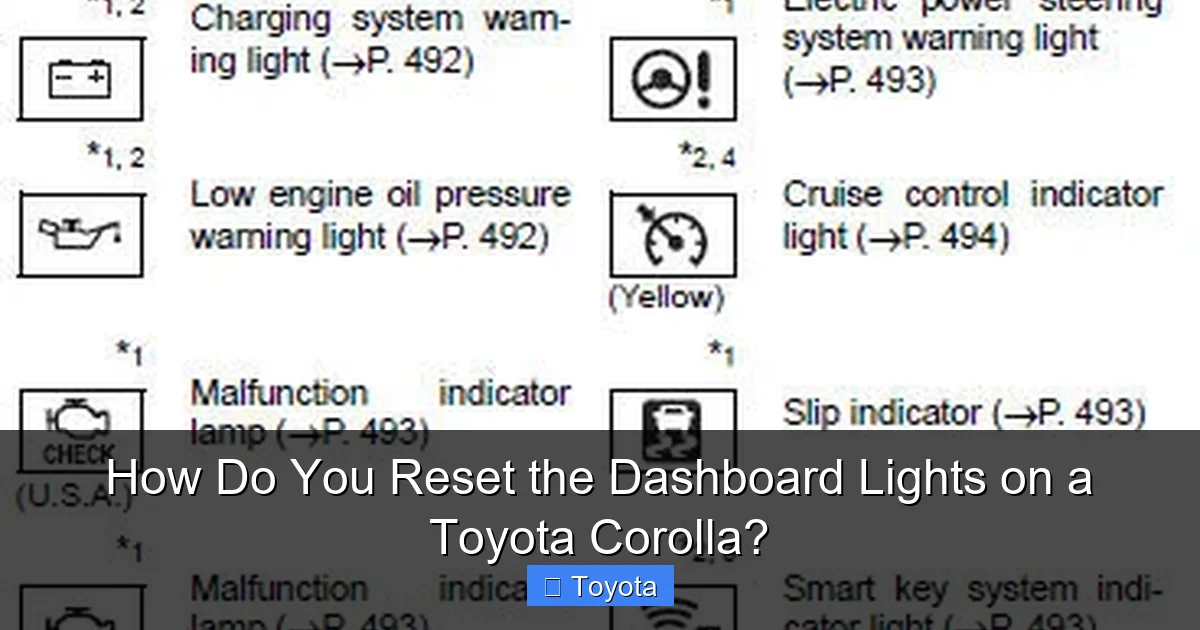
Familiarize yourself with what each dashboard icon means. Your owner’s manual has a diagram of the instrument cluster with explanations. Knowing the difference between a simple reminder (wrench/MAINT REQD) and a critical warning (red thermometer for overheating, oil can for low pressure) is essential for safe operation. For specific resets on related Toyota models, guides like how to reset the maintenance light on a Toyota Yaris follow similar principles to the Corolla.
Conclusion: Knowledge is Power Under the Hood
Resetting the dashboard lights on your Toyota Corolla is a useful skill that puts you in control of your vehicle’s maintenance routine. For the routine maintenance required light, it’s a simple, tool-free procedure you’ll likely perform several times over the life of your car. For the check engine light, the process is less about a button combination and more about the diagnostic and repair work that precedes any reset. Remember the core principle: the light is a symptom, not the disease. Treat the cause, not the symptom. By combining this practical knowledge with a commitment to proactive maintenance, you’ll keep your Corolla’s dashboard clear of unnecessary warnings, ensure your safety on the road, and extend the life of your trusted vehicle. When in doubt, especially with persistent or critical warning lights, investing in a professional diagnosis is always the smart, safe choice.
Frequently Asked Questions
Can I reset the check engine light by just disconnecting the battery?
Yes, disconnecting the negative battery terminal for about 15 minutes will clear the check engine light by resetting the ECU. However, this is a blunt tool that also erases radio presets, clock settings, and may cause the engine to idle poorly until it “relearns” its parameters. More importantly, it does not fix the underlying problem, so the light will likely return quickly if the fault persists.
How do I know if my “MAINT REQD” light is a real emergency or just a reminder?
The “MAINT REQD” or wrench symbol is never an emergency. It is exclusively a reminder for scheduled maintenance, most commonly an oil change. It will illuminate steadily (not flashing) and does not indicate a system failure. You can safely drive for several hundred miles after it comes on to complete your service, but you should schedule it promptly.
My tire pressure light came on, I filled the tires, but it won’t turn off. What now?
After inflating to the correct pressure, you may need to drive for 10-20 minutes at highway speeds for the system to recognize the new pressure. If it still doesn’t go off, your Corolla may require a manual TPMS reset via a button or through the digital menu in the instrument cluster (see your owner’s manual). A persistent light could also mean a faulty tire pressure sensor or a slow leak in the tire.
Is it safe to drive with the check engine light on?
It depends. If the light is steady and yellow/amber, and your car is running normally (no strange noises, loss of power, or smoke), you can drive cautiously to a repair shop. Get it diagnosed within a few days. If the light is flashing, it indicates a severe misfire that can damage the catalytic converter. You must stop driving immediately and have the car towed. A red check engine light (rare) also indicates a severe issue requiring immediate attention.
Why did my check engine light come on after I filled up with gas?
The most common cause is a loose, damaged, or missing gas cap. The evaporative emission (EVAP) system detects a leak in the fuel tank vapor circuit and sets a code. Simply remove the cap, inspect it for cracks, and reinstall it until it clicks firmly. The light should go out within a few drive cycles. If it doesn’t, the cap may be faulty, or there could be a leak elsewhere in the EVAP system.
What’s the difference between the “Check Engine” light and the “Service Engine Soon” light?
There is no functional difference. Both are the Malfunction Indicator Lamp (MIL). Automakers use different wording—”Check Engine,” “Service Engine Soon,” “Check Powertrain”—but they all mean the engine computer has stored a diagnostic trouble code. The action is the same: diagnose the code, repair the issue, then reset the light.


