How to Install Led Lights on a Ford F-150
Contents
- 1 Key Takeaways
- 2 📑 Table of Contents
- 3 Why LED Lights Are a Game-Changer for Ford F-150 Owners
- 4 Getting Started: Tools, Safety, and Pre-Installation Checks
- 5 Selecting the Right LED Lights for Your Specific F-150 Model
- 6 Installing LED Headlights: A Comprehensive Step-by-Step Guide
- 7 Wiring and Mounting Auxiliary LED Lights (Fog Lights, Light Bars, etc.)
- 8 Troubleshooting Common Issues: Flicker, Errors, and More
- 9 Maintenance and Care for Your New LED Lights
- 10 Conclusion: Enjoy the Brilliance
- 11 Frequently Asked Questions
Upgrading your Ford F-150 with LED lights boosts visibility, style, and efficiency. This guide walks you through selecting compatible LEDs, pre-installation prep, step-by-step wiring and mounting, and troubleshooting common issues like flickering or error codes. With the right tools and safety measures, you can achieve a professional-looking installation in a few hours.
Hey there, fellow Ford F-150 enthusiast! If you’re reading this, chances are you’re tired of the dim, yellowish glow of your stock halogen lights and ready for a serious upgrade. Installing LED lights on your Ford F-150 is one of the most impactful and rewarding modifications you can make. It’s not just about looks—though the crisp, modern white light definitely turns heads—it’s about safety, efficiency, and getting more out of your tough truck. Whether you’re navigating dark backroads, working late at the job site, or just want to see the trail ahead clearly, LED lighting transforms your F-150’s capability. The best part? With some basic tools and a little patience, you can do it yourself. This guide will walk you through every single step, from picking the right bulbs to troubleshooting that annoying flicker. Let’s get your F-150 shining bright.
Key Takeaways
- Choose LED lights specifically designed for your F-150’s year and trim to ensure proper fit and function.
- Always disconnect the battery before starting to avoid electrical shorts or damage.
- Use a circuit tester to identify correct wires and avoid blowing fuses.
- Consider CAN bus compatibility; some trucks need load resistors to prevent flickering or error messages.
- Route wires through factory grommets and secure them with zip ties for a clean, safe installation.
- Test all lights before final mounting to ensure proper operation and alignment.
📑 Table of Contents
- Why LED Lights Are a Game-Changer for Ford F-150 Owners
- Getting Started: Tools, Safety, and Pre-Installation Checks
- Selecting the Right LED Lights for Your Specific F-150 Model
- Installing LED Headlights: A Comprehensive Step-by-Step Guide
- Wiring and Mounting Auxiliary LED Lights (Fog Lights, Light Bars, etc.)
- Troubleshooting Common Issues: Flicker, Errors, and More
- Maintenance and Care for Your New LED Lights
- Conclusion: Enjoy the Brilliance
Why LED Lights Are a Game-Changer for Ford F-150 Owners
Before we grab the toolbox, let’s talk about why swapping to LED is such a smart move for your Ford F-150. It goes way beyond just being a “brighter bulb.”
Brightness and Visibility
This is the most obvious benefit. A quality LED headlight puts out significantly more lumens (the measure of light output) than a standard halogen. Where a typical halogen might produce 700-1,000 lumens per bulb, a good LED can easily hit 2,000-4,000 lumens. But it’s not just about raw power. LED lights have a color temperature around 5,000K to 6,000K, which is a pure, brilliant white—closer to natural daylight. This contrast makes it much easier to spot pedestrians, animals, road signs, and obstacles at night. Your brain processes this white light better, reducing eye fatigue on long drives. For a truck like the F-150, which often sees duty in rural areas or on unlit roads, this improved visibility is a huge safety win.
Energy Efficiency
LEDs are incredibly efficient. They draw far fewer amps from your truck’s electrical system compared to halogens. A standard halogen low beam might pull 55 watts, while an equivalent LED might only use 20-30 watts. This reduced draw means less strain on your alternator and battery. For F-150 owners who run lots of accessories or have aftermarket sound systems, that extra electrical capacity is valuable. It also means a tiny, almost negligible impact on fuel economy—every little bit helps!
Longevity and Durability
Here’s where LEDs truly shine. They don’t have a fragile filament like halogens. They’re solid-state components, making them highly resistant to the vibrations and shocks that are part of everyday truck life. A quality LED headlight is rated for 30,000 to 50,000 hours of operation. In practical terms, that’s potentially the lifetime of your truck. You’ll likely never have to replace them, unlike halogens that burn out every year or two. They’re also built tough with aluminum housings and polycarbonate lenses that resist cracking and UV damage.
Getting Started: Tools, Safety, and Pre-Installation Checks
Success in any DIY project starts with preparation. Rushing into this without a plan can lead to stripped bolts, fried wiring, or a truck that won’t start. Let’s get organized.
Visual guide about How to Install Led Lights on a Ford F-150
Image source: square1offroad.com
Essential Tools You’ll Need
Gather these before you pop the hood. You’ll likely have most already:
- Socket Set & Ratchet: 7mm, 8mm, 10mm, and 13mm are most common for F-150 headlight and fog light bolts.
- Screwdrivers: Flathead and Phillips, for plastic clips and trim removal.
- Trim Removal Tools: Plastic pry tools to avoid scratching your paint or cracking plastic covers.
- Wire Strippers/Crimpers: If you need to splice wires.
- Digital Multimeter: Absolutely crucial for testing circuits and verifying power/ground.
- Circuit Tester or Test Light: A simpler, quick way to find switched power.
- Wire Connectors: Quality butt splices, ring terminals, and heat shrink tubing.
- Zip Ties: Various sizes for bundling and securing wires neatly.
- Work Gloves: To protect your hands from sharp metal and plastic.
- Flashlight/Headlamp: Your primary light source once the truck’s lights are off!
Safety First: Non-Negotiable Rules
Working on your vehicle’s electrical system carries risks. Follow these rules every time:
- Disconnect the Battery: This is rule #1. Always remove the negative (-) terminal from the battery before touching any wiring. This prevents accidental shorts that can damage modules, melt wiring, or cause sparks.
- Work on a Cool Engine: Don’t try this right after driving. Engine components are hot and can cause burns.
- Secure the Vehicle: Ensure your F-150 is in park (or 1st gear for manual), parking brake is set, and wheels are chocked.
- Don’t Force It: If a bolt or clip is stuck, don’t muscle it. Apply penetrating oil and let it sit, or use the correct tool. Forcing it breaks plastic, which is a costly mistake.
- Be Mindful of Airbags: When working near the grille or dash, be aware of airbag sensor locations. Don’t disconnect or tamper with yellow wiring harnesses—those are for airbags.
Understanding Your F-150’s Electrical System
Modern F-150s (2015 and newer) are rolling computers. They use a Controller Area Network (CAN bus) system to monitor everything. This system expects a certain electrical resistance from your headlight bulbs. When you put in a low-draw LED, the computer might think a bulb is out, triggering a warning light or causing the lights to flicker. This is the most common issue DIYers face. We’ll address solutions later, but knowing this upfront is key. Also, locate your fuse boxes—one under the hood and one inside the cab (usually on the driver’s side end panel). A good habit for any automotive work is knowing where your fuses are and which ones control what. While that link is for a Honda Civic, the principle of checking your owner’s manual for fuse locations is universal for your F-150.
Selecting the Right LED Lights for Your Specific F-150 Model
Not all LED lights are created equal, and your F-150’s year and trim level matter a lot. A 2015 XL and a 2023 Platinum have very different headlight assemblies.

Visual guide about How to Install Led Lights on a Ford F-150
Image source: autoledtech.com
Types of LED Lights: Headlights, Fog Lights, and More
What exactly are you upgrading?
- LED Headlight Bulbs (Drop-in Replacements): These replace your stock H11 (low beam) and 9005 (high beam) halogen bulbs. They’re the easiest install, often plug-and-play. They fit inside your existing housing.
- Complete LED Headlight Assemblies: These are full projector or reflector housings with LEDs built-in. They offer the best performance and look but require removing the entire headlight assembly. More involved, but often the best result.
- LED Fog Lights: Factory fog light housings can often accept LED bulbs. Or you can add auxiliary fog light brackets and LED pods.
- LED Light Bars/Strips: For off-road or bed lighting. These require dedicated wiring and switches.
For a first-time project, starting with drop-in headlight bulbs or fog light bulbs is the most straightforward path.
Compatibility and Fitment is Everything
This is where many people slip up. You must buy LEDs designed for your F-150’s specific bulb type (H11, 9005, 9006, etc.). Check your owner’s manual or simply remove one stock bulb to see the numbering. Also, consider your headlight housing type. Most F-150s from 2015-2020 have reflector housings, while some higher trims have projectors. 2021+ models have a new headlight design. Ensure the LED bulb you choose is rated for reflector or projector use—using the wrong type in the wrong housing causes glare and poor beam pattern. Reputable sellers will list compatibility by year, make, model, and trim. Don’t guess.
Quality and Brand Considerations
The Amazon special $20 LED kit is almost always a disaster. They overpromise lumens, have poor heat management, and die quickly. Invest in a known brand from the automotive lighting community (like Diode Dynamics, Morimoto, AUXITO, or SEALIGHT). Look for:
- High-Quality CSP or COB Chips: These provide a focused, consistent beam.
- Effective Heat Sinks: Aluminum fins with a fan or passive cooling. LEDs fail from heat, not burnout.
- IP67/IP68 Waterproof Rating: Essential for truck use, especially in wheel wells or exposed areas.
- Good Warranty: 1-3 years is standard for quality brands.
- Positive Community Reviews: Search forums like F150Gen14.com for real-user experiences.
We’ve tested and reviewed the best options on the market. For a deep dive into the top-performing LED headlights that are direct fits for various F-150 models, check out our comprehensive guide on the Best LED Headlights for Ford F-150.
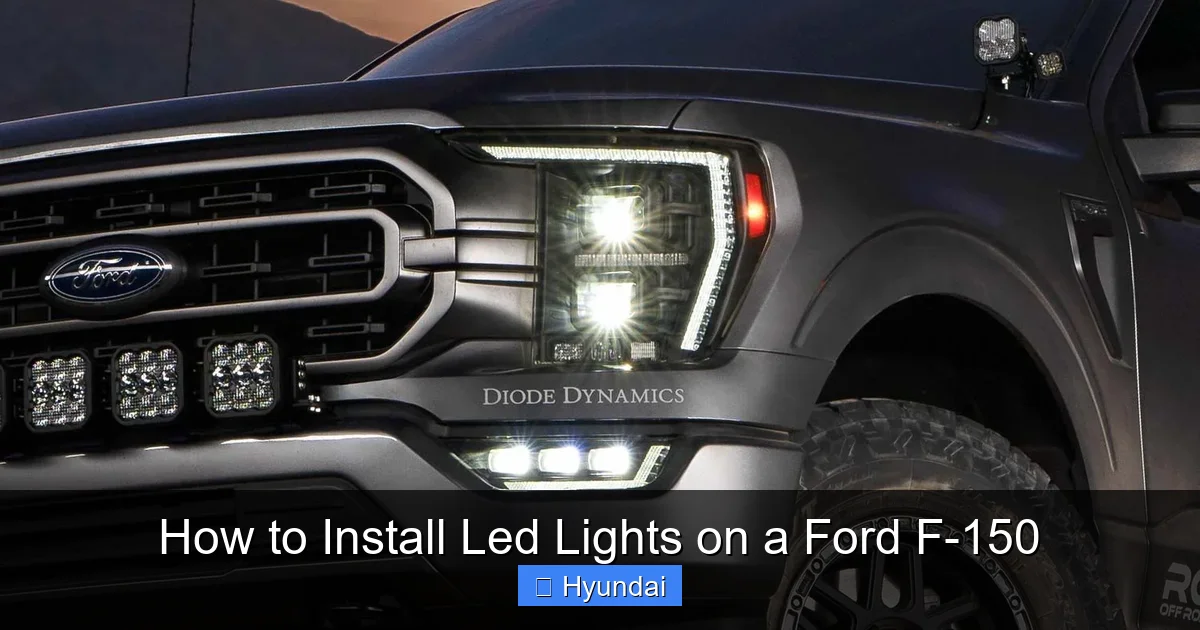
Installing LED Headlights: A Comprehensive Step-by-Step Guide
Let’s get to the meat of it. We’ll focus on the most common upgrade: replacing the stock halogen bulbs with plug-and-play LED bulbs inside the original housing. This is a huge improvement for minimal work.

Visual guide about How to Install Led Lights on a Ford F-150
Image source: ic.carid.com
Step 1: Disconnect the Battery
Pop the hood. Locate the battery (usually in the front corner of the engine bay). Using a 10mm socket, loosen the negative (black, marked with a “-“) terminal clamp. Tuck the cable away so it can’t accidentally touch the terminal. This is your safety lock.
Step 2: Access and Remove the Old Halogen Bulbs
The access point varies by year:
- 2015-2020 F-150s: You can often access the back of the headlight assembly from inside the engine bay. There’s a rubber boot covering the bulb connector. Unplug the electrical connector. Then, twist the bulb holder counter-clockwise about 1/4 turn and pull it straight out. Carefully remove the old halogen bulb. Note: Some models require removing the entire headlight assembly to access the back. If so, you’ll need to remove the plastic grille and several bolts (usually 10mm) around the headlight. Gently pull the assembly forward.
- 2021+ F-150s: These have a different design. You typically need to remove the entire headlight assembly. Start by removing the front grille (clips and screws). Then, remove the bolts securing the headlight (usually 7mm, 8mm, and 10mm). Carefully pull the assembly out, being mindful of the wiring harness clip on the back. Disconnect the harness, then you can access the bulbs from the back of the removed assembly.
Pro Tip: Wear gloves or use a clean cloth when handling the new LED bulb. Oils from your skin can get on the glass and cause hotspots, leading to premature failure.
Step 3: Install the New LED Bulb
Take your new LED bulb. It will have a much larger heat sink and fan assembly than the tiny halogen. This is normal. Insert the bulb into the housing exactly as the old one came out. You may need to gently maneuver the bulky heat sink to clear surrounding components. Ensure the rubber sealing boot is properly seated around the bulb base to maintain the factory weather seal. Twist the bulb holder clockwise to lock it in place. Plug the electrical connector firmly onto the bulb’s plug. You should hear a click. If your LED kit came with an adapter (for CAN bus or plug compatibility), it will go between the truck’s harness and the bulb’s plug.
Step 4: Test Before Reassembly
This is critical. Before you put any grilles or headlight assemblies back, reconnect the negative battery cable. Turn the ignition to the “ON” position (don’t start). Turn on your low beams. Go to the front of the truck. Are both new LEDs on? Are they bright white? Check high beams. Also, look at the beam pattern on a wall or garage door. It should be a clean, sharp cutoff line (for projectors) or a even spread (for reflectors), without dark spots or excessive scatter. If one doesn’t work, double-check connections. If they flicker or cause a “bulb out” warning on your dash, you likely need a load resistor (more on that in troubleshooting). Once confirmed working, turn off the ignition, disconnect the battery again, and proceed to reassemble.
Step 5: Reassemble and Final Check
If you removed the entire headlight assembly, carefully position it back, align the mounting holes, and hand-start all bolts. Tighten them in a cross pattern to ensure even pressure and a proper seal against the fender. Don’t over-tighten plastic bolts. Reinstall any grille pieces you removed. Reconnect the battery. Turn on all lights one final time: low beams, high beams, turn signals (if your LED bulbs have them), and parking lights. Ensure the headlight aim is correct. Your F-150 has adjustment screws on the back of the headlight assembly (usually a Phillips head and a Torx). You can fine-tune the vertical and horizontal aim. The goal is to illuminate the road without blinding oncoming drivers. Consult your owner’s manual for the proper aiming procedure, often involving a wall and measuring distances.
Wiring and Mounting Auxiliary LED Lights (Fog Lights, Light Bars, etc.)
Want more light? Adding auxiliary LED fog lights or a light bar is a popular next step. The principles are similar but with more custom wiring.
Choosing Mounting Locations and Legal Considerations
First, decide what you’re adding. Factory fog light brackets on your F-150 grille or bumper are perfect spots for LED fog light pods. For a light bar, common spots are the top of the grille, behind the grille, or in the front bumper (if you have a cutout). Important: Know your local laws. Many states regulate the color (white or amber only for front), height, and number of auxiliary lights. They must be aimed so as not to blind other drivers. A common rule: fog lights should be mounted low (below headlights) and aimed downward.
Routing Wires Through the Firewall
You need to get power from the engine bay to the cab for a switch and fuse. The firewall is the metal wall between the two. Look for an existing factory grommet—a rubber seal around a hole where other wires pass. These are perfect for running your new wires through without drilling. Common locations are near the brake master cylinder or behind the battery. Use a wire coat hanger or a fish tape to carefully pull your positive (red) and negative (black) wires through the grommet from the cab side to the engine bay side. Add a small dab of dielectric grease to the grommet and wires to maintain the seal and prevent corrosion.
Connecting to Power: Switched and Constant Sources
You need two main power wires:
- Switched Power (turns on with ignition): This powers your lights only when the truck is on. The best source is the fuse box under the hood. Find an empty fuse slot that is “switched” (power only when key is on). Use a fused tap (add-a-circuit) to connect your wire without splicing. Always use an appropriately sized fuse (check your LED’s amp draw). A 10-15 amp fuse is typical.
- Ground: A solid connection to the truck’s chassis. Find a clean, unpainted metal spot near the mounting location. Use a self-tapping screw or an existing bolt. Scrape away any paint or corrosion with a file for a perfect connection.
For a simple fog light install, you can sometimes tap into the existing fog light harness if your truck came with the wiring but no lights (common on XL trims). Use a multimeter to find the switched power and ground in that harness when the lights are on.
Weatherproofing and Securing
Every connection outside the cab must be waterproof. Use heat shrink butt splices or high-quality waterproof connectors (like Deutsch or Weatherpack). After crimping, slide heat shrink over the connection and apply heat. For extra security, wrap the connection in electrical tape and then a piece of rubber vacuum hose. Route all wires away from hot exhaust parts, moving suspension components, and sharp edges. Use plenty of zip ties every 6-8 inches to secure the wire loom to the frame or existing harnesses. A clean, professional-looking install is a safe one.
Example: Installing LED Fog Light Pods
Mount the pods to your chosen brackets using the supplied hardware. Apply a small bead of silicone sealant around the bolt holes on the outside to prevent water ingress. Route the wires from each pod back to a central junction point (a waterproof fuse block or a simple distribution block). From there, run your main power/ground wires as described above. Install a toggle switch in the cab (drill a hole in the dash or use an empty switch panel). Wire the switch between the fused power source and your lights. If your pods have a separate amber/white switch, you’ll need more wires. The process for installing auxiliary lights on a Toyota Tacoma follows very similar wiring principles, which you can read about for additional context on general fog light installation.
Troubleshooting Common Issues: Flicker, Errors, and More
Even with careful work, you might hit a snag. Here’s how to diagnose and fix the most common problems.
Flickering Lights
Symptom: Your new LEDs pulse, shimmer, or seem to dim when the engine is running or other accessories are on.
Cause: The F-150’s CAN bus system is sending pulsed power to monitor the bulb. Halogens don’t care, but LEDs need steady DC. The flicker is the computer’s “check.”
Solution: Install a load resistor or capacitor. This is a small electronic component you wire in parallel with the LED bulb (positive to positive, negative to negative). It simulates the electrical load of a halogen bulb, tricking the computer into thinking everything is normal. Most quality LED bulb kits include one. If yours didn’t, they’re cheap and easy to buy online. Mount the resistor to a metal surface with its double-sided tape—it gets warm.
Bulb Out Warning or Check Engine Light
Symptom: A warning light on your dash says “Headlight Out” or you get a generic check engine light.
Cause: Same as flicker—the computer detects a lower than expected resistance and thinks a bulb has burned out.
Solution: The load resistor usually fixes this. If the warning persists, you may need a more advanced “CAN bus decoder” or “error canceller.” Some trucks are more sensitive. In extreme cases, you can use a scan tool to clear the code, but the resistor is the permanent fix. For general guidance on clearing vehicle warning messages, the process on a Dodge Ram 1500 shares similar steps with many modern vehicles, though your F-150 may require a specific procedure or tool.
Lights Won’t Turn On At All
Symptom: Nothing. No light, no flicker.
Diagnosis: This is usually a wiring or connection issue.
- Recheck the bulb is fully seated and locked.
- Verify the electrical connector is clicked in place.
- Use your multimeter or test light at the connector to see if power is reaching it (with battery connected and lights on). No power? Check fuses in the engine bay fuse box (look for “HEAD LP” or “LOW BEAM”).
- Check your ground connection. A poor ground is a classic culprit. Test continuity between the bulb’s ground pin and a known good battery negative with the multimeter (should be near zero ohms).
- If you tapped into a wire, ensure you didn’t nick the main wire or create a short.
Moisture Inside the Headlight Housing
Symptom: Condensation or water droplets inside the headlight lens after washing or rain.
Cause: The factory seal was broken when you removed the bulb or assembly, or the rubber boot isn’t sealing properly around the larger LED heat sink.
Solution: Ensure the rubber boot is fully seated and undamaged. Apply a thin layer of dielectric grease inside the boot’s lip to improve the seal. If moisture gets in, you can drill a small hole in the lowest part of the housing to let it drain, but this is a last resort. The best fix is to remove the assembly, dry it completely with a hairdryer, reseal all gaskets with silicone, and ensure the boot is perfect.
Maintenance and Care for Your New LED Lights
Your LED upgrade is done, but a little upkeep ensures they perform for years.
- Clean Lenses Regularly: Bugs, road grime, and UV exposure can yellow polycarbonate lenses over time. Wash them with car soap and a soft microfiber cloth. For heavy oxidation, use a dedicated plastic headlight restoration kit.
- Inspect Connections: Once a year, pop the hood and check the wiring you added. Look for cracked insulation, loose zip ties, or corrosion on connectors. Re-secure or re-solder as needed.
- Check Aim Periodically: Heavy loads in the bed or a suspension lift can change your headlight aim. Periodically check that your beams are still properly aligned to avoid dazzling other drivers.
- Don’t Touch the LED Emitter: If you ever need to handle the bulb itself, avoid touching the actual LED chip (the small square or rectangle). Oil from your skin can cause a hot spot and failure. If you do, clean it gently with isopropyl alcohol.
With proper care, your LED lights will likely outlive your F-150. They represent one of the best “set it and forget it” upgrades you can make.
Conclusion: Enjoy the Brilliance
Installing LED lights on your Ford F-150 is a fantastic DIY project that delivers immediate, tangible results. You’ve now got the knowledge to choose the right components, execute a safe installation, and solve any hiccups along the way. The transformation is incredible: a brighter, whiter, more modern light that makes your truck safer and more capable at night. It’s a tangible upgrade you can be proud of every time you turn the key. Remember to take your time, prioritize safety by disconnecting the battery, and don’t hesitate to consult your owner’s manual or online forums specific to your F-150’s generation. If you ever feel overwhelmed, a reputable automotive electrician can finish the job for a reasonable fee. But for most, this is a weekend project that pays off in spades. Now go enjoy the view from the driver’s seat—it’s never been clearer.
Frequently Asked Questions
Are LED headlights legal on my Ford F-150?
Yes, LED headlights are legal if they are DOT-compliant and properly aimed. Avoid overly blue or purple hues, as these can be illegal in some states. Always check your local regulations regarding auxiliary lighting as well.
Why do my new LED headlights flicker when the engine is running?
Flickering is almost always caused by your F-150’s CAN bus system, which monitors bulb resistance. The solution is to install a load resistor (often included with quality LED kits) in parallel with the bulb to simulate the load of a halogen and stop the flicker.
Do I need a special adapter or harness for my 2020 F-150?
It depends. Many 2015-2020 F-150s with reflector housings can use simple plug-and-play H11/9005 LED bulbs. However, some trims, especially those with factory HID projectors, require specific harness adapters to work correctly. Always verify compatibility for your exact year, make, model, and trim before purchasing.
Can I install LED lights myself, or should I go to a professional?
You can absolutely do it yourself if you have basic mechanical aptitude and the right tools. Drop-in LED bulbs are very straightforward. Installing full assemblies or complex auxiliary lighting requires more skill. If you’re uncomfortable with wiring or aiming, seeking professional help is a smart choice to ensure safety and performance.
How long do LED lights typically last in a Ford F-150?
High-quality automotive LEDs are rated for 30,000 to 50,000 hours of operation. Given that the average driver might use their headlights 1,000 hours per year, they can easily last 30+ years—effectively the lifetime of the vehicle. Their solid-state construction also makes them far more resistant to the vibrations of truck life.
What brightness (lumen count) is best for my F-150?
For street-legal headlights, look for a balanced output around 2,000-3,000 lumens per bulb. More lumens don’t always mean better; a poorly designed high-lumen bulb can have a terrible beam pattern that blinds others and reduces your own visibility. Prioritize a brand with a proven, focused beam pattern over a raw lumen number.