
How to Set Home Address in a Tesla Model 3
Contents
- 1 Key Takeaways
- 2 📑 Table of Contents
- 3 Understanding the Tesla Navigation System & Home Address Feature
- 4 Method 1: Setting Your Home Address via the Touchscreen
- 5 Method 2: Setting Your Home Address via the Tesla Mobile App
- 6 Method 3: Setting Your Home Address with Voice Commands
- 7 Advanced Uses and Customization of Your Home Address
- 8 Troubleshooting Common Issues with Home Address
- 9 Customization and Related Tesla Setup Tips
- 10 Conclusion: Your Tesla, Your Home, Your Way
- 11 Frequently Asked Questions
Setting your home address in a Tesla Model 3 is a simple yet powerful way to enhance your driving experience. This allows the car’s navigation system to provide instant routing to your most frequent destination with a single tap. In this guide, we’ll walk you through three easy methods—touchscreen, mobile app, and voice commands—so you can set it up in minutes. You’ll also learn advanced customization tips and how to troubleshoot common issues for a flawless setup.
Welcome to the world of Tesla ownership! The Tesla Model 3 is a marvel of modern engineering, blending cutting-edge electric performance with an incredibly intuitive, software-driven interior. One of the first things many new owners want to do is personalize their vehicle to fit their life seamlessly. At the top of that list? Setting your home address. It’s more than just a convenience—it’s about transforming your Model 3 from a fantastic car into an intelligent partner that knows your routines. Imagine hopping in, tapping a single icon, and having the car ready to guide you home through the best route, accounting for current traffic. That’s the power of a properly configured home address. This guide will walk you through every single method, step-by-step, ensuring you master this essential feature. We’ll cover everything from the basic touchscreen setup to advanced integration with your commute. By the end, you’ll be a pro at making your Tesla truly yours.
Key Takeaways
- The Home Address feature provides one-touch navigation: Once set, you can navigate home instantly from the Tesla’s touchscreen or via voice command, saving time and effort.
- You can set it via three primary methods: The central touchscreen, the Tesla mobile app, or by using voice commands—each offers flexibility based on your preference.
- Precision matters for accurate routing: Always enter a complete, exact address to avoid navigation errors. Use the “+” button to fine-tune the pin location on the map.
- Your home address syncs across your Tesla account: Changes made in the car or app update everywhere, ensuring consistency for all drivers and features like “Navigate to Departure.”
- It integrates with advanced features like Commute: Tesla can automatically suggest routes based on your home and work addresses, factoring in real-time traffic for your daily drive.
- Troubleshooting is often simple: Common issues like an outdated address or GPS glitches are usually resolved by checking your connection, restarting the touchscreen, or updating the software.
- Setting it up is not just for convenience: It also aids emergency services and ensures your Tesla’s location-based features, like finding nearby charging stations or service centers, are accurately tailored to your area.
📑 Table of Contents
- Understanding the Tesla Navigation System & Home Address Feature
- Method 1: Setting Your Home Address via the Touchscreen
- Method 2: Setting Your Home Address via the Tesla Mobile App
- Method 3: Setting Your Home Address with Voice Commands
- Advanced Uses and Customization of Your Home Address
- Troubleshooting Common Issues with Home Address
- Customization and Related Tesla Setup Tips
- Conclusion: Your Tesla, Your Home, Your Way
Before we dive into the “how,” let’s quickly understand the “why” and the ecosystem it lives in. The Tesla Model 3’s navigation system is not like the basic GPS in many cars. It’s a connected, live, and intelligent platform that pulls data from the internet, your vehicle’s sensors, and your personal settings. The Home Address is a cornerstone of this system.
What Does the Home Address Actually Do?
At its core, saving your home address creates a permanent, named destination in your navigation system. You’ll see it as a small house icon 🏠 on your map and in your “Favorites” or “Recent” list. Its primary job is to provide instant routing. But its benefits cascade into other features:
- One-Tap Navigation: From the main screen or the “Go Home” shortcut, you can start navigation home immediately.
- Voice Command Integration: Simply say “Navigate home” or “Take me home,” and your Model 3 will comply.
- Commute Prediction: If you also set a work address, Tesla learns your typical travel patterns. On weekday mornings and evenings, it may proactively suggest routes to work or home on the touchscreen.
- “Navigate to Departure” for Trips: When planning a trip on the map, the final destination’s address is automatically set as your “departure” point for the return journey, simplifying multi-stop trips.
- Location-Based Services: It helps the car contextualize other services. For instance, finding the nearest Supercharger or service center will prioritize locations near your home base.
Think of it as telling your car, “This is my hub.” Everything else radiates from there. It’s a foundational piece of the personalized Tesla experience.
Method 1: Setting Your Home Address via the Touchscreen
This is the most direct and visual method, perfect for when you’re parked or a passenger. The large, responsive touchscreen makes this a breeze. We’ll go through the exact taps.
Visual guide about How to Set Home Address in a Tesla Model 3
Image source: i.ytimg.com
Step-by-Step Touchscreen Instructions
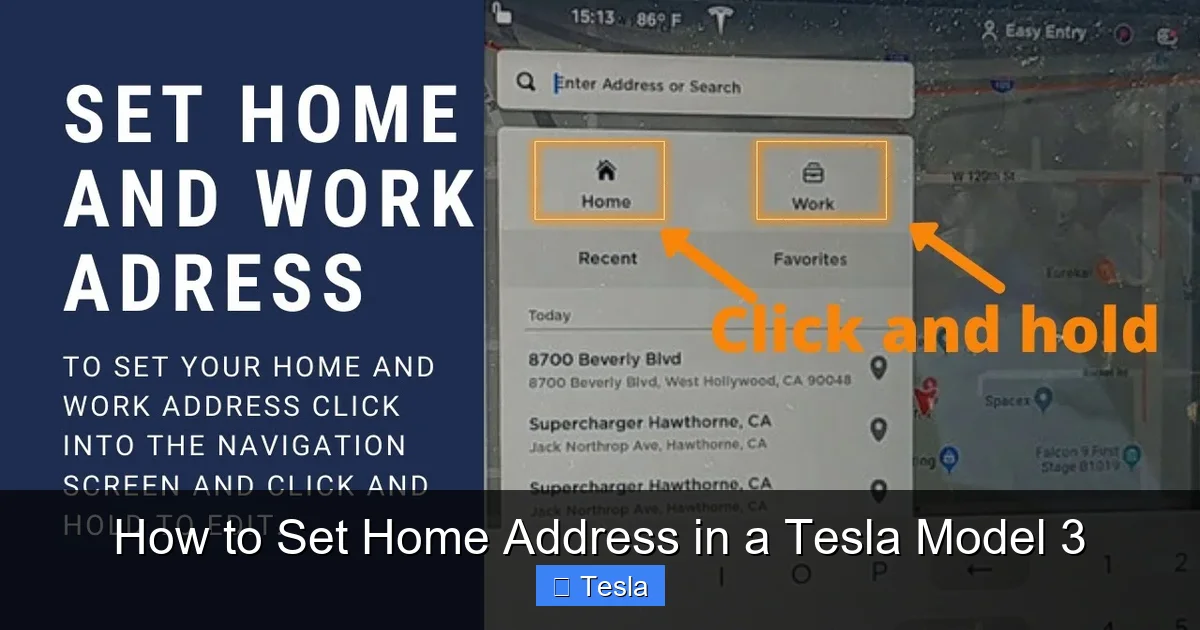
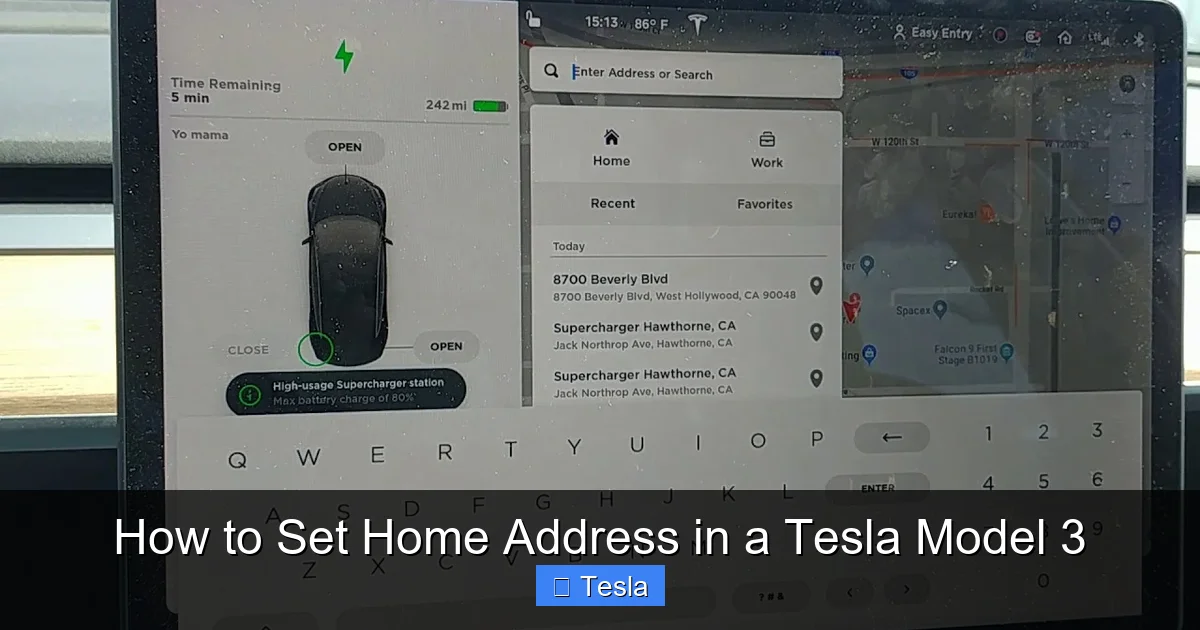
1. Access the Main Navigation Map: Tap the large “Navigation” icon (it looks like a diamond or a map pin) on the bottom dock of your touchscreen. This opens the full-screen map view.
2. Open the Search Bar: At the top of the map screen, you’ll see a search bar that likely says “Where to?” Tap it.
3. Search for Your Home Address: Use the keyboard to type your full, precise home address. Be specific—include street number, street name, apartment or unit number if applicable, city, and state. As you type, Tesla’s system will suggest matches from its database. Select the correct one from the list. Pro Tip: If your address isn’t found perfectly, you can drop a pin manually on the map by long-pressing the exact location and then selecting “Drop Pin Here.”
4. Set as Home: Once the address is confirmed and appears on the map, you’ll see a blue navigation route line. Look below the address on the screen for a set of options. You should see buttons like “Start” and a small icon that looks like a house or says “Home.” Tap the house icon or the “Set as Home” text.
5. Confirmation: The system will confirm that your home address has been saved. You might see a small toast notification at the bottom of the screen. Your home is now set! You can test it by tapping the house icon in your favorites or by using the voice command “Navigate home.”
Important Tips for Touchscreen Entry
- Use the “+” to Fine-Tune: After selecting an address, zoom in on the map pin. If the pin isn’t exactly on your driveway or building entrance, tap the “+” (plus) button on the right side of the screen to adjust the pin location with precision. This is crucial for large complexes or rural properties.
- Saving Multiple “Homes”: The system only allows one primary “Home” address. However, you can save other frequent locations (like a second home, family member’s house, or a vacation spot) as Favorites. Use the star icon next to an address to save it to your Favorites list for quick access.
- Check the Map View: After setting, always glance at the map to ensure the pin is in the right spot. An address saved to the wrong side of the street can lead to frustrating navigation.
Method 2: Setting Your Home Address via the Tesla Mobile App
You don’t even need to be in the car! The Tesla mobile app (available for iOS and Android) is a powerful companion that lets you manage your vehicle remotely. Setting your home address here is incredibly convenient, especially if you’re setting it up before taking delivery or while away from the car.
Visual guide about How to Set Home Address in a Tesla Model 3
Image source: i.ytimg.com
Prerequisites
Ensure your phone is connected to the internet (Wi-Fi or cellular) and that you are logged into the Tesla app with the same account linked to your Model 3. Your car must also have a network connection (LTE or Wi-Fi) to receive the updated address.
Step-by-Step App Instructions
1. Open the Tesla App: Launch the app on your smartphone. You should see your Model 3 listed on the main screen, showing its current status (locked, unlocked, etc.).
2. Enter the ‘Controls’ Menu: Tap on the image of your car. This brings up the primary control panel.
3. Navigate to ‘Location-Based’ Settings: Scroll down through the various menus (like Climate, Lock, Charging). Look for a section called “Location-Based” or “Navigation”. The exact label can vary slightly with app updates. Tap it.
4. Edit Home/Work Addresses: Inside this menu, you will see fields for “Home” and “Work.” Tap on the “Home” field.
5. Enter the Address: A keyboard will appear. Type your full home address, just as you would in the car. The app will use your phone’s location services and Tesla’s database to offer suggestions. Select the correct one.
6. Save: Once the address is entered correctly, look for a “Save” or checkmark icon (usually in the top right corner). Tap it.
7. Sync Confirmation: The app will send the update to your car. Depending on your car’s connectivity, the change should reflect within a few seconds to a minute. You can often see a small sync icon spinning. To confirm, you can open the car’s touchscreen and check the Home address in the navigation favorites.
Why Use the App? Advantages & Considerations
The mobile app method is fantastic for pre-delivery setup or for making changes on the go without needing to start the car. However, it relies entirely on your phone’s internet and the car’s connectivity. If your Model 3 is in a deep sleep or in an area with poor cellular signal, the sync might be delayed. For immediate verification, it’s always good to check the touchscreen after using the app.
Method 3: Setting Your Home Address with Voice Commands
For the ultimate in hands-free convenience, Tesla’s voice command system is a game-changer. It’s particularly useful while driving, as it minimizes distraction. While you can’t initially set a home address purely by voice (the system needs to confirm the exact address from its database), you can navigate home instantly once it’s set. There’s also a clever workaround to set it.
Visual guide about How to Set Home Address in a Tesla Model 3
Image source: lh4.googleusercontent.com
The Direct “Navigate Home” Command
This is the primary voice command you’ll use daily. With your home address already saved:
- Press the right scroll wheel button on your steering wheel (or say “Hey Tesla” if you have that feature enabled).
- When you hear the chime, clearly say: “Navigate home.”
- The car will immediately begin plotting a route to your saved home address. It’s that simple.
Workaround to Set/Change Home via Voice
You can’t say “Set my home address to 123 Main Street.” However, you can use voice to start navigation to a new location and then save it as home via the touchscreen, which is faster than typing. Here’s the flow:
- While parked or a passenger, use voice: “Navigate to 123 Main Street.” (Provide the full address).
- The car will start routing. Once the route is on screen, tap the house icon or “Set as Home” on the touchscreen as described in Method 1. This combines voice for address entry with touch for the save action.
Note: Voice command accuracy for addresses can vary. It’s often best to use the touchscreen or app for the initial precise entry, then rely on voice for daily use.
Advanced Uses and Customization of Your Home Address
Once your home address is set, you can unlock even more utility from your Tesla’s navigation system. These features make your Model 3 feel like it’s truly synced with your life.
Leveraging the Commute Feature
If you set both a Home and a Work address, Tesla’s software can learn your commute pattern. During typical commute times (e.g., 7-9 AM and 5-7 PM on weekdays), you might see a prompt on your touchscreen or in the Tesla app suggesting a route to work or home. This predictive feature is designed to save you a tap. You can adjust or disable these commute predictions in the navigation settings under “Commute” if you prefer manual control.
Using “Navigate to Departure” for Trips
Planning a weekend getaway? When you set a final destination on a trip (e.g., a hotel), Tesla automatically sets your home as the “Departure” point for the return leg. On the last day of your trip, you’ll see a prominent “Navigate Home” button on the map. This eliminates the need to re-enter your home address after a long journey. It’s a brilliant touch for multi-day trips.
Integrating with Calendar & Third-Party Apps
If you use Apple Calendar or Google Calendar and have it synced to your Tesla (via your phone’s Bluetooth connection or Tesla account), events with locations can appear on your touchscreen. Tapping an event with an address will navigate there. While this doesn’t directly use your home address, having your home saved ensures that if an event is at your house (like a party), the navigation is accurate. It’s all part of the connected ecosystem.
Practical Example: A Day in the Life
Imagine this: You’re leaving for work. You get in your Model 3, it’s already running. You press the right scroll wheel and say, “Navigate to work.” The car, knowing your work address, plots the fastest route. After a long day, you get back in. You see the “Navigate Home” button right on the main screen because your trip to work is complete. You tap it, and you’re on your way. No typing, no searching. This is the seamless experience a saved home address enables.
Troubleshooting Common Issues with Home Address
Even with a system as polished as Tesla’s, occasional hiccups happen. Here’s how to solve the most common problems.
“Home Address Not Found” or Incorrect Location
Symptom: You search for your address, but the pin lands on the wrong property or the system can’t find it.
Solution: This is almost always a data issue. First, try searching with less detail (just street name and number). If multiple results appear, choose the correct one. If the pin is slightly off, use the “+” button on the map screen to drag it to the exact spot on your driveway or building entrance. For new developments or rural routes, the map data might be outdated. In this case, use the “Drop Pin” method: zoom in, long-press the exact location on the map, and select “Drop Pin Here.” Then, immediately tap the house icon to save that precise pin as your home.
Home Address Won’t Save or Disappears
Symptom: You set it, but later it’s gone, or the save button is grayed out.
Solution: This is typically a connectivity or software glitch.
- Check Your Connection: Your car must have an active internet connection (LTE signal bars visible on the top status bar) to save and sync settings. If you’re in a parking garage or remote area, move to a location with better signal.
- Restart the Touchscreen: Hold down both scroll wheels on the steering wheel until the screen turns black and the Tesla logo reappears. This soft reboot often clears temporary software bugs. After restart, try setting the address again.
- Update Software: Go to Controls > Software > Check for Updates. Install any available updates. Tesla frequently improves navigation and address handling in updates.
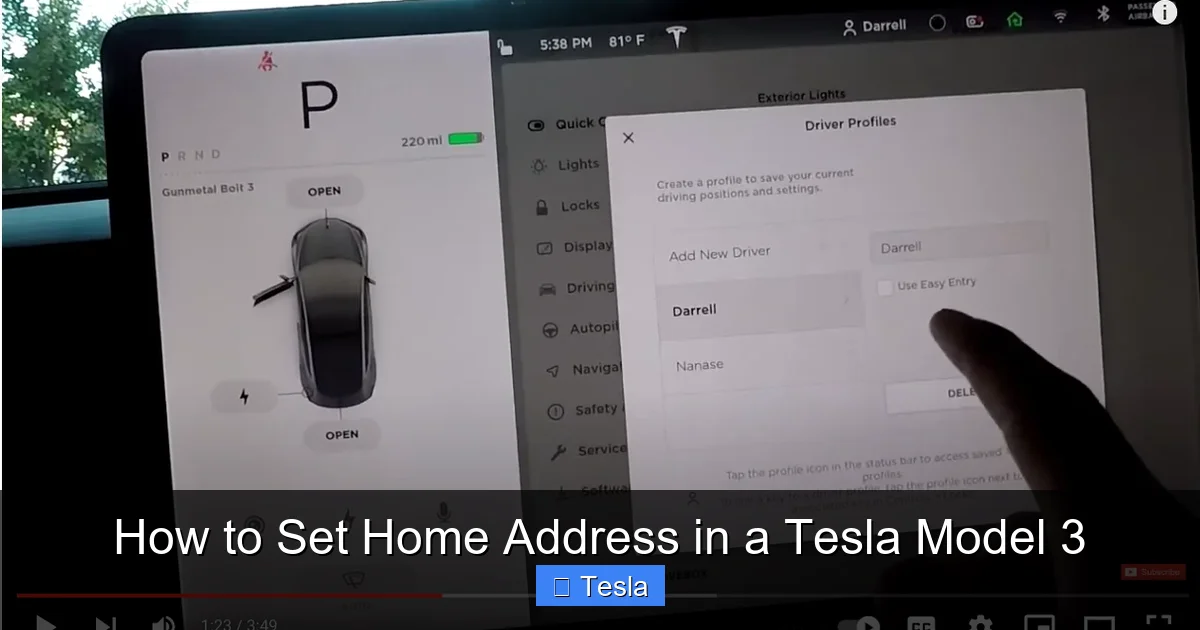
- Check Account Login: Ensure you are logged into the correct Tesla account in the car (check Controls > Security & Drivers > Driver Profile). Addresses are saved per account. If you’re using a guest profile, it won’t have your saved home.
Voice Command “Navigate Home” Doesn’t Work
Symptom: The car responds “I don’t have a home address set” or ignores the command.
Solution: This means the car’s system genuinely doesn’t have a home address saved in its current profile. Revisit Method 1 and verify you saved it correctly. Also, if multiple drivers use the car, ensure you are in the correct driver profile that has the home address saved. Switch profiles via the driver icon on the top right of the touchscreen.
Customization and Related Tesla Setup Tips
Setting your home address is often part of a broader initial setup process. Here are a few related customizations that pair perfectly with your new home address.
Setting Your Work Address
Follow the exact same steps to set your work address. This completes the commute pair. Having both allows the “Commute” feature to work its magic. You can set it in the same “Location-Based” menu in the app or via the touchscreen search.
Adding Favorite Destinations
Don’t limit yourself to just home and work. Use the star icon ⭐ next to any searched location to add it to your Favorites list. This is perfect for your favorite grocery store, gym, charging station, or even that wrap installer you found after researching how much it costs to wrap a Tesla Model 3. Having all your key spots saved makes navigation instantaneous.
Configuring Navigation Preferences
Tailor the navigation experience to your driving style. Go to Navigation Settings (the gear icon on the map screen). Here you can:
- Choose to Avoid Tolls or Avoid Highways.
- Set your preferred Energy Consumption display (miles/kWh or percent).
- Enable/disable Voice Guidance volume and detail.
- Turn the Commute feature on or off.
These settings, combined with your home and work addresses, create a navigation system that’s uniquely yours.
Conclusion: Your Tesla, Your Home, Your Way
Setting your home address in a Tesla Model 3 is one of those foundational tasks that unlocks the vehicle’s thoughtful, user-centric design. It’s a five-minute process that pays dividends every single time you drive. From the effortless “Navigate home” voice command to the predictive commute suggestions, this small step deeply personalizes your interaction with the car. Remember, precision is key—take an extra moment to ensure the pin is exactly right on your property. Use the method that suits you best, whether it’s the tactile touchscreen, the convenient mobile app, or the hands-free voice control. And don’t forget to explore the related settings to build a complete, customized navigation profile. Now, go ahead, set that address, and enjoy the seamless, intelligent driving experience your Tesla was built to deliver. Welcome to the future, where your car truly knows the way home.
Frequently Asked Questions
Can I set more than one home address in my Tesla Model 3?
No, the system only allows for one primary “Home” address. However, you can save other frequent locations (like a second home or family member’s house) as Favorites using the star icon for quick one-tap access.
How do I edit or change my home address later?
Simply repeat the same process you used to set it initially—via the touchscreen, mobile app, or by navigating to the new location and tapping the house icon again. The new address will overwrite the old one and sync across your account.
Does setting my home address affect my Tesla’s autopilot or self-driving features?
No. The home address is solely for navigation and location-based convenience features. It does not influence Autopilot, Full Self-Driving capability, or any safety-critical driving systems. It only provides a destination for the route planner.
What if my Tesla’s GPS seems inaccurate when navigating home?
First, ensure your home pin is precisely placed using the “+” adjuster. If GPS accuracy is generally poor, a touchscreen restart often helps. Also, ensure your car’s software is up to date, as map data and GPS algorithms are improved regularly via over-the-air updates.
Can a passenger set the home address while I’m driving?
Yes, absolutely. The touchscreen and app methods are fully accessible to any passenger. However, for safety, the voice command “Navigate home” can be used by the driver without touching any controls.
Do I need to be connected to Wi-Fi to set or change my home address?
No, you do not need Wi-Fi. The Tesla uses its built-in LTE cellular connection to sync address data. However, a stable cellular signal is required for the car or app to communicate with Tesla’s servers and save the change.


