
How to Install a Front License Plate on a Tesla Model 3
Contents
- 1 Key Takeaways
- 2 📑 Table of Contents
- 3 Understanding the Challenge: Why No Front Bracket?
- 4 Method 1: The Adhesive Approach (Clean & Secure)
- 5 Method 2: The Tow Hook Method (Functional & Removable)
- 6 Method 3: Aftermarket Bracket Kits (The OEM-Like Solution)
- 7 Alignment, Sensors, and Final Checks
- 8 Maintenance, Removal, and Long-Term Care
- 9 Conclusion: Confidence in a Clean Installation
- 10 Frequently Asked Questions
Installing a front license plate on a Tesla Model 3 requires careful planning due to the lack of a pre-mounted bracket. This guide covers three primary methods: using strong adhesive, utilizing the tow hook, or installing an aftermarket bracket. Proper alignment is critical to avoid blocking sensors and ensure a clean, legal fit. Follow our detailed steps for a successful DIY project that protects your Tesla’s finish and maintains its advanced driver-assistance systems.
So, you’ve got a sleek, minimalist Tesla Model 3, and you’ve just received your new license plates. You go to put the front one on, and… nothing. There’s no bracket, no obvious mounting point. This is a common "Tesla moment," a design choice that prioritizes clean lines over traditional hardware. But the law in most states requires a front plate, so what do you do? Installing a front license plate on a Tesla Model 3 is a straightforward DIY project, but it demands attention to detail to avoid damaging your car’s premium paint or interfering with its sophisticated sensor suite. This guide will walk you through every step, method, and consideration to get that plate on securely, safely, and with a factory-like appearance.
We’ll break down the three most popular and reliable methods: the permanent-looking adhesive approach, the functional tow hook method, and the clean aesthetic of an aftermarket bracket. You’ll learn exactly which tools you need, how to prepare the surface for a perfect bond, how to align it flawlessly, and the crucial steps to ensure your Tesla’s cameras and radar see the road clearly. Whether you’re a first-time Tesla owner or a seasoned DIY enthusiast, this complete tutorial will give you the confidence to handle this small but important task yourself.
Key Takeaways
- No Factory Bracket: The Tesla Model 3 does not come with a front license plate bracket, requiring an aftermarket solution or alternative mounting method.
- Three Main Methods: Choose between adhesive mounting, tow hook utilization, or a dedicated third-party bracket based on your preference for permanence and aesthetics.
- Sensor Safety is Paramount: Incorrect plate placement can obstruct front-facing cameras and radar sensors, potentially disabling Autopilot and safety features.
- Surface Preparation is Key: Thoroughly clean and degrease the mounting area to ensure adhesive bonds properly and prevent paint damage.
- Legal Compliance: Verify your state’s laws regarding front license plates, as requirements vary, and ensure your installation meets visibility standards.
- Tool Checklist: Essential items include a cleaning kit, adhesive strips or epoxy, a level, painter’s tape, and possibly a tow hook adapter or bracket kit.
- Consider Paint Protection: Applying a paint protection film or wrap before mounting can safeguard against adhesive residue and minor scratches.
📑 Table of Contents
- Understanding the Challenge: Why No Front Bracket?
- Method 1: The Adhesive Approach (Clean & Secure)
- Method 2: The Tow Hook Method (Functional & Removable)
- Method 3: Aftermarket Bracket Kits (The OEM-Like Solution)
- Alignment, Sensors, and Final Checks
- Maintenance, Removal, and Long-Term Care
- Conclusion: Confidence in a Clean Installation
Understanding the Challenge: Why No Front Bracket?
Tesla’s design philosophy for the Model 3 (and Model Y) embraces a smooth, uncluttered front end. The lower grille area is a single, seamless panel. Unlike conventional cars with prominent plastic grilles and bolt holes, the Model 3’s front bumper cover is designed to be a clean canvas. This creates the initial hurdle: there is no factory-provided threaded insert or bracket to screw a plate onto.
The Legal Reality
Before we dive into solutions, it’s vital to know your local laws. While some states (like Arizona, Arkansas, and Florida) do not require a front license plate, the majority do. You must check your specific state’s DMV or DOT regulations. Failing to display a required front plate can result in tickets and fines. Our goal is to install one correctly, not to circumvent the law. Always ensure your final installation allows for clear, unobstructed visibility of the plate from a standard viewing angle.
Sensor Territory: The Hidden Complexity
The area behind the Tesla’s front grille is not just empty space. It houses critical components for Autopilot and safety systems:
- Front-facing Camera: Typically located behind the Tesla "T" logo or just below it, behind a transparent cover.
- Forward-facing Radar: Usually mounted behind the lower grille vents or in the center of the bumper.
- Ultrasonic Sensors: These are on the bumpers, but the front radar and camera are the primary concerns for plate mounting.
Placing a license plate directly over these sensors can block their field of view. This can cause persistent "Front Radar Obstructed" or "Camera obstructed" warnings on your dashboard, and more importantly, it can disable Autopilot, Traffic-Aware Cruise Control, and Collision Avoidance features. Your installation must avoid this zone entirely.
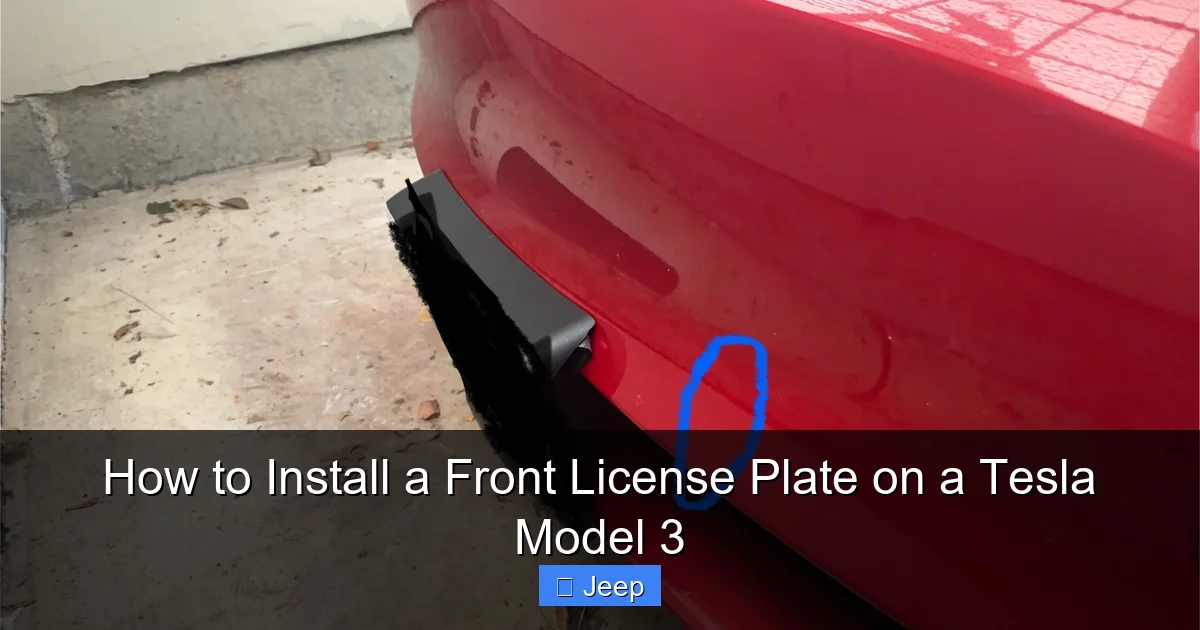
Method 1: The Adhesive Approach (Clean & Secure)
This is the most popular method for achieving a clean, bracket-free look. It uses high-strength automotive adhesive pads or epoxy to bond the license plate directly to the painted bumper. When done correctly, it’s extremely secure and virtually invisible.

Visual guide about How to Install a Front License Plate on a Tesla Model 3
Image source: cravenspeed.com
Gather Your Tools and Materials
For this method, you will need:
- Your license plate.
- 3M VHB (Very High Bond) Tape: The gold standard. Get the double-sided foam tape, preferably the 4941 or 5952 series. It’s designed for exterior automotive use and holds indefinitely but can be removed with effort and heat.
- Alternatively, Automotive Epoxy: Like Loctite 480 or a similar flexible, gap-filling epoxy. This is more permanent and riskier for removal.
- Isopropyl alcohol (90%+).
- Microfiber cloths.
- Painter’s tape or masking tape.
- A clean, lint-free towel.
- A small level or smartphone level app.
- Gloves (optional but recommended).
Step-by-Step Adhesive Installation
- Clean the Mounting Area: This is the most critical step for adhesion. Park your Tesla in a shaded, clean area. Use isopropyl alcohol and a microfiber cloth to thoroughly clean the exact area on the bumper where the plate will sit. Remove all wax, grease, and road film. Do this at least twice and let it air dry completely. Any residue will cause failure.
- Prepare the License Plate: Clean the back of your license plate with alcohol as well. If your plate has a pre-drilled hole for a bracket, you’ll need to cover it. Use a small piece of painter’s tape on the back to create a smooth surface, or fill the hole with a dab of epoxy that will cure.
- Apply the Adhesive: If using VHB tape, cut two strips to match the height of the plate (or four small pieces for each corner). Peel one side and stick it to the cleaned back of the license plate. Peel the second protective layer off. If using epoxy, mix a tiny amount according to the manufacturer’s instructions and apply a thin, even bead in a zig-zag pattern across the back of the plate. Less is more; you don’t want it squeezing out the sides.
- Dry-Fit and Mask: Before touching the adhesive, do a dry run. Hold the plate up to the bumper. Use painter’s tape to mark the exact top corners or a reference line on the bumper. This is your guide for perfect placement. Also, use this moment to confirm the plate is not covering any sensor openings. The safe zone is generally the very bottom center of the bumper, below the radar and camera. On most Model 3s, this means placing the top edge of the plate at least 4-6 inches below the leading edge of the hood.
- Position and Apply: With your helper (or carefully by yourself), align the plate using your tape marks. Start by placing the top edge first and gently lowering it, ensuring it’s perfectly horizontal using your level. Once positioned, press firmly and evenly across the entire plate for 30 seconds. Pay extra pressure on the edges.
- Curing Time: Do not disturb the plate for at least 24 hours. The adhesive needs this time to reach its full bond strength. Avoid driving immediately if possible, or at least avoid high-pressure car washes for a few days.
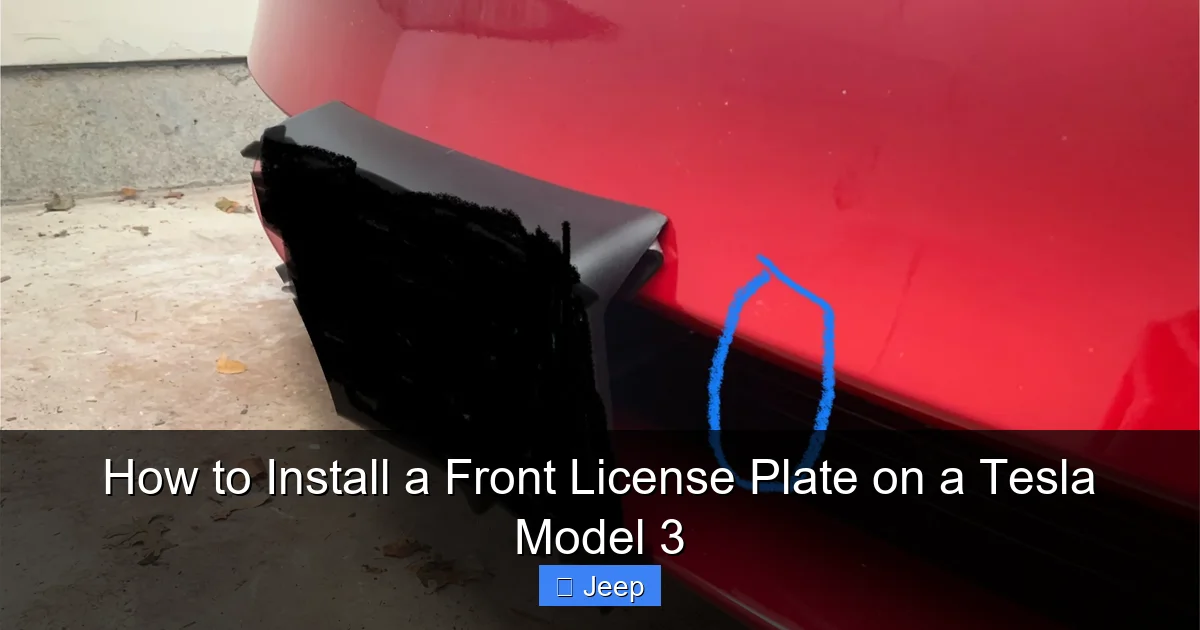
Method 2: The Tow Hook Method (Functional & Removable)
Many Tesla Model 3 owners are unaware that their car has a hidden, reinforced tow hook eyelet behind a small square cover in the lower center of the front bumper. This is a factory-installed, threaded mounting point designed for towing. You can purchase a simple adapter that threads into this eyelet and provides a horizontal bar to which you can bolt your license plate. This method is excellent for renters or those who want a completely removable, no-adhesive solution.
Visual guide about How to Install a Front License Plate on a Tesla Model 3
Image source: media.printables.com
Required Components
- Tesla Model 3 Tow Hook Adapter: Search for "Tesla Model 3 front tow hook license plate mount." These are typically made of stainless steel or aluminum. Popular brands include EVanna, Tork, and various sellers on Tesla accessory sites. Ensure it’s for the correct Model 3 year range (2017-present).
- Your license plate.
- Two small stainless steel screws (usually #8-32 or similar, often included with the adapter).
- A small socket wrench or screwdriver (depending on the adapter).
- Plastic trim removal tools (optional, for accessing the tow hook cover).
Step-by-Step Tow Hook Installation
- Locate and Access the Tow Hook: The cover is a small, square plastic piece, often textured, located in the very bottom center of the front bumper, just above the splitter. It may have a tiny indentation or slot. Gently pry it off using a plastic trim tool or a flat, wide screwdriver wrapped in tape to avoid scratching. It’s clipped in place.
- Thread the Adapter: Screw the tow hook adapter into the now-exposed threaded eyelet. Turn it clockwise by hand until it’s snug. Do not over-tighten with a tool, as the threads are in the bumper plastic. Hand-tight plus a quarter turn is usually sufficient.
- Attach the License Plate: The adapter will have two pre-drilled holes. Place your license plate against it and use the provided screws to secure the plate to the adapter. Tighten just enough to hold it firmly without deforming the plate.
- Check Clearance: Look at the installation from the side. The plate will protrude slightly from the bumper face. Ensure it’s not interfering with the lower air intake or any sensor openings above it. The tow hook method typically positions the plate very low, which is usually safe for sensors but may not meet some states’ height requirements. Double-check your local regulations on plate mounting height.
- Reversibility: To remove, simply unscrew the plate, then unscrew the adapter from the tow hook eyelet. Replace the plastic cover. No tools, no residue.
Method 3: Aftermarket Bracket Kits (The OEM-Like Solution)
If you want a dedicated, bolt-on bracket that mimics a factory installation, several third-party companies design brackets specifically for the Tesla Model 3. These brackets typically bolt to the tow hook eyelet or to the bottom of the bumper using existing holes or custom fasteners, providing a sturdy metal mount for the plate. They often come in brushed aluminum or black anodized finishes to look intentional.
Visual guide about How to Install a Front License Plate on a Tesla Model 3
Image source: media.printables.com
Popular Bracket Types
- Tow Hook Mounted Brackets: Similar to the simple adapter but with a more robust, L-shaped or flat bracket design that may position the plate slightly higher or offer a more integrated look.
- Bumper Clamp-On Brackets: These brackets have rubber-coated clamps that grip the underside edge of the front bumper lip. They require no drilling and no use of the tow hook. They are completely removable but rely on friction and clamping force.
- Drill-In Brackets: The most permanent option. These involve drilling small holes through the front bumper cover (into the underlying reinforcement) and bolting the bracket on. This is a permanent modification and not recommended for most owners due to warranty and resale concerns.
Installing a Tow Hook Bracket Kit
Assuming you choose a reputable tow hook-mounted bracket kit (the most common and sensible aftermarket option):
- Follow the first step from Method 2 to access and expose the tow hook eyelet.
- The bracket will have a central hole or slot that aligns with the tow hook. Thread it on and secure it with the provided bolt and washer. This bolt usually goes through the bracket and threads into the tow hook eyelet.
- Tighten securely. Some kits include a locking feature or a set screw to prevent rotation.
- Attach your license plate to the bracket using the included screws or your own (stainless steel is best).
- Align and check for sensor clearance as described previously.
Pro Tip: Before purchasing any aftermarket bracket, read reviews specifically about fitment for your Model 3’s production year. Fit can vary slightly between early and late models. A poorly designed bracket can vibrate or be misaligned.
Alignment, Sensors, and Final Checks
No matter which method you choose, the final alignment and sensor check are non-negotiable. A crooked plate looks terrible and a sensor-blocking plate is dangerous.
Achieving Perfect Alignment
Use your painter’s tape reference marks. Place a small torpedo level on top of the license plate. The bubble must be centered. Take a step back and look at the plate’s relationship to the car’s body lines—it should be parallel to the hood line and the lower grille. The plate should be centered left-to-right on the bumper. Use a tape measure from the plate’s outer edges to the nearest body line (like the headlight housing) to ensure symmetry.
The Sensor Sweep Test
After installation, but before driving, get in the car and start it up. Watch the touchscreen and instrument cluster for any warnings related to "Front Camera Obstructed" or "Radar Obstructed." If you see a warning, the plate is too high or too close to the sensor housing. You will need to remove it and remount it lower.
Next, take a short, slow test drive on a quiet street. Engage Autopilot (if conditions allow) and watch for the same warnings. Also, listen for any unusual rattles or wind noise from the front end, which could indicate the plate or bracket isn’t seated properly. A properly installed plate should be silent at highway speeds.
Maintenance, Removal, and Long-Term Care
Your installation is complete, but your work isn’t entirely done. Proper care ensures the system lasts and you can address issues later.
Cleaning
When washing your car, pay attention to the plate and its mounting points. Spray behind the plate if possible (with a low-pressure hose) to rinse out any debris that could accumulate and potentially scratch the paint over time. Use a soft brush on the plate itself.
What If You Need to Remove It?
- Adhesive Method: This is the trickiest. Use a heat gun or hairdryer on a low setting to warm the adhesive behind the plate. Work slowly around the edges. Once pliable, use a plastic trim tool to gently pry the plate away. Go slowly to avoid bending it. Any residual adhesive can be removed with an adhesive remover (like 3M Adhesive Remover) or by carefully rolling a fresh piece of tape over it. The process may leave some paint damage if not done meticulously. This is why considering a protective wrap on that bumper section beforehand is a smart move for many owners.
- Tow Hook/Bracket Methods: These are trivial to remove. Simply unbolt the plate or bracket. No tools beyond a wrench/screwdriver are needed, and there is zero impact on the paint.
Winter and Severe Weather
In areas that use road salt, the bottom of the car is exposed to corrosive elements. The back of your license plate can become a trap for salty slush. Make sure to rinse this area thoroughly during winter washes to prevent corrosion on the plate itself or, in the case of adhesive, to prevent water from seeping behind it and potentially affecting the bond over many years.
Conclusion: Confidence in a Clean Installation
Installing a front license plate on your Tesla Model 3 doesn’t have to be a source of anxiety. By understanding your options—the seamless adhesive look, the removable tow hook adapter, or the dedicated aftermarket bracket—you can choose the path that best fits your lifestyle and aesthetic. The universal keys to success are meticulous surface preparation, unwavering attention to sensor clearance, and precise alignment. Remember, that pristine front end is a hallmark of the Tesla experience. Taking the time to do this job right preserves that look while keeping you legally compliant and your car’s advanced systems fully operational. Now, with your plate securely and correctly mounted, you can hit the road with one less item on your Tesla ownership checklist.
Frequently Asked Questions
Is it illegal to not have a front license plate on a Tesla Model 3?
It depends entirely on your state’s laws. Many states, including California, New York, and Texas, require a front plate. A few, like Arizona and Montana, do not. You must check your local DMV regulations to avoid fines. This guide assumes you need to install one for legal compliance.
Will using adhesive damage my Tesla’s paint when I remove the plate?
There is always some risk with any adhesive. High-quality 3M VHB tape is designed for automotive use and typically removes cleanly with heat and patience. However, on older paint or paint with existing imperfections, removal could cause some clear coat damage. Using a paint protection film in the mounting area beforehand provides the best safeguard against any potential harm.
Will the tow hook method affect my Tesla’s Autopilot or sensors?
No, when installed correctly. The tow hook is a factory-installed, reinforced point designed for towing. Accessing it does not affect any sensors. The adapter simply bolts onto it and positions the plate low on the bumper, well away from the forward-facing camera and radar, as long as you use a properly designed adapter that positions the plate low enough.
How do I know if my license plate is blocking a sensor?
After installation, start your car and look at the touchscreen. If you see a gray or red icon with a crossed-out camera or radar, or a text warning like "Front Camera Obstructed," your plate is in the wrong position. You will need to remount it lower. A test drive with Autopilot engaged (on a clear road) will also confirm if the system is functioning normally.
Can I install the front plate myself, or should I go to a professional?
This is a very manageable DIY project for anyone comfortable with basic tools and careful alignment. The adhesive method requires the most care. If you are unsure about locating sensors or achieving a perfect bond, a professional detailer or Tesla accessories installer can do it quickly, often for a reasonable fee, and will guarantee the work.
What is the best method for a leased Tesla Model 3?
For a leased vehicle, you absolutely want a removable method to avoid any permanent modifications. The tow hook adapter or a clamp-on bracket are the ideal choices. They require no drilling and no adhesive, ensuring you can return the car to its original, pristine condition at lease-end with zero questions asked. Avoid any drilling or permanent adhesive solutions on a lease.


