
How to Fix a Torn Car Cover: A DIY Guide to Patching, Reinforcing, and Protecting Your Vehicle

Quick Answer
Fixing a torn car cover is a straightforward DIY project that can save you the cost of a full replacement. You can restore structural integrity using specialized repair tapes, liquid fabric sealants, or proper hand-stitching depending on the fabric type. For long-term durability, reinforce both the interior and exterior sides of the rip.
Essential Repair Steps
- Clean and dry: Wipe down the damaged area with rubbing alcohol and let it dry completely before applying any adhesive.
- Choose your material: Match your patch kit to the cover material, such as canvas, micro-porous film, or woven polyester.
- Apply double-sided patches: Place a patch on the inside for strength and another on the outside for weather resistance.
- Stitch high-stress zones: Use heavy-duty UV-resistant thread for seams and mirror pocket corners prone to heavy wind buffeting.
Pro Maintenance Tip
- Inspect your cover every three months for microscopic UV degradation to catch tears before they spread across seams.
Walking out to your car and spotting a rip in your protective cover is always frustrating. We buy these covers to shield our paint from harsh UV rays, sap, and bird droppings, but mother nature and sharp mirrors can take a toll. Instead of throwing away an expensive multi-layer cover, you can easily patch it up in your driveway.
Over the years, I have patched everything from heavy-weight multi-layer storage covers to light breathable indoor dust shields. In this guide, I will walk you through diagnosing the tear, choosing the right adhesive materials, and applying permanent fixes that stand up to highway speeds and heavy downpours.
In This Guide
How Do You Identify the Type and Extent of Car Cover Damage?
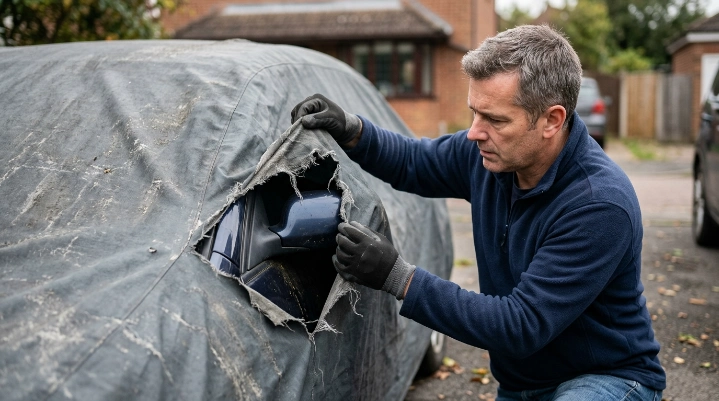
A torn car cover is not a one-size-fits-all fix. Before you grab any tape or glue, you need to understand what caused the failure.
Sharp exterior features like protruding radio antennas, aggressive mirror angles, or spoiler edges frequently puncture thin synthetic fabrics. Environmental degradation also makes covers brittle, leading to large jagged rips across the roof or hood panels.
Assess whether the fabric is simply split or if the material has become paper-thin from ultraviolet breakdown. If the surrounding fabric disintegrates when you pinch it, patching a single hole will only buy you a few weeks before a new tear forms nearby.
Section Takeaway: Always inspect the fabric surrounding a tear to ensure the material is still structurally sound enough to hold an adhesive patch.
What Are the Best Repair Materials for Different Car Cover Fabrics?
Different car cover materials require specific bonding agents to ensure long-term holding power against rain and wind.
Vinyl and heavy multi-layer covers react best to heavy-duty vinyl cement or specialized waterproof repair tape. Breathable woven polyester and polypropylene covers require fabric glues that maintain flexibility so the cover can stretch over your vehicle contours.
Avoid standard household duct tape at all costs. Duct tape leaves a gummy residue that bakes onto your vehicle’s clear coat in the sun and loses its adhesive properties after the first rainstorm.
| Cover Material | Best Repair Method | Durebility Level |
|---|---|---|
| Woven Polyester | Fabric glue and matching patch | High |
| Multi-Layer Fleece Lined | Heavy-duty adhesive patch kit | High |
| Lightweight Dust Cover | Flexible fabric mending tape | Medium |
| Vinyl / Waterproof | Vinyl cement and PVC patch | Very High |
Section Takeaway: Matching your repair product to your specific car cover fabric prevents peeling and ensures complete waterproof protection.
How Do You Patch a Torn Car Cover Step-by-Step?
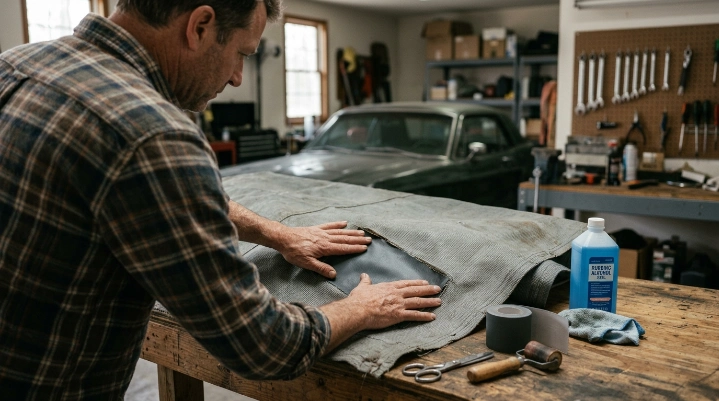
Fixing a tear requires patience and precise surface preparation. Clean surfaces ensure a permanent chemical bond between the patch and the cover.
Lay the car cover flat on a clean workbench or table. Pull the edges of the tear together as closely as possible without bunching up the surrounding fabric.
Wipe the area down with isopropyl alcohol to remove dust, pollen, and oils. Let the surface dry completely before moving to the next step.
Cut a patch from your repair kit that extends at least two inches past the tear in every direction. Apply a matching patch to both the inside and outside of the cover for maximum strength.
Press the patches down firmly with a roller or the back of a spoon to eliminate air bubbles. Allow the adhesive to cure for 24 hours before putting the cover back on your car.
Section Takeaway: Double-sided patching and proper surface cleaning are the two most critical factors for a permanent repair.
How Do You Reinforce and Stitch High-Stress Seams?
Areas like mirror pockets, elastic hems, and rooftop centerlines endure constant tension from wind flapping. Adhesive patches alone often fail in these high-stress zones.
Use a heavy-duty sailmaker needle and UV-resistant polyester or nylon thread. Standard cotton thread rots quickly under sunlight and moisture.
Employ a lockstitch or blanket stitch pattern to bind the torn edges together securely. Knot your thread tightly at both ends and seal the exterior stitching line with liquid seam sealer.
Section Takeaway: Combining hand-stitching with a waterproof sealant creates an unbreakable bond on high-tension seams and corners.
How Can You Prevent Future Tears and Extend Cover Life?
Preventative maintenance keeps your car cover functional for years and stops minor scuffs from turning into major splits.
Always remove sharp antennas or cover them with a microfiber cloth before draping the cover over your car. Secure your cover with a wind strap kit to prevent aggressive flapping during heavy storms.
Wash your car cover twice a year by laying it out on a clean driveway, scrubbing it with mild automotive soap, and letting it air dry completely. Storing a dirty cover accelerates fabric breakdown and mold growth.
Section Takeaway: Proper installation techniques and regular cleaning eliminate the friction points that cause premature fabric wear.
Frequently Asked Questions
Can I use Gorilla Tape to fix a torn car cover?
Gorilla tape provides a temporary fix in an emergency, but it is not recommended for long-term use. The adhesive breaks down under UV exposure and leaves a sticky residue on your car paint.
How long do car cover patches last?
A properly applied patch using fabric-specific adhesive and a double-sided technique can easily last the remaining lifespan of the car cover, typically 2 to 5 years.
Should I patch the inside or outside of the cover?
For the strongest hold, you should patch both sides. The inside patch handles structural tension, while the outside patch prevents rain and wind from lifting the edges.
Can waterproof car covers be repaired without losing water resistance?
Yes, as long as you use waterproof adhesive patches and apply a liquid seam sealer over any stitched areas to maintain complete moisture protection.
What is the best way to store a car cover to prevent damage?
Fold your cover loosely rather than stuffing it into a tight bag. Store it in a cool, dry place away from direct sunlight and rodent access.
Final Takeaway
Repairing a torn car cover is an easy weekend DIY project that saves you money and keeps your vehicle protected. By cleaning the surface, choosing the right adhesive, and reinforcing high-stress seams, your repaired cover will stand up to the elements for years to come.