
Ripped Car Cover Repair: How to Fix Tears, Holes, and Split Seams

Quick Answer
Most small car-cover rips can be repaired with a compatible fabric or vinyl patch applied from the underside. Clean and dry the damaged area, use a patch that overlaps healthy material, press it firmly, and let the adhesive cure before reinstalling the cover. If the surrounding material is brittle or several areas are failing, replacement is usually smarter; current car-cover testing from Car and Driver can help when you need a new cover.
Fast repair steps
- Remove the cover: Never cut, sew, or glue the cover while it is sitting on your vehicle.
- Identify the material: Check the care label before choosing adhesive, repair tape, sewing, or heat.
- Clean and dry: Remove dust, oils, and moisture around the tear so the patch can bond properly.
- Cut the patch: Make it extend roughly one inch beyond the damaged area where practical.
- Patch underneath: Align the torn edges and press the repair material firmly over sound fabric.
- Let it cure: Follow the repair product’s stated curing time before stretching the cover over the car.
A ripped car cover doesn’t automatically belong in the trash. I’ve seen small wind tears and snagged spots become usable repairs when they’re caught before the surrounding material starts failing.
The important part is matching the repair to the cover. This guide shows you how to patch common materials, deal with split seams, judge whether a repair will last, and prevent the same tear from coming back.
In This Guide
- Can a Ripped Car Cover Be Repaired?
- What Do You Need to Repair a Ripped Car Cover?
- How Do You Repair a Ripped Car Cover Step by Step?
- Which Repair Method Works for Each Car Cover Material?
- When Should You Replace a Torn Car Cover?
- How Do You Keep a Car Cover From Ripping Again?
- Frequently Asked Questions
Can a Ripped Car Cover Be Repaired?
Yes. A small, isolated rip in otherwise flexible and healthy material is often a good candidate for DIY car cover repair.
The repair becomes less dependable when the fabric around the tear has become thin, chalky, stiff, or brittle. In that situation, the patch may hold while the weakened material beside it tears next.
Definition: A ripped car cover repair is the process of reinforcing torn cover material with a compatible patch, repair tape, adhesive, or stitching so the cover can continue shielding the vehicle.
Good candidates for repair
- A short tear caused by snagging the cover.
- A small puncture with strong material around it.
- A seam that has opened while the fabric remains intact.
- A localized worn spot that has not spread across the cover.
- Minor damage away from heavily stretched straps, hems, or anchor points.
Damage that deserves closer inspection
Wind damage deserves special attention. Once air gets underneath a loose cover, repeated flapping can turn a tiny opening into a much longer tear.
I pay particular attention to mirror pockets, corners, elastic hems, and tie-down locations. Those areas see more tension than the center of a panel.
Before repairing anything, look over the entire cover instead of focusing only on the obvious rip. General vehicle-care resources such as Kelley Blue Book’s car maintenance information follow the same useful principle: catching wear early is easier than dealing with larger damage later.
What Do You Need to Repair a Ripped Car Cover?
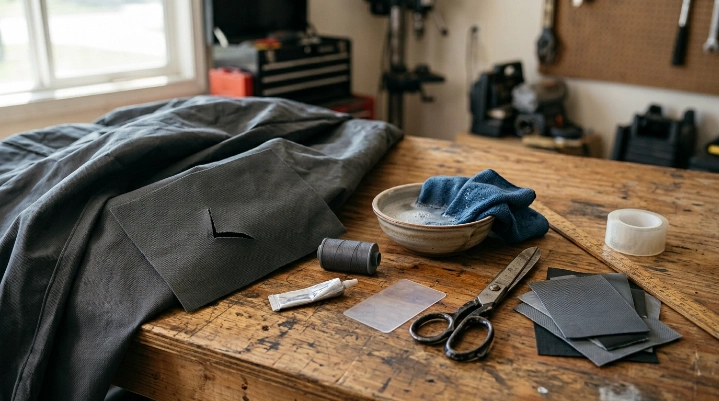
You don’t need a professional upholstery shop for most small repairs. You do need materials that are compatible with the cover you own.
Basic repair supplies
- Clean microfiber cloths
- Mild soap and water
- Scissors with a clean cutting edge
- Ruler or measuring tape
- Compatible fabric, nylon, polyester, or vinyl patch
- Outdoor-rated repair tape or adhesive when appropriate
- Roller, plastic card, or another smooth tool for pressing adhesive patches
- UV-resistant polyester thread and a suitable needle if the cover can safely be sewn
Check the cover’s care label before bringing out an iron, heat gun, strong solvent, or aggressive cleaner. Synthetic layers can react very differently to heat and chemicals.
Why ordinary duct tape isn’t my first choice
Duct tape can close a hole temporarily, but it isn’t my preferred permanent repair. Outdoor exposure, repeated folding, heat, moisture, and fabric movement can weaken the bond or leave difficult residue.
A dedicated outdoor fabric patch, vinyl repair patch, or tarp-style repair tape is usually a cleaner choice. Match the repair material to the cover rather than choosing tape only because it’s available.
How Do You Repair a Ripped Car Cover Step by Step?
For most fabric-style covers, the best DIY approach is to align the damaged area and reinforce it from the underside. That keeps the patch supported when the cover is stretched over the vehicle.
1. Remove the cover from the car
Take the cover completely off before starting. Move it to a clean table, floor, or other smooth work surface.
This protects your paint from scissors, needles, adhesive, and accidental pressure. It also lets you flatten the damaged area properly.
2. Inspect the tear and surrounding material
Gently pull the material flat without stretching it. Look several inches around the tear for thinning, extra holes, loose coating, or failed stitching.
- If the surrounding material feels strong, continue with the repair.
- If it tears with light handling, replacement may be more sensible.
- If the problem is only an opened seam, restitching may work better than covering everything with tape.
3. Clean the repair area
Remove loose dirt with mild soap and water unless the patch manufacturer specifies another cleaner. Rinse away cleaner residue and let the cover dry completely.
Adhesives don’t bond well to dust, oil, wax, or moisture. Don’t rush this part.
4. Align the damaged edges
Lay the tear in its natural position without overlapping the two sides. You want the cover to retain its original shape after repair.
Trim only loose threads that prevent the patch from sitting flat. Don’t cut sound material just to make the opening look neater.
5. Cut a generously sized patch
For a small tear, I like a patch that reaches about one inch beyond the damage on every side where the cover design allows it. This puts the adhesive onto healthy material rather than the weakened edge.
Rounded corners can also reduce exposed points that might catch while the cover is folded or moved.
6. Apply the patch from underneath
Turn the damaged section inside out. Center the patch over the tear and apply it according to the patch manufacturer’s directions.
- Start pressing near the center.
- Work outward toward the patch edges.
- Smooth out wrinkles and trapped air.
- Press every edge firmly.
- Do not immediately stretch-test the repair.
7. Reinforce the outside only if needed
A second exterior patch can help in a high-movement location, but it isn’t required for every tear. Too much stiff repair material can create a new stress point beside the patch.
If appearance matters, an underside-only repair usually looks cleaner.
8. Give the adhesive time to cure
Follow the repair product’s instructions rather than assuming it is ready immediately. Some pressure-sensitive patches bond quickly but continue developing strength over time.
Reinstall the cover only after the repair can handle normal folding and tension.
Section Takeaway: Clean, dry material and a wide patch bonded to healthy fabric matter more than making the repair nearly invisible. Don’t stretch-test a fresh patch before it has cured.
Which Repair Method Works for Each Car Cover Material?
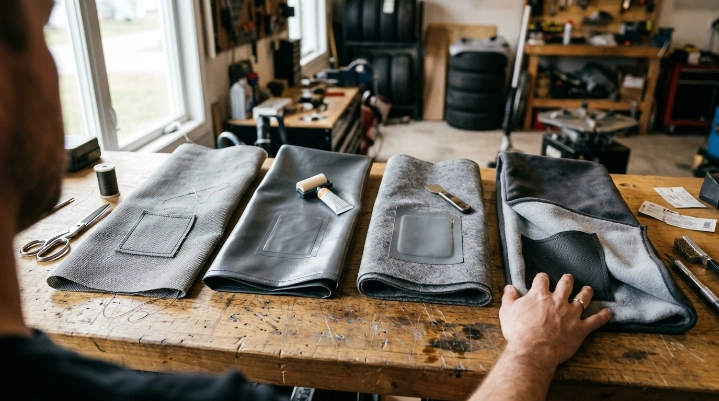
The best method depends on how the cover is constructed. A repair that works on woven polyester may damage a coated or nonwoven multilayer cover.
| Cover Type | Preferred DIY Repair | Sewing? | Heat? |
|---|---|---|---|
| Woven polyester or nylon | Compatible fabric patch; stitching plus patch for some tears | Often possible | Only if care label allows |
| Vinyl or vinyl-coated material | Vinyl repair patch or compatible adhesive | Usually avoid unless designed for it | Only as repair-kit instructions permit |
| Nonwoven multilayer cover | Compatible self-adhesive patch or repair tape | Often unsuitable | Avoid unless manufacturer approves |
| Soft indoor or lined cover | Soft fabric patch from underside | Possible on suitable woven material | Depends on fiber and liner |
Repairing a sewn seam
If the thread failed but both fabric panels remain healthy, recreating the seam may produce a neater repair. Use thread suitable for outdoor exposure and follow the original stitch line where practical.
Water-resistant covers need extra care because every needle hole can create a potential path for moisture. A compatible seam sealer may be needed after stitching.
Repairing a waterproof or coated cover
Don’t assume ordinary fabric glue will bond to a coated surface. Use a repair patch or adhesive specifically compatible with the material named on the label.
Likewise, don’t iron a coated cover simply because an iron-on patch worked on another piece of fabric. Excess heat can distort synthetic layers or damage coatings.
When Should You Replace a Torn Car Cover?
Replace the cover when the damage is no longer localized. A strong patch cannot restore material that has deteriorated across a large area.
Signs replacement makes more sense
- Several unrelated tears have appeared.
- The material feels brittle or tears beside previous repairs.
- A large section of protective coating is separating.
- The elastic hem or tie-down structure is badly torn away.
- Large sections of an inner liner are exposed or damaged.
- Major seams are failing in several places.
- The cover no longer stays securely fitted in wind.
- Previous patches repeatedly peel or tear loose.
Think about what the cover is supposed to do. If rain, dust, sun, or wind can easily get through the damaged section, keeping the old cover may defeat the reason you’re using one.
That matters even more for a vehicle stored for long periods. Consumer Reports’ guidance for cars that aren’t driven much highlights that storage itself still requires attention and maintenance.
Repair cost versus replacement value
A small patch kit makes sense for one clean tear. Repeatedly buying repair products for a deteriorated cover usually doesn’t.
I also wouldn’t trust a heavily repaired outdoor cover before a major storm. At that point, reliable fit and intact material matter more than squeezing another season out of it.
How Do You Keep a Car Cover From Ripping Again?
The best repair is one you only have to make once. Most repeat tears come from ongoing tension, flapping, sharp contact points, or weakened material.
Use the correct size
A cover stretched too tightly puts continuous load on seams, mirror pockets, and corners. A cover that’s too loose can flap aggressively in wind.
A secure fit should follow the vehicle without forcing you to pull hard to reach the bumpers.
Secure the cover before windy weather
- Use the cover’s intended straps or tie-down system.
- Check that buckles and straps don’t rub against painted surfaces.
- Make sure elastic hems remain positioned under the bumpers.
- Inspect high-tension areas after unusually windy conditions.
If one area repeatedly tears, don’t just keep patching it. Find the tension or rubbing point that’s causing the failure.
Keep the car and cover clean
Dirt trapped beneath a moving cover can rub against paint. Dirt also makes adhesive repairs harder and can shorten the useful life of the cover.
Wash the cover according to its manufacturer’s instructions. Let it dry properly before folding it for storage.
Don’t drag the cover
Dragging it across pavement can abrade outer fabric and contaminate the inner surface. Fold or roll the cover as you remove it instead.
Keep the soft side away from garage floors, driveways, gravel, and sharp objects.
Inspect repairs periodically
Look at patch edges and nearby fabric every few uses. Catching a lifting corner takes much less work than repairing another long tear.
Car-cover care is only one part of keeping a vehicle protected. The Edmunds car maintenance resource is a useful companion for staying on top of broader ownership and maintenance needs.
Section Takeaway: A secure fit, controlled wind movement, clean material, and regular inspection give a repaired cover its best chance of lasting.
Frequently Asked Questions
Can I use duct tape to repair a ripped car cover?
Duct tape can work as a temporary emergency fix, but it isn’t ideal for a lasting repair. A compatible outdoor fabric patch, vinyl patch, or repair tape usually handles weather, folding, and fabric movement better.
Should I patch a car cover from the inside or outside?
For many small tears, applying the main patch from the inside gives a cleaner appearance and reinforces the damaged area when the cover is stretched. High-stress damage may sometimes benefit from reinforcement on both sides.
Can I sew a torn car cover?
You can sew some woven polyester or nylon covers, particularly when a seam has opened. Avoid assuming every cover can be sewn because needle holes can weaken nonwoven material or reduce the water resistance of coated covers.
Can I use an iron-on patch on a car cover?
Only use an iron-on patch when the cover’s care instructions and patch manufacturer both permit the required temperature. Many synthetic, coated, multilayer, and lined covers can be damaged by excessive heat.
How large should a patch be for a ripped car cover?
The patch should extend well beyond the damaged edges and bond to strong material. For a small tear, roughly one inch of overlap around the damage is a useful starting point when the cover design allows it.
Will a repaired car cover still be waterproof?
It depends on the cover and repair method. A compatible waterproof patch can restore protection around a small tear, while stitching or an incompatible adhesive may create paths for moisture unless the repair is properly sealed.
Is it worth repairing an old car cover?
It is worth repairing when the damage is isolated and the remaining material is still flexible and strong. If the fabric is brittle, several seams are failing, or new tears keep appearing, replacing the cover is usually the better long-term choice.
Final takeaway: Start a ripped car cover repair while the damage is still small. Match the patch to the material, work on a clean and dry surface, reinforce healthy fabric around the tear, and give the repair enough curing time before putting the cover back into service.
If the surrounding material is already failing, don’t rely on one patch to rescue the whole cover. A properly fitted replacement will provide more dependable protection and can save you from repeating the same repair after the next windy day.