

How to Turn the Parking Brake Off on a Toyota Forklift
Contents
- 1 Key Takeaways
- 2 📑 Table of Contents
- 3 Understanding Your Toyota Forklift’s Parking Brake System
- 4 Step-by-Step: How to Turn the Parking Brake Off
- 5 Troubleshooting Common Parking Brake Problems
- 6 Safety Best Practices When Releasing the Parking Brake
- 7 Regular Maintenance to Prevent Brake Problems
- 8 Conclusion: Confidence Through Competence
- 9 Frequently Asked Questions

Car Wash Mitt

Torque Wrench Set

Car Fog Light Bulb

Car Emergency Roadside Kit
Safely turning off the parking brake on your Toyota forklift is a fundamental skill for every operator. This process varies slightly depending on whether your model has a manual lever or an electric push-button system. Always follow the correct procedure to ensure the brake fully releases and to prevent damage to the braking system or accidents during operation.
There you are, ready to start your shift or move a load, and you go to pull away, but your Toyota forklift just won’t budge. You press the accelerator, the engine revs, but you’re going nowhere. The culprit? A parking brake that hasn’t fully released. It’s a common frustration, but knowing exactly how to turn the parking brake off on a Toyota forklift is essential knowledge for every operator. It’s not just about convenience; it’s a critical safety and equipment preservation skill. Forcing a stuck brake can shred cables, burn out electric motors, or cause a dangerous sudden release. This comprehensive guide will walk you through everything you need to know, from identifying your brake system to mastering its release, troubleshooting problems, and implementing preventive maintenance. We’ll keep it clear, simple, and focused on getting you back to work, safely.
First, let’s be clear: the parking brake on a forklift is not your primary service brake. You use your foot pedal to stop and slow down during normal operation. The parking brake is a secondary, holding brake designed exclusively for when the forklift is parked and unattended. Its job is to keep the forklift from rolling on an incline if the hydraulic pressure bleeds off. Because it’s often mechanically applied and held, it can sometimes stick, especially in cold weather or with infrequent use. The method to disengage it is straightforward but must be done correctly. We’ll break it down by system type, as Toyota has used both manual and electric setups across their extensive forklift fleet.
Key Takeaways
- Safety First: Always park on level ground, engage the parking brake only when stationary, and chock the wheels before working near the brake mechanism.
- Identify Your System: Toyota forklifts use either a traditional manual hand lever or a modern electric/push-button parking brake release. Knowing which one you have is the first step.
- Standard Release Procedure: For manual systems, firmly pull and release the lever. For electric systems, press and hold the designated release button until you hear a click or feel the brake disengage.
- Test Before Moving: After releasing the brake, gently attempt to move the forklift forward and backward a few inches to confirm the brake is fully disengaged and the tires can rotate freely.
- Address Stuck Brakes Immediately: If the brake will not release, do not force it. Investigate for common issues like cold weather seizing, cable tension, or electrical faults, or call a qualified technician.
- Regular Maintenance is Key: Include the parking brake cable, lever, and actuator in your routine pre-operation inspections. Keep the mechanism clean and lubricated according to Toyota’s service manual.
- Know When to Seek Help: If troubleshooting doesn’t resolve a stuck brake, or if you notice frayed cables, damaged components, or persistent warning lights, consult a certified Toyota industrial equipment mechanic.
📑 Table of Contents
Understanding Your Toyota Forklift’s Parking Brake System
Before you can turn the parking brake off, you need to know what type of system you’re dealing with. Toyota forklifts, like most brands, primarily use two designs for their parking brake: the traditional mechanical hand lever and the newer electric push-button system. Your operator’s manual is the ultimate authority, but you can often identify the system by a quick look in the cab.
The Classic Manual Hand Lever
This is the most common and intuitive system, especially on older and many mid-range Toyota models like the 7-series or the classic 5-series. You’ll see a lever, usually on the left side of the operator’s seat or on the center console column. It often has a red plastic handle or grip for easy identification. When you pull this lever up and toward you (the direction can vary slightly; some push down), it mechanically engages a brake band or shoe on the rear differential or drive shaft. To release it, you simply push or pull the lever back to its original, flat position. There is usually a distinct, audible “clunk” or “thud” as the brake disengages from the rotating component. This system is purely mechanical, relying on cables or a direct linkage, so it’s very reliable but can suffer from cable stretch, rust, or freezing in cold, damp conditions.
The Modern Electric/Push-Button Parking Brake
Found on many newer Toyota forklifts, including the premium 8-series and some electric models, this system uses an electric actuator—essentially a small motor—to apply and release the brake. Instead of a lever, you’ll find a button, often located on the dashboard or a control panel. The button may be red or have a “P” or brake symbol on it. To engage the parking brake, you press and hold the button until you hear a whirring sound and feel a vibration, then the button may illuminate. To disengage, you press and hold the button again. The motor will run, releasing the mechanical brake shoes. This system offers the convenience of one-touch operation and often integrates with the forklift’s electronic control module. However, it introduces potential electrical faults, such as a dead battery, blown fuse, failed actuator motor, or wiring issues.
Why Does My Parking Brake Engage Automatically?
You might wonder why the brake is on when you go to move. Many modern Toyota forklifts, both manual and electric, have a feature where the parking brake automatically engages when you shut off the engine or key. This is a safety interlock to prevent the forklift from rolling away if the operator forgets to set it manually. On these models, you must actively disengage it before you can drive away. This is a standard safety feature, not a malfunction. Always consult your specific model’s manual to understand its auto-engage behavior.
Step-by-Step: How to Turn the Parking Brake Off
Now for the core procedure. The steps differ based on your system, but the principle is the same: apply the correct action to the control until you feel or hear the brake release. Always perform these steps with the forklift’s engine running and in neutral, unless your manual specifies otherwise.
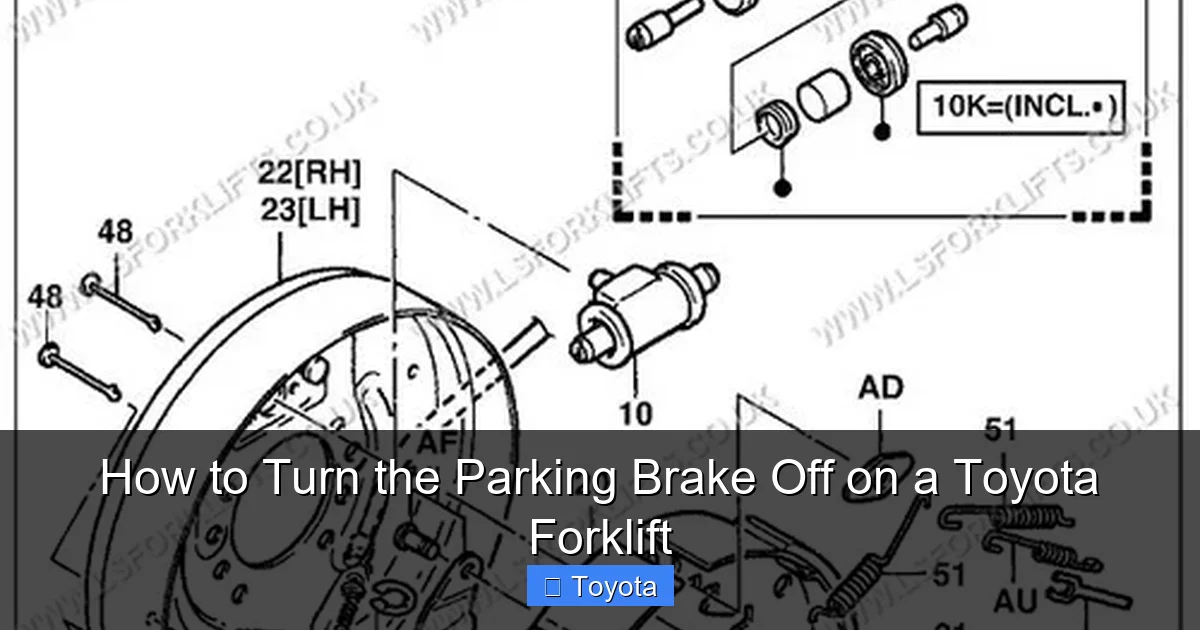
Visual guide about How to Turn the Parking Brake Off on a Toyota Forklift
Image source: lsforklifts.com
For Manual Lever Systems
1. Sit in the operator’s seat and fasten your seatbelt. This is non-negotiable for safety.
2. Start the engine and let it idle. Ensure the transmission is in Neutral (N).
3. Locate the parking brake lever. It’s typically on the left side. Grasp the red handle firmly.
4. Apply steady pressure in the direction that releases it. This is usually pushing the lever forward and down until it lies flat against the frame or console. Do not yank it violently.
5. Listen and feel. You should hear a clear metallic clunk or thud from the rear axle area as the brake shoes disengage from the drum or rotor.
6. Visually confirm the lever is in the fully released, horizontal position. Some models have a detent or click when properly seated.
7. Gently press the accelerator while holding the service brake. You should feel the forklift want to move. Release the service brake and let it roll a few inches forward and backward to be absolutely sure the brake is free.
For Electric Push-Button Systems
1. Sit, buckle, start the engine. As with the manual system, your seatbelt must be fastened, and the transmission in Neutral. Many electric brake systems require the key to be in the “ON” or “RUN” position, not just “ACCESSORY.”
2. Locate the parking brake button. It’s often on the dash, marked with a red “P” or a brake symbol inside a circle.
3. Press and hold the button firmly. You must hold it for 2-5 seconds. Do not just tap it.
4. Listen for the actuator. You will hear a distinct electric motor whirring or humming sound coming from under the forklift, near the rear axle. This is the brake releasing. The sound will stop when it’s fully disengaged.
5. Watch the indicator light. The button’s light (if equipped) should turn OFF. On some models, a separate parking brake warning light on the dashboard will extinguish.
6. Test for freedom of movement as described in step 7 of the manual procedure. The brake should release smoothly.
What to Do If the Brake Won’t Release
This is the critical part. If, after following the correct procedure, the brake remains engaged (you feel heavy resistance, hear grinding, or the forklift won’t creep), STOP. Do not rev the engine or try to force it. Here is your systematic approach:
- For Manual Brakes: Check if the lever itself is physically stuck. Gently wiggle it side-to-side while attempting to release. Look under the forklift (you may need to open the hood for access – see our separate guide on how to open the hood on a Toyota forklift) to see if the cable is frayed, broken, or caught on something. In cold weather, the brake drum/shoe interface can freeze. A gentle application of a de-icer spray (like a petroleum-based product, not water-based) to the brake assembly through the wheel spokes (if accessible) can help.
- For Electric Brakes: First, check the basics. Is the battery charged and the key in the correct position? Listen closely—do you hear *any* motor sound at all when you press the button? If you hear nothing, check the forklift’s main fuses and the specific fuse for the parking brake circuit (location in manual). A dead battery can also prevent the actuator from having enough power to move. If you hear a straining motor sound but no release, the mechanism is likely jammed mechanically.
- Universal First Step: Ensure the parking brake is actually the problem. Sometimes a severely worn or damaged service brake shoe can drag and mimic a stuck parking brake. Also, check that the wheels aren’t chocked or blocked.
Troubleshooting Common Parking Brake Problems
Understanding why a brake sticks helps you fix it and prevents a recurrence. We’ll break down the most frequent culprits for both system types.

Visual guide about How to Turn the Parking Brake Off on a Toyota Forklift
Image source: i.ytimg.com
Cold Weather and Rust: The Arch-Nemesis
Moisture and salt (in winter environments) cause rust to form on the brake drum’s interior surface and on the brake shoes. When the brake is set, the shoes press against this rusty surface. Overnight or during downtime, they can literally weld themselves together via surface rust. This is the most common cause of a stuck manual parking brake. The solution is often a combination of gentle mechanical persuasion and rust penetration. After attempting to release, you can try carefully tapping the brake drum with a rubber mallet to break the rust bond. A penetrating oil like WD-40 can be sprayed into the drum through the openings around the wheel hub (ensure the area is clean first). Let it soak, then try releasing again. For electric brakes, the actuator can also seize due to rust on its shaft or mounting points, requiring lubrication or replacement.
Cable Tension and Wear (Manual Systems)
The steel cable that connects your lever to the brake mechanism can stretch over time or fray. If it’s too loose, the lever may not fully engage or disengage the brake. If it’s stuck in the sheath due to dirt or corrosion, it won’t move freely. Visually inspect the cable from the lever to the rear axle. Look for kinks, broken strands, or areas where the outer sheath is damaged. Lubricate the cable with a dry lubricant or light oil if accessible. If adjustment is possible (some systems have a turnbuckle), follow the manual’s procedure to set the correct tension—typically, there should be a slight free play in the lever before it begins to engage the brake.
Electrical Faults (Electric Systems)
The electric system is simple in concept but relies on several components: the switch/button, the wiring, the fuse, the actuator motor, and sometimes a control module. Start with the power: check battery voltage and connections. Then, locate and inspect the fuse for the parking brake circuit (refer to your manual’s fuse panel diagram). A blown fuse is an easy fix. If the fuse is good, the next suspect is the switch itself. They can wear out or get clogged with debris. Listen for the actuator motor. If it runs but the brake doesn’t release, the motor’s gear train may be stripped, or the mechanical linkage it turns is seized or broken. This usually requires a technician to replace the actuator assembly.
Mechanical Failure or Obstruction
Less common but possible: a brake shoe could be broken, a spring could be snapped, or a foreign object (like a piece of debris or a broken part) could be jamming the mechanism. This is a serious issue that requires a professional mechanic to disassemble the brake unit, inspect all components, and replace any damaged parts. Forcing the brake in this scenario will cause catastrophic damage.
Safety Best Practices When Releasing the Parking Brake
Rushing or being careless with the parking brake can lead to property damage or personal injury. Integrate these habits every single time.

Visual guide about How to Turn the Parking Brake Off on a Toyota Forklift
Image source: shnxforklift.com
Always Perform a Pre-Operation Inspection
Your daily checklist must include a test of the parking brake. Before you even start the engine, with the forklift parked and secured, engage the brake firmly. Then, start the engine and attempt to release it. Does it work smoothly? Is there any unusual noise? Catching a minor issue like a stiff cable early prevents a major failure later.
Secure the Forklift Before Working on It
If you are troubleshooting a stuck brake and need to get under the forklift or near the wheels, you must take extraordinary precautions. Never rely on the parking brake itself to hold the forklift. Always:
- Park on a perfectly level surface.
- Chock the wheels on the opposite side of where you’re working. For example, if you’re inspecting the rear brake, chock the front wheels securely with heavy-duty wheel chocks.
- If on an incline, turn the wheels toward the curb (if outdoors) and use multiple chocks.
- Lower any raised forks or attachments to the ground.
- Ensure the transmission is in Neutral and the engine is off.
Test in a Safe, Open Area
After you believe the brake is released, do not immediately head into a busy warehouse aisle. Test the forklift’s mobility in a large, empty space. Gently accelerate forward and backward. Listen for any dragging, grinding, or squealing noises from the rear axle. Feel for any pulling to one side. If anything feels abnormal, stop immediately and re-investigate. A partially engaged parking brake will quickly overheat, destroy the brake shoes/drum, and create a fire hazard.
Never Disable or Bypass the Mechanism
You might be tempted, if the brake is frequently stuck, to disconnect the cable or unplug the electric actuator to “make it work.” Do not do this. You are now operating a forklift without a functional parking brake, which is a severe safety violation and a huge liability. It also puts extra, unintended stress on your primary hydraulic brakes, wearing them out prematurely. The correct fix is repair or replacement, not disablement.
Regular Maintenance to Prevent Brake Problems
An ounce of prevention is worth a pound of cure. Integrating the parking brake into your routine maintenance schedule will save you from downtime and costly repairs.
Monthly Visual and Functional Inspection
Once a month, or as part of your pre-op, go beyond the lever test. With the forklift safely lifted on jack stands (if you have the equipment and training) or by inspecting through the wheels, look at the brake assembly. Check for:
- Cable Health: Fraying, kinks, corrosion, or worn sheaths.
- Lever/Button Play: Excessive free play in the lever or a mushy button can indicate wear.
- Rust, dirt, or grease buildup on the brake drum and backing plate.
- Leaking hydraulic fluid (if the brake is hydraulically assisted, though rare for parking brakes).
Lubrication and Cleaning
For manual systems, the pivot points on the lever and the cable anchor points may need a drop of light oil annually. Never lubricate the brake shoes or drum friction surfaces—that will cause slippage and brake failure. For electric systems, keep the actuator and its mating parts clean and dry. In corrosive environments (seafood processing, fertilizer plants), more frequent cleaning and application of a light anti-corrosion spray on external metal parts may be necessary.
Follow Toyota’s Service Schedule
Your Toyota forklift owner’s manual provides a detailed maintenance schedule. The parking brake system, especially the cables on manual models, is typically considered a wear item. Toyota may recommend a full inspection and possible adjustment or replacement at specific hourly intervals (e.g., every 500 or 1000 hours). Adhering to this schedule is the best way to ensure system reliability. If your forklift is used heavily or in harsh conditions, consider more frequent inspections.
Address Dashboard Warning Lights Immediately
Many newer Toyota forklifts have a parking brake status light on the dashboard. If this light stays on after you’ve released the brake, or if it illuminates unexpectedly while driving, it indicates a fault. This could be a simple sensor issue or a sign of a deeper problem with the electric actuator. Consult your manual. Sometimes, a system reset is needed after a repair; the procedure can vary. For general guidance on resetting dashboard indicators on Toyota equipment, you might refer to resources on turning off maintenance lights, as the diagnostic principles can be similar. However, always prioritize a professional diagnosis for persistent warnings.
Conclusion: Confidence Through Competence
Mastering how to turn the parking brake off on your Toyota forklift is about more than just moving a lever or pressing a button. It’s about understanding your machine, respecting its systems, and committing to safe, methodical operation. You now know to identify your brake type, execute the proper release sequence, and systematically troubleshoot if it sticks. Remember the golden rules: always test for freedom of movement before driving, never force a stuck brake, and incorporate brake checks into your daily and monthly routines. A well-maintained parking brake is a silent guardian, keeping your forklift secure when parked and ensuring a smooth, safe start every time. By following this guide, you protect yourself, your coworkers, your cargo, and your valuable equipment. Stay safe, stay observant, and operate with confidence.
Frequently Asked Questions
What should I do if my Toyota forklift’s parking brake lever feels stiff and won’t move?
Do not use excessive force. First, ensure the engine is running and the transmission is in Neutral. Try gently wiggling the lever side-to-side while pressing the release direction. If it remains stuck, the cable is likely frozen or corroded. Apply a penetrating oil to the cable sheath and the brake mechanism under the forklift (you may need to open the hood for access). Allow it to soak and try again. In very cold weather, the brake drum and shoes may be frozen together; a gentle tap on the drum with a mallet can break the ice bond.
Can I safely drive a short distance if my parking brake is slightly engaged?
Absolutely not. Driving with any amount of parking brake engagement is extremely dangerous and damaging. It will cause the brake shoes/drum to overheat rapidly, leading to brake failure, a potential fire, and severe damage to the rear axle and differential. The brake will also cause the forklift to pull sharply to one side, risking a tip-over or collision. Always ensure the brake is fully released before moving.
My electric parking brake button makes a sound but the brake doesn’t release. What’s wrong?
Hearing the actuator motor run but feeling no release means the electric motor is working, but the mechanical linkage it operates is seized or broken. This could be due to severe rust on the actuator shaft, a broken gear inside the actuator, or a seized brake shoe mechanism itself. This requires a technician to inspect and likely replace the actuator or rebuild the brake assembly.
How often should I inspect the parking brake on my Toyota forklift?
You should perform a functional test of the parking brake during every pre-operation inspection (daily). Additionally, a more thorough visual inspection of the cables, lever, and brake assembly should be done monthly or according to the schedule in your Toyota owner’s manual. For heavy-duty or harsh-environment use, increase the frequency of these inspections.
Is it normal for the parking brake to feel hot after driving?
No, the parking brake should never get hot during normal operation because it is completely disengaged. If you notice a burning smell or excessive heat from the rear wheels, it means the parking brake is partially or fully engaged while driving. Stop immediately in a safe area and investigate. Continuing to drive will destroy the brake components and create a serious safety hazard.
My parking brake won’t release, and I see a warning light on the dashboard. What does this mean?
A persistent parking brake warning light on the dashboard indicates the forklift’s computer has detected a fault in the brake system. For electric brakes, this could be a failed actuator, a broken wire, or a faulty position sensor. For manual systems with a sensor, it might mean the brake is still applied. This is a serious issue. Do not ignore it. The forklift should not be operated until the fault is diagnosed and repaired by a qualified technician. Consult your manual for specific light meanings and reset procedures after repair.


