
How to Reset the Maintenance Light on a 2012 Toyota Rav4
Contents
- 1 Key Takeaways
- 2 📑 Table of Contents
- 3 Understanding the “Maintenance Required” Light on Your 2012 RAV4
- 4 Preparation and Safety First: Before You Touch Anything
- 5 Step-by-Step: The Primary Reset Method (Via Odometer Display)
- 6 Alternative Procedure: Using the Multi-Information Display (MID)
- 7 After the Reset: What This Means for Your RAV4’s Health
- 8 Troubleshooting: What to Do If the Light Won’t Reset or Comes Back On
- 9 Common Mistakes and Pitfalls to Avoid
- 10 When to Seek Professional Help: Don’t Gamble with Your Engine
- 11 Frequently Asked Questions


Resetting the maintenance light on your 2012 Toyota RAV4 is a simple, DIY procedure you can complete in under a minute. It involves using the trip meter/odometer button to navigate the instrument cluster menu and confirm the reset. However, this light is a crucial reminder for scheduled service; you should only reset it after performing the required maintenance, like an oil change, to avoid engine damage.
Key Takeaways
- The maintenance light is a service reminder, not a fault indicator: It illuminates based on mileage/time intervals to alert you that routine maintenance, such as an oil and filter change, is due. Resetting it simply tells the car’s computer you’ve completed the work.
- Two primary methods work for the 2012 RAV4: You can reset it via the “Trip A” odometer display or through the “Settings” menu on the multi-information display, depending on your trim’s instrument cluster.
- Safety and preparation are key: Always ensure the vehicle is parked safely with the parking brake set and the ignition in the “ON” position (but engine off) before starting the reset procedure.
- Never reset the light without performing the maintenance: The light is a critical safeguard. Resetting it without changing the oil or addressing other scheduled services risks severe engine wear and voids your warranty.
- If the light returns immediately or won’t reset, there’s a problem: This indicates either the maintenance wasn’t completed correctly, there’s an electrical issue, or a different fault code is active. A professional diagnostic is needed.
- The process is similar across many Toyota models: While button names and menu paths can vary slightly, the core principle of using the odometer/trip button to navigate and reset is consistent. You can find guides for other models like the 2021 RAV4 or the general Toyota maintenance light.
📑 Table of Contents
- Understanding the “Maintenance Required” Light on Your 2012 RAV4
- Preparation and Safety First: Before You Touch Anything
- Step-by-Step: The Primary Reset Method (Via Odometer Display)
- Alternative Procedure: Using the Multi-Information Display (MID)
- After the Reset: What This Means for Your RAV4’s Health
- Troubleshooting: What to Do If the Light Won’t Reset or Comes Back On
- Common Mistakes and Pitfalls to Avoid
- When to Seek Professional Help: Don’t Gamble with Your Engine
Understanding the “Maintenance Required” Light on Your 2012 RAV4
That little wrench icon glowing on your dashboard isn’t trying to ruin your day. It’s actually your 2012 Toyota RAV4’s way of being a responsible partner in vehicle ownership. This “Maintenance Required” light is a sophisticated, timer-based reminder system engineered by Toyota. It’s not triggered by a sensor that checks your oil’s condition; instead, it’s a pre-programmed countdown that starts counting down from the last time it was manually reset after a service. Think of it as a highly reliable, built-in calendar alert for your car’s health.
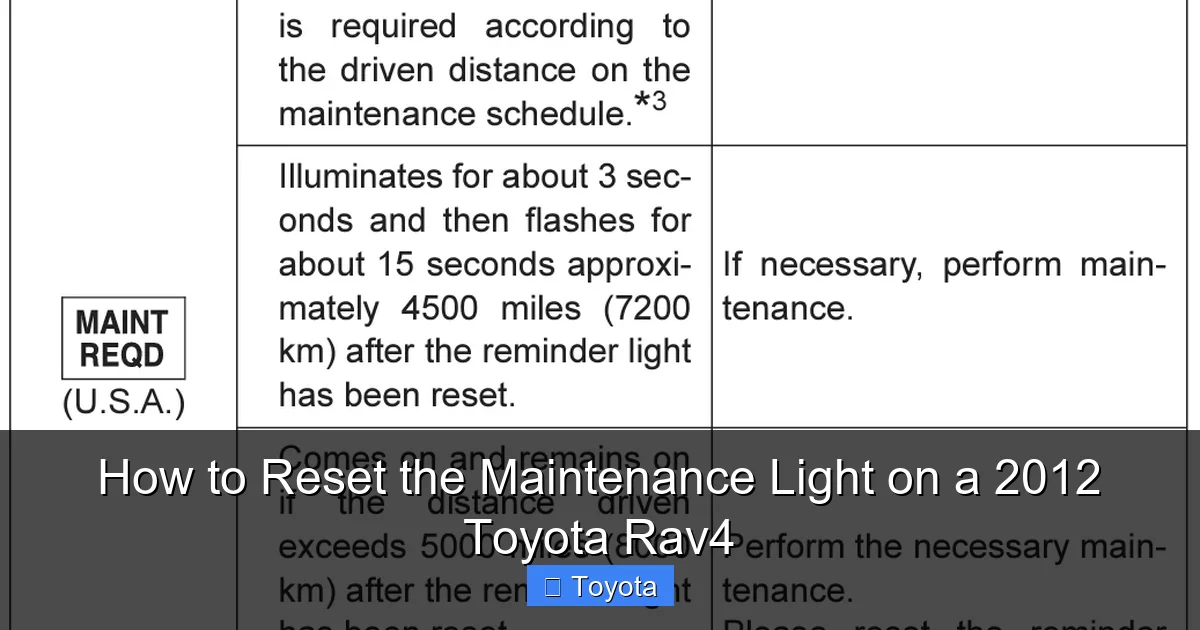
For the 2012 model year, the RAV4’s system is designed to illuminate the wrench symbol after approximately 5,000 miles (or 6 months, whichever comes first) since the last reset. This interval aligns with the traditional recommendation for engine oil and filter changes under normal driving conditions. Ignoring this light doesn’t mean your car will break down immediately, but it does mean you’re operating outside the manufacturer’s specified maintenance schedule. This can lead to increased engine wear, reduced fuel efficiency, and potentially void parts of your warranty. Resetting the light is the final, crucial step in the maintenance cycle—it’s your way of telling the car’s computer, “The scheduled service is complete, start the new countdown.”
The Difference Between “Maintenance Required” and “Check Engine”
It’s vital to distinguish this light from the more ominous “Check Engine” light (the engine-shaped icon). The Check Engine light indicates an active fault or malfunction detected by the car’s onboard diagnostics (OBD-II) system, often related to emissions, engine performance, or sensor failures. The Maintenance Required light is purely a mileage/time counter. You should never, under any circumstances, reset the Check Engine light without first diagnosing and repairing the underlying issue. The methods for resetting these two lights are completely different. If you’re unsure which light is on, consult your owner’s manual—it’s the definitive source for your specific vehicle’s symbols.
Preparation and Safety First: Before You Touch Anything
Before you dive into the button-pressing sequence, a few moments of preparation will make the process smooth and error-free. This isn’t a complex mechanical task, but it does require your full attention for about 30 seconds. Rushing or pressing the wrong buttons can lead to frustration or accidentally changing other settings.
Visual guide about How to Reset the Maintenance Light on a 2012 Toyota Rav4
Image source: oilreset.com
First, park your RAV4 on a level surface. Engage the parking brake firmly. You do not need to pop the hood or get any tools. This is an electronic reset done entirely from the driver’s seat. Next, insert the key and turn the ignition to the “ON” or “ACC” position. This is the position where all your dashboard lights illuminate, but the engine is not running. Do not start the engine. The entire reset procedure happens with the engine off. If your RAV4 is equipped with a keyless push-button start, press the “ENGINE START/STOP” button twice without touching the brake pedal to put it in “ON” mode.
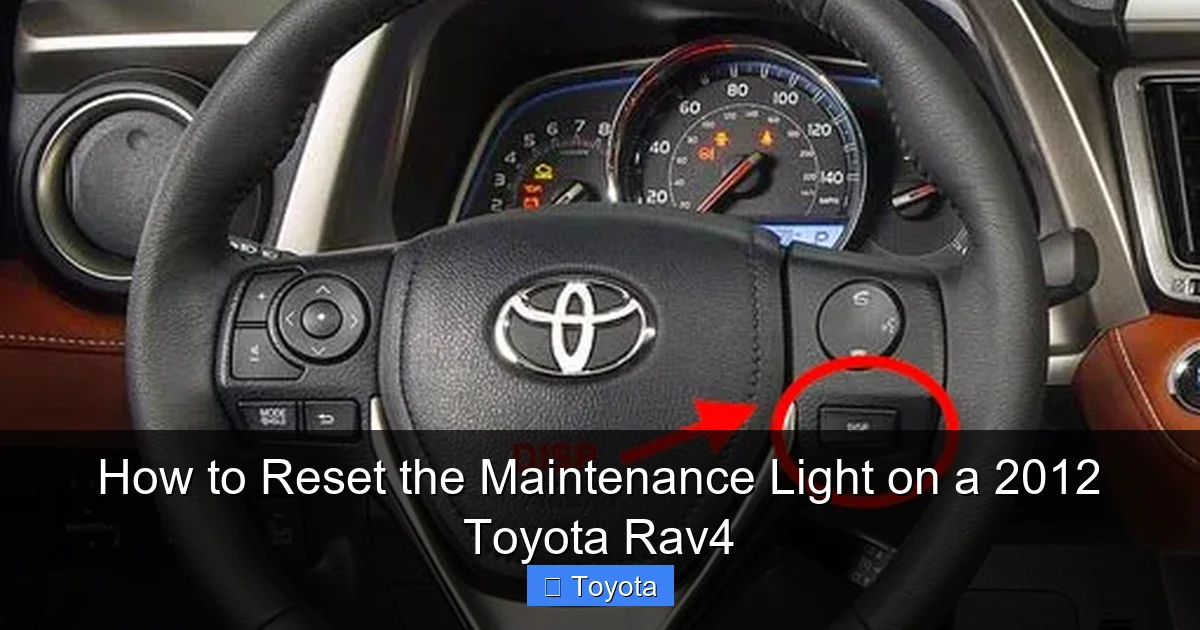
Now, locate your trip meter/odometer reset button. On the 2012 RAV4, this is a small, black plastic stalk protruding from the instrument cluster on the right-hand side of the steering wheel column. You’ll use this button to navigate menus and make selections. Take a second to familiarize yourself with its location and feel. A clear mind and a stable vehicle are your best tools here.
Step-by-Step: The Primary Reset Method (Via Odometer Display)
This is the most common and straightforward method for the 2012 RAV4. It uses the standard odometer/trip meter display screen. The sequence is precise, so follow these steps carefully. The goal is to get the display to show a series of blinking zeros or a “DONE” message.
Visual guide about How to Reset the Maintenance Light on a 2012 Toyota Rav4
Image source: rav4hub.com
Detailed Button-Press Sequence
- Start with ignition ON: Ensure the key is in the “ON” position (all dash lights on, engine off).
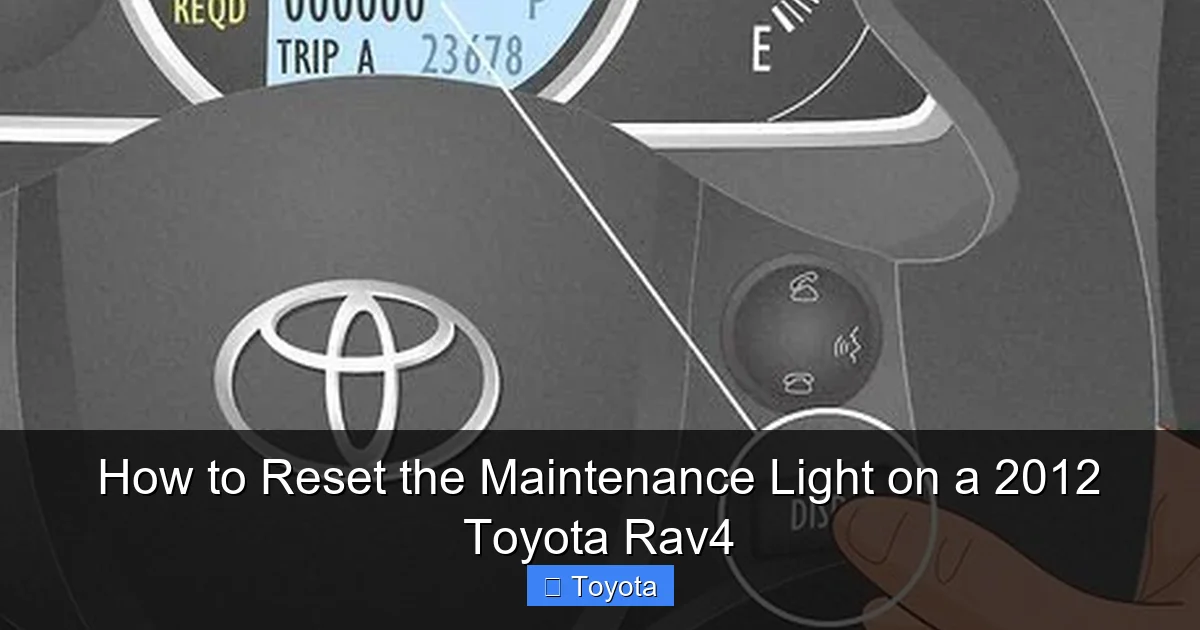
- Display the odometer: Press the stalk button on the steering column once or twice to cycle the display until you see the “ODO” (odometer) reading, not the trip A or B meters.
- Access the settings menu: Now, press and hold the stalk button. Don’t just tap it—hold it down. After about 5-7 seconds, you should see the odometer reading change to “——–” or the display will blink. This is your cue that you’ve entered the settings menu.
- Navigate to the maintenance reset: While still holding the button, the display will cycle through different menu options. You’re looking for a message that says “MAINTENANCE” or may show a wrench icon. Keep the button held until this appears.
- Release and confirm: Once “MAINTENANCE” is displayed, release the button. The display should then change to show a number (like “5000”) or a reset prompt. Quickly press the button again (a single tap). This tap confirms the reset.
- Look for confirmation: The display should then change to “DONE” or a series of zeros (e.g., “000000”) for a few seconds before returning to the normal odometer reading. This “DONE” is your success signal.
- Turn off and verify: Turn the ignition off, wait a few seconds, and turn it back on. The wrench light should be extinguished. Start the engine to be absolutely sure it stays off.
Pro Tip: If you get lost in the menus or it seems to be cycling too fast, simply turn the ignition off, take a breath, and start again from step 1. The system is designed to time out and return to the odometer if you hold the button too long without a selection.
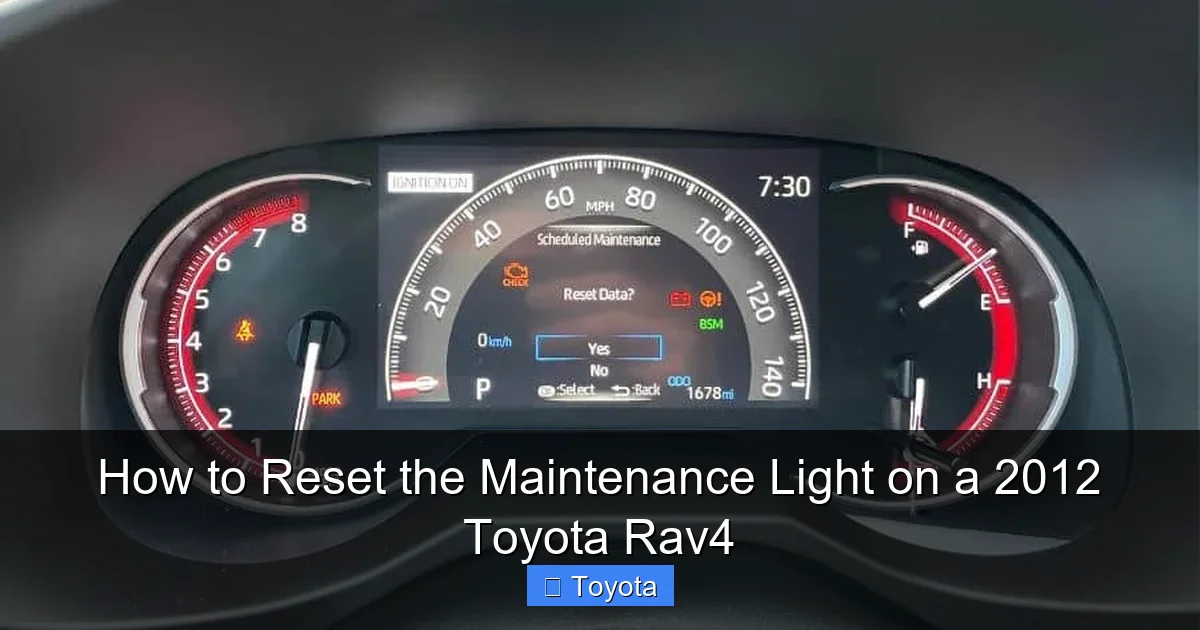
Alternative Procedure: Using the Multi-Information Display (MID)
Some 2012 RAV4 trims, particularly those with a more advanced multi-information display (MID) screen between the speedometer and tachometer, may use a slightly different method. If the primary method above doesn’t seem to work or your display looks different, try this variation. The principle is identical: use the stalk button to navigate and select.
Visual guide about How to Reset the Maintenance Light on a 2012 Toyota Rav4
Image source: wikihow.com
MID-Specific Steps
- With ignition ON, use the stalk button to cycle through the MID displays until you see a screen that shows trip meters, fuel economy, or outside temperature. You’re looking for a screen where you can access a “Settings” or “Menu” option.
- Press and hold the stalk button. On some models, this directly brings up a menu list on the MID. You might see “MAINTENANCE” or “MAINT RESET” in the list.
- Use short presses of the button to scroll through the menu items if necessary. The selection is usually made by holding the button again or by a single press when the desired item is highlighted.
- Once you select the maintenance reset option, the display will ask for confirmation (often “YES” or “NO”). Use the button to toggle to “YES” and hold or press to confirm.
- Success will be indicated by “DONE,” “COMPLETE,” or the wrench icon disappearing from the main display.
Important: Your owner’s manual is the ultimate authority. If these steps don’t work, consult the “Maintenance/Service” or “Instrument Cluster” section of your manual for the exact procedure for your specific VIN and trim package. The difference often comes down to whether your vehicle has a basic odometer-only cluster or a full MID.
After the Reset: What This Means for Your RAV4’s Health
Congratulations! The annoying wrench is gone. But the reset is the final step, not the first. The light should only be reset after you have completed the required maintenance. For a 2012 RAV4, the primary trigger is an oil and filter change. However, the “MAINTENANCE REQUIRED” interval also encompasses other scheduled services listed in your Toyota’s maintenance guide. This includes tire rotation, air filter inspection/replacement, cabin filter replacement, fluid level checks, and brake inspection.
Simply resetting the light without performing these tasks is a false economy. You’re effectively silencing a vital alarm without fixing the problem. The engine will continue to run on old, degraded oil, which loses its lubricating and cooling properties over time. This leads to increased friction, sludge buildup, and ultimately, premature engine wear or failure. The cost of an engine rebuild is astronomically higher than a routine oil change. If you reset the light but haven’t serviced the car, you are gambling with one of your most valuable assets.
For a comprehensive overview of what service is due at specific mileage intervals, refer to the “Scheduled Maintenance” chart in your owner’s manual. If you’ve lost your manual, you can often find digital copies online or request one from a Toyota dealer. Keeping a personal service log alongside the vehicle’s history is also an excellent habit.
Troubleshooting: What to Do If the Light Won’t Reset or Comes Back On
Sometimes, the process doesn’t go as planned. Here are the most common scenarios and how to handle them.
The Light Won’t Turn Off After Following the Steps
First, double-check your procedure. Did you hold the button long enough to enter the menu? Did you see a “DONE” or confirmation message? Try the sequence again, ensuring the ignition is in the correct “ON” position (all dash lights on). If it still refuses, there are a few possibilities:
- The maintenance interval hasn’t been met: The system may be designed to not allow a reset until the required mileage/time has elapsed since the last service. This is rare but possible if the system was not reset after the last oil change.
- Electrical or instrument cluster fault: A blown fuse related to the instrument panel or a malfunction in the cluster itself can prevent the reset command from being received. Check the “INSTR” or “GAUGE” fuse in your under-hood fuse box first.
- Low battery voltage: A weak car battery can sometimes cause electronic glitches. Ensure your battery is healthy, especially if the car has been sitting.
The Light Comes Back On Immediately or Very Soon After Reset
This is a clear red flag. It means the system’s internal counter is not being held at zero. The most likely cause is that the maintenance was not actually performed. The previous owner or shop may have simply reset the light without changing the oil. The system is now counting down from the last reset, not from a true service point. The only solution is to perform the overdue maintenance (at minimum, an oil and filter change) and then attempt the reset again. If it comes back on again quickly after a proper service, there is a serious electronic control module issue that requires a dealer’s diagnostic computer.
For owners of other Toyota SUVs like the Highlander or Avalon, similar troubleshooting logic applies, but the specific menu structures can differ.
Common Mistakes and Pitfalls to Avoid
Even with the best instructions, it’s easy to make a small error that derails the process. Knowing these pitfalls beforehand will save you time and frustration.
- Pressing the wrong button: The RAV4 has several stalks and buttons. Ensure you are using the trip meter/odometer reset button on the right side of the steering column. The turn signal lever and wiper controls on the left are not used for this.
- Not holding the button long enough: The initial press-and-hold is the gateway to the hidden menu. A quick tap won’t do it. You must hold it for 5-7 seconds until the display changes.
- Letting go too soon: Once you see “MAINTENANCE” or the wrench icon, you must release the button before pressing again to confirm. Holding it through the confirmation step often just cycles to the next menu item.
- Confusing the “Trip A” and “ODO” displays: The reset sequence typically starts from the main odometer (“ODO”) reading, not the trip meter “A” or “B.” If you start on a trip meter, the sequence may not work or may reset the trip meter instead.
- Attempting with the engine running: Always perform this with the engine off and the key in the “ON” position. Having the engine running can sometimes lock out certain menu functions or is simply not the state the system expects for a reset.
- Ignoring the underlying reason: The biggest mistake of all is using this guide as a “how to turn off the light” without addressing the “why.” This guide is for resetting the reminder after service. Using it to avoid service is detrimental to your vehicle.
When to Seek Professional Help: Don’t Gamble with Your Engine
While resetting the light is a DIY task, there are clear instances where you should stop and call a professional. If you have followed the correct procedure meticulously for your specific 2012 RAV4 and the light refuses to extinguish, the problem likely lies beyond a simple button sequence. This could indicate a fault in the Engine Control Unit (ECU), a problem with the instrument cluster circuitry, or a deeper electrical issue.
Furthermore, if the light comes back on within 100-200 miles of a reset, it’s a strong signal that the maintenance was not performed correctly or that there is an underlying mechanical issue causing excessive wear. For example, a severely clogged oil filter or using the wrong oil grade could cause the system’s logic to flag an issue. A certified Toyota technician has access to the proprietary diagnostic software (like Techstream) that can communicate directly with the vehicle’s modules. They can verify the maintenance interval status, check for any stored fault codes unrelated to the maintenance light, and ensure the system is functioning as intended.
Remember, the cost of a professional diagnostic is minimal compared to the potential cost of catastrophic engine failure. Your safety and your RAV4’s longevity are worth more than saving a few dollars on a DIY reset that might mask a bigger problem.
Final Word: Your 2012 Toyota RAV4 is known for its reliability. Part of that reputation comes from adhering to its maintenance schedule. The Maintenance Required light is your faithful assistant in that endeavor. By understanding its purpose, performing the required service with quality parts and oil, and then correctly resetting the light, you are actively participating in ensuring your RAV4 provides you with many more years of safe, dependable, and enjoyable driving. For owners of different models, such as those needing to turn off the maintenance light on a Toyota in general, the core principles remain the same: service first, reset second.
Frequently Asked Questions
Can I reset the maintenance light on my 2012 RAV4 without changing the oil?
Technically, yes, you can follow the button sequence to turn the light off. However, this is strongly discouraged and harmful. The light is a critical reminder that your engine needs fresh oil. Resetting it without performing the service means your engine will continue running on degraded oil, leading to increased wear and potential severe damage. Always perform the required maintenance first.
What is the difference between the “Maintenance Required” light and the “Check Engine” light on my RAV4?
The “Maintenance Required” light (wrench icon) is a simple mileage-based timer reminding you of scheduled service like oil changes. The “Check Engine” light (engine icon) indicates an active fault or malfunction detected by the car’s computer, often related to emissions, engine performance, or sensor issues. You should only reset the Check Engine light after a professional diagnosis and repair.
Why does my maintenance light come back on right after I reset it?
If the light returns very quickly (within 50-100 miles), it almost always means the maintenance was not actually performed. The previous person likely only reset the light without changing the oil or completing the service. The system is counting down from the last reset, not from a true service point. Perform the correct maintenance (oil/filter change) and then reset it again.
I followed the steps exactly, but my 2012 RAV4’s light won’t reset. What now?
First, triple-check you’re using the correct button (right-side stalk) and holding it long enough to enter the menu. Ensure you’re starting from the main “ODO” display, not a trip meter. If it still fails, there may be an electrical issue like a blown “INSTR” fuse, a weak battery, or a fault in the instrument cluster or ECU. A professional diagnosis is recommended.
Does the maintenance light on my 2012 RAV4 only mean I need an oil change?
While the most common trigger is the 5,000-mile oil change interval, the “Maintenance Required” system is also tied to other scheduled services. This includes tire rotations, air filter/cabin filter replacements, and various inspections as outlined in your owner’s manual’s maintenance schedule. The light coming on means one or more of these service items is due.
Is it safe to drive my RAV4 with the maintenance light on?
It is generally safe to drive for a short distance (a few hundred miles) to reach your trusted mechanic or service center. The light is a warning, not an immediate “stop driving” signal like an oil pressure warning. However, you should address the reminder as soon as possible. Prolonged driving with the light on means you are operating past the manufacturer’s recommended service interval, which increases the risk of engine wear and other problems.


