
How to Reset Maintenance Required on a Toyota Corolla
Contents
- 1 Key Takeaways
- 2 📑 Table of Contents
- 3 Understanding the Maintenance Required Light on Your Toyota Corolla
- 4 Preparing to Reset: What You Need to Know First
- 5 Method 1: The Classic Button Sequence Reset (For Most Pre-2019 Models)
- 6 Method 2: Resetting with an OBD2 Scanner (For Newer Models and Troubleshooting)
- 7 When to Reset (and When You Shouldn’t)
- 8 After the Reset: Verification and Best Practices
- 9 Conclusion: A Simple Task for a Healthy Car
- 10 Frequently Asked Questions


The “maintenance required” light on your Toyota Corolla is a service reminder, not an emergency. You can reset it yourself after completing the necessary maintenance, like an oil change. The process involves a simple button sequence for most models, though newer ones may require an OBD2 scanner. Always ensure the actual service is performed before resetting the light to keep your car healthy.
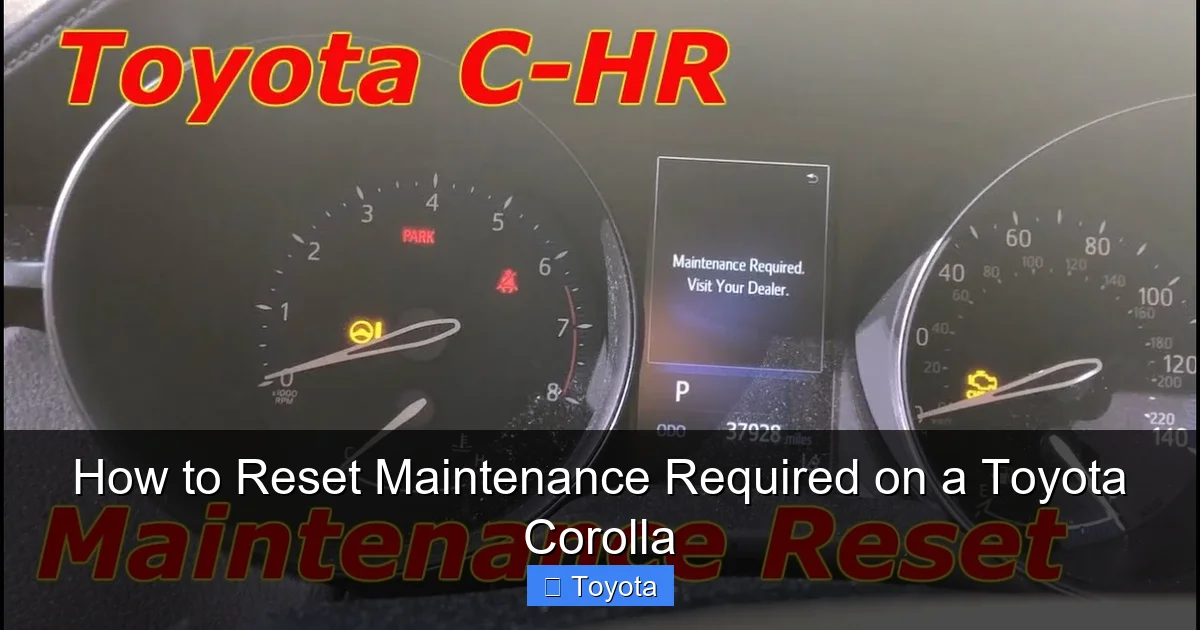
That little wrench icon glowing on your dashboard. It’s not the check engine light, but it’s just as persistent. For Toyota Corolla owners, the “maintenance required” light is a friendly—if sometimes ignored—nudge from your car. It’s telling you it’s time for some TLC, usually an oil change or other scheduled service. But once you’ve actually done the work, that light needs to go away. Leaving it on defeats the purpose and can be a constant distraction. The good news? Resetting it is a straightforward DIY task for most Corolla owners. You don’t need to be a mechanic. This guide will walk you through everything you need to know, from what that light truly means to the exact button presses or scanner steps for your specific model year. Let’s get that wrench off your dash and restore your peace of mind.
Key Takeaways
- The light is a mileage-based reminder: The wrench icon illuminates after a set interval (typically 5,000 miles) to remind you of scheduled maintenance like oil changes, tire rotations, or inspections.
- Two primary reset methods exist: Most Corollas (pre-2019) use a manual button/odometer sequence. Many 2019+ models require an OBD2 scanner due to updated software.
- Never reset without performing maintenance: Resetting the light without changing oil or addressing other services can lead to engine damage and voids your warranty. The light is a tool for your car’s health, not just an annoyance.
- Your model year dictates the procedure: The exact steps vary significantly between generations. Identify your Corolla’s model year before starting to avoid confusion.
- Post-reset verification is crucial: After resetting, start the engine and check that the wrench icon is off and the odometer displays normal information. A recurring light indicates a problem or incomplete reset.
- Professional help is always an option: If you’re uncomfortable or the reset fails, a dealer or mechanic can reset it quickly during a service visit, ensuring it’s done correctly.
📑 Table of Contents
- Understanding the Maintenance Required Light on Your Toyota Corolla
- Preparing to Reset: What You Need to Know First
- Method 1: The Classic Button Sequence Reset (For Most Pre-2019 Models)
- Method 2: Resetting with an OBD2 Scanner (For Newer Models and Troubleshooting)
- When to Reset (and When You Shouldn’t)
- After the Reset: Verification and Best Practices
- Conclusion: A Simple Task for a Healthy Car
Understanding the Maintenance Required Light on Your Toyota Corolla
Before we dive into the “how,” let’s talk about the “why.” The maintenance required system in your Corolla isn’t a complex computer diagnosis. It’s an elegant, mileage-based timer built into the instrument cluster. Think of it as a highly reliable kitchen timer that gets set when you last had your car serviced.
What That Wrench Icon Really Means
When you see that wrench symbol illuminate, often alongside the words “MAINTENANCE REQUIRED,” your Corolla is simply counting down from a preset number of miles. This interval is typically 5,000 miles for oil changes in most modern Corollas, but it can also be programmed for other services like tire rotations, cabin air filter changes, or comprehensive inspections, depending on your maintenance schedule. It does not mean something is immediately broken. It’s a proactive reminder, a preemptive strike against neglect. Ignoring it is like ignoring the “change oil” sticker your mechanic puts on your windshield—eventually, your engine will let you know in a much more expensive way.
How the System Tracks Your Service Intervals
The system’s memory is stored in your car’s computer. When a certified technician performs a service, they often use a scan tool to reset this counter to zero. If you do the work yourself or take it to a shop that doesn’t reset it, the counter keeps ticking up from its last reset point. Once it reaches the predetermined mileage (say, 5,000 miles after the last reset), the wrench light comes on. This system is separate from your check engine light, which monitors emissions and engine performance issues in real-time. The maintenance light is purely a mileage counter, making it safe and simple to reset once the underlying service is complete.
Preparing to Reset: What You Need to Know First
Jumping into the reset process without preparation is a recipe for frustration. Taking five minutes to set the stage will save you time and ensure success.
Visual guide about How to Reset Maintenance Required on a Toyota Corolla
Image source: i.ytimg.com
Safety First: Why You Shouldn’t Reset Without Maintenance
This cannot be stressed enough: only reset the maintenance required light after you have completed the specific service it is reminding you of. The most common reminder is for an engine oil and filter change. Driving with old, degraded oil causes excessive engine wear, reduces fuel efficiency, and can lead to catastrophic engine failure. Resetting the light without changing the oil is like erasing a to-do list without doing the task—the work still needs to be done, and now you’ve lost your reminder. If your Corolla is due for a multi-point inspection, resetting the light skips that crucial safety check of belts, hoses, brakes, and fluids. Always perform the required service first. If you’re unsure what service is due, consult your owner’s manual or a trusted mechanic.
Tools and Information to Have Ready
For the manual button method, you need nothing but your car keys and your fingers. For the scanner method, you’ll need an OBD2 scanner that has the capability to access the Toyota maintenance system, not just read engine codes. Not all cheap universal scanners have this function. Popular options include the Autel, Launch, or even the more affordable but capable Bluetooth adapters paired with a smartphone app like Torque Pro (though app compatibility varies). Also, have your owner’s manual handy. While this guide covers the general process, your manual has the definitive steps for your exact model year and trim.
Model Year Differences: The Critical Divide
This is the most important preparation step. The reset procedure changed dramatically with the 2019 model year when Toyota introduced the current generation (E210 series). For 2014-2018 Corollas (older models), you will almost always use the manual odometer/button sequence. For 2019 and newer Corollas (current models), you will almost always need an OBD2 scanner to reset the maintenance light. There are rare exceptions, so if you have a 2019+ model, check your owner’s manual first. Attempting the old button sequence on a new Corolla will not work and can cause confusion. Knowing your model year is step zero.
Method 1: The Classic Button Sequence Reset (For Most Pre-2019 Models)
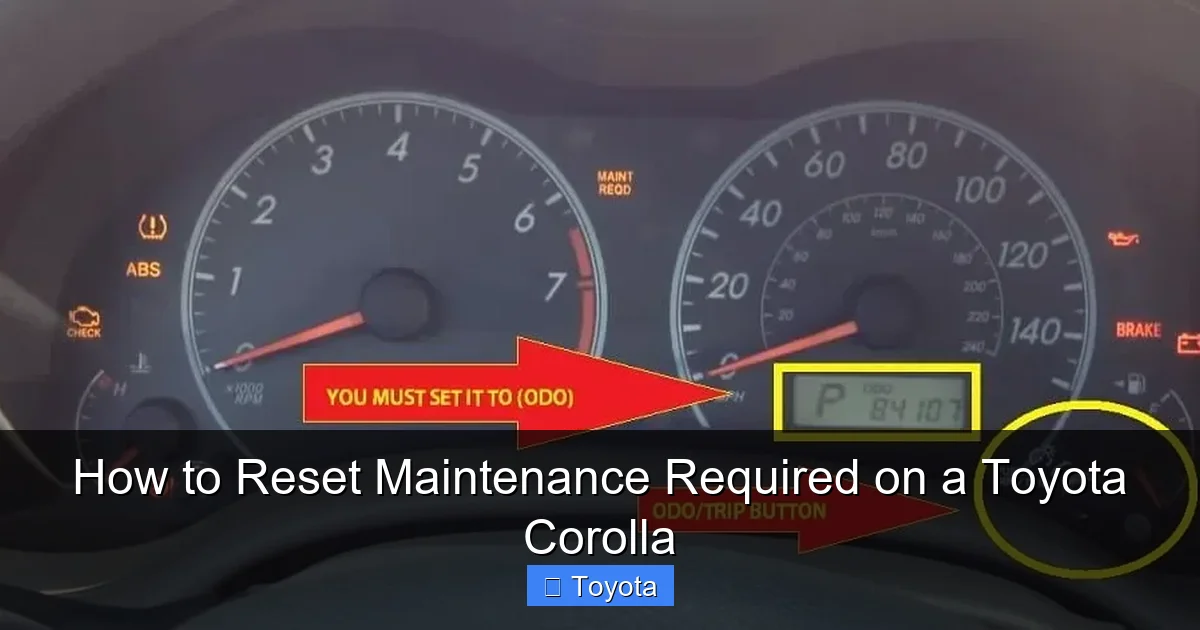
If your Corolla is from the 2014 through 2018 model years, you hold the golden ticket to a simple, no-tool reset. The process uses the odometer/trip meter button on your dashboard. It’s a quick dance of button presses that you can master in 30 seconds.
Step-by-Step for 2014-2018 Corollas
Here is the universal procedure for these model years. Make sure the car is parked, the engine is OFF, and the key is in the OFF position or removed. For push-button start models, do not press the brake pedal or start button.
- Turn the ignition to the “ON” position. This is the position right before you start the engine—all dash lights should be on, but the engine is not running. For keyless models, press the “START/STOP” button twice without touching the brake pedal.
- Locate the “ODO/TRIP” button. This is the small button on your instrument cluster, usually on the lower left or right side of the speedometer. It toggles between the odometer and trip meter readings.
- Turn the ignition OFF. Now turn the key back to the OFF position or press the start button once to turn the car completely off.
- Press and hold the “ODO/TRIP” button. While holding it down, turn the ignition back to the “ON” position (step 1). Keep holding the button.
- Watch the odometer display. After a few seconds, the display will change. You might see dashes “—–” or a series of zeros. Continue holding the button until you see the word “DONE” or the wrench icon blink and go out.
- Release the button and turn the ignition OFF. Release the button, turn the car off, then start the engine normally to verify the light is off.
Pro Tip: If it doesn’t work the first time, repeat the sequence carefully. Ensure you are holding the button long enough during step 5. The display change can be subtle.
The Updated Process for 2019 and Newer Models (Without a Scanner)
Some 2019+ Corollas surprisingly still have a hidden manual reset, but it’s inconsistent and not documented in official manuals. The reliable method for this generation is unequivocally the OBD2 scanner. If you find a forum post describing a button sequence for a 2020 Corolla, treat it with extreme caution—it may not work for your specific VIN or could be for a different market. Your safest bets are: 1) Use an OBD2 scanner, or 2) Have a dealer/shop reset it during your service. Don’t waste hours trying elusive button combinations. For a reliable reset on these models, proceed to Method 2.
Method 2: Resetting with an OBD2 Scanner (For Newer Models and Troubleshooting)
For 2019+ Corollas, and as a foolproof method for any model if the button sequence fails, an OBD2 scanner is your tool. The port is under the dashboard, just to the left of the steering column. Any OBD2-compliant scanner will plug in, but you need one that can access the “Global OBD” or “Powertrain” menus and specifically has a function for “Maintenance Reset” or “Service Reset” for Toyota.
Visual guide about How to Reset Maintenance Required on a Toyota Corolla
Image source: i0.wp.com
Why Some Models Require a Scanner
Toyota updated the instrument cluster software in the E210 platform (2019+) to make the system more integrated and secure. The manual reset sequence was removed from most North American models to ensure the light is only reset by a professional-grade tool or a knowledgeable technician. This prevents owners from accidentally or ignorantly resetting the light without performing the service. It’s a shift in philosophy, but it means DIYers need a capable scanner. If you own a 2019+ Corolla, investing in a $30-$50 scanner with maintenance reset functions (like the Autel AL319 or similar) is worthwhile for this and other future tasks.
Detailed Scanner Reset Procedure
The steps are generally the same across scanners, though menu names vary.
- Plug in the scanner. Turn the ignition to the “ON” position (engine off). Plug the scanner’s OBD2 connector into the port under your dash.
- Power on the scanner. The device will communicate with your car’s computer. Navigate through the menus. You are looking for options like: “Diagnostic,” “Global OBD,” “Vehicle Info,” or “Maintenance.”
- Select the “Maintenance” or “Service Reset” function. The scanner will ask you to confirm the vehicle make, model, and year if it doesn’t auto-detect. Select “Toyota,” “Corolla,” and your correct model year.
- Choose the specific reset. You may see options like “Oil Maintenance Reset,” “Service Due Reset,” or simply “Maintenance Required Reset.” Select the one that corresponds to the wrench light.
- Follow the prompts. The scanner will likely ask you to confirm. It may display the current mileage since last reset. Confirm you want to reset it. A successful reset will usually show a “DONE,” “COMPLETED,” or “SUCCESSFUL” message.
- Turn the ignition OFF, unplug the scanner, and start the car. Verify the wrench light is extinguished.
Important: If your scanner cannot find a maintenance reset option for your 2019+ Corolla, it may not have the necessary software. You may need a more advanced scanner or a professional tool. In this case, your best option is to have it reset at a dealership or reputable repair shop.
When to Reset (and When You Shouldn’t)
Timing is everything. Knowing the right and wrong moments to hit that reset button protects your investment and ensures your safety.
The Right Time: After Certified Maintenance
The only appropriate time to reset the maintenance required light is immediately after you or a professional has completed the service that the light is indicating. For 99% of owners, this means after an oil and filter change. If your light came on at 5,000 miles, you change the oil, then you reset the counter to zero so the next 5,000-mile countdown begins. If your car is due for a 30,000-mile major service that includes spark plugs, air filter, and fluid checks, complete all those tasks first, then reset. The light is a tally mark for your car’s maintenance history, not a standalone switch.
Red Flags: When the Light Might Indicate a Real Problem
While rare, the maintenance required light can sometimes behave differently. If the light comes on very shortly after a reset—say, within 500 miles—it could indicate a faulty sensor or a problem with the system’s memory. More importantly, if the light is flashing (which is uncommon for this system) or if it comes on along with other warning lights, stop driving and consult a professional. Also, if you have performed all due maintenance and the light returns immediately after a reset, there may be an underlying electrical issue. In these cases, a proper diagnosis with a professional scanner is needed. Remember, this light is separate from the check engine light. For issues related to engine performance or emissions, you’d be dealing with a check engine light reset, which is a different procedure altogether.
Comparing to Other Models: A Quick Look at Toyota’s System
It’s fascinating how consistent yet varied Toyota’s maintenance reminder systems are. Your Corolla’s process is very similar to a Toyota Yaris or Toyota Avalon from the same era. However, larger vehicles like the Toyota RAV4 or Toyota Highlander might have slightly different button locations or scanner requirements due to different instrument clusters. The core principle—a mileage-based timer—remains identical across the lineup. This means once you master your Corolla, you could likely help a friend with a similar-year Camry or Tacoma. For a deep dive into the universal Toyota system, you can explore how to reset the maintenance required light on any Toyota, which covers foundational concepts.
After the Reset: Verification and Best Practices
You’ve pressed the buttons or scanned the system. The light is off. You’re done, right? Not quite. A few final steps ensure everything is truly in order.
How to Confirm the Reset Was Successful
Do not just assume the light stayed off. Perform this verification ritual:
- Start the engine. Turn the key or press the start button. Let the dash perform its startup bulb check. The wrench icon should not reappear after the test.
- Cycle through the odometer displays. Use your “ODO/TRIP” button to scroll through the odometer, trip A, and trip B. Ensure no service message is hidden in a sub-menu.
- Drive for a short distance. Take the car for a 5-10 minute drive around the block. Sometimes a light will flicker back on if the reset wasn’t fully registered. A successful reset will stay off.
- Note the odometer reading. Make a mental or physical note of the current mileage. This is your new baseline. Your next service will be due at this reading + 5,000 miles (or your manufacturer’s interval).
Setting Reminders for Your Next Service
Now that the counter is at zero, you have a fresh 5,000-mile window. Don’t let this be the last time you think about maintenance. Set a calendar reminder on your phone for 4,500 miles from now. Write it on the sticker you’ll put on your windshield (if you use one). The whole point of the system is to give you a buffer. Getting the service done *before* the light comes on is ideal. This proactive approach saves money on premature wear and prevents that anxious feeling of driving with a warning light on.
Common Mistakes That Cause the Light to Return Prematurely
If your light comes back too soon, here’s what to check:
- Incomplete Service: Did you change the oil but forget to reset the light? (Unlikely, but possible if you had a shop do the work).
- Wrong Reset Procedure: You may have used the sequence for a different model year. Double-check your Corolla’s year.
- Faulty Odometer/Button: Rarely, the “ODO/TRIP” button or its internal contact can fail, preventing the signal from reaching the computer.
- Low Battery Voltage: If your car battery is weak or was disconnected during the reset, the system might not save the new zero point. Ensure the battery is healthy.
- Software Glitch: Like any computer, the instrument cluster can have a hiccup. A full battery disconnect (negative terminal for 10 minutes) can sometimes clear a stuck light, but this also resets other settings like radio presets and clock.
If you’ve verified the service was done and the correct procedure was followed, but the light persists, it’s time to consult a professional. There may be a deeper issue with the maintenance reminder module itself.
Conclusion: A Simple Task for a Healthy Car
Resetting the maintenance required light on your Toyota Corolla is a empowering little DIY project. It connects you to your vehicle’s needs and reinforces the habit of regular service. Remember the golden rule: service first, reset second. Identify your model year correctly—pre-2019 owners can enjoy the simple button dance, while 2019+ owners should have a compatible OBD2 scanner ready or plan to have it done during their service. By following the clear steps outlined here, you can quickly clear that wrench from your dashboard, restore your instrument cluster to its clean, uncluttered state, and drive with the confidence that your Corolla is on a proper maintenance schedule. Your car thanks you in longevity and reliability.
Frequently Asked Questions
Can I reset the maintenance required light without getting an oil change?
Technically yes, but you should never do this. The light is a critical service reminder. Resetting it without performing the required maintenance, especially an oil change, risks severe engine damage and voids your warranty. The system is designed to protect your engine, not to be ignored.
Why does the maintenance required light keep coming back after I reset it?
If the light returns immediately or very soon after a reset, there are a few likely causes: 1) The reset procedure was not completed correctly for your specific model year. 2) The underlying service (like an oil change) was not actually performed. 3) There is a fault in the maintenance reminder system itself, which requires professional diagnosis.
How many miles can I drive after the maintenance required light comes on?
The light illuminates at a preset interval, typically 5,000 miles for oil changes in modern Corollas. It is designed to give you a buffer to schedule and complete the service. You should plan to have the service done within 1,000 miles of the light coming on to avoid excessive engine wear. Driving long distances with the light on means you’re operating past your recommended service interval.
Is the maintenance required light the same as the check engine light?
No, they are completely different systems. The maintenance required light (wrench icon) is a simple mileage-based reminder for scheduled services like oil changes. The check engine light (usually an engine-shaped icon) indicates a problem with the engine’s emissions or performance system detected by the car’s computer and requires immediate diagnosis. Their reset procedures are also different.
Do I need a special tool to reset the light on a 2022 Toyota Corolla?
Yes, for almost all 2019 and newer Corollas, including the 2022 model, you will need an OBD2 scanner that has the specific function to access and reset the Toyota maintenance system. The old manual button sequence used in pre-2019 models does not work on these newer cars. A basic code-only scanner will not suffice.
What should I do if the reset procedure doesn’t work for my Corolla?
First, double-check that you are using the correct procedure for your exact model year. If you have a 2019+ model and are trying the button method, it will fail—you need a scanner. If you have the correct method and it still fails, ensure your car’s battery is healthy. If the problem persists, the maintenance reminder module may be faulty. The best course of action is to have a Toyota dealer or a qualified mechanic reset it with their professional diagnostic tools and inspect the system.


