How to Replace a Subaru Battery
Contents
- 1 Key Takeaways
- 2 📑 Table of Contents
- 3 Why Replacing Your Subaru Battery Matters
- 4 Signs It’s Time to Replace Your Subaru Battery
- 5 Tools and Materials You’ll Need
- 6 Step-by-Step Guide to Replacing Your Subaru Battery
- 7 Choosing the Right Battery for Your Subaru
- 8 Post-Installation Tips and Maintenance
- 9 Common Mistakes to Avoid
- 10 Conclusion
- 11 Frequently Asked Questions

Car Window Tint Film

Side Mirror Rain Guard

Car LED Headlight Bulb

Jumper Cables
Replacing a Subaru battery is simpler than you think—and doing it yourself can save you time and money. With the right tools, safety precautions, and a clear process, most Subaru owners can complete this task in under 30 minutes.
Key Takeaways
- Turn off the engine and remove the key: Always start by ensuring the vehicle is off and the key is out of the ignition to prevent electrical shorts or accidental starts.
- Use proper safety gear: Wear gloves and safety glasses to protect against battery acid and sparks during the replacement process.
- Disconnect the negative terminal first: This reduces the risk of short circuits when handling metal tools near the battery.
- Check battery compatibility: Ensure the new battery matches your Subaru’s specifications, including group size, cold cranking amps (CCA), and reserve capacity.
- Reset electronic settings after installation: Replacing the battery may reset radio presets, clock, and other systems—be prepared to reconfigure them.
- Dispose of the old battery responsibly: Most auto parts stores accept used batteries for recycling at no cost.
- Test the new battery and charging system: After installation, start the car and consider a voltage test to confirm everything is working properly.
📑 Table of Contents
Why Replacing Your Subaru Battery Matters
Your Subaru’s battery is the heart of its electrical system. It powers everything from the engine starter to the infotainment screen, climate controls, and safety features like airbags and ABS. When that battery starts to fail, you might notice slow engine cranks, dim headlights, or warning lights on the dashboard. Ignoring these signs can leave you stranded—especially in cold weather, when batteries are under the most stress.
Replacing a Subaru battery isn’t just about convenience; it’s about reliability and safety. A weak battery can cause erratic behavior in modern electronics, including false error codes or even prevent the car from starting altogether. The good news? Unlike some car repairs that require specialized tools or dealership visits, battery replacement is one of the most DIY-friendly maintenance tasks you can perform. With a few basic tools and a little know-how, you can replace your Subaru’s battery at home in less than an hour.
Whether you drive a Forester, Outback, Impreza, or Crosstrek, the process is largely the same across Subaru models. This guide will walk you through every step—from identifying when it’s time for a new battery to safely installing and testing the replacement. You’ll also learn how to choose the right battery, avoid common mistakes, and keep your Subaru running smoothly for years to come.
Signs It’s Time to Replace Your Subaru Battery
Before diving into the replacement process, it’s important to confirm that your battery actually needs replacing. Not every starting issue is battery-related—alternator problems, faulty starters, or corroded cables can mimic battery failure. But there are several telltale signs that point directly to a dying battery.

Visual guide about How to Replace a Subaru Battery
Image source: images.simplepart.com
Slow Engine Crank
One of the most common symptoms is a slow or labored engine crank when you turn the key. If your Subaru used to start instantly but now takes a few seconds—or makes a clicking sound—it’s likely the battery isn’t delivering enough power. This is especially noticeable in cold weather, as low temperatures reduce a battery’s efficiency.
Dimming Lights and Electrical Issues
Pay attention to your headlights, interior lights, and dashboard indicators. If they flicker or appear dimmer than usual, especially when the engine is idling, your battery may be struggling to maintain voltage. You might also notice that power windows move slowly or the radio resets unexpectedly.
Check Engine or Battery Warning Light
Modern Subarus are equipped with sophisticated onboard diagnostics. If the battery warning light (often shaped like a battery or labeled “ALT” or “CHG”) appears on your dashboard, it could indicate a charging system issue—but a weak battery is often the root cause. Similarly, a generic “Check Engine” light can sometimes be triggered by low system voltage.
Swollen or Leaking Battery Case
Physically inspect your battery. If the case appears bloated, cracked, or leaking fluid, it’s time for a replacement immediately. Swelling usually indicates overcharging or extreme heat exposure, both of which can damage the internal components and pose a safety risk.
Age of the Battery
Even if your battery seems to be working fine, most car batteries last between 3 to 5 years. If your Subaru’s battery is older than four years, consider proactively replacing it—especially if you live in a climate with harsh winters or summers. Preventative replacement can save you from being stranded unexpectedly.
Failed Load Test
Many auto parts stores offer free battery testing. A load test measures how well the battery holds a charge under stress. If the test shows low cranking amps or voltage drop, it’s a clear sign the battery needs replacing—even if it still starts the car occasionally.
Tools and Materials You’ll Need
Before you begin, gather all the necessary tools and materials. Having everything ready will make the process smoother and safer. Most of these items are inexpensive and commonly found in home toolkits.

Visual guide about How to Replace a Subaru Battery
Image source: images.simplepart.com
Basic Hand Tools
You’ll need a set of wrenches or socket drivers, typically in 10mm and 12mm sizes, to remove the battery hold-down clamp and terminal connections. A ratchet with extensions can help reach tight spaces, especially in compact engine bays like those in the Impreza or WRX.
Safety Gear
Always wear protective gloves and safety glasses. Car batteries contain sulfuric acid, which can cause chemical burns if it contacts your skin or eyes. Even if you don’t see visible leaks, accidental spills can occur when handling the battery.
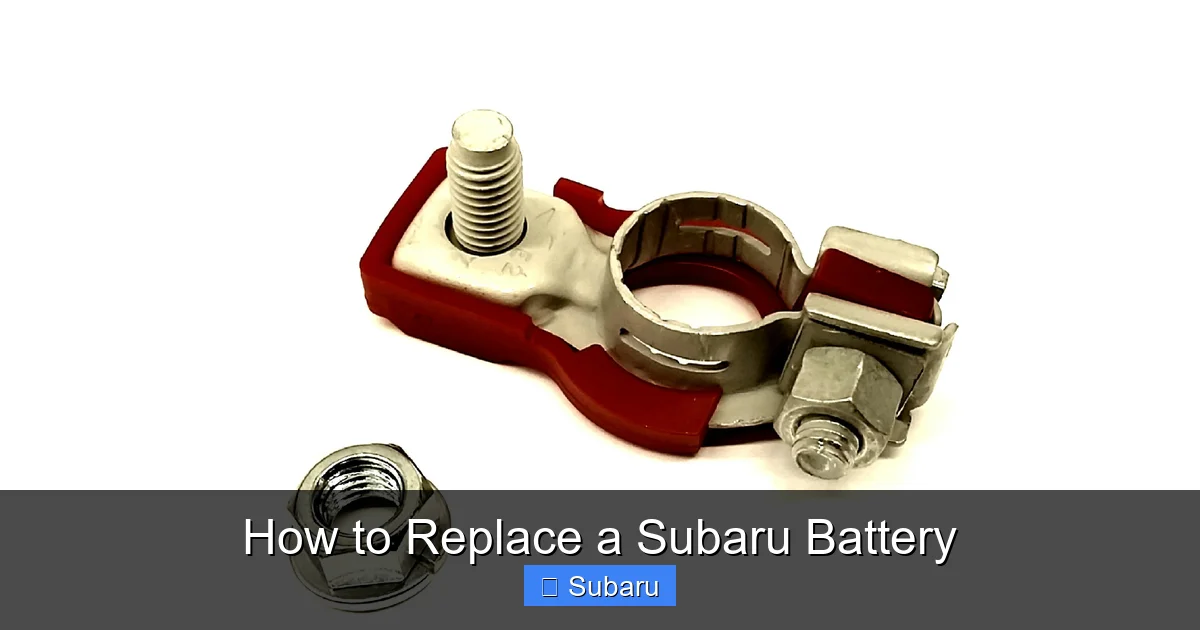
Battery Terminal Cleaner (Optional)
If your terminals are corroded, a wire brush or terminal cleaner tool can help remove buildup. Corrosion appears as a white, powdery substance around the terminals and can interfere with electrical connections. Cleaning them ensures a solid connection with your new battery.
New Battery
Make sure you purchase the correct replacement battery for your specific Subaru model and year. Check your owner’s manual or the label on the old battery for the group size (e.g., Group 35, Group 24F), cold cranking amps (CCA), and reserve capacity (RC). Popular brands like Interstate, Optima, and Subaru OEM batteries are reliable choices.
Battery Terminal Protector Spray (Optional)
After installation, applying a thin layer of terminal protector spray or petroleum jelly can help prevent future corrosion and ensure long-lasting connections.
Memory Saver (Optional but Recommended)
A memory saver is a small device that plugs into your OBD2 port or cigarette lighter and maintains power to your car’s electronics while the battery is disconnected. This prevents the loss of radio presets, seat memory, and other settings. If you don’t have one, be prepared to reset these features manually.
Step-by-Step Guide to Replacing Your Subaru Battery
Now that you’ve confirmed the need for a new battery and gathered your tools, it’s time to get started. Follow these steps carefully to ensure a safe and successful replacement.
Visual guide about How to Replace a Subaru Battery
Image source: images.simplepart.com
Step 1: Park Safely and Prepare the Vehicle
Park your Subaru on a flat, level surface and engage the parking brake. Turn off the engine and remove the key from the ignition. If your vehicle has a push-button start, make sure it’s in the “off” position and the key fob is away from the car to prevent accidental activation.
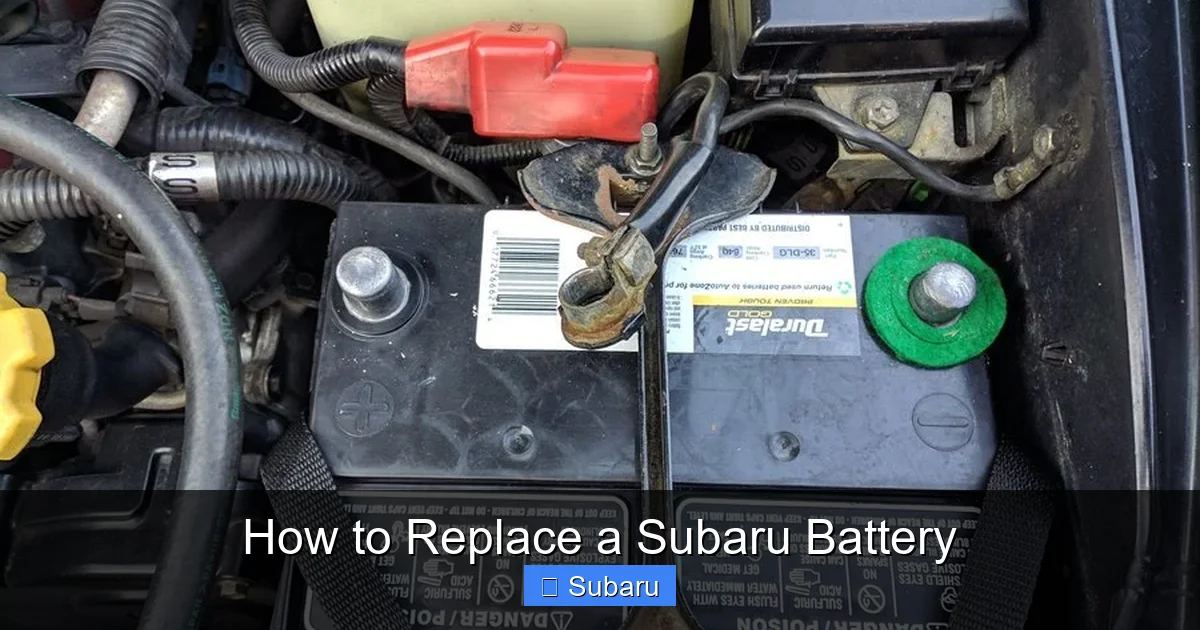
Open the hood and locate the battery. In most Subaru models, the battery is on the driver’s side of the engine bay. It’s a rectangular box with two thick cables attached—one red (positive) and one black (negative).
Step 2: Disconnect the Negative Terminal First
Always disconnect the negative (black) terminal before the positive (red) one. This reduces the risk of short circuits. Use your wrench or socket to loosen the nut on the negative terminal clamp. Once loose, carefully wiggle the clamp off the battery post. Tuck it aside so it doesn’t accidentally touch the terminal or any metal part of the car.
Pro Tip: If the terminal is stuck, gently rock it back and forth rather than prying it. Forcing it can damage the battery post or cable.
Step 3: Disconnect the Positive Terminal
Repeat the process for the positive (red) terminal. Loosen the nut and remove the clamp. Again, keep it away from any metal surfaces to avoid sparks.
Step 4: Remove the Battery Hold-Down Clamp
Most Subaru batteries are secured by a metal or plastic hold-down clamp bolted to the battery tray. Use your wrench to remove the bolt(s). Once the clamp is loose, lift it off and set it aside.
Step 5: Lift Out the Old Battery
Batteries are heavy—typically 30 to 50 pounds—so use proper lifting technique. Bend your knees, keep your back straight, and lift with your legs. If the battery is stuck due to corrosion or age, gently rock it side to side to break it free.
Once removed, place the old battery in a sturdy container or on a non-conductive surface. Never place it directly on concrete, as this can discharge it further.
Step 6: Clean the Battery Tray and Terminals
Inspect the battery tray for dirt, corrosion, or debris. Use a wire brush or cloth to clean it thoroughly. If there’s heavy corrosion, mix baking soda and water to neutralize the acid, then wipe it clean with a damp rag.
Also clean the cable terminals with a wire brush to ensure a solid connection with the new battery.
Step 7: Install the New Battery
Place the new battery into the tray, ensuring it’s oriented correctly—the positive and negative terminals should match the cable positions. Most Subaru batteries have the positive terminal on the right side when facing the driver’s side.
Reinstall the hold-down clamp and tighten the bolt securely. The battery should not move when shaken.
Step 8: Reconnect the Terminals
This time, connect the positive (red) terminal first. Slide the clamp onto the post and tighten the nut firmly. Then connect the negative (black) terminal and tighten it as well.
Important: Never reverse the order—connecting the negative first can cause a dangerous short if your wrench touches both the terminal and a metal part of the car.
Step 9: Apply Terminal Protection (Optional)
If desired, spray a light coat of terminal protector or apply a thin layer of petroleum jelly to both terminals. This helps prevent future corrosion.
Step 10: Start the Engine and Test
Close the hood and start your Subaru. The engine should fire up smoothly. Let it run for a few minutes to allow the alternator to charge the new battery.
Check that all electrical systems are working—lights, radio, climate control, etc. If you used a memory saver, your settings should be preserved. If not, you may need to reset the clock, radio presets, and driver seat positions.
Choosing the Right Battery for Your Subaru
Not all batteries are created equal. Choosing the wrong one can lead to poor performance, premature failure, or even damage to your vehicle’s electrical system. Here’s what to consider when selecting a replacement battery.
Check the Owner’s Manual
Your Subaru’s owner’s manual lists the recommended battery specifications, including group size, CCA, and RC. This is the best place to start. For example, a 2020 Subaru Outback typically uses a Group 35 battery with at least 600 CCA.
Understand Group Size
The group size refers to the physical dimensions and terminal placement of the battery. Using the wrong group size may mean the battery won’t fit in the tray or the cables won’t reach the terminals. Common Subaru group sizes include 35, 24F, and 47.
Cold Cranking Amps (CCA)
CCA measures how much power the battery can deliver at 0°F for 30 seconds while maintaining voltage. The higher the CCA, the better the battery performs in cold weather. If you live in a northern climate, opt for a battery with a higher CCA rating than the minimum requirement.
Reserve Capacity (RC)
RC indicates how long the battery can power essential systems if the alternator fails. A higher RC is beneficial for vehicles with many electronic features or for drivers who frequently use accessories with the engine off.
OEM vs. Aftermarket
Subaru OEM batteries are designed specifically for your vehicle and often come with a warranty. However, high-quality aftermarket brands like Interstate, DieHard, or Optima can offer better performance and value. Just ensure they meet or exceed Subaru’s specifications.
Warranty and Lifespan
Look for a battery with a strong warranty—typically 3 to 5 years. Some premium batteries offer free replacement within the first few years, which can save money if the battery fails prematurely.
Post-Installation Tips and Maintenance
Replacing the battery is just the first step. Proper maintenance can extend its life and keep your Subaru running reliably.
Reset Electronic Systems
After installation, you may need to reset the clock, radio presets, and navigation system. Some Subarus also require a throttle body relearn procedure, which can be done by turning the ignition on for 30 seconds without starting the engine, then turning it off for 10 seconds.
Check Charging System
Use a multimeter to test the battery voltage. With the engine off, it should read around 12.6 volts. With the engine running, it should be between 13.7 and 14.7 volts, indicating the alternator is charging properly.
Inspect Terminals Regularly
Every few months, check the battery terminals for corrosion or looseness. Clean them if needed and ensure the connections are tight.
Avoid Deep Discharges
Leaving lights on or using accessories with the engine off can drain the battery. If your Subaru won’t start after such an event, use jumper cables or a portable jump starter—but avoid repeatedly deep-discharging the battery, as this shortens its lifespan.
Store Properly if Not in Use
If you plan to store your Subaru for an extended period, consider using a battery maintainer or trickle charger to keep the battery charged without overcharging.
Common Mistakes to Avoid
Even simple tasks can go wrong if you’re not careful. Here are some common pitfalls to watch out for when replacing your Subaru battery.
Reversing Terminal Order
Connecting the positive terminal last is safe, but connecting the negative first can cause sparks, damage electronics, or even start a fire if your tool touches both the terminal and a grounded metal part.
Forcing a Stuck Terminal
Never use excessive force to remove a terminal clamp. If it’s stuck, try rocking it gently or using a terminal puller tool. Forcing it can crack the battery post or damage the cable.
Ignoring the Hold-Down Clamp
A loose battery can shift during driving, potentially damaging cables or causing a short circuit. Always secure the new battery with the hold-down clamp.
Using the Wrong Battery
Installing a battery with the wrong group size or insufficient CCA can lead to poor performance or failure. Double-check specifications before purchasing.
Not Disconnecting the Negative First
This is a critical safety step. Skipping it increases the risk of electrical shock or damage to your vehicle’s computer systems.
Conclusion
Replacing a Subaru battery is a straightforward task that most owners can handle with basic tools and a little patience. By recognizing the signs of a failing battery, choosing the right replacement, and following the correct installation steps, you can save money and avoid the hassle of a roadside breakdown.
Remember to prioritize safety—wear gloves and glasses, disconnect the negative terminal first, and secure the new battery properly. After installation, take a moment to test the system and reset any electronic settings. With proper care, your new battery will keep your Subaru running smoothly for years to come.
Whether you’re a seasoned DIYer or tackling your first car repair, this guide gives you everything you need to replace your Subaru battery confidently. So the next time your car struggles to start, don’t panic—grab your tools and get to work. Your Subaru (and your wallet) will thank you.
Frequently Asked Questions
How often should I replace my Subaru battery?
Most Subaru batteries last between 3 to 5 years. If your battery is older than 4 years or shows signs of weakness, consider replacing it proactively to avoid unexpected failures.
Can I replace the battery myself, or do I need a mechanic?
Yes, you can replace the battery yourself with basic tools. It’s a simple process that most Subaru owners can complete in under 30 minutes without professional help.
Will replacing the battery reset my radio or navigation settings?
Yes, disconnecting the battery will likely reset radio presets, clock, and seat memory. Using a memory saver can prevent this, but you may still need to reconfigure some settings manually.
What happens if I connect the battery terminals in the wrong order?
Connecting the positive terminal last is safe, but connecting the negative first can cause sparks, damage electronics, or even start a fire if your tool touches both the terminal and a grounded part of the car.
Where can I recycle my old Subaru battery?
Most auto parts stores, including AutoZone, Advance Auto Parts, and O’Reilly, accept used car batteries for recycling at no cost. Some may even offer a small credit toward a new battery.
How do I know if my new battery is working properly?
After installation, start the engine and check that all electrical systems function. Use a multimeter to test voltage—12.6 volts when off, and 13.7–14.7 volts when running indicates a healthy charging system.