How to Remove a Spare Tire from a Ford F-150 Without a Key
Contents
- 1 Key Takeaways
- 2 📑 Table of Contents
- 3 Understanding Your F-150’s Spare Tire Winch System
- 4 Essential Tools: What You Need to Succeed
- 5 Method 1: The High-Torque Break-Through (Primary Method)
- 6 Method 2: Alternative Tricks for Stubborn Nuts
- 7 Method 3: The Last Resort – Cutting the Cable
- 8 Safety First: Non-Negotiable Precautions
- 9 What to Do When You’re Stuck: Professional Help and Replacement
- 10 Conclusion: You’ve Got This
- 11 Frequently Asked Questions

Car Wash Mitt

Car Battery Tester

Car Roof Rack Cross Bars

Liquid Car Polish
Finding yourself with a flat and no spare tire key is a frustrating but common F-150 owner problem. This guide provides detailed, safe methods to access and remove your under-truck spare tire using basic tools you likely already have. We cover the factory lock mechanism, step-by-step removal techniques, and crucial safety precautions to get you back on the road without damaging your truck.
Picture this: you’re on a backroad, you hear that unmistakable thump-thump-thump, and you pull over to inspect. A flat tire. No problem, you think, you have a spare. You go to lower it from under your Ford F-150, reach for the key in your center console… and it’s not there. Maybe it’s in the other vehicle, or maybe it’s just lost. That feeling of dread is all too real. But before you panic and call an expensive tow truck, take a breath. Removing a spare tire from a Ford F-150 without the key is a challenge many owners face, and it’s almost always solvable with patience, the right approach, and a few common tools. This isn’t about being a mechanic; it’s about being resourceful. We’re going to walk through exactly how to do it, safely and effectively, so you can handle this situation yourself.
First, let’s demystify the system. Your F-150’s spare tire isn’t just sitting on a hook. It’s secured by a steel cable that runs from a winch mechanism mounted near the rear axle up to a large, threaded nut on the underside of the truck body. That nut is what the key fits into. Turning the key lowers the cable, letting the tire drop. When the key is missing, that nut is essentially a solid, locked plug. Our goal is to either turn that nut without the key or, as a last resort, cut the cable. The methods we’ll discuss apply primarily to the popular 2004-2014 model years with the traditional undercarriage mount. If you have a newer F-150 with the spare inside the bed or under a bed cover, the process is different and often simpler, involving access panels.
This guide is broken down logically. We’ll start by identifying your exact situation and gathering tools. Then, we’ll dive into the primary method: using immense torque to break the lock. We’ll explore alternative tricks for stubborn situations. Finally, we’ll cover the absolute last-resort options and critical safety steps you must never skip. By the end, you’ll know exactly what to do. And remember, this problem is so common that we’ve even written about similar lockout issues for other vehicles, like how to open a Honda Civic trunk without a key, which shares the same principle of bypassing a mechanical lock.
Key Takeaways
- The F-150’s spare tire is held by a cable winch system with a lockable nut. Without the key, you must bypass or break this lock to lower the tire.
- Always prioritize safety by using wheel chocks and working on level ground. Never crawl under a vehicle supported only by a jack.
- A breaker bar and socket are the most effective tools for applying extreme torque. Standard wrenches often lack the necessary leverage.
- Penetrating oil (like PB Blaster) is your best friend for stuck, corroded lock nuts. Apply it and wait 10-15 minutes before attempting to turn.
- If all else fails, calling a mobile locksmith or tow truck is the safest, last-resort option. They have specialized tools like key grinders or air ratchets.
- Prevention is key: keep a spare key in your glove box and consider a lockable storage box for the tire key.
- This process works for most 2004-2014 F-150s with the classic under-carriage spare. Newer models with inside-mount spares require different steps.
📑 Table of Contents
- Understanding Your F-150’s Spare Tire Winch System
- Essential Tools: What You Need to Succeed
- Method 1: The High-Torque Break-Through (Primary Method)
- Method 2: Alternative Tricks for Stubborn Nuts
- Method 3: The Last Resort – Cutting the Cable
- Safety First: Non-Negotiable Precautions
- What to Do When You’re Stuck: Professional Help and Replacement
- Conclusion: You’ve Got This
Understanding Your F-150’s Spare Tire Winch System
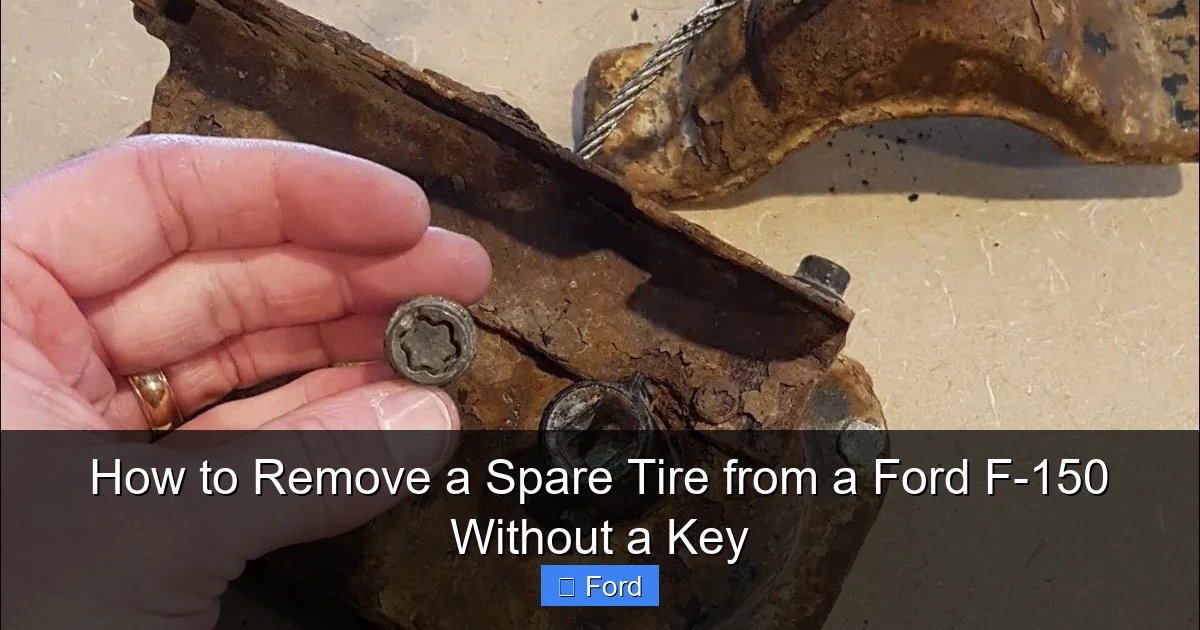
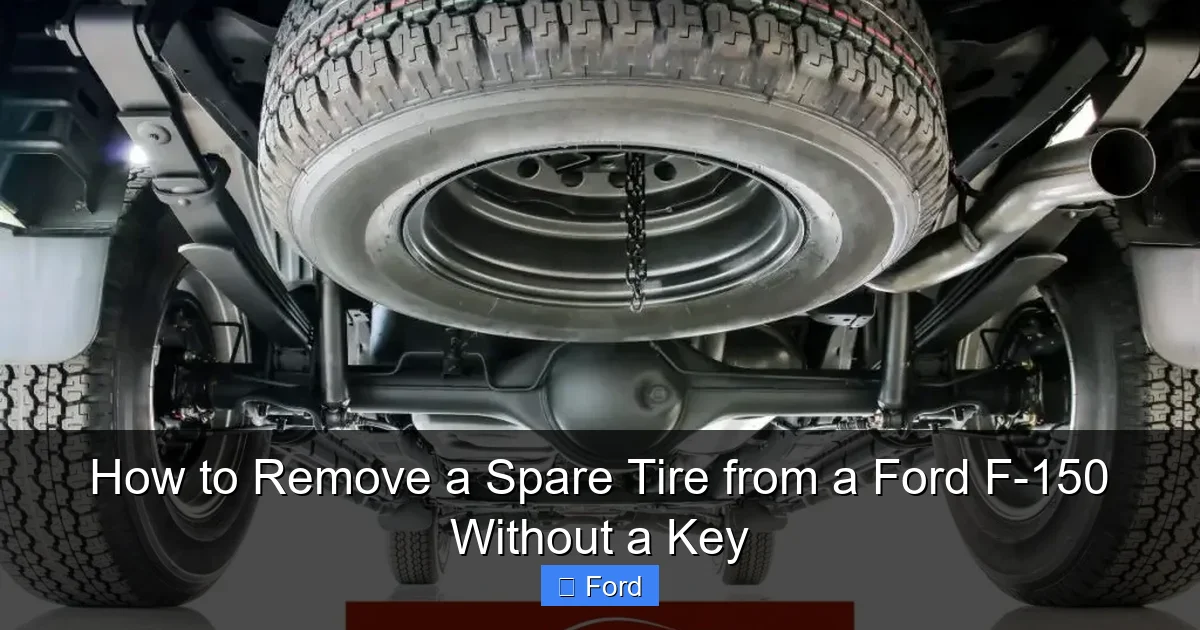
To solve the problem, you need to understand the machine you’re working on. The spare tire carrier in pre-2015 F-150s is a robust but simple piece of engineering. It consists of three main parts: the winch assembly (a spool of cable with a gear train), the steel cable itself, and the lock nut that passes through the truck’s frame or a reinforcement bracket. The key fits into a square socket on this nut. When you turn the key, it rotates the nut, which either winds or unwinds the cable via the winch gears.
The lock nut is typically a large, 1 1/16-inch or 1 1/8-inch hexagonal bolt, but the key fits into a square drive recessed into the center. This square drive is what we’re targeting. The entire assembly is designed to hold a 100+ pound tire securely while driving over bumps, so it’s built tough. Over time, especially in regions that use road salt, this nut can become severely corroded and frozen in place. This is good news and bad news. It’s bad because it might not turn even with the key. It’s good news for our no-key scenario because a severely stuck nut is more likely to break free with a sudden, massive amount of torque rather than steady pressure. This principle guides our primary method.
You also need to locate the exact assembly on your specific truck. For most 2004-2014 F-150s, crawl under the rear of the vehicle. Look directly behind the rear axle, near the center of the truck. You should see a large, rusty metal plate bolted to the frame. This is the winch mounting bracket. The cable will be coiled on a drum on this bracket, and the lock nut will be visible, pointing upward, often with a plastic or rubber cap covering it. Remove any dirt or mud from around the nut to see it clearly. Identifying this is your first and most important step.
Identifying Your Model Year and Assembly Type
While the 2004-2014 range is the most common for this issue, it’s worth a quick check. For 2015-2020 F-150s, the spare tire location changed. Many moved it to inside the cargo area under a floor panel, or it’s mounted in the bed under a lockable tonneau cover or a simple swing-down carrier. If your spare is inside the truck, you likely just need to lift a floor mat and unscrew a large nut by hand or with a standard socket—no special key required. The key system is almost exclusively for the undercarriage mount to prevent theft. So, confirm you have the under-truck cable system before proceeding with these invasive methods.
Essential Tools: What You Need to Succeed
You are not going to turn this nut with your hands. You need leverage, and lots of it. Gathering the right tools before you start is non-negotiable for both efficiency and safety. Here is your essential toolkit:

Visual guide about How to Remove a Spare Tire from a Ford F-150 Without a Key
Image source: tiresgym.com
- A 4-Ton or Higher Capacity Jack and Jack Stands: You will need to raise the rear of the truck slightly to relieve tension on the cable and get better access. A bottle jack or the factory scissor jack will work in a pinch, but a sturdy floor jack is ideal. This is for safety and access, NOT for going under the truck.
- Wheel Chocks: At least two. Place them securely in front of and behind the front tires. An F-150 on an incline is a recipe for disaster.
- A Breaker Bar (Minimum 18 inches, 24+ is better): This is a non-ratcheting, solid steel bar. Its sole purpose is to provide immense leverage. A standard ratcheting socket wrench will likely strip the nut or break the ratchet mechanism under extreme load.
- The Correct Socket: You need to fit the nut itself, not the key socket. Measure the flat-to-flat distance of the hexagonal nut. Common sizes are 1 1/16″ (27mm) or 1 1/8″ (29mm). Get a high-quality, impact-rated 6-point socket. A 12-point socket is more likely to round off the corners.
- A Large Pipe or “Cheater Bar”: A piece of 1-inch or larger steel pipe that slides over the end of your breaker bar to dramatically increase leverage. This is often the difference between success and failure.
- Penetrating Oil (PB Blaster, Liquid Wrench, Kroil): Spray this liberally around the nut and into the square keyhole. It seeps into corrosion and helps free the metal. Let it soak for at least 10-15 minutes, even longer if the truck is very rusty.
- Safety Glasses and Gloves: Always. Metal can shear, tools can slip.
- A Light Source: A headlamp is perfect. You’ll be working in a dark, dirty space.
Optional but helpful tools include a hammer for tapping the socket on (carefully!) or a torque multiplier (a specialized tool that fits over the nut and provides extreme leverage, but is a specialty item). With this kit assembled, you’re ready for the main event. If you’re ever working on a different vehicle and need to access a locked component, the principle of using penetrating oil and massive torque is universal, as seen in guides for removing an ignition lock cylinder without a key on a Dodge Dakota.
Method 1: The High-Torque Break-Through (Primary Method)
This is the standard, most effective method for a reason. It uses physics: applying a huge amount of rotational force to overcome the static friction holding the corroded lock nut in place. The key (pun intended) is to apply this force suddenly and in the correct direction. You are trying to simulate the force of the key being turned, but multiplied by 50.

Visual guide about How to Remove a Spare Tire from a Ford F-150 Without a Key
Image source: fordmasterx.com
Step-by-Step High-Torque Procedure
Step 1: Preparation and Safety. Park on a solid, level surface. Engage the parking brake firmly. Chock the front wheels meticulously. If you have a bed liner or anything else inside the truck bed, remove it. A shifting load while you’re under the truck is dangerous. Put on your safety glasses.
Step 2: Locate and Clean. Crawl under the rear. Identify the large lock nut. Use a wire brush or rag to clean off as much dirt, mud, and loose rust as possible from the nut and the surrounding bracket. This helps your socket seat properly.
Step 3: Apply Penetrating Oil. Spray the penetrating oil directly onto the nut, focusing on the gap between the nut and the bracket it’s threaded onto. Also, spray some into the square keyhole in the center of the nut. Let it soak. Don’t be shy. For a vehicle that’s seen several northern winters, you may want to do this step and let it sit overnight if possible.
Step 4: Fit the Socket. Slide your correctly-sized 6-point socket onto the nut. Ensure it’s seated fully and straight. A misaligned socket will just round off the nut.
Step 5: Attach the Breaker Bar. Slide your breaker bar through the socket’s square drive. Now, take your large pipe (“cheater bar”) and slide it over the end of the breaker bar handle. You can tape it in place if you’re worried about it slipping off.
Step 6: The Initial Jerk (Counter-Clockwise). Here’s the technique. You are going to apply force in a short, sharp, counter-clockwise motion (which is the “loosen” direction). Do not try to slowly push. Instead, use your body weight to give a quick, hard jerk on the pipe. The goal is a sudden shock to break the bond of corrosion. Pull the bar toward you (if the nut is on the driver’s side, you’ll be pulling; if on the passenger side, you’ll be pushing—plan your stance). Use your legs and back, not just your arms. Listen and feel. You might hear a loud SNAP or POP as the nut breaks free and begins to turn. If it doesn’t budge, reapply more penetrating oil and wait another 10 minutes.
Step 7: Sustained Pressure. Once you feel that initial give, the nut should now turn with more steady pressure. Keep the pipe on and continue turning counter-clockwise. The cable will start to unwind, and you’ll feel the tire lowering slightly. Keep turning until the tire is low enough to slide out from under the truck. You may need to stop and reposition the breaker bar as the nut turns.
Step 8: Lower and Remove. Once the tire is near the ground, you can support it and completely lower it by hand. Then, simply pull it out from under the truck. You’ve done it.
Critical Note: The nut is threaded normally (righty-tighty, lefty-loosey). However, on some older models, it could be a reverse thread. If you’re applying massive force in the correct “loosen” direction and it won’t budge at all (not even a millimeter), stop. Try turning it clockwise (the “tighten” direction) with the same sudden jerk. If it moves clockwise, you have a reverse thread. Then simply continue turning clockwise to lower the tire. This is rare but possible.
Method 2: Alternative Tricks for Stubborn Nuts
What if the high-torque method fails? The nut is just impossibly seized. Don’t give up yet. Before you resort to cutting, try these alternative tricks that can provide the extra edge.
Visual guide about How to Remove a Spare Tire from a Ford F-150 Without a Key
Image source: cardeeply.com
The Heat Method (Use with Extreme Caution)
Metal expands when heated. By applying intense heat directly to the nut (not the cable or surrounding bracket), you can break the bond of corrosion. This is a last-resort method due to fire risk and potential damage to nearby components like brake lines, fuel lines, or the truck’s frame paint.
- What you need: A propane torch.
- Procedure: With the truck safely supported and chocked, apply the torch flame directly to the sides of the hexagonal nut. Heat it until it’s glowing a dull red. This takes 2-3 minutes of constant heating. Wear heat-resistant gloves. Keep a fire extinguisher nearby. Once red-hot, immediately try the high-torque method again. The sudden expansion from heating, followed by the force, often does the trick. Never heat the nut while it’s under tension from the tire’s weight. Ensure the tire is fully supported on the ground or on a block before heating.
The Impact Method
An impact wrench (air or electric) delivers thousands of rapid, concussive blows of torque. This can be more effective than steady pressure. If you have access to an impact wrench and a large impact socket, this is a fantastic option.
- Procedure: Fit the impact socket. Set the wrench to “loosen” (counter-clockwise). Hold it firmly against the nut. The rapid hammering action will often shock a frozen nut free much easier than manual force. Be prepared for it to turn suddenly once it breaks loose. This method works on the same principle as the manual jerk, but much faster and with more power.
If you don’t own an impact, some auto parts stores rent them. This is a great investment if you anticipate future DIY projects.
The “Double-Nut” or “Cheater Socket” Method
This is a clever trick if you can get two nuts on the spindle. Sometimes, you can thread a second, identical nut onto the lock nut itself.
- Procedure: Carefully thread a second, identical large nut onto the exposed threads of the lock nut (the part that sticks up). Use a wrench to tighten this second nut against the first one. Now, you have a larger, double-thick nut to which you can apply your breaker bar. The increased surface area can help prevent rounding and gives you more material to grab. Apply your high-torque jerk to this second nut. The force transfers through both nuts to break the original one loose.
This requires the threads to be clean and accessible, which they often are not under the truck, but it’s worth a quick inspection.
Method 3: The Last Resort – Cutting the Cable
If every single method above has failed, and you absolutely must get the spare tire today, your only remaining option is to sever the steel cable. This is destructive and means you will need to replace the entire winch cable assembly afterward (a $50-$150 part). But it will get the tire out.
How to Safely Cut the Spare Tire Cable
Warning: The cable is under constant tension from the weight of the tire. If you cut it, the tire will drop suddenly. You must be prepared for this.
- What you need: A heavy-duty angle grinder with a metal cut-off wheel, or a reciprocating saw (Sawzall) with a metal-cutting blade. Bolt cutters are usually not strong enough for this thick, hardened steel cable.
- Procedure: First, support the tire. Get a sturdy block of wood or a second jack and place it directly under the tire. Jack it up just enough to take the weight off the cable. This is critical. Now, locate the cable. It runs from the winch drum to the tire. The best place to cut is close to the winch drum itself, where there is a straight run of cable. Wear full face protection—sparks and metal shards will fly. Make a clean, straight cut through the cable. As soon as it severs, the tire will drop onto your support block. Lower it the rest of the way and remove it.
- Aftermath: You now have a severed cable. The winch mechanism is useless. You will need to purchase a replacement cable/winch assembly and install it. This is a moderately difficult DIY job involving crawling under the truck and bolting the new unit in place. Alternatively, a tire shop or mechanic can do it quickly. But in an emergency, this gets you moving.
Safety First: Non-Negotiable Precautions
I cannot stress this enough. You are working with a 200+ pound vehicle component suspended by a single, potentially failing point. One mistake can cause severe injury or death. Follow these rules without exception.
- Never, Ever, Get Under the Truck Supported Only by the Jack. The jack is for lifting the rear slightly to relieve cable tension and improve access, NOT for supporting the vehicle’s weight. If you must get under the truck to see or work, you must use proper jack stands placed on solid frame rails. The factory scissor jack is not a stand. Invest in a pair of heavy-duty jack stands.
- Always Use Wheel Chocks. On an incline, the truck can roll off the jack. Even on level ground, a shift in weight while you’re pulling with great force can cause movement. Chock the front wheels securely.
- Wear Eye Protection. A socket can slip, a breaker bar can break, a grinding wheel can shatter. Metal fragments travel at high speed. Safety glasses are mandatory.
- Use Gloves. You’ll be handling rough, sharp, rusty metal. A good pair of mechanic’s gloves protects your hands from cuts and abrasions.
- Be Aware of the Tire’s Weight. When the cable finally gives, the tire will drop, possibly quickly. Keep your feet and limbs clear of the space directly under the tire. Have a plan for supporting it once it’s low.
- Know When to Call a Professional. If you are uncomfortable with any step, if the truck is on an unstable surface, or if the tools you have are inadequate, stop. The cost of a mobile locksmith or a tow truck is infinitely cheaper than a hospital bill or a crushed vehicle. This is a sign of intelligence, not failure.
These safety protocols are universal for any under-car work. For instance, if you ever need to remove a tire from a wheel, similar precautions about jack stands apply.
What to Do When You’re Stuck: Professional Help and Replacement
Let’s assume you’ve tried the high-torque method, the heat trick, and maybe even an impact wrench, and that nut is not moving an inch. It’s welded itself to the threads. Now what?
Your first call should be to a mobile locksmith. Explain you have a Ford F-150 with a locked spare tire carrier and no key. Many locksmiths specialize in automotive lockouts and carry specialized tools like key code cutters or, more relevantly, high-torque air ratchets or even grinders on flexible shafts that can reach the nut more easily than you can. They can often apply more controlled, sustained torque than a person with a breaker bar. This is usually cheaper than a full tow.
Your second call is to a roadside assistance service or tow truck. Explain the situation. They have the heavy-duty equipment (like huge hydraulic wrenches) to apply monumental force or to simply cut the cable on the spot. This is the most expensive but most guaranteed option.
Once you’ve retrieved the tire and had it repaired/replaced, you must address the broken or permanently disabled winch system. You have two choices:
- Replace the Winch Cable Assembly: Purchase the correct part for your F-150’s year and configuration (Ford part number or a quality aftermarket equivalent from O’Reilly, AutoZone, etc.). Installation involves unbolting the old winch from the frame, threading the new cable through the bracket, and securing the new nut. It’s a 1-2 hour DIY job if you’re moderately handy.
- Install an Aftermarket Lockable Spare Tire Carrier: Companies like Dee Zee or Lund make simple, lockable swing-down carriers that bolt to the bumper or hitch. You secure the tire with a padlock. This eliminates the complex cable system entirely and is a great upgrade for security and simplicity.
Finally, learn from this experience. Get a spare key made for your F-150’s trunk/tire lock. They are cheap (often under $20 at a dealership or locksmith). Store it in your glove box or with your jack kit. You can also find guides on how to get a spare key for your car that explain the process for most vehicles. Prevention is the best cure.
Conclusion: You’ve Got This
Finding yourself without the spare tire key for your Ford F-150 is a major inconvenience, but it’s never a dead end. The core of the solution is understanding that you’re fighting against corrosion and tension, not a sophisticated lock. With a good breaker bar, a correctly-sized socket, plenty of penetrating oil, and strict adherence to safety protocols, you can almost always break that nut free using the high-torque jerk method. Alternative methods like heat or an impact wrench provide powerful backups. Cutting the cable is the nuclear option, but it works.
The experience teaches a broader lesson about vehicle self-reliance. Many automotive problems are about applying the right tool with the right technique. Whether you’re dealing with a stubborn lug nut, a frozen oil drain plug, or a mysterious lock, patience and physics are on your side. Remember to always work safely, know your limits, and don’t hesitate to call a pro when needed. Now, go forth, apply that torque, and get that spare tire down. Your journey awaits.
Frequently Asked Questions
Will using a pipe over my wrench break it?
Yes, that’s the point. A standard ratchet wrench is not designed for the extreme torque needed and will likely break. A solid breaker bar is meant for this abuse. The “cheater pipe” simply extends the bar’s length, multiplying your force. Always use a solid, non-ratcheting bar for this job.
What if the nut is rounded off and my socket won’t grip?
This is a tougher spot. Try a 6-point socket first, as it grips better. You can also try a bolt extractor socket set (like GearWrench or Irwin), which has reversed, tapered threads that bite into the rounded metal as you turn. Apply penetrating oil and use the impact method if possible. As a last resort, you may need to use an angle grinder with a thin cut-off wheel to carefully cut a slot into the top of the nut and then use a large flat-head screwdriver and a hammer.
Can I just cut the cable without lifting the truck?
Technically yes, but it’s messy and dangerous. The cable is under tension. If you cut it while the tire is resting on the ground, the sudden release of tension can cause the cable to whip violently. It’s safer to slightly jack the tire up and support it with a block before cutting, so the drop is controlled.
My F-150 is very rusty. Is heat my best bet?
Heat is effective but carries significant risk. It can damage wiring, brake lines, or fuel lines that are often routed near the spare tire carrier. It can also burn you or ignite flammable materials. Always use heat as a secondary step after applying penetrating oil and attempting high-torque. If you use heat, protect nearby components with a wet rag or heat shield and have a fire extinguisher ready.
How much does a new spare tire winch cable cost?
A direct replacement winch cable assembly from Ford or a quality aftermarket brand typically costs between $60 and $150, depending on your specific F-150 model year and whether you get just the cable or the entire winch unit. Installation is the real cost if you pay a shop, but it’s a manageable DIY project.
Is there a way to prevent this from happening again?
Absolutely. Once you have the tire down and the system repaired or replaced, get a duplicate key made for the lock nut. Store it in your glove compartment or with your emergency kit. You can also install an aftermarket lockable spare tire carrier that uses a simple padlock instead of the complex factory cable system, eliminating the key issue entirely.