How to Reduce Oil Level in an Audi Q7
Overfilled engine oil in your Audi Q7 is a serious issue that can cause foaming, increased pressure, and catastrophic engine failure. Correcting it requires precise measurement and careful drainage, either manually or by a professional. Always confirm the exact level with the dipstick before and after any adjustment to ensure it sits perfectly within the recommended range.
Let’s talk about a problem that’s deceptively simple but potentially devastating: too much oil in your Audi Q7. You might think, “More lubrication is better, right?” Wrong. Engine oil operates under precise pressure and volume. When you overfill, you disrupt the entire system. The crankshaft slaps through the oil pan, churning it into a frothy, aerated mess that can’t lubricate properly. This foam can’t be pumped effectively, leading to starvation of critical components like bearings. Worse, the pressurized foam can rupture seals and gaskets, causing leaks that look like a slow-motion oil spill under your SUV. The goal here isn’t just to “take some out.” It’s to restore the oil level to the exact, perfect sweet spot marked on your dipstick. This guide will walk you through the why, the how, and the critical safety steps for how to reduce oil level in an Audi Q7 correctly.
Key Takeaways
- Overfilling is Dangerous: Excess oil aerates into foam, loses lubrication, and can cause seals to blow, leading to expensive engine damage.
- Check Correctly First: Always use the electronic dipstick or manual dipstick on level ground with the engine warmed but off for 2-3 minutes for an accurate read.
- Draining is the Only Fix: You must physically remove the excess oil; there is no safe “burn-off” method. This is done via the drain plug or a suction pump.
- Know When to Call a Pro: If you’re uncomfortable, the drain plug is seized, or you suspect internal damage from prolonged overfilling, seek a certified Audi technician immediately.
- Prevent Future Overfills: Always add oil gradually, checking the level after each half-quart. Use the exact oil specification (VW 502 00/504 00) your Q7 requires.
- Monitor After Correction: After draining, re-check the level, run the engine, and check for new leaks. Watch for oil pressure or warning lights in subsequent drives.
- Cost of Mistake vs. Prevention: A DIY drain costs only the oil you waste. A pro service is affordable, but engine repair from overfilled oil can cost thousands.
📑 Table of Contents
- Understanding Oil Levels: Why “Full” Isn’t Always Best
- How to Check Your Audi Q7’s Oil Level with Absolute Accuracy
- Methods to Reduce Oil Level in Your Audi Q7
- When to Immediately Seek Professional Help
- Preventing Future Overfills: Best Practices for Your Q7
- The Critical Link: Oil Level, Pressure, and Long-Term Engine Health
- Conclusion: Precision is Paramount
Understanding Oil Levels: Why “Full” Isn’t Always Best
Your Audi Q7’s engine is a finely tuned piece of German engineering. It’s designed to hold a specific volume of oil—often between 6.5 and 8.5 quarts depending on the engine (like the 3.0L TFSI V6 or the 4.0L TFSI V8). The dipstick or electronic level sensor has a range, usually marked “MIN” and “MAX” or with crosshatching. The ideal spot is right in the middle, or at the “MIN” mark for most modern VWs/Audis when cold. Operating consistently at or above the “MAX” line is a recipe for trouble.
The Physics of Foam: What Happens Inside an Overfilled Engine
Imagine whipping cream in a bowl—that’s what your crankshaft does to excess oil. It incorporates air, creating foam. This foam has two fatal flaws: it’s compressible and it doesn’t lubricate. Your oil pump is designed for liquid, not foam. It can’t generate proper pressure, leading to low oil pressure warnings even though there’s plenty of oil *in* the pan. Simultaneously, the rotating assembly creates immense pressure in the crankcase. This pressure needs to escape, and it will, often through the path of least resistance—seals and gaskets. You’ll find oil weeping from the valve cover gaskets, the oil filter housing, or even the rear main seal. This is pressure-induced leakage, not a failed seal. Fixing the level often stops the leak without any gasket replacement.
Recognizing the Symptoms of an Overfilled Q7
Before you even check the dipstick, your Q7 might be telling you something’s wrong. Look for these red flags:
- Blue-ish or White Smoke from the Exhaust: This isn’t just a little puff. It’s a continuous, sweet-smelling (like burnt maple syrup) smoke that indicates oil is being burned in the combustion chamber due to increased crankcase pressure forcing oil past piston rings.
- Misfires and Rough Running: Foamy oil can cause variable valve timing (VVT) components to malfunction, leading to erratic engine behavior and check engine lights.
- Oil Pressure Warning Light: Paradoxically, you may see this even with too much oil, because the pump is starving on foam.
- Oil Leaks Appearing Suddenly: Multiple new drips or seeps, especially around the top of the engine, are a classic sign of overpressure.
- Increased Oil Consumption: You’re topping up between changes more often, not because you’re burning oil normally, but because the system is being forced to consume it.
If you notice these, check the level immediately. For a comprehensive guide on diagnosing oil-related issues, including consumption, you can read our article on how to stop oil burning in car effectively.
How to Check Your Audi Q7’s Oil Level with Absolute Accuracy
You cannot fix what you don’t accurately measure. The “how to reduce oil level” process starts and ends with a correct reading. The method differs slightly between models, but the principles are universal.

Visual guide about How to Reduce Oil Level in an Audi Q7
Image source: shiftthrill.com
Step 1: The Golden Rules of Preparation
Park your Q7 on a perfectly level surface—a garage floor, not a sloped driveway. Any incline will give a falsely high reading. The engine should be warm, but not scorching. The best practice is to drive the vehicle for at least 10-15 minutes to get it to full operating temperature, then park and shut it off. Wait exactly 2-3 minutes. This allows oil to drain fully back into the pan. Do not check immediately after shutting off; you’ll get a dangerously low reading. Do not check after the car has been sitting for hours; oil will fully drain, giving a “low” read that isn’t accurate for operating conditions.
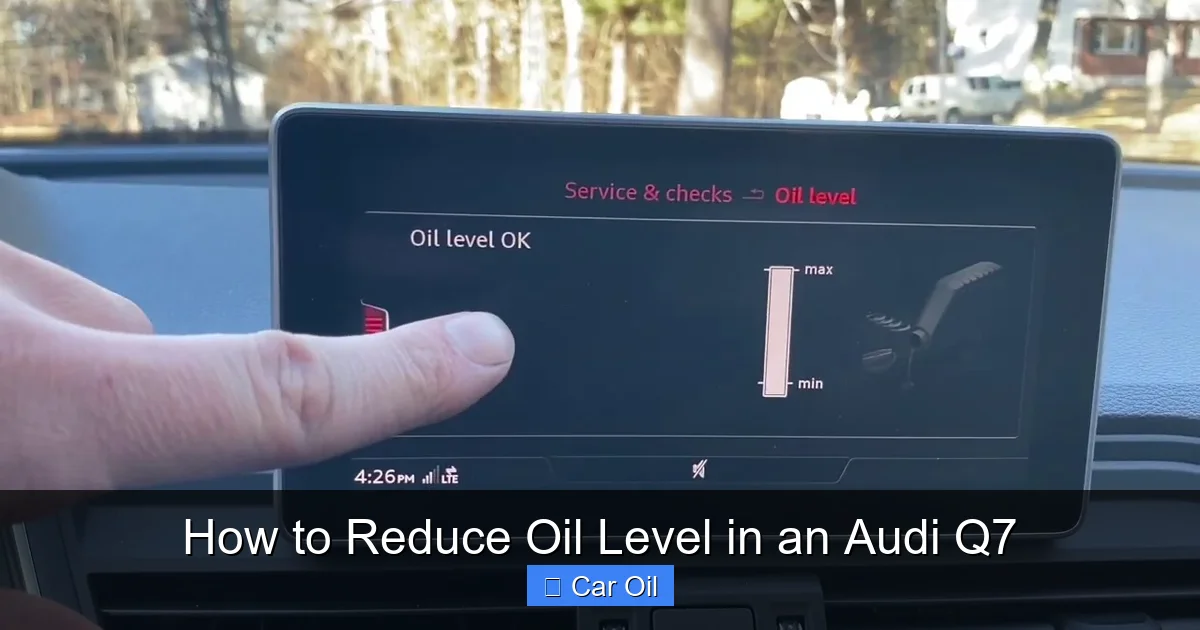
Step 2: Using the Electronic Oil Level Sensor (Most Common on Q7)
Your Audi Q7 likely uses a capacitive sensor in the oil pan, read via the MMI or driver information display. Here’s the precise procedure:
- With the engine off and the key in the ignition (or using the start/stop button without pressing brake), turn the ignition to the “ON” position.
- Use the steering wheel controls or MMI knob to navigate to the “Vehicle” or “Service” menu.
- Select “Oil Level.” The system will run a quick check (you might hear the pump activate) and display “Oil Level OK” or a bar graph with “MIN” and “MAX.”
- Critical: If it shows “Oil Level Too High” or the bar is at or above MAX, you have overfilled. If it shows “Oil Level Too Low,” you may have a different problem or the car wasn’t level/warm enough.
This electronic system is generally reliable, but it can be fooled by a faulty sensor or extreme overfill. It’s still wise to confirm with the manual dipstick.
Step 3: The Manual Dipstick Verification (Your Safety Net)
Even with a sensor, a physical check is the gold standard. Locate the yellow-handled dipstick (usually on the driver’s side front of the engine bay).
- Pull it out, wipe it clean with a lint-free cloth.
- Re-insert it fully, ensuring it seats properly.
- Pull it out again and read the level. The oil will be on the crosshatched or dotted area. The correct level for a warm engine is typically between the two marks, with many manufacturers (including VW/Audi for recent models) specifying the “MIN” mark as the target when hot. Consult your owner’s manual for your specific engine code.
- If the oil is above the upper mark, you must reduce it. If it’s just slightly above, you might be okay, but the goal is MIN.
For a deeper dive into the universal principles of checking oil that apply to all vehicles, including your Q7, our ultimate guide to checking oil in a car provides excellent foundational knowledge.
Methods to Reduce Oil Level in Your Audi Q7
Once you’ve confirmed the level is too high, you have options. The core principle is: you must remove liquid oil from the sump. There is no safe chemical or “run it and it’ll burn off” method. Attempting to run the engine overfilled to “use up” the oil will likely destroy it first.

Visual guide about How to Reduce Oil Level in an Audi Q7
Image source: shiftthrill.com
Method 1: The Partial Drain (Most Common DIY Fix)
This is the standard, controlled way to remove a specific amount of oil. You’re essentially performing a mini-oil change.
- Tools Needed: Socket/wrench for the drain plug (usually 17mm or 19mm), a deep oil drain pan, gloves, safety glasses, funnel, new crush washer for the drain plug (highly recommended), jack and jack stands (if needed for clearance).
- Procedure:
- Warm the Oil: Run the engine for 5-10 minutes. Warm oil flows much faster and more completely than cold, thick oil.
- Lift & Level: Safely raise the front of the Q7 if needed for clearance, but ensure it remains level. An unlevel car during draining will leave oil in the pan.
- Place Drain Pan: Position it directly under the oil pan drain plug.
- Loosen Drain Plug: Break it loose by hand, then use your socket to open it the rest of the way. Have the pan ready! Oil will flow out quickly at first, then slow to a drip.
- Control the Drain: The goal is to remove a known quantity. A full drain will remove all oil. For a partial drain, you must estimate. A typical Q7 holds ~7 quarts. If you’re 1 quart over, you need to drain roughly 1/7th of the total volume. This is tricky. A better method: loosen the plug until you have a steady drip, let it drip for a set time (e.g., 30 seconds), then tighten and check level. Repeat until correct.
- Retighten: Once you’ve drained enough, clean the plug and sealing surface, install the new crush washer, and torque the plug to spec (usually 25-30 ft-lbs—check manual!). Over-tightening can strip the pan.
- Check & Refill: After draining, wait a few minutes, then check the level with the dipstick (car still level). It will likely be low. Start the engine, let it idle for 30 seconds, shut off, wait 2 minutes, and re-check. Add the correct oil (VW 502 00/504 00 spec) in small increments (1/4 quart at a time) until it hits the MIN mark.
Pro Tip: If you’re unsure about the drain volume, it’s safer to drain a little, check, and repeat. You can always add more oil; you can’t un-drain what you’ve already taken out.
Method 2: The Extraction Pump (Cleaner, More Precise)
This method uses a manual or electric pump with a long tube inserted down the dipstick tube to suck oil out from the sump. It’s cleaner (no mess under the car) and allows for very precise removal.
- Tools Needed: Oil extractor pump (like a Mityvac or similar), appropriate length and diameter tubing, container for old oil.
- Procedure:
- Warm the Oil: Same as before—warm oil is less viscous and pumps easier.
- Insert Tube: Remove the dipstick. Insert the pump’s tube down the dipstick tube until you feel it bottom out near the sump (be gentle).
- Pump: Operate the pump (manual pumping or electric) until oil begins flowing into your container.
- Monitor Quantity: This is the key advantage. You can pump out exact quarts or liters. Pump out the estimated overfill amount (e.g., if you think you’re 1 qt over, pump out 0.75 quarts initially).
- Check Frequently: After pumping, re-check the dipstick level. The oil in the sump will mix, so the reading should be accurate after a minute or two.
- Repeat: Continue pumping in small increments until the level is at MIN.
This is the preferred DIY method for many, as it avoids the mess and potential torque issues of the drain plug. However, it can be slow for large overfills.
Method 3: Professional Service (The Stress-Free Option)
If the above methods seem daunting, or if the overfill was extreme (several quarts), a professional is the wise choice. A dealership or independent Audi shop will:
- Confirm the level with their diagnostic tools.
- Perform a controlled drain or use a commercial extractor.
- Inspect for any damage or leaks caused by the overfill.
- Use the correct oil and filter (if they do a full change) and reset the service interval.
- Provide a receipt and peace of mind.
The cost will be a fraction of an engine repair. For context on typical service costs for your Q7, our detailed article on how much is an Audi Q7 oil change gives you a benchmark for this type of work.
When to Immediately Seek Professional Help
Some situations are beyond the scope of a careful DIYer. Stop and call a professional if:
Visual guide about How to Reduce Oil Level in an Audi Q7
Image source: i.ytimg.com
- The engine was run significantly overfilled for any length of time. If you drove it, even a short distance, with the level high, internal components may have been damaged. Foam can cause bearing wear in minutes. A pro can perform a compression test and oil pressure test to check for damage.
- You see metal shavings in the drained oil. This is a sign of catastrophic wear. The engine may need a rebuild.
- The drain plug is frozen or strips the oil pan. This is a common and expensive mistake. A technician has impact tools, heat, and experience to handle it, or can use the extractor method exclusively.
- Multiple seals are now leaking. While fixing the level may stop new leaks, existing ones might need replacement. A pro can diagnose which leaks are pressure-related and which are age-related.
- You are uncomfortable working under a heavy SUV. Safety is paramount. If you don’t have proper jack stands or a level workspace, don’t risk it.
Remember, the cost of a diagnostic visit is cheap insurance against a $10,000+ engine replacement.
Preventing Future Overfills: Best Practices for Your Q7
An ounce of prevention is worth a pound of cure. Here’s how to never find yourself in this situation again.
The “Add a Little, Check a Lot” Rule
Never pour in a full quart without checking. Always add oil in half-quart (0.5L) increments. After each addition:
- Replace the cap, start the engine, let it idle for 30 seconds.
- Shut off, wait 2 minutes on level ground.
- Check the level with the dipstick or electronic system.
- Repeat until the level is at MIN.
This method is foolproof and takes less time than draining excess oil later.
Know Your Q7’s Exact Oil Capacity and Specification
Your owner’s manual is your bible. It lists the exact capacity for your specific engine (e.g., “3.0L TFSI: 7.2 quarts with filter change”). It also mandates the VW specification: VW 502 00 for gasoline engines (for older models) or VW 504 00/507 00 for newer models requiring long-life oil. Using the wrong oil weight or spec can affect level readings and engine protection. When in doubt, use the oil cap itself as a guide—it often lists the spec.
Be Meticulous During an Oil Change
If you do your own oil changes, follow a strict process:
- Drain completely. Let it drip for at least 15-20 minutes.
- Replace the drain plug washer every single time.
- Install the new filter dry (if it’s a cartridge type) or pre-filled (if it’s a traditional spin-on, but be careful not to overfill the filter itself).
- Pour in one quart less than the manual’s “full” capacity.
- Start, run, shut off, wait, check, and then top up to MIN.
This conservative approach prevents the most common error: assuming the “full” capacity is what you should start with, forgetting that the old filter and residual oil in the engine still hold some volume.
Regular Checks Are Non-Negotiable
Get in the habit of checking your oil at least once a month, and before long trips. It’s a 30-second task that can save your engine. For a broader understanding of optimal maintenance timing, our article on when to check oil in your car helps build that crucial habit.
The Critical Link: Oil Level, Pressure, and Long-Term Engine Health
We’ve focused on the acute problem of overfill, but let’s connect the dots to your Q7’s long-term vitality. Oil is the lifeblood. Its primary jobs are to lubricate, cool, clean, and protect. All these functions are optimized within a narrow range of volume and pressure.
How Overfill Disrupts the Entire System
Think of the oil pump like your heart. It needs to pump a liquid, not a foam, to create pressure. That pressure sends oil through tiny galleries to bearings, cam lobes, and piston pins. Foam collapses under pressure, so those critical spots get starved. The result is metal-on-metal contact within seconds. The increased pressure also forces oil past seals designed for a specific pressure differential. The valve cover gasket, a common failure point on Q7s, is not meant to hold back 10 PSI of crankcase pressure. It will fail.
Furthermore, the extra volume means the crankshaft dips deeper into the oil pan. At high RPMs, this creates tremendous windage and drag. The engine has to work harder to spin the crank through the oil, sapping power and increasing fuel consumption. All that churning also heats the oil excessively, breaking down its viscosity and protective additives faster.
The Domino Effect: From Overfill to “Oil Burning”
The most common and costly symptom of chronic overfill is what owners describe as “the car is burning oil.” In reality, it’s being forced out. The pressurized crankcase vents excess vapor and mist into the intake tract via the PCV (Positive Crankcase Ventilation) system. This oil-laden vapor is then burned in the combustion chamber. You see blue smoke. Your catalytic converters can get clogged with oil residue. Your spark plugs foul. This isn’t normal ring wear; it’s a mechanical pressurization problem. Fixing the oil level is the first and most crucial step in stopping this cycle. For strategies to combat oil consumption once the level is correct, our piece on stopping oil burning in cars is an essential follow-up read.
Long-Term Costs of Neglect
Ignoring an overfilled oil level leads down a predictable path:
- Phase 1 (Days/Weeks): Leaks, smoke, warning lights.
- Phase 2 (Months): Catalytic converter damage, fouled plugs, potential VVT system issues causing poor performance and codes.
- Phase 3 (Catastrophe): Bearing failure. The foam-starved main or rod bearings overheat and weld themselves to the crankshaft. This is a “grenade in the block” scenario. The engine locks up or throws a rod through the side of the block. Repair cost: $8,000 – $20,000+.
Comparing that to the 30 minutes and $20 in oil it takes to properly reduce the level makes the choice crystal clear.
Conclusion: Precision is Paramount
Your Audi Q7 is a sophisticated machine that deserves precise care. Reducing oil level isn’t a messy, approximate task; it’s a delicate procedure of measurement, controlled removal, and re-verification. The message is simple: Check accurately first, drain or extract methodically second, and never guess. Whether you choose the partial drain method, the cleaner extraction pump, or the peace of mind that comes with a professional service, the goal is the same—the oil level resting calmly at the “MIN” mark on a warm, level engine. This single, simple maintenance point protects your investment, ensures performance, and prevents a small mistake from becoming a financial and mechanical disaster. Take the time, use the right tools, and your Q7’s engine will reward you with years of reliable, powerful service. For more foundational knowledge on all things oil, from checking to changing, explore our library of friendly, beginner-friendly guides designed to make car maintenance accessible to everyone.
Frequently Asked Questions
Can I just remove the oil cap and let some oil drip out to reduce the level?
No. The oil cap is on the valve cover, not the oil pan. Removing it will not drain any oil from the sump. You must drain from the bottom via the drain plug or use an extraction pump through the dipstick tube. Attempting to siphon through the filler hole is ineffective and risky.
How much overfilled is considered “safe” to drive to a shop?
There is no “safe” overfill. However, if you are slightly (less than 0.5 quart or 0.5L) above MAX and notice no symptoms (smoke, leaks, lights), you may cautiously drive a short distance (<5 miles) to a professional. Any significant overfill or presence of symptoms means the car should be towed to prevent engine destruction.
Will draining the excess oil fix the oil leaks that started after I overfilled?
Often, yes. The leaks are likely caused by increased crankcase pressure from the overfill, which forces oil past gaskets and seals designed for normal pressure. Once you return the oil level to the correct specification, the pressure normalizes, and the leaks frequently stop on their own within a few days. If leaks persist, the gaskets may have been damaged and need replacement.
What’s the best way to get the old oil after I drain it?
Always collect it in a sealed, dedicated container (like the original oil bottles or a purpose-made drain pan with a lid). Most auto parts stores (AutoZone, Advance, O’Reilly) and many repair shops offer free used oil recycling. Never dump oil on the ground, in drains, or in the trash. It’s illegal and environmentally catastrophic.
After I drain the excess oil, do I need to change the oil filter too?
Not necessarily for a simple overfill correction. If you only drained a small amount (1-2 quarts) from the sump, the filter still contains good oil and its primary function isn’t compromised. However, if the overfill was massive or you suspect contamination (like coolant or fuel in the oil), a full oil and filter change is warranted. For peace of mind, many people opt for a full change during a partial drain procedure.
My Audi Q7’s electronic oil level shows “MAX” but the manual dipstick shows “MIN.” Which one is right?
This discrepancy usually points to a faulty electronic sensor or a wiring issue. The manual dipstick, when used correctly on a level, warm engine, is the more reliable mechanical gauge. Trust the dipstick. However, if the dipstick is also hard to read or seems inconsistent, it could be an issue with the dipstick tube or a severe internal problem. In this case, have a professional diagnose the sensor system and verify the physical level with a clean dipstick.