

How to Download Tesla Dashcam Footage to Your Phone
Contents
- 1 Key Takeaways
- 2 📑 Table of Contents
- 3 Understanding Your Tesla’s Dashcam System: The Foundation
- 4 What You’ll Need: The Essential Toolkit
- 5 Method 1: The Classic & Reliable USB Transfer
- 6 Method 2: Using the Tesla Mobile App (Wireless Convenience)
- 7 Troubleshooting: Why Your Download Might Be Failing
- 8 Pro Tips & Advanced Management
- 9 Conclusion: Your Eyes on the Road, In Your Pocket
- 10 Frequently Asked Questions

Steering Wheel Cover

Pressure Washer for Car

Car Sunshade for Windshield

Car Trash Can
Downloading Tesla dashcam footage to your phone is a simple two-step process: save clips to a formatted USB drive from your car, then transfer them to your phone. Alternatively, use the Tesla mobile app for direct downloads. Ensure you have a compatible USB drive, the Tesla app installed, and understand your vehicle’s storage limits to capture and access your footage efficiently.
Hey there, Tesla owner! Have you ever experienced that heart-stopping moment—a close call on the road, a mysterious dent in your parking spot, or a scenic drive you just wish you could rewatch? Your Tesla’s built-in dashcam system is a fantastic feature, capturing it all. But that footage is locked inside your car’s media system until you take action. Knowing how to download Tesla dashcam footage to your phone is the key to unlocking those memories, securing evidence for insurance, or just sharing a cool video. It’s easier than you think, and I’m here to walk you through every single step, from the gear you need to pro tips that will save you time and frustration. Let’s get those videos onto your device!
Key Takeaways
- USB drive is essential: You must use a high-quality, properly formatted USB drive ( FAT32 or exFAT ) to save footage from your Tesla’s dashcam system.
- Two main methods exist: The primary method uses a USB drive for physical transfer. The secondary method uses the Tesla mobile app for wireless downloads, but has limitations.
- Storage is limited and cyclical: Tesla dashcams record in 1-minute loops and automatically overwrite old footage unless you save a clip. Total saved clip storage is typically around 1-2 hours.
- Sentry Mode footage is separate: Sentry Mode events are saved to a different folder on the USB drive than continuous dashcam clips. You must check both folders.
- App dependency: The Tesla mobile app method requires your phone to be actively connected to your car’s Bluetooth or Wi-Fi and the car to be awake (parked with screens on).
- Common issues are often format-related: The #1 reason downloads fail is an incompatible or incorrectly formatted USB drive. Always format within the Tesla itself.
- Footage is time-sensitive: Once a clip is overwritten by new recordings, it’s permanently gone. Save important events to your phone immediately.
📑 Table of Contents
- Understanding Your Tesla’s Dashcam System: The Foundation
- What You’ll Need: The Essential Toolkit
- Method 1: The Classic & Reliable USB Transfer
- Method 2: Using the Tesla Mobile App (Wireless Convenience)
- Troubleshooting: Why Your Download Might Be Failing
- Pro Tips & Advanced Management
- Conclusion: Your Eyes on the Road, In Your Pocket
Understanding Your Tesla’s Dashcam System: The Foundation
Before we dive into the “how,” let’s quickly cover the “what.” Every Tesla from 2017 onward (with HW2 or newer) has a built-in dashcam system using the car’s Autopilot cameras. It’s not a separate device; it’s software running on your car’s computer. This system constantly records a 360-degree view, but here’s the crucial part: it’s a continuous loop. The last hour or so of driving is always stored on a USB drive you insert. When that hour is full, the oldest minute gets automatically deleted to make room for new footage. It’s designed for recent events, not a permanent archive.
Dashcam vs. Sentry Mode: What’s the Difference?
This trips up a lot of new Tesla drivers. They are two separate recording modes that save to different folders on your USB drive.
- Dashcam (Continuous Recording): This is the default. It records while you’re driving. You manually save a clip by pressing the dashcam icon on the touchscreen or via a steering wheel button (on some models). Saved clips go to a “SavedClips” folder.
- Sentry Mode (Active Security): This is your car’s security guard. When parked, it uses the cameras to monitor for threats. If it detects a potential risk (like someone leaning on the car or a break-in attempt), it saves a 10-minute video clip to a “SentryClips” folder on the USB. It also sounds an alarm and displays a message on the screen.
When you go to download footage, you must check both folders. A near-miss while driving is in “SavedClips.” A person messing with your parked car is in “SentryClips.” Confusing the two means you might miss the evidence you actually need.
Why You Can’t Just “Stream” Footage Directly (The Big Myth)
A common question is: “Can’t I just watch the dashcam footage on my phone through the Tesla app?” The short answer is no, not in real-time. The dashcam footage is stored locally on the USB drive inside the car. The Tesla app does not have a live “dashcam stream” feature. The only way to get that video file onto your phone is to physically remove the USB drive and plug it into your phone (or a computer first), or use the app’s “Save Video” feature which *requires* the USB to be in the car and the car to be awake. This is a critical distinction that shapes our entire process.
What You’ll Need: The Essential Toolkit
Getting started requires just a few items, but each one is important. Skipping a step here leads to the most common failures.

Visual guide about How to Download Tesla Dashcam Footage to Your Phone
Image source: cisdem.com
1. The Right USB Drive: Don’t Skimp Here!
This is the most important piece of hardware. Not all USB drives work. Tesla’s system is picky.
- Type: Use a USB-A flash drive (the rectangular, classic USB plug). Some newer Teslas have USB-C ports; you can use a USB-C drive or a USB-A to USB-C adapter. Avoid hubs or external hard drives that require external power.
- Capacity: 32GB to 128GB is the sweet spot. Larger drives (e.g., 256GB+) may work but are unnecessary and can take longer to format. The system only uses a small partition for dashcam footage.
- Speed: Look for a drive with good read/write speeds (USB 3.0 is ideal, but USB 2.0 works). Slow drives can cause dropped frames or recording errors.
- Reliability: Buy from reputable brands like Samsung, SanDisk, or Kingston. A cheap, no-name drive will fail you at the worst moment.
Pro Tip: Dedicate one USB drive solely to your Tesla’s dashcam. Don’t use it for other files. Formatting it wipes everything anyway.
2. Your Smartphone & A File Manager App
You’ll need your iPhone or Android phone and a way to access the files on the USB drive. Most modern phones can read a standard USB drive with the right adapter.
- iPhone/iPad: You need Apple’s Lightning to USB adapter (or USB-C to USB-C if you have a newer iPhone/iPad with USB-C). The built-in Files app will then recognize the drive.
- Android: Most Android phones support USB On-The-Go (OTG). You might need a USB-C to USB-A adapter. Your phone’s built-in file manager (like “My Files” on Samsung) should work.
If your phone’s built-in manager is clunky, apps like “Solid Explorer” (Android) or “Documents by Readdle” (iOS) are excellent for browsing USB drives.
3. The Tesla Mobile App (For Method 2)
If you want to try the wireless method, you must have the official Tesla app installed, logged into your account, and your phone must be paired with your car via Bluetooth. Your car also needs to be in “Park” with the screens awake (you can’t download if the car is asleep).
4. A Computer (Optional but Helpful)
While not strictly necessary, having a laptop or desktop PC makes managing large video files much easier. You can transfer all clips from the USB to your computer, review them, and then only copy the important ones to your phone. It also gives you a backup and a place to permanently save critical footage.
Method 1: The Classic & Reliable USB Transfer
This is the gold standard, the method that works every time if you follow the steps. It’s a physical process: car → USB drive → phone (or computer). Let’s break it down.
Visual guide about How to Download Tesla Dashcam Footage to Your Phone
Image source: tinyfrom.com
Step 1: Prepare and Format Your USB Drive IN YOUR TESLA
This is the most critical step. Formatting the drive on your computer will *not* work. Tesla uses a specific folder structure that must be created by the car itself.
- Insert your blank, compatible USB drive into one of the front USB ports (the ones in the center console). The rear USB ports may not have enough power or may be data-only; stick to the front ones for best results.
- On your Tesla’s touchscreen, go to Controls > Safety & Security > Dashcam (the path may vary slightly by model/year).
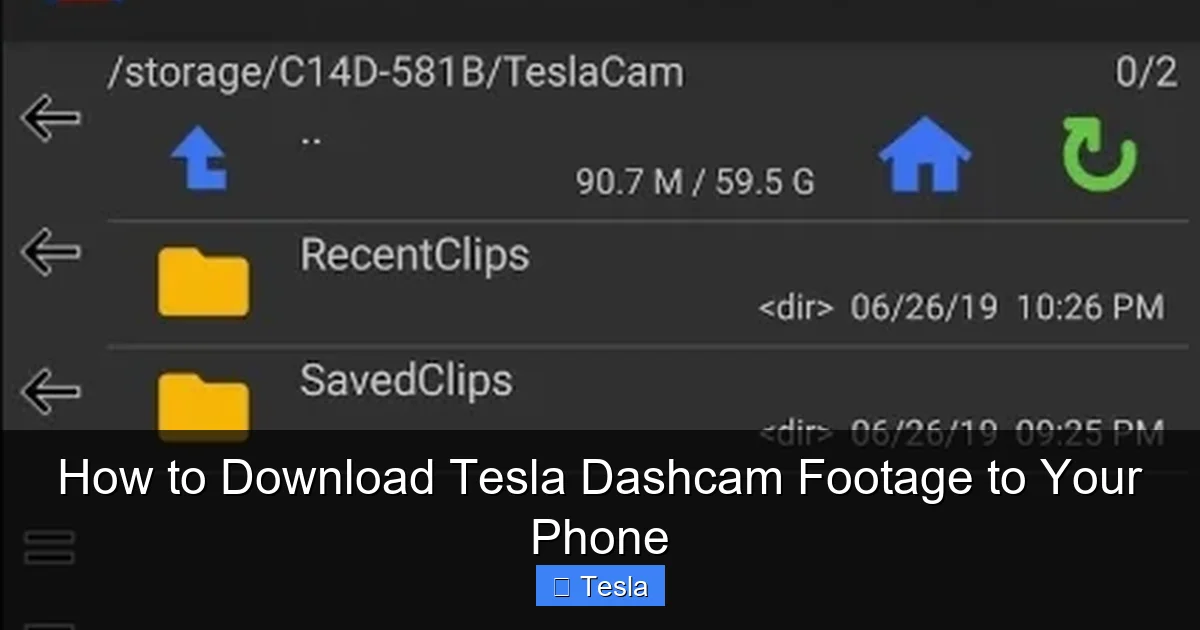
- You should see an option to “Format USB Drive” or “Enable Dashcam”. Tap it. The car will create the necessary folders: “TeslaCam,” with subfolders “RecentClips,” “SavedClips,” and “SentryClips.”
- Wait for it to finish. You’ll see a notification. Do not remove the drive until formatting is complete.
What if it doesn’t format? Your drive might be too old, too large, or incompatible. Try a different, known-good drive. If your Tesla says “USB drive not supported,” it’s almost always the drive’s fault.
Step 2: Record and Save Your Clips
Now that your drive is ready, just drive! The dashcam will automatically record. When something happens you want to save:
- While driving, tap the dashcam icon (a small camera) on the top-right of the screen. Or, if your steering wheel has a button (like a scroll wheel button on the right), press and hold it to save the last minute of footage.
- For a Sentry Mode event, the car automatically saves the 10-minute clip. You’ll get a notification on your phone via the Tesla app.
Saved clips appear in the “SavedClips” folder. You can also manually save the current “RecentClips” (the continuous loop) at any time.
Step 3: Safely Eject and Remove the USB Drive
Do not just yank it out!
- On the touchscreen, go back to Controls > Safety & Security > Dashcam.
- Look for an option to “Eject USB Drive” or a safe removal icon. Tap it. Wait for the “Safe to Remove” message.
- Now, physically pull the USB drive out.
Step 4: Connect the USB Drive to Your Phone
This is where your adapters come in.
- Plug the USB drive into the appropriate adapter for your phone (Lightning to USB-A, USB-C to USB-A, etc.).
- Your phone should detect the drive. Open your file manager app.
- Navigate to the “TeslaCam” folder. You’ll see the three folders: “RecentClips,” “SavedClips,” “SentryClips.”
- Browse into the folders. Video files are in 1-minute chunks, named with timestamps (e.g., “2024-01-15_14-30-01.mp4”).
Step 5: Copy the Videos to Your Phone
Find the clips you want. They are typically in chronological order.
- Select the video file(s).
- Use the “Copy” or “Move” function.
- Paste them into a folder on your phone’s internal storage (like “DCIM” or a new “TeslaDashcam” folder).
- Once the transfer is complete, you can safely eject the USB drive from your phone.
Important: The video files can be large (50-200MB per minute depending on resolution). Ensure you have enough free space on your phone.
Step 6: Watch and Share
Open your phone’s gallery or video player app. The .mp4 files should play natively. You can now edit, share to social media, send to your insurance company, or save to cloud storage like Google Photos or iCloud.
Method 2: Using the Tesla Mobile App (Wireless Convenience)
This method is newer and feels more “high-tech,” but it has significant limitations. It’s best for quickly grabbing a single recent clip when you don’t have your USB adapter handy.

Visual guide about How to Download Tesla Dashcam Footage to Your Phone
Image source: tinyfrom.com
Prerequisites for App Success
- Your Tesla must be in Park.
- The car’s touchscreen must be awake (you may need to tap it or open a door). If the car is asleep, the app can’t access the USB.
- Your phone must be connected to the car via Bluetooth (for basic connectivity) and/or the car’s Wi-Fi hotspot (for faster transfer). The app will guide you.
- The USB drive must be properly formatted and inserted (same as Method 1).
- You need a strong cellular signal on your phone, as the app uses Tesla’s servers to broker the connection.
Step-by-Step App Download
- Open the Tesla app and select your vehicle.
- Tap “Security” (the shield icon).
- You should see a section for “Dashcam” or “Sentry Clips.” Tap it.
- The app will connect to your car and load a list of available saved clips (from “SavedClips” and “SentryClips”). It shows thumbnails and timestamps.
- Select the clip(s) you want. There is usually a download/cloud icon.
- Tap “Save to Phone” or the download arrow.
- The app will download the video file over your phone’s data or Wi-Fi. This can take several minutes for a full 1-minute clip, especially on a slow connection.
Major Drawbacks to Know:
- Speed: It’s much slower than a direct USB transfer.
- Reliability: The connection can drop. If your car goes to sleep during the download, it will fail.
- No bulk download: You typically have to download clips one by one. For multiple videos, the USB method is far superior.
- RecentClips limitation: The app often only shows “SavedClips” and “SentryClips.” It may not show the continuous “RecentClips” folder, so you can’t grab the last minute of driving unless you saved it first.
Verdict: Use the app for a quick, one-off download when you’re away from your computer and USB adapter. For any serious archiving or multiple clips, stick to the USB drive method.
Troubleshooting: Why Your Download Might Be Failing
Let’s fix the common headaches. Don’t panic; most have simple solutions.
“Tesla says USB Drive Not Supported” or “No USB Detected”
This is the #1 issue. The drive is the problem, not your Tesla.
- Solution: Try a different, known-good USB drive. Ensure it’s formatted by the Tesla (Step 1 above). Avoid USB hubs. Use the front ports. Some users report that certain brands (like older Kingston or generic drives) simply don’t work. A Samsung BAR or SanDisk Ultra is a safe bet.
“No Files Found” on the USB After Recording
The USB is in, but the folders are empty.
- Solution: Did you format it in the Tesla? If yes, did you actually save a clip? Remember, continuous recording isn’t saved until you manually tap the dashcam icon. For Sentry Mode, did an event trigger? Check the “RecentClips” folder—you should see many 1-minute files if it’s recording. If it’s truly empty, the drive may be faulty or the car’s recording may be disabled (check Controls > Safety & Security > Dashcam is toggled ON).
App Won’t Connect or Download Fails
The app is finicky.
- Solution: Make sure the car is awake and in Park. Restart the Tesla touchscreen (hold both scroll wheels until it reboots). Restart your phone’s Bluetooth. Ensure your phone has a good internet connection. If all else fails, fall back to the USB method.
Video Files Won’t Play on My Phone
The files are there, but your phone’s default player chokes.
- Solution: The Tesla records in standard .mp4 (H.264). Most phones play this fine. If not, download a free, powerful video player app like VLC for Mobile or MX Player. They support all codecs.
USB Drive Shows Up But Folders Are Missing
You see the drive, but no “TeslaCam” folder.
- Solution: You didn’t format it in the Tesla. Eject the drive, put it back in the Tesla, and force a format from the car’s settings menu. This will create the correct folder structure.
Pro Tips & Advanced Management
Now that you have the basics down, let’s level up. These tips will make you a dashcam power user.
Manage Storage Like a Pro
That 1-2 hour loop fills up fast. Be strategic.
- Regularly transfer and delete: Don’t let the USB fill up. Once a week, copy all saved clips to your computer, then format the drive again in your Tesla to start fresh. This prevents old clips from being overwritten before you back them up.
- Use multiple USB drives: Keep one in the car and one as a backup. Rotate them. When one is full, swap it out. Label them “Tesla 1” and “Tesla 2.”
- Check free space: The Tesla screen doesn’t show USB free space. A full drive will stop recording. If you notice “Recording Stopped” messages, it’s time to clear space.
The “Sentry Mode” Folder is Your Security Goldmine
If you park in public areas, regularly check the “SentryClips” folder. These are the events where your car felt threatened. You might capture hit-and-runs, vandalism, or thieves casing cars. This footage is invaluable for police reports and insurance claims. Set a reminder to check it every few days if you use Sentry Mode daily.
Editing and Sharing Footage
Raw dashcam videos are 1-minute clips. For sharing a longer incident, you’ll need to stitch them together.
- On Phone: Use iMovie (iOS) or CapCut (Android/iOS) to trim and combine clips. You can also add text overlays with timestamps.
- On Computer: Use free software like DaVinci Resolve, Shotcut, or even Windows Movie Maker. This gives you more control for creating a polished video for insurance.
- Compress for sharing: If you need to email a clip to an insurance adjuster, the raw file might be too large. Use an online compressor (like Clideo or a desktop tool like HandBrake) to reduce the file size while maintaining usable quality.
Protect Your Investment: Beyond the Dashcam
Your Tesla’s cameras are a huge asset. Consider complementary protections. While your dashcam records incidents, it can’t prevent them. For comprehensive vehicle protection, you might explore paint protection film or a full wrap to guard against scratches and rock chips that a dashcam might capture. If an incident does cause damage, knowing the cost to replace a Tesla window can help with budgeting for repairs. And if you’re taking your Tesla on long trips, ensure you have a reliable way to charge it by understanding the cost to install a Tesla charger at home, so your car is always powered and ready to record.
Conclusion: Your Eyes on the Road, In Your Pocket
Mastering the download process transforms your Tesla’s dashcam from a passive feature into an active tool. You now have the power to capture evidence, relive adventures, and share moments that would otherwise be lost to the ether of overwritten data. Remember the golden rule: format in the car, use a good USB drive, and don’t wait to transfer important clips. Start with the reliable USB method, use the app for quick saves, and build a routine of backing up your footage. Your future self—the one dealing with an insurance claim or wanting to show off a beautiful drive—will thank you. Now, go plug in that USB and unlock those memories!
Frequently Asked Questions
Why isn’t my USB drive showing up in my Tesla even though it worked before?
First, try formatting it again directly in your Tesla (Controls > Safety & Security > Dashcam > Format USB). If that fails, the drive has likely reached the end of its life or become corrupted. Replace it with a new, high-quality USB drive from a reputable brand. Always use the front USB ports for best compatibility.
Can I download dashcam footage without a USB drive?
Yes, but with major limitations. The Tesla mobile app allows you to download “SavedClips” and “SentryClips” directly to your phone, but only when your car is awake, in Park, and has a strong connection. It’s slow and doesn’t access the continuous “RecentClips” folder. For reliable, bulk transfers, a USB drive is still necessary.
How long does Tesla store dashcam footage automatically?
The dashcam continuously records in a rolling 1-hour loop (sometimes slightly more depending on USB capacity). Once that hour is full, the oldest minute is automatically and permanently deleted. Sentry Mode events are saved separately and are not overwritten until the USB drive fills up completely, which can take days or weeks depending on how often Sentry Mode triggers.
What’s the difference between a regular dashcam clip and a Sentry Mode clip?
A regular dashclip is manually saved by you during or after a drive and comes from the continuous recording loop. A Sentry Mode clip is automatically saved when parked sensors detect a potential threat. They are stored in different folders on your USB (“SavedClips” vs. “SentryClips”). Both are crucial but for different scenarios.
Can I edit the Tesla dashcam videos on my phone?
Absolutely. The .mp4 files are standard video files. You can use any basic video editor on your phone (like iMovie, CapCut, or InShot) to trim the clip, combine multiple 1-minute segments, add text, or compress it for easier sharing. For more advanced editing, transfer the files to a computer.
How do I share dashcam footage with my insurance company?
First, download the relevant clip(s) to your phone using the USB method. Then, you can either upload them directly through your insurer’s mobile app or website, or transfer them to a computer and upload from there. If the files are too large, use a free online video compressor to reduce the size while maintaining clear evidence of the incident. Always keep the original, uncompressed file as your master copy.


