
How to Change Spark Plugs on a 2017 Jeep Renegade
Contents
- 1 Key Takeaways
- 2 📑 Table of Contents
- 3 Why Bother? The Importance of Healthy Spark Plugs
- 4 Gathering Your Tools and Parts
- 5 Preparation and Safety First
- 6 Step-by-Step: Removing the Old Spark Plugs
- 7 Step-by-Step: Installing the New Spark Plugs
- 8 Final Checks and Reassembly
- 9 Maintenance Tips and Long-Term Care
- 10 Frequently Asked Questions


Changing the spark plugs on your 2017 Jeep Renegade is a straightforward DIY task that can save you significant money on labor costs. With the right tools and a careful approach, you can complete this essential maintenance in about an hour. Following our detailed guide ensures proper installation, which is critical for engine performance, fuel economy, and preventing misfires.
Key Takeaways
- Correct Spark Plugs Are Crucial: Using the exact type and heat range specified by Jeep (typically NGK or Champion) ensures optimal combustion and prevents engine damage.
- Gather All Tools First: You will need specific socket sizes, a torque wrench, and dielectric grease. Having everything ready prevents mid-job trips to the store.
- Safety and Order Matter: Always disconnect the battery first and remove one spark plug wire/coil at a time to avoid mixing up the firing order.
- Torque Specs Are Non-Negotiable: Over or under-tightening the new plugs can cause leaks, thread damage, or broken insulators. Use a torque wrench.
- Check the Gap: Even new plugs can have an incorrect gap. Verify and adjust it to the factory specification (usually ~0.043″) before installation.
- Inspect Related Components: While the plugs are out, check the condition of the ignition coils, spark plug wires, and the valve cover gasket for signs of wear or leaks.
📑 Table of Contents
Why Bother? The Importance of Healthy Spark Plugs
Your 2017 Jeep Renegade’s 2.4L TigerShark inline-4 engine is a workhorse, but it relies on a tiny component to ignite the air-fuel mixture in each cylinder: the spark plug. Think of them as tiny, high-voltage lightning bolts that start the power stroke. Over time, spark plugs wear out. The electrode erodes, the gap widens, and the ceramic insulator can crack or foul. This leads to misfires, rough idling, poor acceleration, decreased fuel economy, and eventually, a check engine light. Replacing them at the manufacturer’s recommended interval—often around 100,000 miles for modern platinum/iridium plugs, but check your owner’s manual—is a critical part of preventive maintenance. Doing it yourself isn’t just about saving the $150-$300 in labor a shop will charge; it’s about understanding your vehicle and ensuring the job is done exactly right with quality parts.
Understanding Your Renegade’s Ignition System
The 2017 Renegade with the 2.4L engine uses a coil-on-plug (COP) ignition system. This is great news for DIYers because it eliminates long, brittle spark plug wires. Instead, each spark plug has its own ignition coil mounted directly on top, held in place by a single bolt. This design makes accessing the plugs relatively simple. However, the coils and their electrical connectors are delicate. You must handle them with care to avoid damaging the plastic housing or the connector pins. The entire process involves unplugging the coil, unbolting it, removing the old plug, and reversing the steps with the new plug. It’s a clean, logical process if you work methodically.
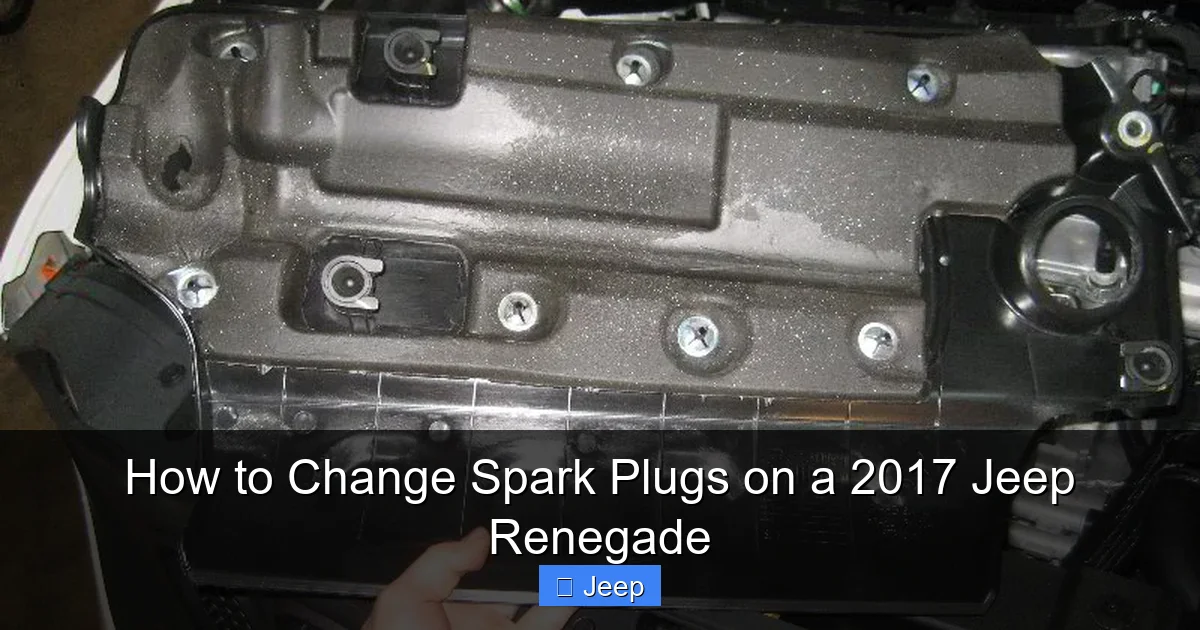
Gathering Your Tools and Parts
Before you pop the hood, a trip to the parts store is essential. Having everything on hand will make the job smooth and prevent frustration. Rummaging through a messy toolbox with hot engine parts is no fun.

Visual guide about How to Change Spark Plugs on a 2017 Jeep Renegade
Image source: vehiclers.com
Required Parts
- 4 x Correct Spark Plugs: For the 2017 Jeep Renegade 2.4L, the factory specification is typically NGK Iridium IX (part number 6518) or the equivalent Champion. Never use a different heat range. You can confirm this by checking the owner’s manual, the sticker under the hood, or by asking at the parts counter with your VIN. Iridium or platinum plugs are standard and last the longest.
- Optional but Recommended: A small tube of dielectric (anti-seize) grease. While many modern plugs come with a nickel-based coating, a tiny dab on the threads (never the porcelain!) can prevent them from seizing in the aluminum cylinder head, making future removal easier.
Essential Tools
- 5/8″ (16mm) Deep Socket: This is the standard size for the spark plug on this engine. A deep socket is crucial to clear the coil and reach down into the well. A six-point socket provides better grip than a twelve-point.
- Ratchet and Extension: A 3/8″ drive ratchet with a 3-6 inch extension gives you the reach and swing room needed.
- Torque Wrench: This is the most important tool. You must torque the new plugs to the factory specification (typically 13-15 ft-lbs for the Renegade 2.4L, but verify). A click-type torque wrench is perfect for this job.
- Funnel: For cleanly adding dielectric grease or thread locker if you choose to use it.
- Socket for Coil Bolts: Usually a 10mm or 13mm socket. Check yours to be sure.
- Spark Plug Gap Tool: A gapping tool or a set of feeler gauges to verify the factory gap (usually 0.043 inches). While new plugs are often pre-gapped, it’s best practice to check.
- Pliers: Needle-nose pliers are handy for carefully pulling the spark plug wire/connector boots if they are stuck.
- Gloves & Safety Glasses: Keep your hands clean and protect your eyes from debris.
- Parts Brush: A small wire or nylon brush to clean debris from the spark plug wells before removal.
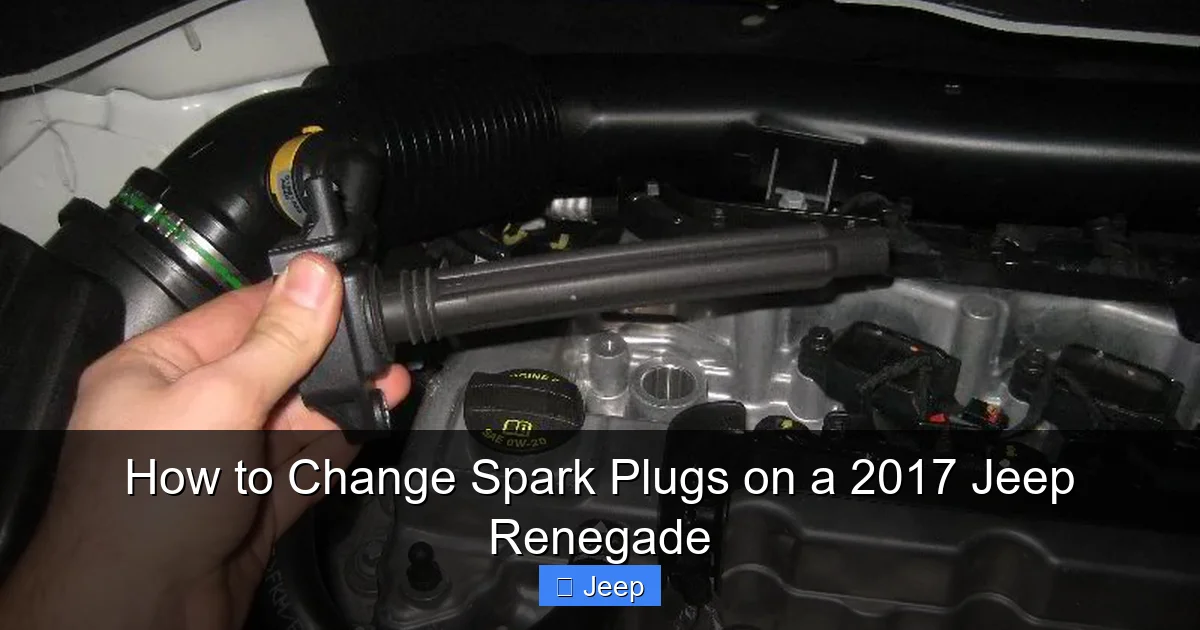
Preparation and Safety First
Rushing into a mechanical job without preparation is the fastest way to make a mistake. A clean, organized workspace is a safe one.
Visual guide about How to Change Spark Plugs on a 2017 Jeep Renegade
Image source: paulstravelpictures.com
Let the Engine Cool Completely
This is non-negotiable. An overheated engine block and exhaust manifold can cause severe burns. Wait at least 2-3 hours after driving. Touch the hood carefully to be sure. Working on a cold engine also prevents the aluminum cylinder head threads from being expanded, which reduces the risk of stripping them when you install the new plugs.
Disconnect the Battery
Locate the negative (-) battery terminal in the engine bay. Use a 10mm wrench to loosen the clamp nut and remove the cable. Tuck it away securely so it can’t flop back and touch the terminal. This prevents any accidental engine start or short circuit while you’re working with the ignition system.
Clean the Work Area
Use your parts brush to gently sweep away any loose dirt, leaves, or debris from around the spark plug coils and valve cover. You don’t want any crud falling into the spark plug wells when you remove the plugs. A clean entry point is key to avoiding expensive cylinder head contamination.
Organize Your Strategy
Label the spark plug wires or coils if they aren’t already numbered (they usually are). You can use tape and a marker, or simply remove and replace them one at a time in order (1-4, front to back). Never remove all the plugs and coils at once. Doing one cylinder at a time eliminates any chance of mixing up the firing order, which would cause a no-start or severe misfire.
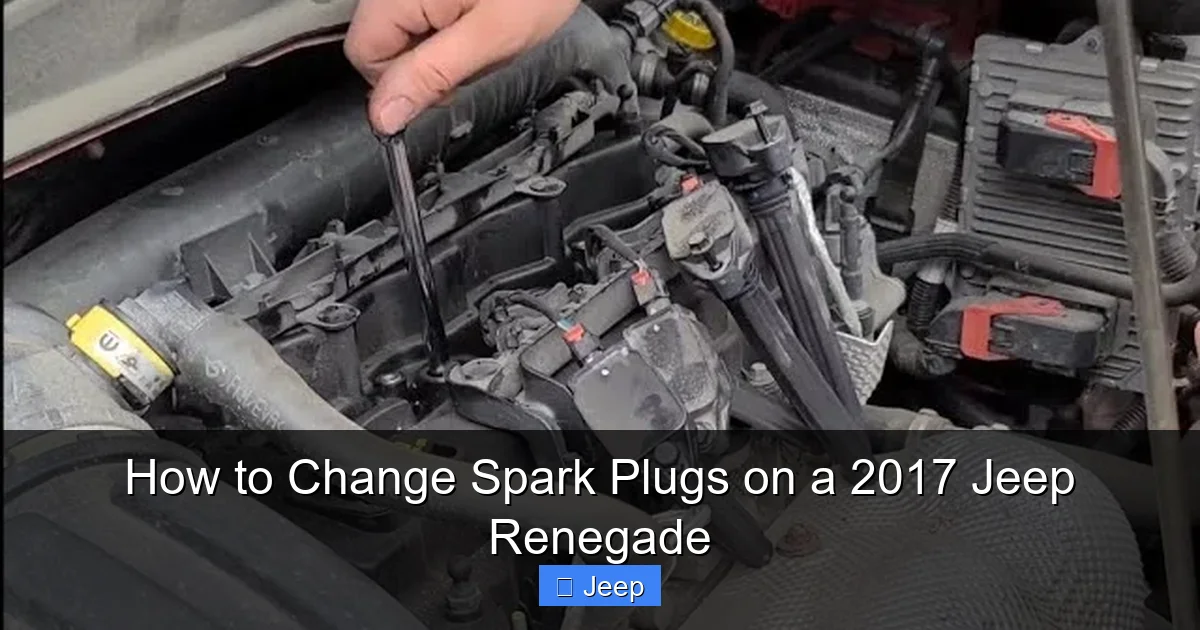
Step-by-Step: Removing the Old Spark Plugs
Now we get to the heart of the matter. Take your time, and don’t force anything.
Visual guide about How to Change Spark Plugs on a 2017 Jeep Renegade
Image source: paulstravelpictures.com
Step 1: Access the Coil
Starting with cylinder #1 (usually the front-most on the driver’s side), locate the ignition coil bolted to the top of the valve cover. It’s a rectangular plastic box with a wiring harness plug on its side. Gently press the tab on the electrical connector and pull it straight off the coil. Do not pull on the wire itself. Place the connector aside where it won’t dangle.
Step 2: Remove the Coil Bolt
Using your 10mm or 13mm socket and ratchet, remove the single bolt holding the coil in place. Be careful; the bolt and washer can fall into the engine bay. Keep them in a small container or magnetic tray. Once the bolt is out, carefully lift the coil straight up and set it aside. The rubber boot on the bottom of the coil will come off the spark plug. If it’s stuck, gently twist it or use pliers on the boot, not the internal parts.
Step 3: Inspect and Clean the Well
With the coil and boot removed, you’ll see the spark plug deep in the well. Use your brush to clean away any debris that has accumulated around the plug’s porcelain top. This prevents dirt from falling into the cylinder when you remove the plug.
Step 4: Remove the Spark Plug
Fit your 5/8″ deep socket onto the ratchet with the extension. Carefully lower it over the spark plug. You’ll feel it engage. Turn the socket counter-clockwise to break the plug loose. It may be tight, especially if the engine is aluminum and the plug has been in there for 100,000 miles. Apply steady, even pressure. If it’s extremely stuck, a light tap on the socket with a hammer can help break the seal, but be gentle. Once loose, unscrew it completely by hand (using the socket) and lift it out. Be mindful of the electrode end; don’t let it bang against the well’s edge.
Step 5: Inspect the Old Plug
This is your diagnostic moment. A photo is worth a thousand words for future troubleshooting.
- Normal: Light tan or gray ceramic, minimal electrode wear.
- Fouled (Oil/Black): Wet, sooty deposits. Could indicate valve seals or piston ring issues.
- Fouled (White/Ash): Blistered, white insulator. Indicates overheating from incorrect heat range or lean condition.
- Worn: Rounded electrode, large gap. Just normal wear at the service interval.
Step-by-Step: Installing the New Spark Plugs
Installation is just as critical as removal. A mistake here can lead to immediate problems or damage that shows up later.
Step 1: Prepare the New Plug
Before you do anything, check the gap. Use your feeler gauge to slide between the center and ground electrode. It should have a slight drag at the specified 0.043″. If it’s too wide, gently tap the ground electrode on a hard surface to narrow it. If too small, use the gauge to pry it open. Handle the porcelain insulator with extreme care; it is fragile. If you choose to use a tiny amount of anti-seize, apply a very thin, even coat only on the threads, not on the first few threads near the sealing surface or on the porcelain.
Step 2: Thread the Plug by Hand
This is the most important step to avoid cross-threading and ruining the expensive aluminum cylinder head. Place the plug’s threads into the well. Turn it clockwise slowly and gently by hand. You should feel it screw in smoothly with no resistance or binding. The first 3-4 turns must be perfectly aligned. If you feel it tighten up or get gritty, stop immediately, remove it, and try again. Forcing it will strip the threads. Once it’s threaded in a few turns, you can use the socket to continue, but still apply gentle pressure.
Step 3: Torque to Specification
Once the plug is finger-tight and seated, use your torque wrench set to 13-15 ft-lbs (consult your manual for the exact spec). Tighten it in a steady, controlled motion until you hear/feel the click. Do not over-tighten. The crush washer on the plug’s seat will compress and seal. Under-torquing can cause a leak and misfire. Over-torquing can crack the porcelain or stretch the threads in the head. The torque wrench is your insurance policy.
Step 4: Reinstall the Coil
Before reinstalling the coil, apply a small amount of dielectric grease to the inside of the rubber boot. This prevents the boot from fusing to the plug’s porcelain over time and makes future removal easier. Press the coil’s boot firmly onto the new spark plug until it seats fully. Reinstall the coil bolt and tighten it securely, but again, don’t over-tighten the plastic. Snug is usually sufficient (about 15-20 inch-pounds). Reconnect the electrical connector until you hear it click.
Step 5: Repeat
Move to the next cylinder in order and repeat steps 1-4. Consistency is key. Work from front to back (1-4).
Final Checks and Reassembly
You’re almost done. These final steps ensure everything is perfect before you start the engine.
Double-Check Everything
Visually confirm that all four coils are securely bolted and all electrical connectors are clicked into place. Ensure no tools, rags, or debris are left in the engine bay. Verify that the spark plug socket and any other tools are accounted for.
Reconnect the Battery
Go back to the battery. Reconnect the negative cable to the terminal and tighten the nut securely. This will restore power to the vehicle’s computer.
Start and Listen
Start the engine. It should crank normally and start without hesitation. Listen carefully. The idle should be smooth and even, not lumpy or rough. There should be no unusual ticking, popping, or misfiring sounds. Let it run for a minute and watch for any warning lights on the dashboard. If the check engine light comes on, use a code reader to see if it’s a misfire code on a specific cylinder, which would indicate an installation issue.
Dispose of Old Plugs Properly
The old spark plugs are considered hazardous waste due to their metal and ceramic composition. You can recycle them at most auto parts stores (like AutoZone or O’Reilly) or with your local hazardous waste program. Do not throw them in the regular trash.
Maintenance Tips and Long-Term Care
Changing your spark plugs is a perfect opportunity to perform other related checks that can save you future headaches.
Consider the Ignition Coils
While you have them out, inspect the bottom of each ignition coil boot. Look for cracks, carbon tracking (black burns), or moisture. A failing coil can cause misfires that ruin a new spark plug. If any coil shows signs of damage or is original with high mileage (over 100k), consider replacing it now. A coil failure will likely set a P030X misfire code and cause a noticeable shake. For more on common Jeep issues, you might find our guide on resetting maintenance lights on similar Fiat Chrysler vehicles helpful for other dashboard warnings.
Check the Air Filter
A clogged air filter makes the engine work harder and can contribute to spark plug fouling from a rich fuel mixture. While you’re under the hood, quickly inspect the engine air filter. If it’s dirty or clogged, replace it. This is another simple DIY task. Our guide on changing an air filter on a Honda Civic shows the universal process that applies to your Renegade as well.
Use Quality Parts and Document
Stick with OEM-specified brands like NGK or Bosch. Cheap, off-brand plugs often have inconsistent gaps and inferior materials. Take a photo of each old plug in its cylinder before removal. This creates a simple record for future reference. Also, note the mileage on a sticker in your engine bay or in your maintenance log.
Know When to Seek Help
If, during removal, a spark plug breaks off in the cylinder head, stop immediately. This is a serious issue requiring professional extraction tools and skills. Similarly, if threads are damaged, a helicoil insert or timesert may be needed. Don’t force it. Also, if your Renegade continues to misfire after a correct plug change, the issue may lie with the fuel injectors, compression, or a faulty new coil. In that case, diagnostic scanning is the next step.
Frequently Asked Questions
How often should I change the spark plugs on my 2017 Jeep Renegade?
Jeep recommends changing the spark plugs every 100,000 miles for the 2.4L engine when using the recommended platinum or iridium plugs. However, if you experience symptoms like poor fuel economy, rough idling, or misfires before that interval, inspect them sooner. Severe driving conditions can shorten their lifespan.
What are the signs of bad spark plugs in a Jeep Renegade?
Common signs include engine misfires (causing a shaking sensation), difficulty starting, decreased acceleration, a noticeable drop in fuel economy, and a check engine light with codes like P0300-P0304. You might also hear unusual popping or backfiring from the exhaust.
Do I need to gap the new spark plugs for a Renegade?
Yes, you always should. While many new plugs are pre-gapped at the factory, they can be damaged in shipping or handling. The factory gap for the 2017 Renegade 2.4L is typically 0.043 inches. Always verify with a feeler gauge and adjust if necessary before installation to ensure optimal performance.
What is the torque spec for spark plugs on a 2017 Jeep Renegade?
The spark plug torque specification for the 2.4L engine is 13-15 foot-pounds (ft-lbs). It is absolutely critical to use a torque wrench. Under-torquing can cause a poor seal and misfires, while over-torquing can crack the ceramic insulator or damage the aluminum cylinder head threads.
Can I use any brand of spark plug in my Jeep Renegade?
You should only use spark plugs that meet Jeep’s specifications for type, heat range, and reach. For the 2.4L, that is typically an NGK Iridium IX (6518) or the direct Champion equivalent. Using the wrong heat range can cause pre-ignition, detonation, or fouling, leading to serious engine damage.
What happens if I over-tighten a spark plug?
Over-tightening is very dangerous. It can crack the delicate ceramic insulator (causing an immediate misfire), stretch and damage the threads in the aluminum cylinder head (leading to a costly repair), or prevent the crush washer from sealing properly, causing a compression leak. Always use a torque wrench and stop at the specified value.


