
How Do I Turn Off the Maintenance Light on a 2010 Toyota Corolla
Contents
- 1 Key Takeaways
- 2 📑 Table of Contents
- 3 Understanding the Maintenance Required Light on Your 2010 Corolla
- 4 Before You Begin: Preparation and Safety
- 5 The Step-by-Step Reset Procedure for a 2010 Toyota Corolla
- 6 Common Mistakes and Troubleshooting
- 7 Beyond the Reset: Understanding Your Corolla’s Maintenance Schedule
- 8 Conclusion: A Simple Reset for Peace of Mind
- 9 Frequently Asked Questions

Pressure Washer for Car
Power Steering Fluid

Car Sunshade for Windshield

LED Indicator Light
The maintenance required light on your 2010 Toyota Corolla is a simple reminder for scheduled service, not an emergency. It illuminates after a set mileage interval, typically signaling an oil change is due. You can reset it yourself in under 30 seconds using only your ignition key and the odometer button, but only after the actual maintenance has been performed. This guide provides the exact procedure, explains what the light means, and highlights why you should never ignore it for long.
You’re driving your trusty 2010 Toyota Corolla, and a small, steady light on the dashboard catches your eye. It’s a little amber icon that looks like a wrench or simply says “MAINT REQD.” You know it’s not the check engine light, but it’s annoying. Your first thought might be, “How do I turn off the maintenance light on a 2010 Toyota Corolla?” You’re in the right place. This is one of the most common and straightforward DIY tasks for Corolla owners. Let’s walk through everything you need to know, from what that light truly means to the precise button-press sequence that will make it disappear—but only after you’ve done the right thing.
The 2010 Corolla’s maintenance required system is a brilliant, low-tech reminder from Toyota. It doesn’t use complex sensors to scan your engine oil’s condition. Instead, it’s a simple mileage counter. After you’ve driven approximately 5,000 miles since the last reset, the system triggers the light to remind you that scheduled maintenance is due. This typically means it’s time for an oil and filter change, along with other inspections outlined in your owner’s manual. It’s a proactive nudge from your car, saying, “Hey, let’s keep you running smoothly.” Because of this simplicity, turning it off is a manual process you can easily do at home. However, the golden rule is absolute: only reset the light after you have completed the necessary maintenance. Resetting it without changing the oil or performing the service is like erasing a to-do list without doing the work. The light will simply come back on, and more importantly, you’ll be risking engine wear. For a broader look at how these systems work across different models, you can explore our general guide on how to turn off the maintenance light on a Toyota.
Key Takeaways
- The light is a mileage-based reminder: It comes on every 5,000 miles to prompt for routine maintenance like an oil and filter change, not because of a sensor fault.
- You must perform the service first: Resetting the light without doing the required maintenance is unsafe and will cause the light to return shortly after.
- The reset takes seconds: For a 2010 Corolla, the process involves a specific button sequence with the ignition key and requires no special tools.
- It’s not the check engine light: The maintenance required light is yellow/amber and says “MAINT REQD,” while a check engine light is usually red/orange and indicates a problem.
- Consult your owner’s manual: It contains the factory maintenance schedule and exact reset instructions specific to your vehicle’s trim and package.
- A persistent light needs diagnosis: If the light won’t reset after following the steps correctly, there may be an underlying electrical or sensor issue requiring a professional.
- Regular maintenance preserves value: Staying on top of these service intervals protects your engine, ensures reliability, and maintains your Corolla’s resale value.
📑 Table of Contents
- Understanding the Maintenance Required Light on Your 2010 Corolla
- Before You Begin: Preparation and Safety
- The Step-by-Step Reset Procedure for a 2010 Toyota Corolla
- Common Mistakes and Troubleshooting
- Beyond the Reset: Understanding Your Corolla’s Maintenance Schedule
- Conclusion: A Simple Reset for Peace of Mind
Understanding the Maintenance Required Light on Your 2010 Corolla
Before you touch a button, it’s helpful to understand exactly what you’re dealing with. This isn’t a warning light for an immediate hazard. Think of it as your car’s calendar alert. The system is designed to illuminate after a predetermined interval—usually 5,000 miles—from the last time it was reset. It’s a fixed timer, not a dynamic sensor. This means the light will come on even if your oil is still perfectly clean, simply because the mileage counter has hit zero. Conversely, if you frequently drive in severe conditions—like extremely hot weather, dusty roads, or lots of short trips where the engine doesn’t fully warm up—you might need service sooner than the 5,000-mile mark. The light won’t know this; it only counts miles. That’s why consulting your owner’s manual for the “Severe Service” schedule is wise.
What the Light Actually Means
When you see that amber wrench or “MAINT REQD” text, your Corolla is telling you it’s due for its A-Service or B-Service, depending on the mileage. For most 2010 Corollas, this first interval is an oil and filter change, tire rotation, and a multi-point inspection. The light is a general reminder for this scheduled maintenance package. It is not specific to the oil alone, though an oil change is the most common component. If other, more urgent issues arise—like low oil pressure, a failing alternator, or an engine misfire—a different warning light (often red) or the check engine light will illuminate. The maintenance required light is a planning tool, not a panic button.
How the System Works: A Simple Counter
Under the hood, the system is elegantly simple. Your car’s computer (ECU) has a small memory chip that stores the mileage at which the last reset occurred. Every mile you drive, it subtracts from a preset value (5,000). When that value reaches zero, it sends a signal to the dashboard to light the maintenance required indicator. There is no oil quality sensor, no pressure sensor for this specific light. This is why the light’s behavior is so predictable. This also means that if you have an oil change performed at a quick-lube shop and they forget to reset the light, it will come on prematurely—often at around 4,500 miles instead of 5,000. Always verify the reset was done after any service. If you’re performing the work yourself, the reset is your final step. For owners of other Toyota SUVs, the principle is identical, though the button locations may differ, as seen in our guide for the 2020 Toyota RAV4.
It’s Not an Emergency, But Don’t Ignore It Long-Term
Seeing that light can be unsettling if you don’t know what it is. Rest assured, your car is not about to break down because of it. You can safely drive for a few hundred miles after it comes on to schedule and complete your service. However, deliberately ignoring it for thousands of miles is a different story. Sticking to the 5,000-mile oil change interval (or your manual’s recommendation) is crucial for engine longevity. Modern synthetic oils can last longer, but the 2010 Corolla’s engine was designed with this interval in mind. Prolonged delays can lead to oil sludge, increased engine wear, and poor fuel economy. So, while you have a small grace period, treat the light as a firm, friendly deadline.
Before You Begin: Preparation and Safety
Now that you know what the light means, let’s get ready to turn it off. The actual reset process takes seconds, but proper preparation ensures it works smoothly and safely. This is the most critical part: confirming the maintenance is done. If you just changed the oil and filter yourself, great. If you had a shop do it, double-check that they performed the reset. If they didn’t, here’s how you do it. Gather nothing more than your car key. You do not need any special tools, scan tools, or to pop the hood. The entire procedure is done from the driver’s seat using the ignition and the odometer/trip meter reset button, which on the 2010 Corolla is the small, black button on the instrument cluster near your speedometer.

Visual guide about How Do I Turn Off the Maintenance Light on a 2010 Toyota Corolla
Image source: i.ytimg.com
Step 1: Confirm All Required Service is Complete
This cannot be stressed enough. Did you change the oil and filter? Did you rotate the tires? Did you inspect the belts, hoses, and fluid levels as recommended? If you skipped any of these, the reset is meaningless. The purpose of the system is to ensure maintenance happens. By resetting it, you are telling the car’s computer, “The service for this 5,000-mile cycle is complete.” If that statement is false, you are misleading your car and yourself. Take a moment to review your service records or receipts. If you’re unsure what service is due at your current mileage, your owner’s manual has a detailed maintenance schedule chart. For a general overview of common Toyota service items, our article on resetting the maintenance required light on a Toyota outlines typical procedures.
Step 2: Position Your Vehicle and Prepare the Ignition
Park your Corolla on a level surface. Engage the parking brake firmly. You do not need to start the engine, but you do need to turn the ignition to the “ON” or “ACC” position, which is the position right before the engine starts. This powers up the dashboard lights and the computer without cranking the engine. Make sure all doors are closed and any accessories (radio, lights) are off to minimize electrical drain during the brief process. Have your key ready. For this model year, you will use the traditional metal key, not a key fob button.
Step 3: Locate the Odometer/Trip Meter Reset Button
On the 2010 Toyota Corolla, the button you need is on the instrument cluster itself, just to the right of the speedometer. It’s a small, black, rectangular button. Its official function is to switch between the odometer and trip meter displays and to reset the trip meters. We will repurpose it for the maintenance light reset. Familiarize yourself with its location before you start the sequence. You’ll need to press and hold it for several seconds.
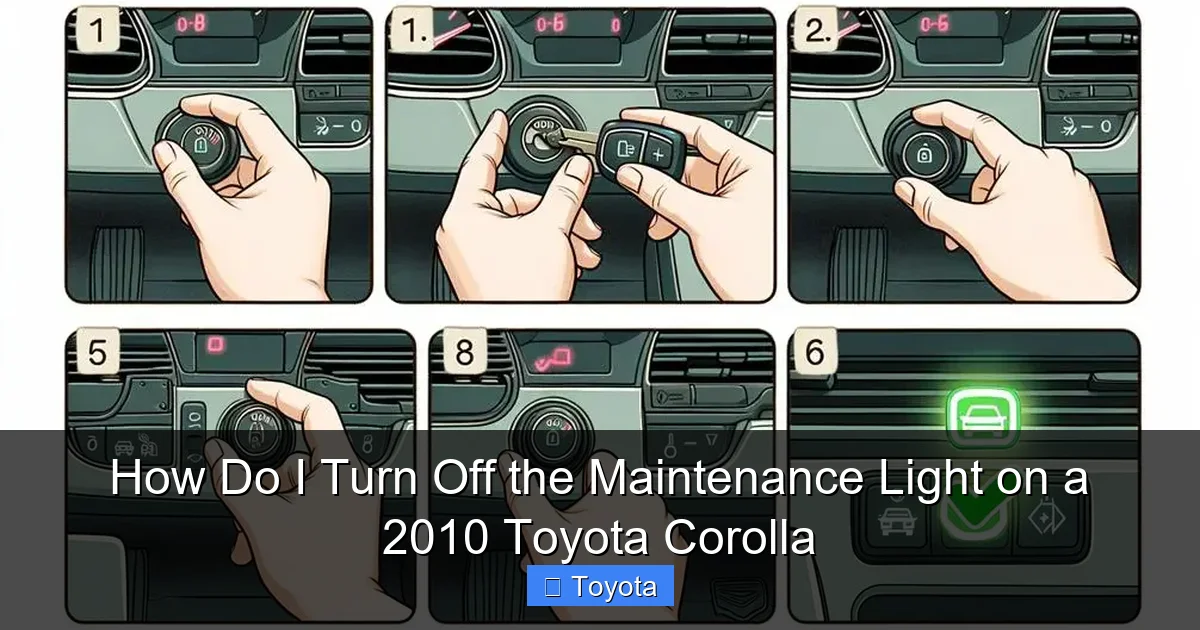
The Step-by-Step Reset Procedure for a 2010 Toyota Corolla
Here it is—the core of your request. The method for the 2010 Corolla is consistent and reliable. It involves a specific sequence of turning the key and pressing the button. Follow these steps exactly. The entire process should take less than 15 seconds once you get the hang of it.

Visual guide about How Do I Turn Off the Maintenance Light on a 2010 Toyota Corolla
Image source: i.ytimg.com
Method 1: The Traditional Odometer Button Technique
This is the standard method for 2010 Corollas and many preceding model years. It’s a manual override accessed through the instrument cluster.
- Turn the ignition OFF. Ensure the key is removed from the ignition or turned to the lock position.
- Press and hold the odometer/trip meter reset button. Locate the button on the instrument cluster. Press it down and keep it held down. Do not release it yet.
- While still holding the button, turn the ignition to the “ON” position. Insert the key and turn it to the position where your dashboard lights come on (the position right before you’d crank the engine). You are holding the button down the entire time.
- Continue holding the button for 5-10 seconds. You should see the odometer display start to blink, or the maintenance required light may start to blink and then go out. This is your confirmation that the reset sequence is active.
- Release the button. After the light blinks and goes out, you can release the reset button.
- Turn the ignition OFF and then back ON. To verify the reset was successful, turn the key completely off, wait a second, and then turn it back to the “ON” position. The maintenance required light should be off. It will remain off until you accumulate another 5,000 miles.
If the light does not go out, ensure you are holding the button long enough (at least 5 seconds) and that you started with the ignition OFF. Sometimes the sequence needs to be repeated. If it still fails after 2-3 attempts, there may be an issue, which we’ll address later. The procedure is very similar for other Toyota models of this era. For instance, resetting the light on a Toyota Highlander from a similar generation uses the same button-hold method.
Method 2: Using the Multi-Function Display (If Equipped)
Some 2010 Corolla trims, particularly the LE or XLE, may have a more advanced multi-information display that shows trip data, fuel economy, and maintenance alerts. If your car has this screen with settings accessed via steering wheel buttons, the reset might be done through a menu. However, this is less common for the base 2010 model. The vast majority of 2010 Corollas use the simple odometer button method described above. If your car has the display, consult your owner’s manual under “Maintenance Reset” or “Settings” for the exact menu path. It typically involves going to the “Settings” or “Vehicle Settings” menu, selecting “Maintenance,” and then choosing “Oil Maintenance” or “Maintenance Reset” and confirming. But again, for a standard 2010 Corolla, the physical button method is almost certainly your answer.
Common Mistakes and Troubleshooting
You followed the steps, but the little wrench is still glaring at you. Don’t panic. A failed reset is usually due to a simple user error or, less commonly, an underlying issue. Let’s troubleshoot.
Why Your Reset Might Fail
The most frequent mistake is not starting with the ignition completely OFF. The sequence must begin with the key out of the “ON” position. If you start with the car already on, the computer won’t register the reset command. Another error is not holding the button long enough. You need to hold it for at least 5-6 seconds after turning the key to “ON.” Watch for the odometer to blink—that’s your cue. Also, ensure you are pressing the correct button. On the Corolla, it’s the single button used for odometer/trip functions. Do not confuse it with the headlight knob or any button on the steering wheel. Finally, if the battery is very weak, the system might not reset properly. A weak battery can cause all sorts of electrical gremlins. If your battery is original (from 2010!) or you’ve had starting issues, consider a battery test or replacement first.
When to Consult a Professional
If you have meticulously followed the correct procedure multiple times and the maintenance required light remains illuminated, there is a possibility of a deeper problem. The system’s memory could be corrupted, or there might be an issue with the instrument cluster itself. While rare, it can happen. At this point, a professional diagnosis is warranted. A mechanic or dealership can use a professional scan tool to communicate directly with the vehicle’s computer and force a reset, or they might identify a faulty component. Also, if the light comes back on immediately after a successful reset and a short drive, it could indicate that the maintenance was not actually completed correctly (e.g., an oil filter wasn’t tightened, causing a leak and low oil pressure which might trigger other systems). This is a safety issue that needs immediate attention. For other dashboard lights, like the battery or ABS lights on different models, the diagnostic process is more complex, as seen in guides for a Toyota Corolla battery light or a Nissan Altima ABS light.
Beyond the Reset: Understanding Your Corolla’s Maintenance Schedule
Resetting the light is the final step, but it’s only meaningful if you understand what work it represents. The 5,000-mile interval for your 2010 Corolla is not arbitrary. It’s Toyota’s recommendation based on the engine design, oil technology of the time, and typical driving conditions. Let’s break down what “maintenance required” usually entails at this interval.
Factory-Recommended Service at 5,000 Miles
For the first few service intervals, the core task is an oil and filter change using the recommended oil viscosity (likely 5W-20 or 5W-30 for the 1.8L engine). Alongside this, a tire rotation is standard to ensure even tread wear. The technician (or you) should also perform a multi-point inspection: checking fluid levels (coolant, brake, power steering, washer), inspecting belts and hoses for cracks, checking the battery, examining the brakes, and looking for any leaks. This is a comprehensive health check. Your owner’s manual has a detailed checklist. As the car ages and mileage climbs, later “B” services will include more items like spark plugs, air filters, and fuel filters at specified intervals (e.g., 30k, 60k, 90k miles). Sticking to this schedule is what keeps your Corolla’s legendary reliability intact.
Severe vs. Normal Driving Conditions
The 5,000-mile interval is for “normal” driving. If your driving habits fall into the “severe” category, you should shorten this interval, often to 3,000-4,000 miles for oil changes. Severe conditions include: frequent short trips (less than 5-10 miles) where the engine doesn’t fully warm up, driving in extremely hot or cold climates, extensive idling, towing a trailer, or driving on dusty, sandy, or muddy roads. Many people’s daily driving actually qualifies as severe. If this sounds like you, consider more frequent oil changes. The maintenance light won’t adjust for this—it will still come on at 5,000 miles—so you may be resetting it more often than you’re changing the oil. That’s okay; the system is a minimum standard. For more on related maintenance, like how to properly check your oil or understand other service lights, resources on basic Corolla upkeep can be helpful.
Keeping Your Own Maintenance Records
Even though the car has this reminder system, keeping a separate, detailed logbook (physical or digital) is a best practice. Note the date, mileage, service performed, and where it was done (shop or DIY). This is invaluable when you sell the car, as it proves to a buyer that the vehicle has been well-cared for. It also helps you track upcoming services beyond the simple oil change, like timing belt replacements (though the 2010 Corolla’s timing chain is generally considered “lifetime” but still benefits from inspection) or major fluid changes. The maintenance light reset is just one data point in your car’s overall service history.
Conclusion: A Simple Reset for Peace of Mind
Turning off the maintenance required light on your 2010 Toyota Corolla is a empowering little DIY task. It reinforces the connection between you and your vehicle and ensures you’re actively participating in its care. Remember the core principle: service first, reset second. With the engine off, press and hold the odometer button while turning the key to the “ON” position, and hold until the display blinks. That’s it. You’ve just completed the cycle. This small act acknowledges the work done and resets the counter for another faithful 5,000 miles. By understanding what the light means, performing the necessary maintenance, and executing the reset correctly, you’re doing right by one of the most reliable cars on the road. Your Corolla will continue to reward you with dependable, economical transportation for years to come. If you ever doubt the process, your owner’s manual is the ultimate authority. And for other Toyota models, from the Yaris to the Tundra, the fundamental logic is the same, even if the button locations vary slightly.
Frequently Asked Questions
Will the maintenance light turn off by itself after I drive enough miles?
No. The maintenance required light is a manual reset system. It will stay illuminated continuously once it comes on until you intentionally perform the reset sequence. It does not auto-extinguish after a set number of miles.
What should I do if the maintenance light won’t reset after I’ve changed the oil?
First, double-check you followed the exact key-and-button sequence correctly, starting with the ignition OFF. If it still fails, ensure the battery is strong. A weak battery can prevent the reset. If the problem persists, a faulty instrument cluster or a corrupted computer memory may be the cause, requiring a professional technician with a scan tool.
Can I reset the maintenance light without changing the oil?
Technically yes, you can follow the button sequence to turn it off. However, this is strongly discouraged. The light is a critical reminder that service is due. Resetting it without performing the oil change and inspection risks engine damage and defeats the purpose of the system. The light will likely come back on very quickly as well.
Is the procedure the same for all 2010 Toyota Corolla trims?
Yes, for the vast majority of 2010 Corolla models (base, LE, S), the reset procedure using the odometer button is identical. Only if your specific vehicle is equipped with the optional full-color multi-information display might there be a menu-based reset, but this was rare for the 2010 model year. The physical button method is standard.
How do I know if the light is for an oil change or other maintenance?
The maintenance required light on your 2010 Corolla is a general reminder for the 5,000-mile service interval, which primarily includes an oil/filter change and tire rotation. It is not specific to one item. Your owner’s manual’s maintenance schedule table will tell you exactly which services are due at your current mileage.
Do I need any special tools or a code reader to reset this light?
No. Resetting the maintenance required light on a 2010 Toyota Corolla requires no tools whatsoever—not even a wrench. You only need your car key. The process is completed manually using the ignition and the odometer reset button on the dashboard. A scan tool is unnecessary for this specific task.


