
How Do You Reset the Warning Light on a Toyota Rav4?
Contents
- 1 Key Takeaways
- 2 📑 Table of Contents
- 3 Understanding Your RAV4’s Dashboard Language: Types of Warning Lights
- 4 Essential Preparation Before You Begin
- 5 How to Reset the Maintenance Required Light on a Toyota RAV4
- 6 How to Reset the Check Engine Light on a Toyota RAV4
- 7 How to Reset the Tire Pressure Light (TPMS) on a Toyota RAV4
- 8 Resetting Other Common RAV4 Warning Lights
- 9 When to Seek Professional Help: Don’t Gamble with Safety
- 10 Frequently Asked Questions
Resetting a warning light on your Toyota RAV4 isn’t always a simple button press. The correct procedure depends entirely on which light is illuminated—a maintenance reminder is very different from a check engine light. Always diagnose the underlying issue first, as resetting a serious warning without repair is unsafe. For common lights like the maintenance required or tire pressure warnings, a manual or sequential button process often works, but for complex issues, a professional scan tool is necessary.
That little light on your dashboard glowing like a tiny, judgmental eye. Whether it’s a familiar wrench icon or a more ominous orange engine, seeing a warning light in your Toyota RAV4 can instantly cause a knot in your stomach. Your first thought is likely, “How do I make it go away?” But before we dive into the “how,” we need to talk about the “why” and the “should you.” Resetting a warning light is not always the right first step. This comprehensive guide will walk you through identifying the light, understanding what it means, and the safe, correct procedures to reset it on your RAV4, covering all generations from the early 2000s to the current 2024 model.
Think of your RAV4’s dashboard as a communication panel from your car to you. Each light is a message. Some messages are polite reminders (“Hey, it’s time for an oil change!”), while others are urgent alerts (“The engine is overheating! STOP!”). Our job is to be good translators. We’ll break this down by the most common warning lights you’ll encounter, starting with the simplest and moving to the more complex. Remember the golden rule: You should only reset a warning light after you have addressed and repaired the problem that triggered it. Simply turning off the light without fixing the issue is like taking the battery out of your smoke detector instead of putting out the fire.
Key Takeaways
- Not All Lights Are Created Equal: A “Maintenance Required” light is a simple reminder, while a “Check Engine” light indicates a diagnosed problem that must be fixed before resetting.
- Safety Comes First: Never reset a warning light for a critical system (like ABS, airbags, or engine misfire) without first repairing the cause. Doing so can be dangerous and cause further damage.
- Your Owner’s Manual is Your Best Friend: The exact reset procedure for your specific model year (2013-2024) is always in the manual. Procedures can change between generations.
- TPMS Resets Often Require a Drive Cycle: After resetting the tire pressure light, you usually need to drive at highway speed for several minutes for the system to relearn sensor positions.
- A Scan Tool is Often Necessary: For check engine lights and some other warnings, a simple button sequence won’t work. You’ll need an OBD-II scanner to clear the fault code after repair.
- Model Year Matters: The reset method for a 2012 RAV4 differs from a 2023 RAV4. Always verify the process for your vehicle’s specific year and trim.
- When in Doubt, Seek a Pro: If the light returns immediately after a reset, or if you’re unsure of the cause, consult a qualified mechanic or Toyota dealership.
📑 Table of Contents
- Understanding Your RAV4’s Dashboard Language: Types of Warning Lights
- Essential Preparation Before You Begin
- How to Reset the Maintenance Required Light on a Toyota RAV4
- How to Reset the Check Engine Light on a Toyota RAV4
- How to Reset the Tire Pressure Light (TPMS) on a Toyota RAV4
- Resetting Other Common RAV4 Warning Lights
- When to Seek Professional Help: Don’t Gamble with Safety
Understanding Your RAV4’s Dashboard Language: Types of Warning Lights
Before you can reset a light, you must correctly identify it. Toyota uses a standardized set of icons, but their meaning is consistent. Let’s decode the most common ones you’ll see on a RAV4.
The “Maintenance Required” or “Service Engine Soon” Light
This is the most common and least alarming light. It typically looks like a wrench icon or says “MAINT REQD.” This is a simple mileage- or time-based reminder from your car’s computer that it’s time for routine scheduled maintenance—usually an oil change, tire rotation, and a multi-point inspection. It does not indicate a problem. It’s a pre-programmed timer. Resetting it is a simple procedure you can do yourself after the maintenance is performed. If you’ve just had service and the light is still on, that’s a clear sign the technician forgot to reset it, which is a common oversight. You can find a general guide for resetting the maintenance required light on any Toyota here, but we’ll cover the RAV4 specifics later.
The “Check Engine” Light (MIL – Malfunction Indicator Lamp)
This is the famous yellow or orange engine-shaped icon. This is not a reminder; it’s a diagnosis. When this light comes on, your RAV4’s computer (ECU) has detected a problem with the emissions system, engine, or transmission that is outside of acceptable parameters. It has stored a Diagnostic Trouble Code (DTC) in its memory. The light could be triggered by something as simple as a loose gas cap or as serious as a failing catalytic converter. You must diagnose the cause using an OBD-II scanner before even considering a reset. Resetting it without repair will cause the light to return, often within a few drive cycles, and you’ll be back to square one. For context, the process for a Toyota Corolla’s check engine light is the same fundamental principle, but always consult your RAV4’s manual for specifics.
The Tire Pressure Monitoring System (TPMS) Light
This is an exclamation point inside a tire cross-section icon. It means your RAV4 has detected a significant difference in tire pressure between one or more tires and the system’s learned baseline. This could be due to a slow leak, a puncture, or simply seasonal temperature changes causing pressure to drop. Before resetting this light, you must check and adjust the tire pressure in all four tires (and the spare, if equipped with a sensor) to the PSI listed on the driver’s door jamb sticker. Once pressures are correct, you’ll need to perform a reset procedure to tell the system the new pressures are the normal baseline.
Other Critical Warning Lights
Lights for the brake system (often an exclamation point in a circle with parentheses), ABS (letters “ABS” in a circle), airbag (a person with a circle/belt), oil pressure (an old-style oil can), and battery (a battery icon) indicate serious, potentially unsafe conditions. Do not attempt to reset these lights yourself without first diagnosing and repairing the underlying fault. These systems are critical for safety. For example, an airbag light means the system is deactivated and may not deploy in a crash. A brake light could mean low fluid or a system failure. These require immediate professional attention. The procedure for an airbag light on a Toyota Camry involves complex diagnostics and should only be done by a technician.
Essential Preparation Before You Begin
So you’ve identified the light. It’s a simple maintenance reminder or a TPMS light after you’ve inflated the tires. You’re ready to reset. Hold on. A few quick prep steps will make the process smooth.
Visual guide about How Do You Reset the Warning Light on a Toyota Rav4?
Image source: i.ytimg.com
Gather Your Tools (Usually Just Your Hands and the Manual)
For most RAV4 maintenance and TPMS resets, you need no tools—just your fingers to press buttons. For the check engine light, you will need an OBD-II scanner. You can buy a basic one for $20-$50, borrow one from an auto parts store (many offer free loaner tools), or have a shop do it. Ensure your RAV4’s battery is in good condition; a weak battery can sometimes cause false warnings or interrupt reset procedures.
Locate Your Owner’s Manual
This is non-negotiable. The exact button sequence, menu path, and drive cycle requirements can vary slightly between model years. A 2019 RAV4 is different from a 2022 RAV4. The manual will have the definitive, factory-correct procedure for your specific vehicle. If you don’t have the physical manual, Toyota often has digital copies available on their owner’s portal.
Safety First: Park and Prepare
Ensure your RAV4 is parked on level ground, the parking brake is set, and the engine is turned off. For TPMS resets, make sure all tires are cold (driven less than 1-2 miles) and inflated to the correct pressure. For any procedure, turn off all accessories (radio, lights, AC) to avoid electrical drains or interference.
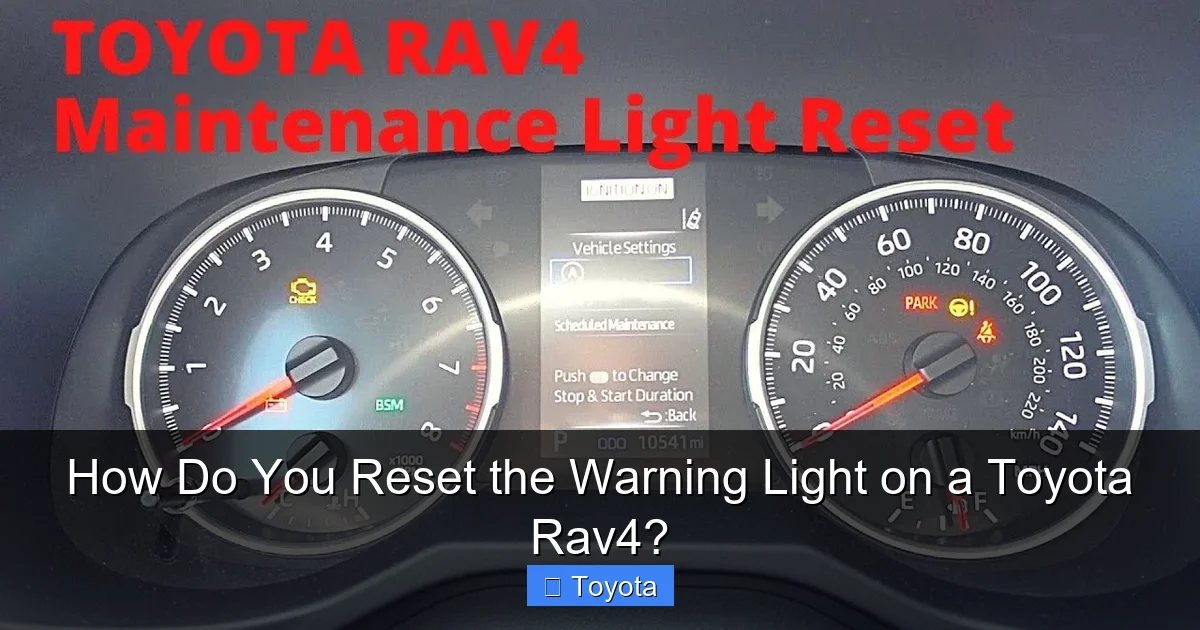
How to Reset the Maintenance Required Light on a Toyota RAV4
This is the most frequently asked question. The good news is that for most RAV4s from the mid-2000s onward, the process is remarkably similar and straightforward. The light is simply a reminder that a set mileage or time interval has passed since the last reset.
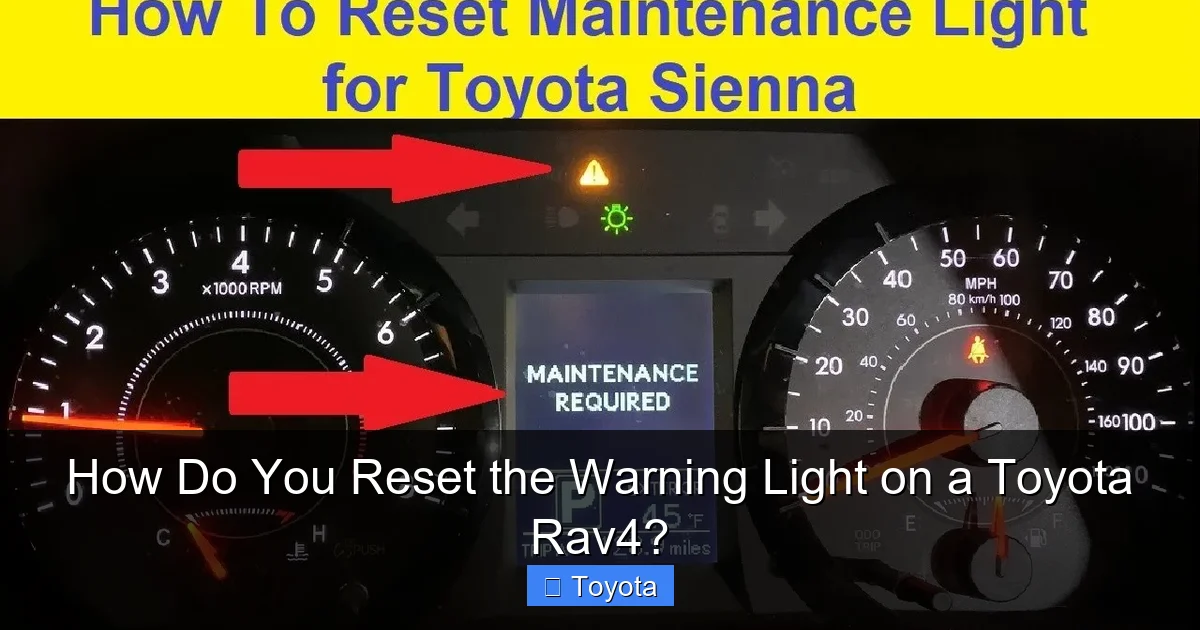
Visual guide about How Do You Reset the Warning Light on a Toyota Rav4?
Image source: i.ytimg.com
The Classic Multi-Button Reset (Most Models 2006-2024)
This method works for a huge range of RAV4 years. The trick is finding the right combination of the odometer display button and the trip meter reset button. They are often the same physical button.
- Turn the ignition to the “ON” position (all dash lights on, but do not start the engine).
- Press the odometer/trip meter reset button (usually on the instrument cluster near the speedometer) until the display shows the total odometer reading (not a trip reading).
- Turn the ignition “OFF.”
- Now, while holding down the reset button, turn the ignition back to “ON.”
- Continue holding the button. After a few seconds, you’ll see the maintenance light begin to blink, then go out, or the odometer display will show “000000” or “—-” for a few seconds before returning to normal.
- Release the button. The light should be off. Start the engine to verify.
Note: On some newer models (like certain 2019-2024 hybrids), the process might be done through the multi-information display on the steering wheel using the “Menu” or “Disp” buttons. You’ll navigate to “Settings” > “Vehicle Settings” > “Maintenance” > “Reset.” Your manual is key here.
What If the Light Comes Back Immediately?
If the maintenance light comes back on right after a reset, it means the system’s internal counter did not properly zero. Try the procedure again, ensuring you hold the button long enough to see the blink or change in display. If it persists, there may be an electrical glitch, or the system may require a scan tool reset, which a dealer or shop can provide.
How to Reset the Check Engine Light on a Toyota RAV4
This is the most important section. Re-read the safety warning above. Do not reset this light without diagnosing and repairing the problem.

Visual guide about How Do You Reset the Warning Light on a Toyota Rav4?
Image source: carscounsel.com
Step 1: Diagnose the Problem
Use an OBD-II scanner (any standard scanner works on any 1996+ vehicle) plugged into the port under the dashboard, usually to the left of the steering column. Turn the ignition to “ON” and follow the scanner’s prompts to read the stored codes. A code like “P0171” (System Too Lean) means something very different from “P0300” (Random/Multiple Cylinder Misfire). Look up the code or take it to a professional. Fix the problem first. This could be replacing a faulty oxygen sensor, tightening a gas cap, repairing a damaged catalytic converter, or addressing a serious engine misfire.
Step 2: Clear the Code (The Reset)
Once the repair is complete, you have two options:
- Drive Cycle: For minor issues (like a loose gas cap), simply driving the car normally for 50-100 miles may allow the computer to see the problem is gone and turn the light off on its own.
- Manual Clear: Using the same OBD-II scanner, go to the “Erase Codes” or “Clear DTC” function. This sends a command to the ECU to wipe the stored fault history. The light should go out immediately.
Critical: After clearing the code, drive the car normally. If the problem is truly fixed, the light will stay off. If the problem persists, the light will return, often within 1-3 drive cycles. This is your confirmation that the repair was successful or that further diagnosis is needed.
How to Reset the Tire Pressure Light (TPMS) on a Toyota RAV4
This light is a pain, but it’s usually an easy fix. It’s triggered by a difference of more than 25% in pressure between tires.
The Prerequisite: Inflate All Tires Correctly
Find the recommended PSI on the sticker on your driver’s door jamb (not the tire sidewall). Inflate all four tires, including the spare if it has a sensor, to this exact pressure. Use a reliable gauge. Cold tires (driven less than 2 miles) give the most accurate reading.
The Reset Procedure for Most RAV4s
Once tires are properly inflated:
- Turn the ignition to “ON.”
- Look for a “TPMS” or “SET” button, usually located under the dash near the steering column or on the lower dash panel to the left of the steering wheel. On some models, there is a dedicated button with a TPMS icon.
- Press and hold the “TPMS” or “SET” button until you hear a beep and see the TPMS light on the dash blink three times, then turn off. This may take 2-5 seconds.
- Release the button. The light should go out. If it stays on, the system may not have received signals from all sensors. Drive the car at 50+ mph for 10-15 minutes. The sensors will transmit, and the system should reset itself after learning the new positions/pressures.
For RAV4s with a Multi-Information Display: You may need to navigate: “Menu” > “Vehicle Settings” > “TPMS” > “Initialize” or “Set Pressure.” The screen will guide you.
Why the Light Might Come Back
If the TPMS light returns quickly, you likely have a slow leak in one of the tires. A tire shop can check for punctures or faulty valve stems. A bad TPMS sensor (the battery inside lasts 7-10 years) will also trigger the light and needs replacement.
Resetting Other Common RAV4 Warning Lights
Let’s briefly touch on a few others you might see.
Oil Change Reminder Light
This is often part of the “Maintenance Required” system but can sometimes be a separate oil can icon. The reset is usually identical to the main maintenance light reset procedure described above. It’s simply a different reminder trigger within the same system. You can also find a specific guide for resetting the oil light on any Toyota.
ABS Light
An illuminated ABS light means the Anti-lock Braking System has a fault and is disabled. Your regular brakes will still work, but you lose the anti-lock functionality. Do not reset this yourself. It requires a professional scan tool with ABS capability to diagnose the wheel speed sensor or module issue. If the problem is fixed, the technician will clear the code.
Master Warning Light (Yellow Triangle with Exclamation)
This is a general catch-all. It could mean a low washer fluid, a burnt-out headlight, a door ajar, or something more serious. Check your owner’s manual for the specific message that should appear on your multi-information display when this light is on. It will tell you exactly what system needs attention. Fix that issue, and the light should go away on its own or require a simple reset of that specific subsystem.
When to Seek Professional Help: Don’t Gamble with Safety
We’ve emphasized it, but it bears repeating. Your instinct to make a warning light disappear is natural, but your safety is paramount. Here is your clear decision tree:
- If the light is red: Stop the vehicle as soon as it is safe to do so. Red means danger (low oil pressure, overheating, severe brake failure). Do not drive. Call for tow/assistance.
- If it’s a check engine light that is flashing: A flashing MIL indicates a severe misfire that can damage the catalytic converter. Stop driving immediately and have the vehicle towed.
- If it’s an ABS, Airbag, or Brake System light: Drive with extreme caution to a trusted repair shop immediately. Do not attempt a reset.
- If the light returns immediately after a reset you performed: This means the problem is still present or a new one has occurred. Stop resetting and get a diagnosis.
- If you are unsure of the light’s meaning: Look it up in your manual. If still unclear, call your dealer or a mechanic.
A professional scan tool, like the one a Toyota technician uses, can read all module codes (engine, transmission, ABS, airbag, etc.) and perform system-specific resets and calibrations that a consumer-grade OBD-II tool cannot. For complex warnings, this is the only safe path.
In conclusion, your Toyota RAV4 is a sophisticated machine that communicates clearly through its dashboard. By learning to listen—to identify the specific light, understand its message, and respond appropriately—you become a more confident and responsible owner. For the simple, non-critical reminders like the maintenance light, you now have the power to reset it yourself after service. For everything else, a measured, diagnostic-first approach is the only way to ensure your RAV4 remains the reliable, safe companion it was built to be. When in doubt, the peace of mind from a professional diagnosis is always worth the investment.
Frequently Asked Questions
Can I reset the check engine light by disconnecting the battery?
Yes, disconnecting the negative battery terminal for 10-15 minutes will clear the ECU’s memory, including the check engine light. However, this also resets all other learned data (radio presets, climate control settings, transmission shift points) and is not a recommended procedure. More importantly, it does not fix the underlying problem, so the light will return. The proper method is to use an OBD-II scanner after the repair is made.
How many miles can I drive with the maintenance required light on?
The maintenance required light is simply a reminder for scheduled service. You can drive thousands of miles with it on, but it’s best to schedule your oil change and inspection as soon as convenient. Ignoring it for too long risks engine wear from old oil and misses other critical safety checks outlined in your maintenance schedule.
Why does my tire pressure light keep coming back after I reset it and inflate the tires?
This usually indicates one of two problems: 1) A slow leak in one of the tires from a puncture or a faulty valve stem, or 2) A dead or failing TPMS sensor. The sensor battery inside the valve stem typically lasts 7-10 years. If your RAV4 is older, a sensor replacement may be necessary. A tire shop can diagnose which sensor is faulty or find the leak.
Do I need to reset the TPMS after rotating my tires?
Yes, absolutely. The TPMS system learns the position of each sensor. When you rotate the tires, the sensors move to different wheel locations. If you don’t perform a TPMS reset/relearn procedure, the system will think the tire in the new location is under-inflated and trigger the light. The reset tells the computer to learn the new positions.
I just had my oil changed. Why is the maintenance light still on?
This is a very common oversight by quick-lube shops. The technician simply forgot to reset the maintenance reminder timer after performing the service. You can reset it yourself using the button procedure in your owner’s manual or by following the standard process for your RAV4’s model year.
Are the reset procedures the same for all Toyota RAV4 model years?
No. While the basic principle for the maintenance light (using the odometer button) has been consistent for over 15 years, the exact steps and button locations can vary. Newer models (2020+) with full digital gauges and steering wheel controls often require using the multi-information display menus. Always consult your specific owner’s manual for the correct procedure for your vehicle.


