
How to Reset the Maintenance Required Light on Toyota
Contents
- 1 Key Takeaways
- 2 📑 Table of Contents
- 3 Why Does the Maintenance Required Light Come On?
- 4 How to Reset the Maintenance Required Light on Older Toyota Models (2000–2017)
- 5 How to Reset the Light on Newer Toyota Models (2018–Present)
- 6 Model-Specific Reset Instructions
- 7 When to Reset the Light (and When Not To)
- 8 What If the Light Won’t Turn Off?
- 9 Conclusion
- 10 Frequently Asked Questions
Resetting the maintenance required light on your Toyota is easier than you think—no mechanic needed. With just a few button presses or ignition cycles, you can clear the reminder and keep your dashboard clean after an oil change or service.
So, you just changed your oil, rotated your tires, or had your Toyota serviced—and now that little yellow or orange “Maintenance Required” light is still blinking on your dashboard. Frustrating, right? You know the work’s done, but the car won’t let you forget. The good news? You don’t need to drive back to the dealership or pay a technician $50 just to turn off a light. Resetting the maintenance required light on your Toyota is a quick, DIY-friendly task that takes less than two minutes—once you know the steps.
This guide walks you through the process for nearly every Toyota model from the early 2000s to today. Whether you drive a trusty Corolla, a rugged Tacoma, a family-friendly Highlander, or a sleek Prius, we’ve got you covered. We’ll break down the methods by model year and type, explain common pitfalls, and share pro tips to ensure the light stays off until your next scheduled service. No tools, no fancy gadgets—just your hands, your key (or push-button start), and a little patience.
Key Takeaways
- Know your model year: Reset procedures vary slightly between older and newer Toyota models, so check your vehicle’s year before starting.
- Use the trip meter button: Most Toyotas from 2000–2017 use the trip odometer button to access the reset menu.
- Turn the ignition to “ON”: You don’t need to start the engine—just turn the key to the second position or press the start button without your foot on the brake.
- Hold the button for 10–15 seconds: Timing is key—holding too briefly or too long can prevent the reset.
- Confirm the light goes off: Once reset, the maintenance required light should disappear and stay off until the next service interval.
- Newer models may use the steering wheel controls: Vehicles like the 2018+ Camry or RAV4 often require navigating through the multi-information display.
- When in doubt, consult your owner’s manual: Toyota provides model-specific instructions—always a reliable first stop.
📑 Table of Contents
- Why Does the Maintenance Required Light Come On?
- How to Reset the Maintenance Required Light on Older Toyota Models (2000–2017)
- How to Reset the Light on Newer Toyota Models (2018–Present)
- Model-Specific Reset Instructions
- When to Reset the Light (and When Not To)
- What If the Light Won’t Turn Off?
- Conclusion
Why Does the Maintenance Required Light Come On?
Before we dive into the reset steps, it helps to understand what this light actually means. Unlike the “Check Engine” light—which signals a potential mechanical issue—the maintenance required light is purely a reminder. Toyota uses a time- or mileage-based system to prompt owners when it’s time for routine service, like oil changes, tire rotations, or inspections.
Most Toyotas are programmed to trigger this light every 5,000 to 10,000 miles, depending on your driving habits and the model. Some newer vehicles even adjust the interval based on how you drive—frequent short trips or stop-and-go traffic may shorten the interval, while highway driving can extend it. The system isn’t tracking actual engine health; it’s just a nudge to keep up with preventive care.
What Triggers the Light?
The maintenance required light typically comes on due to one of two reasons:
- Mileage-based interval: Your Toyota’s computer counts down from the last reset and illuminates the light when you hit the preset mileage (usually 5,000 or 10,000 miles).
- Time-based interval: Even if you haven’t driven much, the light may appear after 6 or 12 months to remind you that fluids and filters degrade over time.
It’s important to note that this light does *not* mean something is wrong with your car. It’s simply Toyota’s way of saying, “Hey, it’s time for a check-up.” Ignoring it won’t damage your engine, but staying on top of maintenance helps prevent bigger issues down the road—like sludge buildup from old oil or worn brake pads.
Difference Between “Maintenance Required” and “Check Engine”
Many drivers confuse these two lights, but they serve very different purposes. The “Check Engine” light (usually an icon of an engine or labeled “MIL”) indicates a detected problem with the engine, emissions system, or onboard diagnostics. It requires immediate attention and often needs a scan tool to diagnose.
In contrast, the “Maintenance Required” light (often labeled “MAINT REQD” or shown as a wrench icon) is purely informational. It’s part of Toyota’s scheduled maintenance reminder system and can be safely reset after service. Think of it like a digital sticky note—friendly, not alarming.
How to Reset the Maintenance Required Light on Older Toyota Models (2000–2017)
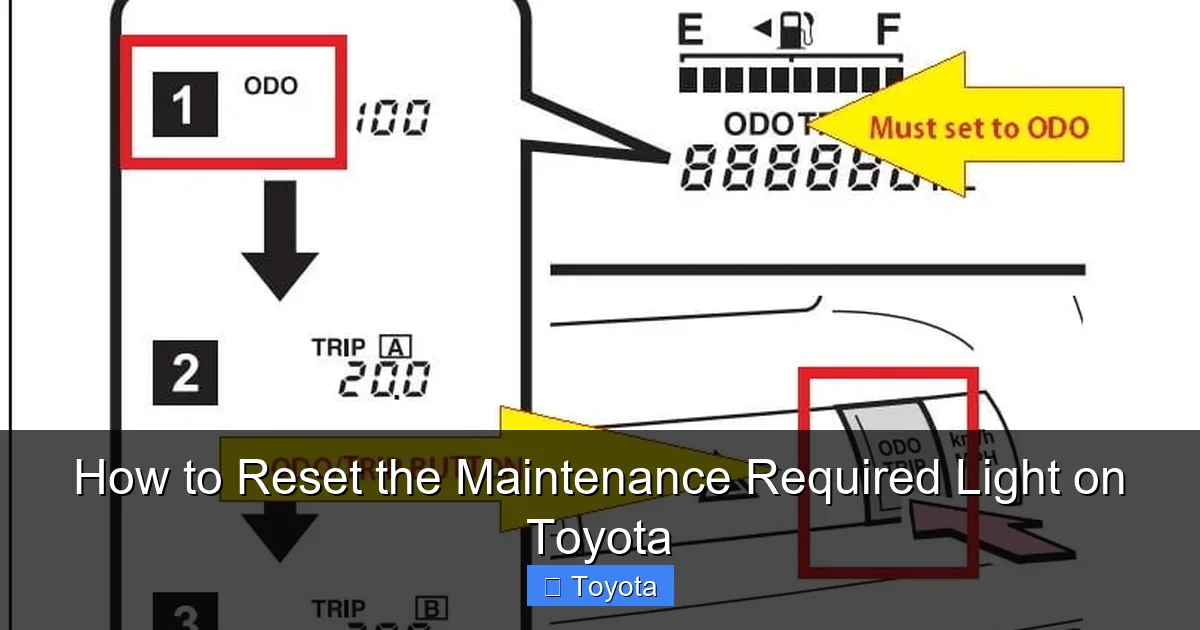
Visual guide about How to Reset the Maintenance Required Light on Toyota
Image source: erwinsalarda.com
If your Toyota was made between 2000 and 2017, chances are you’ll use the trip odometer button to reset the light. This method works for popular models like the Camry, Corolla, RAV4, Highlander, Tacoma, and 4Runner. The process is straightforward and requires no special tools.
Step-by-Step Reset Procedure
Follow these steps carefully:
- Turn the ignition to “ON”: Insert your key and turn it to the second position (where the dashboard lights up), but don’t start the engine. If you have a push-button start, press the “Start” button once without pressing the brake pedal.
- Locate the trip meter button: This is usually on the instrument cluster, near the speedometer. It may be labeled “Trip,” “Odo/Trip,” or just have a small button with an arrow.
- Press and hold the trip button: While the ignition is on, press and hold the trip button. You’ll see the odometer change from total mileage to trip A or trip B.
- Turn the ignition off and back on: While still holding the trip button, turn the key back to “OFF,” then return it to “ON.” Continue holding the button.
- Watch for the light to flash: After about 5–10 seconds, the maintenance required light should begin to flash, then stay on steadily.
- Release the button and wait: Let go of the trip button. The light should turn off completely within 10–15 seconds. If it doesn’t, repeat the process.
Example: Resetting a 2012 Toyota Camry
Let’s say you just changed the oil in your 2012 Camry at 45,000 miles, and the maintenance light came on at 40,000. Here’s how you’d reset it:
- Turn the key to “ON” (dashboard lights up, engine off).
- Press and hold the trip button on the instrument cluster.
- Turn the key to “OFF,” then back to “ON”—all while holding the button.
- After 8 seconds, the “MAINT REQD” light flashes, then stays lit.
- Release the button. The light turns off after 12 seconds.
Success! Your Camry now recognizes the service and won’t remind you again until the next interval.
Common Mistakes to Avoid
Even simple procedures can go wrong if you rush. Here are frequent errors and how to fix them:
- Starting the engine: Never start the car during the reset. The ignition must be “ON” but the engine off.
- Letting go too soon: Hold the button for the full duration. Releasing too early interrupts the reset.
- Using the wrong button: Make sure you’re pressing the trip odometer button, not the hazard light or audio controls.
- Not cycling the ignition properly: You must turn the key to “OFF” and back to “ON” while holding the button—this triggers the reset mode.
How to Reset the Light on Newer Toyota Models (2018–Present)
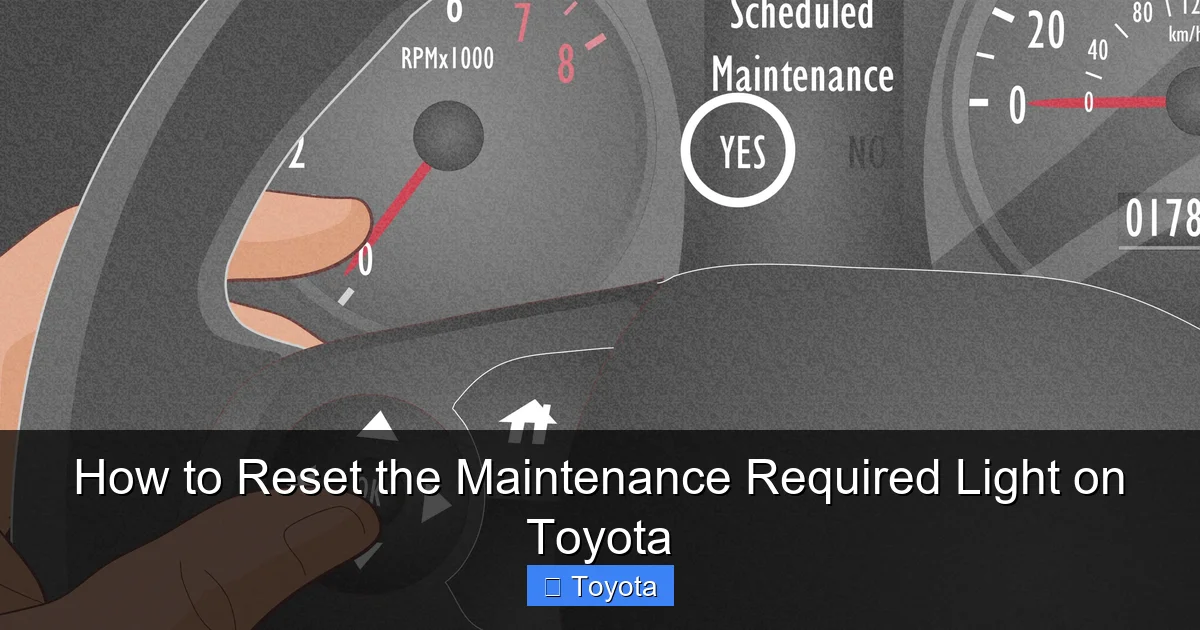
Visual guide about How to Reset the Maintenance Required Light on Toyota
Image source: wikihow.com
Starting around 2018, Toyota began phasing out the traditional trip button method in favor of digital menus accessed through the steering wheel controls. This change affects models like the 2018+ Camry, 2019+ RAV4, 2020+ Corolla, and 2021+ Highlander. The process is a bit more involved but still doable at home.
Using the Multi-Information Display (MID)
Newer Toyotas feature a multi-information display (MID) in the instrument cluster—a small screen that shows trip data, fuel economy, and maintenance reminders. You’ll use the arrow buttons on the steering wheel to navigate this menu.
Step-by-Step Reset Procedure
- Turn the ignition to “ON”: Press the start button once (without brake) or turn the key to the second position.
- Press the “DISP” or “INFO” button: This is usually on the right side of the steering wheel. It cycles through display options.
- Navigate to the maintenance menu: Use the up/down arrow buttons to scroll until you see “Maintenance” or “MAINT REQD.”
- Select “Reset” or “OK”: Press the center button or “Enter” to confirm. You may see a prompt like “Reset Maintenance Data?”
- Confirm the reset: Select “Yes” or press “OK” again. The light should disappear from the dashboard.
- Turn off the ignition: Once the light is off, you can turn the car off. The reset is complete.
Example: Resetting a 2020 Toyota RAV4
After an oil change at 15,000 miles, the maintenance light appears. Here’s how to clear it:
- Press the start button (no brake) to turn on the dashboard.
- Press the “DISP” button until you see “Maintenance” on the MID.
- Use the down arrow to highlight “Reset.”
- Press the center button to confirm.
- Select “Yes” when prompted.
- The “MAINT REQD” light turns off immediately.
It’s that simple—no key juggling or button holding required.
Troubleshooting Tips for Newer Models
If the reset doesn’t work:
- Make sure the ignition is fully “ON”—some systems won’t respond if the car is in accessory mode.
- Check that you’re using the correct steering wheel buttons. Some models have separate “DISP” and “INFO” functions.
- If the menu doesn’t appear, try cycling through all display options—sometimes “Maintenance” is buried under “Vehicle Settings.”
- Ensure the vehicle is in “Park” (for automatics) or neutral with the parking brake on (for manuals).
Model-Specific Reset Instructions
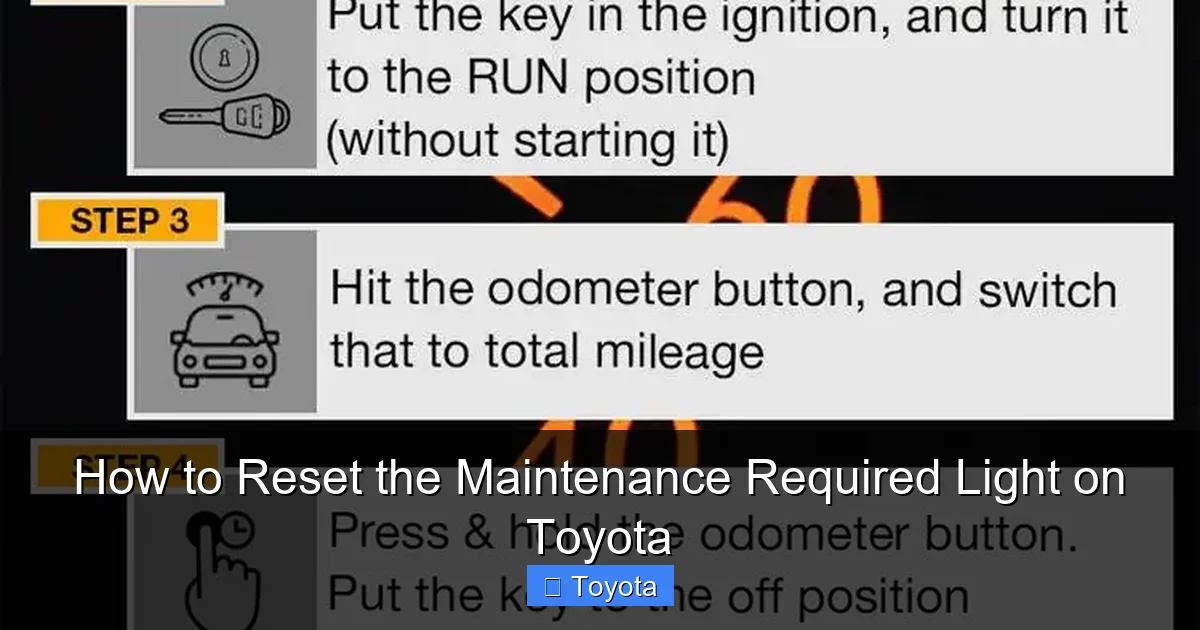
Visual guide about How to Reset the Maintenance Required Light on Toyota
Image source: obdadvisor.com
While the general methods above cover most Toyotas, a few models have unique quirks. Here’s a quick reference for popular vehicles.
Toyota Prius (2004–2015)
The Prius uses a hybrid-specific reset method:
- Turn ignition to “ON.”
- Press the trip button to show “Trip A.”
- Turn ignition off.
- Hold the trip button and turn ignition back to “ON.”
- Continue holding until the light flashes and turns off.
Note: Some Prius models require the brake pedal to be pressed during the reset—check your owner’s manual.
Toyota Tacoma (2005–2015)
The Tacoma follows the standard trip button method, but timing is critical:
- Hold the trip button for at least 10 seconds after cycling the ignition.
- If the light doesn’t turn off, wait 30 seconds and try again.
Toyota 4Runner (2010–2024)
For 2010–2017 models, use the trip button method. For 2018+, use the steering wheel controls. Some 4Runners have a “Maintenance” option under “Settings” in the MID.
Toyota Sienna (2011–2020)
The Sienna often requires a double-cycle:
- Complete the reset process once.
- If the light remains, repeat the entire sequence.
When to Reset the Light (and When Not To)
Resetting the maintenance light is appropriate after:
- Oil and filter changes
- Tire rotations
- Brake inspections
- Scheduled 5,000- or 10,000-mile services
However, avoid resetting the light if:
- You haven’t actually performed the service—resetting without maintenance defeats the purpose.
- The “Check Engine” light is also on—this indicates a real problem that needs diagnosis.
- You’re unsure of the last service date—check your records or ask your mechanic.
Pro Tip: Keep a Service Log
To avoid confusion, keep a simple log of your maintenance. Note the date, mileage, and services performed. This helps you track intervals and ensures you only reset the light when appropriate.
What If the Light Won’t Turn Off?
Sometimes, despite following the steps correctly, the maintenance required light refuses to disappear. Here’s what to do:
Double-Check the Procedure
Go through the steps again slowly. Timing is often the issue—especially with older models. Make sure you’re holding the button long enough and cycling the ignition at the right moment.
Try a Battery Reset
If the light persists, a temporary power loss can reset the system:
- Turn off the car and remove the negative terminal of the battery.
- Wait 10–15 minutes.
- Reconnect the terminal and try the reset procedure again.
Note: This may reset other systems (radio presets, clock, etc.), so use it as a last resort.
Visit a Dealer or Mechanic
If all else fails, the issue may be a faulty sensor or software glitch. A Toyota service center can reset the light using their diagnostic tools—usually for free or a small fee.
Conclusion
Resetting the maintenance required light on your Toyota doesn’t have to be a mystery. With the right steps, you can clear that persistent reminder in under two minutes and get back to enjoying your drive. Whether you’re driving a 2005 Corolla or a 2023 RAV4, the process is designed to be user-friendly—once you know how.
Remember: the light is there to help you, not hassle you. Resetting it after proper maintenance keeps your Toyota running smoothly and your dashboard distraction-free. And now that you know how, you’ll never have to pay a dealer just to turn off a light again.
Keep this guide bookmarked, share it with fellow Toyota owners, and drive with confidence—knowing you’ve got the knowledge to handle this common task like a pro.
Frequently Asked Questions
Can I reset the maintenance light without going to the dealer?
Yes, absolutely. Most Toyota models allow you to reset the maintenance required light yourself using simple button combinations or steering wheel controls—no special tools or dealer visit needed.
Will resetting the light affect my warranty?
No, resetting the maintenance light has no impact on your warranty. It’s a standard procedure recommended by Toyota and doesn’t alter any vehicle systems or settings.
How often should the maintenance light come on?
Typically every 5,000 to 10,000 miles, depending on your driving habits and model. Some newer Toyotas adjust the interval based on engine data and usage patterns.
What if I reset the light by mistake?
Don’t worry—resetting it early won’t harm your car. Just make sure to perform the scheduled maintenance soon. The light will reappear at the next interval based on mileage or time.
Does the reset work on hybrid Toyotas like the Prius?
Yes, but the method may differ slightly. Most Prius models use a variation of the trip button reset, sometimes requiring the brake pedal to be pressed during the process.
Why does the light come back on after I reset it?
If the light returns immediately, you may not have completed the reset correctly. If it comes back after a few miles, it could indicate a sensor issue or that the vehicle’s computer hasn’t registered the service—try the reset again or consult your manual.


