Where Is Starter on Ford F150
Contents
- 1 Key Takeaways
- 2 📑 Table of Contents
- 3 Introduction: Why Knowing Your Starter’s Location Saves Time and Money
- 4 The Starter’s Job and Its Fixed Home on the F150
- 5 Generation-Specific Locations: 4th Gen (2004-2008)
- 6 Generation-Specific Locations: 12th Gen (2009-2014)
- 7 Generation-Specific Locations: 13th Gen (2015-Present)
- 8 How to Safely Access and Identify Your Starter
- 9 Common Starter Issues and When Replacement Isn’t Simple
- 10 Conclusion: Knowledge is Power (and a Working Truck)
- 11 Frequently Asked Questions


The starter on a Ford F150 is located on the backside of the engine, attached to the transmission bell housing. Its precise position varies slightly between the 2004-2008 (4th gen), 2009-2014 (12th gen), and 2015+ (13th gen) models, primarily due to engine and cab configuration differences. Access is always from underneath the truck, requiring you to locate it between the engine and the firewall, near the bottom of the transmission. Identifying the correct component—a cylindrical solenoid with thick battery and motor wires—is key before attempting any work.
Key Takeaways
- Universal Location Principle: On all Ford F150s, the starter is mounted on the rear of the engine, bolted to the transmission’s bell housing. You will always access it from underneath the vehicle.
- Generation Matters: The exact position changes with engine type (V8 vs. V6) and cab/bed style (SuperCrew/Short Bed vs. Regular Cab/Long Bed), affecting how easily you can see and reach it.
- Identification is Key: Look for a small cylindrical component with two very thick wires (one from the battery, one to the motor) and a smaller plug for the ignition signal. This distinguishes it from other parts like the transmission solenoid.
- Access Requires Lifting: You must safely jack and support the truck. For 4×4 models, the transfer case and skid plate often must be removed first, which adds significant time and complexity.
- Common Failure Signs: Symptoms include a single loud “click” with no crank, a slow cranking engine, or smoke/smell from the starter area. These point to a faulty starter, not just a dead battery.
- Replacement Difficulty Varies: On some 4×4 and crew cab models, the starter is notoriously difficult to access, requiring special tools and potentially dropping the transmission or exhaust. Always check a service manual for your specific year and configuration.
- Always Disconnect the Battery: Before touching anything, disconnect the negative battery terminal. The starter’s main wire is always live and can cause dangerous sparks or short circuits if mishandled.
[FEATURED_IMAGE_PLACEHOLDER]
📑 Table of Contents
- Introduction: Why Knowing Your Starter’s Location Saves Time and Money
- The Starter’s Job and Its Fixed Home on the F150
- Generation-Specific Locations: 4th Gen (2004-2008)
- Generation-Specific Locations: 12th Gen (2009-2014)
- Generation-Specific Locations: 13th Gen (2015-Present)
- How to Safely Access and Identify Your Starter
- Common Starter Issues and When Replacement Isn’t Simple
- Conclusion: Knowledge is Power (and a Working Truck)
Introduction: Why Knowing Your Starter’s Location Saves Time and Money
There’s almost nothing more frustrating than turning the key in your Ford F150 and hearing nothing but a weak click or a complete silence. You jump the battery, check the fuses, and still, the engine refuses to turn over. At that moment, your mind races through possibilities. Is it the battery? The ignition switch? The dreaded starter motor? For a truck as ubiquitous and reliable as the F150, a failed starter is a common culprit. But before you can diagnose or replace it, you need to answer one fundamental question: Where is the starter on a Ford F150?
This isn’t just a matter of curiosity—it’s a critical piece of DIY knowledge. Knowing the exact location helps you confirm the problem, source the correct replacement part, and realistically assess if this is a job you can tackle in your driveway or if it’s time to call a professional. The starter’s position is consistent in principle but varies in practical access depending on your truck’s generation, engine size, and cab/bed configuration. This guide will walk you through it all, generation by generation, with clear instructions on how to find, identify, and access this vital component. We’ll also touch on common issues and when a repair might be more complex than it seems, perhaps even connecting to related systems like those discussed in our article on IWE technology on Ford F150s, which can affect front-end component layout.
The Starter’s Job and Its Fixed Home on the F150
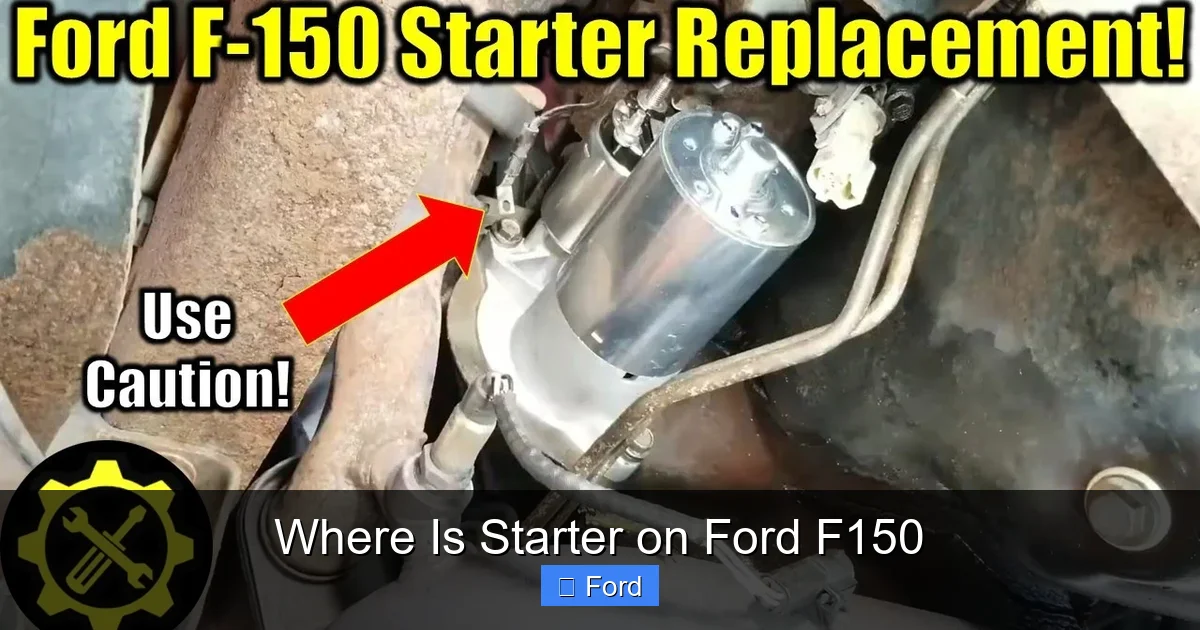
What the Starter Actually Does
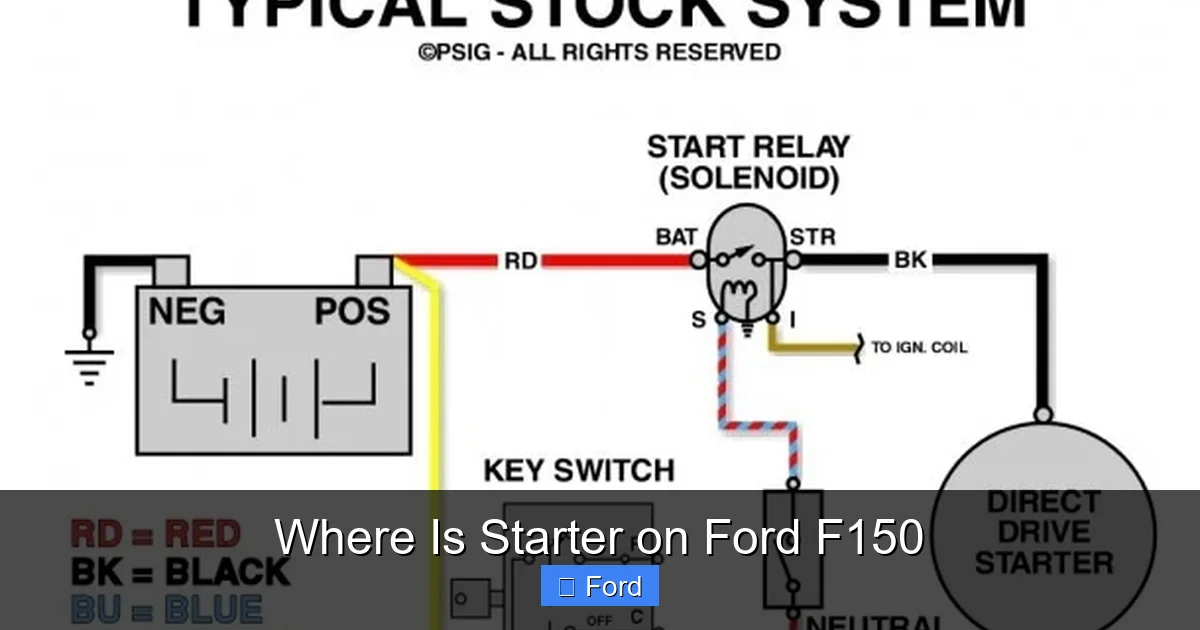
Before we get dirty, let’s understand the part we’re hunting. The starter motor is a powerful electric motor. Its sole job is to crank the engine over fast enough for it to start running under its own power. When you turn the key (or press the start button), a small signal from the ignition switch travels to the starter solenoid. The solenoid acts as a heavy-duty switch, closing a circuit that sends huge current from your battery directly to the starter motor. That motor then engages a small gear (the Bendix drive) with the engine’s flywheel (on manual transmissions) or flexplate (on automatics), spinning the engine to life.
Visual guide about Where Is Starter on Ford F150
Image source: cimg6.ibsrv.net
Because it must physically mesh with the engine’s rotating assembly, the starter has only one logical mounting point: directly on the back of the engine, bolted to the bell housing that connects to the transmission. This means you will never find the starter on the front of the engine, near the alternator or belts. It is always at the rear, tucked up against the firewall or transmission tunnel.
The Universal Rule: Rear-Mounted, Bottom-Side
For every single Ford F150 produced, the starter follows this rule. It is mounted on the rear-facing side of the engine block, at the bottom. To see it, you must be looking up from underneath the truck, typically between the engine oil pan and the front of the transmission. The bell housing it bolts to is a cast aluminum or iron structure that forms the rear seal of the engine and the front seal of the transmission. The starter’s location is dictated by its need to reach the flexplate or flywheel, which is mounted directly behind the engine and in front of the transmission.
This fixed position is great news for DIYers because it means you can develop a mental map. Once you know the general area for your generation, you can find it regardless of whether you have a V6 or V8. The challenge comes not from *finding* the part, but from *reaching* the bolts that hold it in place, especially on 4×4 models where the transfer case and skid plate create a formidable barrier.
Generation-Specific Locations: 4th Gen (2004-2008)
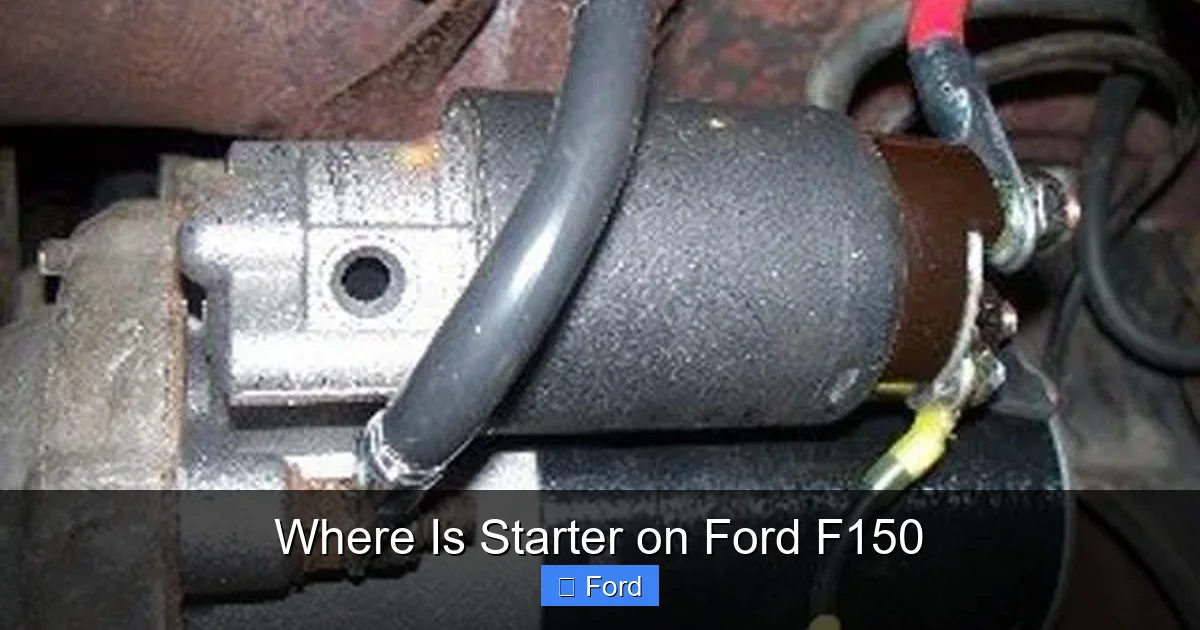
Let’s start with the classic body style. The 2004-2008 Ford F150 (4th generation) is a favorite among enthusiasts and is still on the road in huge numbers. Its layout is relatively straightforward compared to later models.
Visual guide about Where Is Starter on Ford F150
Image source: i.ytimg.com
For 2WD Models (Regular, SuperCab, SuperCrew)
On any 2WD 2004-2008 F150, the starter is located on the rear of the engine, low and to the passenger side (right side if sitting in the truck). You will see it clearly once you’re underneath. It’s a cylindrical solenoid and motor assembly, about the size of a large soup can, bolted with two or three bolts to the engine bell housing. The thick red cable from the battery runs forward along the frame rail and connects directly to the solenoid’s main post. A smaller wiring harness plug connects to the side of the solenoid.
Access Tip: For these 2WD models, access is relatively good. You’ll need to remove any heat shields or splash panels between the engine and firewall. Often, you can reach the starter bolts with a ratchet and extension from the driver’s side (left) of the transmission tunnel. The main battery cable nut is usually accessible from the top or passenger side.
For 4×4 Models (The Added Challenge)
Here’s where it gets tricky. On 4×4 models from this generation, the starter is in the exact same place on the engine. However, the transfer case is mounted directly behind the transmission, and a heavy steel skid plate covers the entire undercarriage. To access the starter, you must:
- Drain the transfer case fluid (a messy but necessary step).
- Unbolt and remove the massive skid plate.
- Unbolt the transfer case from the transmission (this is heavy and awkward).
- Support the transmission and carefully slide the transfer case back and out of the way.
This process can easily turn a 1-hour starter replacement on a 2WD into a 4-6 hour ordeal requiring significant mechanical skill and tools. Many owners of 4×4 models from this era opt to pay a professional due to this complexity.
Generation-Specific Locations: 12th Gen (2009-2014)
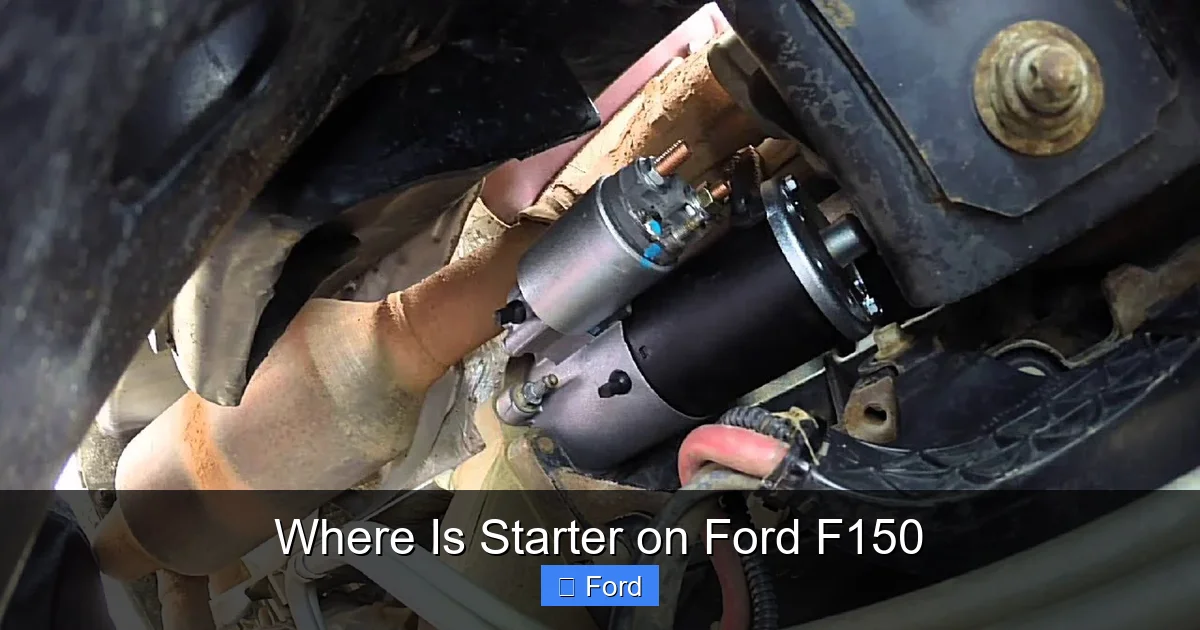
The 2009-2014 F150 (12th generation) brought a new body and updated engines, but the starter’s fundamental location remained the same. The biggest variables are still 2WD vs. 4×4 and cab/bed configuration affecting component placement.
Visual guide about Where Is Starter on Ford F150
Image source: mikrora.com
V8 vs. V6 Differences
For the 12th gen, the starter location is nearly identical between the popular 5.4L and 6.2L V8s and the 3.7L V6 or 3.5L EcoBoost V6. It’s always on the rear of the engine, low down. The V8s might have a slightly different starter solenoid shape, but the mounting points and access routes are the same. The key difference is the surrounding components. For example, on a 2012 F150 with a 5.4L, the starter is on the passenger side of the bell housing. On a 2014 with the 3.5L EcoBoost, it’s in the same vicinity.
Impact of Cab and Bed Length
This might seem irrelevant, but it affects the exhaust system and heat shields. A SuperCrew with a 5.5′ bed has a shorter driveshaft and exhaust routing compared to a Regular Cab with an 8′ bed. On the long-bed models, the exhaust cross-over pipe often runs very close to or even over the top of the transmission and starter area. You may need to temporarily unbolt or move this pipe to gain clearance for removing the old starter and installing the new one. Always inspect your specific truck’s layout before starting.
4×4 Access Remains Labor-Intensive
The 12th gen followed the same pattern as the 4th: 4×4 models require transfer case removal for direct starter access. Some clever mechanics have developed methods to “tuck” the starter out from the top by removing the transmission pan and flexplate/flywheel, but this is even more complex and risky. The standard, recommended procedure is still transfer case removal. The process is similar to the 2004-2008 models but with updated fasteners and components. If you own a 4×4 from this generation, brace yourself for a major project.
Generation-Specific Locations: 13th Gen (2015-Present)
The 2015+ F150 (13th generation) introduced an aluminum body and a range of new engines, including the 3.5L EcoBoost (in two tunes), 5.0L V8, and the high-performance 3.5L V6 in the Raptor. The starter’s location principle is unchanged, but packaging is tighter.
The “Hidden” Starter on Some Models
On many 2015-2020 F150s, particularly those with the 3.5L EcoBoost engine, the starter is not as immediately visible from underneath. It is often tucked further up into the engine valley, behind the engine oil pan, and partially obscured by other components like the transmission bell housing bolts or the starter heat shield. You will still find it on the rear of the engine, but you may need to look *up* into the space between the engine and firewall rather than having it hang down openly.
Pro Tip: On these models, the best way to confirm you’ve found it is to trace the very thick, heavy-gauge wire (usually 4-6 gauge) that comes from the positive battery terminal. It runs along the frame rail, then takes a sharp turn upward and inward toward the firewall. Follow that wire—it will lead you directly to the starter solenoid’s main terminal post.
4×4 Models: The Skid Plate Maze
For 4×4 2015+ models, the front skid plate is a large, complex, multi-piece assembly made of aluminum. It is much lighter than the old steel plates but is secured by many bolts and clips. Removing it is still a mandatory first step. Furthermore, the transfer case on these newer trucks is often larger and has more electronic connectors (for the 4×4 mode selector). You must disconnect all wiring harnesses before unbolting it. The process is more delicate due to the aluminum parts and electronic components but follows the same core sequence: skid plate off, transfer case unbolted and dropped/slid back.
The Raptor Exception
The Ford Raptor (2017+, 2021+) has a unique transfer case and skid plate setup due to its off-road focus. Accessing the starter on a Raptor is arguably the most difficult of any F150. The transfer case is massive, and the skid plate is a heavily reinforced, integrated part of the underbody protection. Removal is a significant undertaking. Additionally, the Raptor’s 3.5L High-Output V6 uses a more powerful starter, which may be slightly larger. Treat this as a major repair requiring a shop manual and potentially a lift.
How to Safely Access and Identify Your Starter
Now that you know where to look, let’s talk about the safe, correct procedure to get your eyes and hands on the part. Safety is not optional here.
Step 1: Secure the Vehicle
Park on a solid, level surface. Engage the parking brake firmly. If you have an automatic, put it in “Park.” If manual, put it in gear. Chock the rear wheels securely. You will be working under the truck, so it must be supported correctly. Use a hydraulic jack to lift the front of the truck, and place it on jack stands under the designated front frame rails. Never rely on the jack alone. Lower the truck onto the stands so the front is fully supported. If you have a 4×4 and need to remove the transfer case, you’ll need to support the transmission/transfer case assembly separately with a jack or transmission jack before unbolting anything.
Step 2: Disconnect the Battery (Non-Negotiable)
This is the most critical step. Locate the negative (-) battery terminal. Using the appropriate wrench (usually 10mm), loosen and remove the negative cable. Tuck it away so it cannot accidentally touch the terminal. The starter’s main power cable is connected directly to the battery positive circuit. If you accidentally touch a metal tool from that cable to any grounded part of the truck (like the frame), you will create a massive short circuit, causing sparks, melted tools, and potentially a fire. Disconnecting the negative terminal breaks this circuit and makes the work safe.
Step 3: Locate the Component
Crawl under the truck with a bright flashlight. Look at the rear of the engine, just above where the transmission bell housing is. You are looking for a cylindrical component, typically 4-6 inches long and 3-4 inches in diameter. It will have two distinct electrical connections:
- The Main Power Cable: A very thick, heavy wire (often red) with a large nut (usually 13mm or 15mm) on a stud. This is the live wire from the battery. Do not confuse this with smaller wiring harnesses.
- The Signal Wire Connector: A smaller plastic plug (usually 2-3 pins) that clips onto the solenoid. This comes from the ignition switch or starter relay.
The starter motor itself is the larger cylindrical part attached to the solenoid (they are often one unit). The solenoid is the smaller cylinder on top or the side. The entire assembly is held to the engine bell housing with two or three bolts (often 13mm or 14mm).
Step 4: Confirm Before You Proceed
If you are unsure, trace that thick red cable from the battery. It will run along the inner fender well or frame rail and terminate at the starter solenoid. That’s your definitive marker. Compare your find to pictures online for your specific year and engine. A common mistake is confusing the starter with the transmission’s torque converter clutch (TCC) solenoid, which is also on the bell housing but is much smaller, has only a small wiring plug, and no thick battery cable.
Common Starter Issues and When Replacement Isn’t Simple
Finding the starter is just step one. Understanding why it failed and what else might be wrong is crucial for a successful repair.
Symptom Diagnosis: Is It Really the Starter?
Before you buy a new starter, rule out simpler problems:
- Single Loud Click: This is the classic symptom of a failed starter solenoid or a starter motor that has shorted internally. The solenoid is trying to engage but the motor isn’t turning. This usually means a new starter is needed.
- Slow, Labored Cranking: The engine turns over very slowly, almost groaning. This can be a weak battery, poor battery connections (corroded terminals), or a failing starter drawing too much current. Check battery voltage first (should be 12.6V+ off, 13.7-14.7V running). Clean all battery and ground connections.
- No Click, No Crank: Could be a dead battery, bad ignition switch, faulty starter relay/fuse, or a complete open circuit in the starter. Check fuses and relays first. Listen for a faint click from under the hood near the firewall (the starter relay).
- Smoke or Smell of Burning: If you see smoke or smell something burning from the starter area, shut it off immediately. This indicates the starter is overheating from excessive current draw due to internal shorts or a mechanical bind (like a seized engine). Do not attempt to restart.
The “While You’re In There” Opportunity
Given the extreme difficulty of accessing the starter on 4×4 and some cab/bed combinations, it is highly recommended to inspect and potentially replace related parts while you have everything apart:
- Flexplate/Flywheel: Look at the ring gear teeth on the flexplate (automatic) or flywheel (manual). If they are chewed up, chipped, or have missing teeth, the starter’s Bendix drive may have been engaging improperly. Replacing the flexplate requires removing the transmission anyway, so if it’s damaged, this is the time to address it.
- Bell Housing Seal: The starter bolts through the bell housing. There is a gasket or seal around the starter’s nose that prevents transmission fluid from leaking out. Replace this seal with the new starter.
- Battery Cables and Grounds: Inspect the thick positive cable from the battery to the starter for corrosion or damage. Check the engine-to-chassis ground straps. Poor grounds cause starter issues.
- Related Components: On some models, the starter is very close to the oil pan or exhaust components. Be prepared to address any leaks or heat shield issues you find.
Conclusion: Knowledge is Power (and a Working Truck)
So, where is the starter on a Ford F150? The answer is always “on the back of the engine, bolted to the transmission bell housing.” But as we’ve detailed, the journey to that answer is filled with important specifics based on your truck’s year, drivetrain, and cab configuration. For 2WD owners, it’s a manageable Saturday project with basic tools. For 4×4, SuperCrew, or long-bed owners, it’s a major undertaking that often involves transfer case removal and a deep understanding of drivetrain components.
Your takeaway should be this: before you buy a part or start turning wrenches, get under your specific truck with a flashlight and confirm the location and access route. Consult a factory service manual for your exact model year. If the access looks overwhelming—especially if you need to drop a transfer case or transmission—the cost of professional installation might be money well spent compared to the time, risk, and potential for error in a home garage. Remember, a correctly installed starter gets your F150 roaring back to life. A botched job can leave you stranded with a damaged drivetrain. If you’re tackling other Ford-specific repairs, our guide on how to replace brakes on a Ford F150 offers another common DIY task with clear steps. Whether you DIY or call a pro, you now have the knowledge to speak intelligently about the problem and ensure it gets fixed right.
Frequently Asked Questions
Can I access the starter on a 4×4 Ford F150 without removing the transfer case?
On most 4×4 F150s, especially from 2009 onward, the starter is completely blocked by the transfer case. The only way to access the starter bolts directly is to remove the transfer case. Some mechanics attempt to work through the transmission pan or by manipulating the starter from awkward angles, but these methods are extremely difficult, time-consuming, and risk damaging internal transmission components. For a reliable repair, transfer case removal is the standard procedure.
What tools do I absolutely need to replace a starter on a Ford F150?
At a minimum, you need: a set of socket wrenches and extensions (10mm-15mm), a good breaker bar for stubborn bolts, a torque wrench for proper reassembly, a heavy-duty floor jack and jack stands, a flashlight, and safety glasses. For 4×4 models, you additionally need a transmission jack or a very strong helper, a large drain pan for transfer case fluid, and potentially special sockets for transfer case bolts. Always consult a service manual for your specific truck’s fastener sizes and torque specs.
How much does a new starter for an F150 cost?
A replacement starter for a Ford F150 can vary widely. A standard OEM-style remanufactured unit typically costs between $100 and $250. High-performance or OEM-brand new starters can run $250 to $500+. Labor costs at a shop range from $200 to $800+ depending entirely on the generation and drivetrain. A 2WD truck might be 1-2 hours of labor, while a 4×4 could be 4-6 hours or more. Always get a quote based on your exact VIN.
My F150 clicks once but doesn’t crank. Is that the starter?
A single loud click from the engine bay, followed by no cranking, is the most common symptom of a failed starter solenoid or a starter motor that has internally shorted. The solenoid is receiving the signal and attempting to engage, but the motor itself isn’t turning. While it’s wise to first check battery voltage and clean the battery terminals (a weak connection can mimic this), a persistent single click almost always points to a starter replacement.
Should I replace the starter relay or fuse at the same time?
It’s a good idea. The starter relay (often in the under-hood fuse box) is an inexpensive part that can fail and cause a “no click, no crank” situation. Since you’re already diagnosing a starting issue, replacing the relay (and checking the relevant fuse) is cheap insurance. It costs $10-$20 and takes two seconds. If your old relay shows signs of burnt contacts or corrosion, replace it.
Is the starter location the same on a Ford F150 and a Nissan Titan?
Yes, the fundamental principle is the same. Both are rear-mounted on the engine bell housing. However, the exact positioning, orientation, and access routes are different due to different engine designs, frame layouts, and drivetrain configurations. The process for a Nissan Titan will have its own unique challenges, but the mental model of “look at the back of the engine, near the transmission” applies to both trucks.