

How to Tell If Cabin Air Filter Needs Replacing on a Toyota
Contents
- 1 Key Takeaways
- 2 📑 Table of Contents
- 3 Why Your Toyota’s Cabin Air Filter Is Your Silent Guardian
- 4 5 Unmistakable Signs Your Toyota’s Cabin Air Filter Is Failing
- 5 How to Inspect Your Toyota’s Cabin Air Filter Like a Pro
- 6 Toyota Model Differences: Where to Find Your Cabin Air Filter
- 7 Cleaning vs. Replacing: Can You Reuse That Filter?
- 8 Final Thoughts: A Small Part, A Big Impact on Your Toyota
- 9 Frequently Asked Questions


Your Toyota’s cabin air filter is vital for clean interior air, but it clogs over time. Key warning signs include persistent musty smells, dramatically reduced airflow from vents, and allergy flares while driving. Regular checks every 15,000-30,000 miles are essential—visually inspect the filter for dirt and debris. Replacement is often a simple DIY job that boosts HVAC efficiency and protects your health. Don’t ignore a failing filter; it strains your system and degrades cabin comfort.
Key Takeaways
- Symptom Recognition: Musty odors, weak vent airflow, and increased dust/allergens inside are the most common red flags.
- Proactive Inspection: Physically check the filter every 15,000-30,000 miles; if it looks dirty or clogged, replace it immediately.
- Model Variations Matter: Cabin air filter location differs significantly between Toyota models (e.g., behind glovebox vs. under hood).
- Replacement is DIY-Friendly: Most Toyota cabin filters are designed for owner replacement with basic tools, saving $50-$100 in labor.
- Health & System Protection: A clean filter removes pollutants and prevents HVAC blower motors from overworking, avoiding costly repairs.
- Environment Influences Lifespan: Driving in dusty, high-pollen, or urban areas drastically shortens filter life—check more frequently.
- Never Assume Existence: Some older or base-model Toyotas (like certain trucks) may not have a cabin air filter; always verify for your specific vehicle.
📑 Table of Contents
- Why Your Toyota’s Cabin Air Filter Is Your Silent Guardian
- 5 Unmistakable Signs Your Toyota’s Cabin Air Filter Is Failing
- How to Inspect Your Toyota’s Cabin Air Filter Like a Pro
- Toyota Model Differences: Where to Find Your Cabin Air Filter
- Cleaning vs. Replacing: Can You Reuse That Filter?
- Final Thoughts: A Small Part, A Big Impact on Your Toyota
Why Your Toyota’s Cabin Air Filter Is Your Silent Guardian
Think about the air you breathe while driving your Toyota. Every time you turn on the fan or AC, that air passes through a critical, often-overlooked component: the cabin air filter. This simple pleated device acts as a bouncer for your vehicle’s interior, blocking pollen, dust, exhaust fumes, road grime, and even harmful pollutants before they reach your lungs. In a Toyota, whether it’s a Camry, RAV4, or Tacoma, this filter is your first line of defense against poor air quality and HVAC system strain. Over time, it becomes a clogged, saturated mess that silently sabotages your comfort, your health, and your car’s performance. Understanding how to tell when this humble filter needs replacing isn’t just maintenance—it’s about ensuring every journey is safe and fresh.
Toyota engineers design their heating, ventilation, and air conditioning (HVAC) systems with efficiency in mind. The cabin air filter sits in the air intake path, usually behind the glovebox, under the hood, or beneath the dashboard. Its job is relentless: trapping particulates as small as 1 micron. But there’s a trade-off. A filter packed with debris restricts airflow, forcing the blower motor to work harder and reducing the effectiveness of your AC and heater. Worse, a saturated filter can harbor mold and bacteria, turning your vents into a source of foul, musty odors. For Toyota owners, recognizing the signs of a failing filter is a straightforward skill that pays dividends in comfort, system longevity, and peace of mind.
5 Unmistakable Signs Your Toyota’s Cabin Air Filter Is Failing
Your Toyota will communicate a failing cabin air filter through sensory clues—smells, sounds, and sensations. Learning to decode these signals is the first step to timely maintenance. Here are the five most common and reliable indicators that your filter is overdue for replacement.

Visual guide about How to Tell If Cabin Air Filter Needs Replacing on a Toyota
Image source: c8.alamy.com
1. Persistent Musty, Mildewy, or “Old Socks” Odor
The classic sign. When a cabin air filter becomes saturated with moisture, organic debris, and microbes, it develops a distinct, unpleasant odor—often described as musty, moldy, or like wet socks. This smell intensifies when you first turn on the fan or AC after the car has been sitting. It’s not just a nuisance; it’s a health concern, as mold spores can circulate into the cabin. If you notice this odor and it doesn’t disappear after running the fan on high with windows down for a few minutes, the filter is almost certainly the culprit. Sometimes, the smell can be faint at first, then grow worse over weeks. Don’t mask it with air fresheners; replace the filter.
2. Noticeably Weak or Reduced Airflow from Vents
Feel like your vents are barely blowing air, even on the highest fan setting? A clogged cabin air filter acts like a blocked straw, severely restricting the volume of air the HVAC system can push through. You might notice this especially on the “max AC” or “defrost” settings, which demand high airflow. Compare the current airflow to how it felt when the car was newer. If it’s a dramatic drop—say, 50% less force—the filter is likely packed with debris. This restriction also makes your blower motor work harder, which can lead to premature motor failure and annoying whirring or humming noises.
3. Increased Dust, Pollen, and Allergens Inside the Cabin
The filter’s primary job is to keep the outside world’s gunk out. If it’s failing, you’ll see the evidence on your dash, seats, and windows. A fine layer of dust accumulates unusually fast. If you have allergies, you might sneeze more while driving, or your eyes may itch. Pet owners might notice more pet hair circulating. This is a clear sign the filter is no longer trapping particles effectively. It’s essentially become a bypass for pollutants, compromising the very reason it exists.
4. Unusual HVAC System Noises
A healthy HVAC system should be relatively quiet. If you hear new sounds—a high-pitched whine, a strained hum, or even a rattling from the dash—it could be the blower motor struggling against a clogged filter. The motor has to spin faster to pull air through a dense barrier, creating stress noises. Sometimes, debris can even flake off a disintegrating filter and get sucked into the fan blades, causing a slapping or rattling sound. If noises coincide with reduced airflow, the cabin air filter is the prime suspect.
5. Foggy Windows That Defrost Slowly or Ineffectively
Your HVAC system’s defrost mode relies on a high volume of dry, warm air to clear the windshield. A clogged cabin filter starves this process of airflow. You’ll find your windows fogging up more easily in humid conditions and taking forever to clear, even when the defroster is on full blast. This is both a comfort and safety issue. While other problems like a leaking heater core can cause fogging, a restricted filter is a common and easy-to-check cause.
How to Inspect Your Toyota’s Cabin Air Filter Like a Pro
Symptoms point you in the right direction, but a physical inspection is the only surefire way to confirm a filter’s condition. The good news? On most Toyotas, this is a straightforward task you can do in your driveway in 15-30 minutes. The exact steps vary by model, but the general process is universal.
Visual guide about How to Tell If Cabin Air Filter Needs Replacing on a Toyota
Image source: c8.alamy.com
Step 1: Locate Your Filter Housing
First, you need to find where Toyota placed the filter in your specific model. Common locations include:
- Behind the Glovebox: This is very common in sedans and coupes like the Camry and Corolla. You’ll often need to remove the glovebox (which usually just involves releasing a couple of stops or screws) to access a rectangular filter slot.
- Under the Hood, Near the Windshield: Many SUVs and crossovers, including the RAV4 and Highlander, place the filter in a housing mounted on the passenger side firewall, just under the cowl panel. You’ll remove a few plastic clips or screws to access it.
- Beneath the Dashboard: Some models locate it behind or below the glovebox area, accessible from the footwell.
Pro Tip: Your owner’s manual is the ultimate map. If you don’t have it, a quick online search for “[Your Year, Make, Model] cabin air filter location” will yield diagrams and videos. For example, if you own a Toyota RAV4, you’ll find the filter under the hood—our detailed guide on how to change the cabin air filter on a Toyota RAV4 walks you through the exact steps with photos.
Step 2: Gather Basic Tools and Prepare
You’ll typically need:
- Screwdrivers (flathead and Phillips)
- Socket set or ratchet (for some models)
- Flashlight (for dark compartments)
- Gloves (optional, for dirty filters)
Ensure your Toyota is parked on a level surface, the engine is cool, and the parking brake is set. For filters under the hood, you’ll need to open the hood first. On models like the Tacoma, the hood release is inside the cab—check your manual. If you’re unsure about the process, our guide on how to pop the hood on a Toyota Tacoma explains it clearly.
Step 3: Remove the Old Filter
Once you’ve opened the housing (usually by removing screws, clips, or a cover), note the filter’s orientation. There’s almost always an arrow indicating airflow direction. Gently slide the filter out. It will likely be covered in a gray or black layer of dirt, leaves, and debris. If it’s a reusable electrostatic filter, it may be washable. But most OEM Toyota filters are disposable pleated paper or fabric.
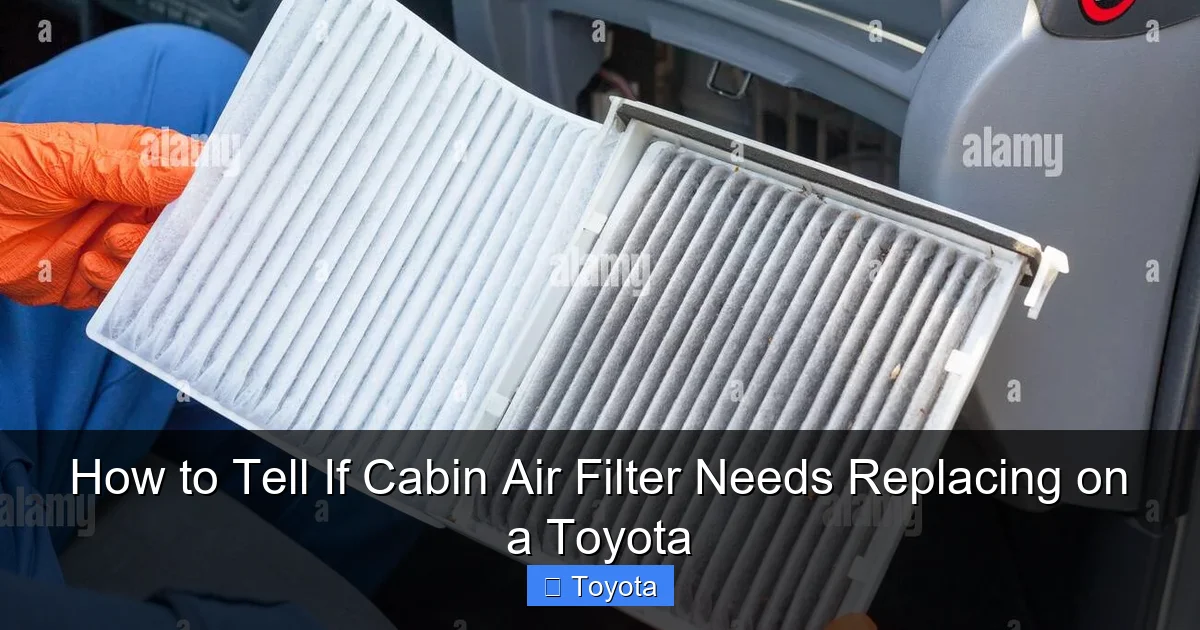
Step 4: The Visual Test – Is It Time to Replace?
Here’s the simple rule: If you can’t see the original color of the filter media through the grime, it’s done. A new filter is typically white or light gray. If yours is dark gray, black, or caked with particles, replace it. Also, check for moisture, mold spots, or physical damage. Even if it looks only moderately dirty but you’ve had it for over 30,000 miles, replacement is wise. When in doubt, replace it—they’re inexpensive insurance.
Step 5: Install the New Filter
Slide the new filter in exactly the same direction as the old one (arrow pointing toward the blower motor). Ensure it seats properly with no gaps. Reassemble the housing cover, securing all clips and screws. Double-check that nothing is left inside the housing.
Toyota Model Differences: Where to Find Your Cabin Air Filter
One size does not fit all in the Toyota world. The location and design of the cabin air filter vary across the lineup, reflecting different vehicle architectures and design priorities. Knowing where to look for your specific model saves time and frustration.

Visual guide about How to Tell If Cabin Air Filter Needs Replacing on a Toyota
Image source: c8.alamy.com
Sedans & Coupes (Camry, Corolla, Avalon)
In these cars, the filter is almost always located behind the glovebox. To access it, you’ll need to open the glovebox, then release the glovebox stops (small plastic arms that limit its drop) on either side. The glovebox will then swing down, revealing the filter housing behind it. It’s a clean, straightforward process that takes minutes. The filter is usually a rectangular panel about 8×10 inches.
SUVs & Crossovers (RAV4, Highlander, Venza)
Many of Toyota’s popular SUVs place the filter under the hood, at the base of the windshield on the passenger side. You’ll remove a plastic cowl cover (the trim piece at the base of the windshield wipers) held by clips or screws. Underneath, you’ll find a rectangular filter housing. This location is convenient because you don’t have to crawl into the passenger footwell. The RAV4 is a prime example—our step-by-step guide covers this exact location.
Trucks & Larger Vehicles (Tundra, Sequoia, Sienna)
This is where things get trickier. Some full-size trucks and minivans have more complicated access points. For instance, the Toyota Tundra’s cabin air filter location has changed over generations. Some model years place it behind the glovebox, while others might have it under the hood or even under the dash. Crucially, some older or base-model trucks may not have a cabin air filter at all. This is a common point of confusion. To be absolutely sure about your Tundra, you should consult a model-specific resource. We have an article that addresses the question does a 2006 Toyota Tundra have a cabin air filter, which explains the specifics for that generation. Always verify for your exact year and trim.
The Importance of Model-Specific Research
Before you start, spend five minutes confirming your filter’s location and removal procedure. A wrong assumption can lead to stripped screws, broken plastic clips, or hours of frustration. Use trusted sources: your owner’s manual, Toyota’s official service information, or reputable automotive websites with guides for your exact model year and trim. This small upfront investment prevents big headaches.
Cleaning vs. Replacing: Can You Reuse That Filter?
This is a frequent question, especially from eco-conscious owners. The answer depends entirely on the type of cabin air filter installed.
Disposable Fiberglass/Paper Filters
The vast majority of OEM Toyota cabin filters are made of pleated paper or fiberglass media. These are not designed to be cleaned. Attempting to vacuum or wash them will damage the delicate fibers, reduce their filtering efficiency, and potentially allow debris to bypass the filter. They are inexpensive (typically $15-$40) and should be replaced outright when dirty.
Reusable Electrostatic or Washable Filters
Some aftermarket filters (like those from K&N or Washable) are made of cotton gauze or electrostatic material coated with oil. These can be cleaned with a special cleaner, re-oiled, and reused for the life of the vehicle. They often promise better airflow and superior filtration. If you have one of these installed, follow the manufacturer’s cleaning instructions precisely. However, note that even reusable filters degrade over time and may eventually need replacement.
The Verdict: Replace for Peace of Mind
For the average Toyota owner using the standard OEM filter, replacement is the only practical option. The cost of a new filter is minimal compared to the potential risk of HVAC system damage from a clogged filter. Furthermore, a new filter guarantees maximum filtration efficiency. If you’re considering a reusable filter for long-term savings, research thoroughly to ensure compatibility with your Toyota model and HVAC system design.
Final Thoughts: A Small Part, A Big Impact on Your Toyota
Your Toyota’s cabin air filter is a perfect example of preventative maintenance. It’s an inexpensive part that plays a massive role in your driving experience. Ignoring it leads to a cascade of problems: stale air, weak AC, strained blower motors, and even health issues from inhaling pollutants. The power is in your hands: with a quick check every year or every 15,000-30,000 miles, you can catch a failing filter before it ruins your ride.
Remember the key symptoms: funky smells, weak airflow, excess dust. If you notice them, don’t wait. Source the correct filter for your model (your local Toyota dealer or parts store can look it up by VIN), and tackle the replacement yourself. The satisfaction of doing it yourself, the savings on labor, and the immediate improvement in cabin air quality are incredibly rewarding. For popular models like the RAV4, the process is especially simple—our dedicated guide makes it foolproof. Make checking your cabin air filter a regular part of your Toyota care routine. Your lungs, your HVAC system, and your wallet will thank you for it.
Frequently Asked Questions
How often should I replace my Toyota’s cabin air filter?
Toyota typically recommends replacing the cabin air filter every 15,000 to 30,000 miles under normal conditions. If you frequently drive in dusty, polluted, or high-pollen areas, shorten this interval to 12,000-15,000 miles. Always check your owner’s manual for the exact recommendation for your specific model and year.
Can a clogged cabin air filter affect my Toyota’s AC performance?
Absolutely. A restricted filter limits airflow through the HVAC system, which reduces cooling and heating efficiency. Your AC will blow warmer air, and the defroster will be slower. It also forces the blower motor to work harder, increasing electrical draw and potentially leading to premature motor failure.
Is it difficult to replace the cabin air filter myself in a Toyota?
For most Toyota models, it’s a beginner-friendly DIY task. Access is usually straightforward—behind the glovebox or under a cowl panel—and requires only basic hand tools. The job often takes 10-30 minutes. The main challenge is locating the filter housing, which varies by model. With a good guide for your specific vehicle, it’s very manageable.
What happens if I never replace a dirty cabin air filter?
Neglect leads to progressively worse cabin air quality, persistent musty odors, and severely reduced HVAC airflow. The blower motor will strain and burn out faster. In extreme cases, a disintegrating filter can send debris into the HVAC system, causing expensive damage to the blower motor, ducts, or evaporator. It also fails to protect you from allergens and pollutants.
Do all Toyota models come with a cabin air filter?
No. While most modern Toyotas (roughly 2000 and newer) are equipped with a cabin air filter, some older models and certain base-trim trucks (like some Tundra and Tacoma configurations) may not have one. The best way to confirm is to consult your owner’s manual or physically inspect the potential filter locations (behind glovebox, under hood).
Why does my Toyota’s cabin air filter get dirty so quickly?
Your driving environment is the biggest factor. Frequent travel on dirt roads, in heavy urban traffic with construction, in areas with high pollen counts, or during wildfire season will load the filter with debris much faster than highway driving in clean, rural areas. If you live in such an environment, inspect the filter every 10,000-12,000 miles.


