
How to Remove the Maintenance Required Light on a Toyota Corolla
Contents
- 1 Key Takeaways
- 2 📑 Table of Contents
- 3 Understanding Your Corolla’s Maintenance Required Light
- 4 Essential Pre-Reset Checklist: Don’t Skip This!
- 5 Method 1: Resetting on Pre-2014 Toyota Corollas (Older Models)
- 6 Method 2: Resetting on 2014+ Toyota Corollas (Newer Models with Multi-Info Display)
- 7 What If the Light Won’t Reset or Comes Back On?
- 8 Beyond the Reset: Your Corolla’s Full Maintenance Schedule
- 9 Conclusion: A Simple Task with Big Importance
- 10 Frequently Asked Questions


The “Maintenance Required” light on your Toyota Corolla is a service reminder, not an emergency. It typically indicates an oil change is due based on your driving mileage or time. You can reset it yourself after performing the necessary maintenance using the built-in odometer button sequence. However, you should never reset it without first addressing the underlying service need, as this light is a crucial tool for protecting your engine.
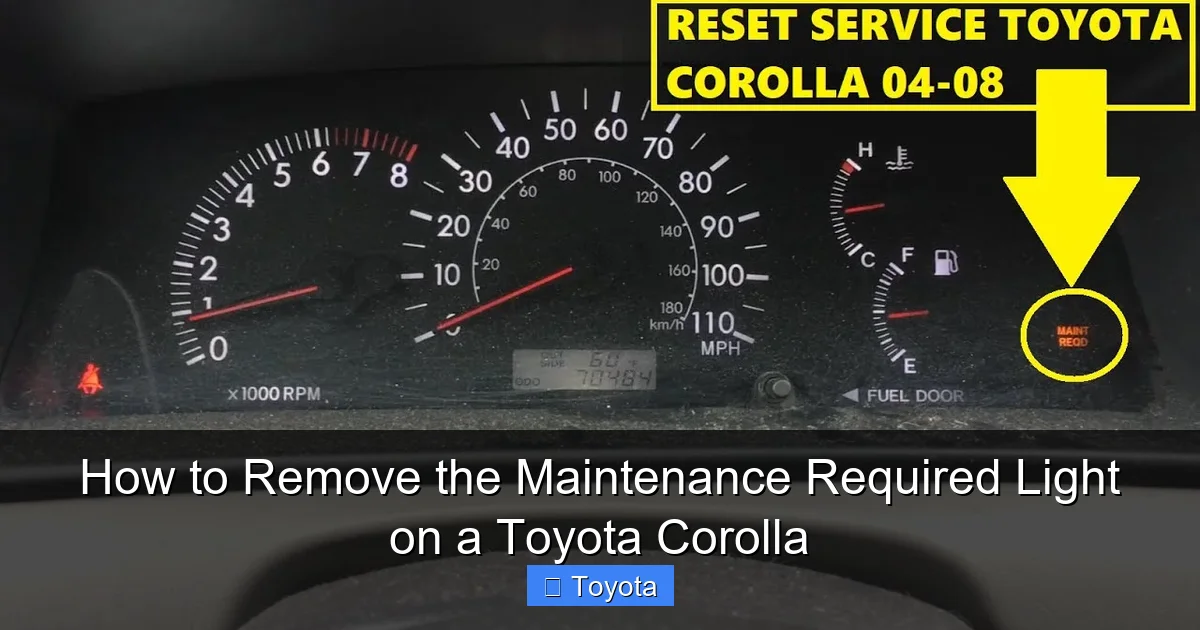
That little wrench icon glowing on your Toyota Corolla’s dashboard can be a real nuisance. It’s the “Maintenance Required” light, and its sole purpose is to remind you that your car is due for its scheduled service. While it’s not as urgent as a check engine light, ignoring it is a path to premature engine wear. The good news is that once you’ve actually done the work—most commonly an oil change—you can easily turn this reminder off yourself. This guide will walk you through exactly how to remove the maintenance required light on a Toyota Corolla, for virtually any model year.
We’ll break it down into simple, no-jargon steps. First, we’ll understand what this light really means. Then, we’ll dive into the specific reset procedures for both older and newer Corolla models. We’ll also cover what to do if the light won’t stay off and why you should never just reset it without doing the work. By the end, you’ll have the confidence to handle this common task and keep your Corolla’s maintenance schedule on track.
Key Takeaways
- The light is a reminder, not a diagnosis: It signals scheduled maintenance (usually an oil change) is overdue based on your vehicle’s internal computer, not a specific part failure.
- Reset only after completing maintenance: Always perform the required service (like changing the oil and filter) before resetting the light. Ignoring the reminder and just turning it off can cause engine damage.
- The reset process is a manual button sequence: You use the odometer/trip meter reset button on the dashboard; no special tools or a diagnostic computer are needed for a standard reset.
- Method varies slightly by model year: The exact button sequence and display messages can differ between older (pre-2014) and newer (2014+) Corolla generations.
- A persistent light may indicate a problem: If the light returns immediately after a correct reset or flashes, it could point to a faulty sensor or other issue needing a professional scan.
- Consult your owner’s manual: Your specific Corolla’s manual will have the definitive, model-year-specific reset procedure and maintenance schedule.
- Resetting is simple but requires focus: The process involves a precise timing of button presses within a specific ignition cycle; follow the steps carefully for success.
📑 Table of Contents
- Understanding Your Corolla’s Maintenance Required Light
- Essential Pre-Reset Checklist: Don’t Skip This!
- Method 1: Resetting on Pre-2014 Toyota Corollas (Older Models)
- Method 2: Resetting on 2014+ Toyota Corollas (Newer Models with Multi-Info Display)
- What If the Light Won’t Reset or Comes Back On?
- Beyond the Reset: Your Corolla’s Full Maintenance Schedule
- Conclusion: A Simple Task with Big Importance
Understanding Your Corolla’s Maintenance Required Light
Before we start pressing buttons, it’s vital to understand what this light is and, more importantly, what it is not. This is a service reminder system engineered by Toyota. It’s not a generic “check engine” alert. The car’s computer, often called the ECM (Engine Control Module), tracks specific parameters: mainly the distance driven since your last oil change and sometimes the time elapsed.
What Triggers the Light?
The system is programmed to illuminate the wrench icon after a predetermined mileage interval, typically every 5,000 to 7,500 miles for older models, or up to 10,000 miles for newer ones using synthetic oil, depending on your driving conditions (severe vs. normal). It also accounts for time, so even if you drive very little, the light may come on annually. The goal is to ensure you get regular oil and filter changes, which are the single most important routine service for engine longevity.
Maintenance Required vs. Check Engine Light
Do not confuse this with the yellow, engine-shaped “Check Engine” light. The Check Engine Light (CEL) indicates a fault in the emissions or engine management system detected by a sensor—a problem that needs diagnosis. The Maintenance Required light is a simple countdown timer for routine service. Its activation is predictable and planned. If your Check Engine Light is on, you must diagnose that issue first; resetting the maintenance light will have no effect on it.
Essential Pre-Reset Checklist: Don’t Skip This!
You might be eager to just make the light go away. But the most critical step happens before you touch any buttons. Resetting the light without performing the actual service is dishonest to your car and dangerous for your engine. Here’s your mandatory checklist:
- Perform the Required Service: This is almost always an oil and filter change. Drain the old oil, replace the filter, and refill with the correct type and amount of oil (check your manual for viscosity like 0W-20). Also, inspect other items like tire pressure, fluid levels, and belts.
- Note the Current Odometer Reading: Write down or take a photo of your current mileage. This is your new baseline for the next service interval.
- Ensure the Service is Complete: Double-check that the oil cap is tight, the drain plug is secure, and there are no leaks underneath the car.
- Turn Off All Accessories: Before starting the reset procedure, make sure the headlights, AC, radio, etc., are all off. The system is sensitive to electrical load.
Only when these steps are done should you proceed to reset the light. This action tells the car’s computer, “The service has been completed; start the countdown for the next 5,000/10,000 miles.”
Method 1: Resetting on Pre-2014 Toyota Corollas (Older Models)
If you own a Corolla from the 2009-2013 model years (or some earlier models with a similar dash layout), the reset procedure uses the traditional odometer button. The process is straightforward and takes less than 30 seconds.
Step-by-Step Button Sequence
First, ensure your car is parked safely with the parking brake set. The ignition should be in the “ON” position (all dash lights on, engine off). Do not start the engine. Now, follow these precise steps:
- Turn the ignition to the “ON” position. You should see all the dashboard lights illuminate, including the Maintenance Required wrench.
- Locate the “ODO/TRIP” button. This is the small button you normally press to toggle between the odometer and trip meter readings. It’s usually on the instrument cluster near the speedometer.
- Press and hold the “ODO/TRIP” button. Keep it held down.
- While still holding the button, turn the ignition key to the “OFF” position. Do not release the button.
- Now, turn the ignition back to the “ON” position while continuing to hold the button. The odometer display will change.
- Continue holding the button. After a few seconds, you should see the odometer display change to show a series of dashes “—–” or a message like “MAINT REQ” or “SETTING” that will blink or count down.
- Release the button. Once you see the dashes or the blinking message, release the button. The Maintenance Required light should start to blink.
- Press the button one final time. A single, quick press of the “ODO/TRIP” button will confirm the reset. The wrench icon should go out, and the odometer should return to its normal display showing your total mileage.
If the light goes out, you’ve succeeded! If it didn’t work, turn the car completely off, wait 10 seconds, and try the sequence again, ensuring you hold the button through the entire off-on cycle.
Method 2: Resetting on 2014+ Toyota Corollas (Newer Models with Multi-Info Display)
Starting with the completely redesigned 2014 Corolla, Toyota introduced a more advanced digital display. The reset procedure is slightly different but just as simple. It uses the buttons on the steering wheel, not the dash cluster.
Using the Steering Wheel Buttons
For 2014-2023 Corollas, you’ll use the “DISP” or “MENU” button and the arrow buttons on the left side of the steering wheel. Again, the engine must be off, and the key in the “ON” position.
- Turn the ignition to the “ON” position. The Maintenance Required wrench will be lit on the dash.
- Press the “DISP” or “MENU” button on the steering wheel repeatedly until you see the “MAINTENANCE” menu appear on the multi-information display (the screen between the speedometer and tachometer).
- Use the “▲” or “▼” arrow buttons to scroll through the maintenance menu options. You are looking for an option that says “MAINTENANCE REQUIRED” or “SERVICE RESET.”
- Select the “MAINTENANCE REQUIRED” option by pressing and holding the “DISP” or “ENTER” button (the exact button varies slightly by year). Hold it for about 2-3 seconds.
- Watch the display. It should change to show “MAINTENANCE RESET” or “SET TO 0?” or a similar confirmation message.
- With the reset message displayed, press and hold the same button (usually “DISP” or “ENTER”) again for a couple of seconds. You may hear a beep.
- Release the button. The wrench icon on your dashboard should extinguish. The display will likely return to showing your mileage or trip information.
For the newest 2022-2023 Corollas with a larger central touchscreen, the process might be integrated into the vehicle settings menu on the screen itself. The principle is the same: navigate to Settings > Vehicle > Maintenance Reset. Always refer to your owner’s manual for the definitive path for your specific trim and year.
What If the Light Won’t Reset or Comes Back On?
You followed the steps perfectly, but that stubborn wrench is still glaring at you, or it came back on after a few miles. This isn’t a failed reset attempt; it’s a message. Here’s what it means and what to do.
Common Reasons for a Persistent Light
- Incomplete Service: Did you change the oil but forget to reset the maintenance reminder on the old oil change sticker in your windshield? The car’s computer and the sticker are separate. The car only cares about its internal counter. However, if you changed the oil but the light came back on very quickly, you may have accidentally triggered the “Severe Service” interval by doing lots of short trips or idling.
- You Didn’t Actually Reset It: The sequence is precise. You must hold the button through the ignition cycle for older models, or hold the “Enter” button on the display screen for newer ones. A quick press won’t do it. Try again, timing it carefully.
- Low Oil Pressure or Level: Some newer vehicles will not allow a reset if the oil pressure is low or the oil level is critically low. Check your dipstick first. An oil light that stays on is a separate, more urgent issue.
- Faulty Sensor or Electrical Issue: Rarely, the sensor that tracks oil life or the circuit connected to the dash could be faulty.
When to Seek Professional Help
If you have:
- Performed the oil change correctly.
- Followed the reset procedure meticulously for your model year.
- The light remains illuminated or illuminates again after driving 100-200 miles.
…then it’s time to visit a trusted mechanic or a Toyota dealership. They can plug in a professional diagnostic scanner (like a Techstream tool) to read the car’s computer logs. They can verify if the maintenance reminder system is functioning correctly and if there are any stored fault codes related to the oil life monitoring system or dashboard instrumentation. This is also a good time to have them perform a full vehicle inspection to ensure no other maintenance items were missed.
Beyond the Reset: Your Corolla’s Full Maintenance Schedule
Removing the light is just acknowledging you’ve done the work. The real benefit comes from doing the work on time. Your Toyota Corolla is designed for reliability, and that reliability is earned through consistent maintenance. The maintenance light is your car’s way of holding up its end of the bargain.
Understanding the Maintenance Intervals
The classic 5,000-mile oil change is a good rule of thumb, but your Corolla’s computer uses a more sophisticated algorithm. It calculates oil life based on engine revolutions, temperature, and drive time—not just miles. Under “normal” driving (mostly highway, moderate temps), you might get 7,500-10,000 miles on synthetic oil. Under “severe” conditions (frequent short trips, extreme heat/cold, dusty roads, heavy loads), that interval drops to 5,000 miles. The light coming on means one of those intervals has been reached.
What Else Should Be Inspected?
When that light comes on, it’s a prompt for a full service check. At a minimum, with your oil change, a technician (or you, if you’re a DIYer) should inspect:
- Tires: Pressure, tread depth, and for any damage.
- All Fluids: Coolant, brake fluid, power steering fluid, and washer fluid.
- Brakes: Pad and rotor thickness.
- Air Filter: A clogged filter reduces fuel economy.
- Battery: Check terminals and voltage.
- Lights and Wipers: Ensure all are functional.
Adhering to this schedule, as detailed in your owner’s manual, is what keeps your Corolla running smoothly for 200,000+ miles. For other Toyota models, the process is very similar. You can find guides for specific vehicles like the Tacoma or the Rav4 on our site, but the core principle of “service first, reset second” never changes.
Conclusion: A Simple Task with Big Importance
Removing the maintenance required light on your Toyota Corolla is a simple, empowering DIY task. It’s one of the easiest pieces of routine maintenance you can perform, taking less than a minute once you know the steps for your model year. The key takeaway is philosophical: this light is a helpful assistant, not an annoyance to be silenced. Its purpose is to safeguard your engine by ensuring timely oil changes.
By completing your scheduled service and then correctly resetting the reminder, you complete the loop. You’ve honored your car’s needs, and it will reward you with reliable, efficient transportation. Bookmark this guide, keep your owner’s manual handy, and drive with confidence, knowing you’re in control of your Corolla’s health. If you ever feel unsure, a quick call to your mechanic or a visit to a dealership for a reset is always a safe and worthwhile option.
Frequently Asked Questions
Can I reset the maintenance light without changing the oil?
Technically yes, using the button sequence described. However, you should never do this. The light is a critical reminder that your oil is degraded. Resetting it without changing the oil means you’ll be driving with old, ineffective oil, which can cause severe engine wear and eventual failure. Always perform the service first.
Will the light come back on if I drive less than 5,000 miles after resetting?
No, not immediately. The reset sets the computer’s internal mileage counter back to zero. It will only illuminate again after you’ve driven the full service interval (e.g., 5,000-10,000 miles) or after the time limit (e.g., 12 months) has passed, whichever comes first. Your driving habits determine the actual mileage interval.
Do I need any special tools to reset the light?
No. For all Corolla models, you only need the ignition key (or push-button start for the “ON” position) and your finger to press the dashboard or steering wheel button. No scan tools, code readers, or mechanical tools are required for the standard maintenance reminder reset.
How often does the maintenance required light come on?
It comes on based on your vehicle’s programmed service interval, which is typically every 5,000 to 10,000 miles or every 12 months, depending on your driving conditions (normal vs. severe) and the type of oil used. The car’s computer calculates the optimal time based on engine runtime and temperature.
My 2018 Corolla’s light looks different from my friend’s 2010 model. Is that normal?
Yes, completely normal. The icon has evolved. Older models often use a simple “MAINT REQ” text or a generic wrench symbol. Newer models (2014+) typically use a more detailed wrench icon that may appear yellow or amber. The meaning is identical, but the reset procedure might differ slightly between these two design generations.
I reset the light after an oil change, but it came back on after one day of driving. What’s wrong?
This is unusual. First, double-check that you performed the reset procedure correctly for your specific model year. If the process was done right, the most likely cause is that the oil level is critically low, triggering a safety lockout that re-illuminates the reminder. Check your dipstick immediately. If the level is fine, a faulty oil life sensor or a deeper electrical issue may be present, requiring a professional diagnostic scan.


