How to Remove a Spare Tire from a Ford F-150 Without the Tool
Contents
- 1 Key Takeaways
- 2 📑 Table of Contents
- 3 Understanding Your F-150’s Spare Tire System
- 4 Preparing for Manual Removal: Safety and Setup
- 5 Step-by-Step Removal: The Drop-Down Winch Method
- 6 Step-by-Step Removal: The Under-Bed Cable System
- 7 Handling Common Challenges and Stuck Situations
- 8 Reinstalling or Storing Your Spare Tire
- 9 Prevention and Future-Proofing
- 10 Frequently Asked Questions


Losing or breaking the special spare tire removal tool for your Ford F-150 is a common frustration, but it’s not a dead end. You can absolutely remove that stubborn spare tire using everyday tools and clever techniques. This guide will walk you through understanding your truck’s specific setup, preparing properly, and executing safe manual removal methods, even if the tire is rusted in place. Remember, while possible, this requires patience and a strong focus on safety to avoid injury or vehicle damage.
So, you’re ready to change a flat tire on your trusty Ford F-150, you pop the tailgate, and there it is: your big, beautiful, full-size spare tire. But where’s the special, weird-looking lug wrench or removal tool? It’s not in the cab, it’s not in the glove box, and it’s definitely not where you remember leaving it. Panic sets in. Don’t worry. This scenario happens to thousands of F-150 owners every year. The factory tool gets lost, borrowed and not returned, or breaks. The good news? You don’t need that specific piece of plastic and metal to get that spare down. With some patience, the right approach, and a heavy dose of safety consciousness, you can absolutely remove a spare tire from a Ford F-150 without the tool. This guide will turn that frustrating moment into a manageable DIY task.
First, let’s get one thing straight: your F-150’s spare tire system is designed to be robust. It’s holding up a 50-90 pound tire under your truck, exposed to the elements. That means it can be incredibly stubborn, especially if you live where they use road salt or haven’t touched it in years. The “tool” you’re missing is essentially a specialized socket or driver that engages a square nut or a long bolt on the winch mechanism. Our goal is to replicate that function with common tools from your toolbox. We’ll cover the two primary systems found on F-150s and walk you through each. This isn’t about brute force; it’s about understanding the mechanics and applying the right leverage.
Key Takeaways
- Know Your System: F-150 spare tire mechanisms vary by year and drivetrain (2WD vs. 4WD). Identify if yours uses a simple drop-down winch or a more complex under-bed cable system before starting.
- Safety is Non-Negotiable: Always use jack stands on solid ground. Never rely solely on a floor jack. Engage the parking brake and chock the wheels. A falling spare tire can cause severe injury.
- Penetrating Oil is Your Friend: For rusted or stuck components (common in older trucks or regions that use road salt), apply WD-40 or a similar product and let it soak for hours or overnight.
- The Right Improvised Tool Works: A large socket (often 21mm or 22mm) with a long handle, a breaker bar, or even a sturdy adjustable wrench can substitute for the missing OEM tool in many cases.
- It’s a Two-Person Job: One person to manage the tool/prying and another to guide and catch the heavy spare tire (which can weigh 50-90 lbs) makes the process vastly safer and easier.
- Don’t Force It: If a component is resisting, stop. Forcing it can strip threads, break the winch mechanism, or cause the cable to snap, creating a bigger, more expensive problem.
- Plan for Reinstallation: Once removed, inspect the winch cable and nut for damage. Lubricate threads before reinstalling the spare to prevent future seizing.
📑 Table of Contents
- Understanding Your F-150’s Spare Tire System
- Preparing for Manual Removal: Safety and Setup
- Step-by-Step Removal: The Drop-Down Winch Method
- Step-by-Step Removal: The Under-Bed Cable System
- Handling Common Challenges and Stuck Situations
- Reinstalling or Storing Your Spare Tire
- Prevention and Future-Proofing
Understanding Your F-150’s Spare Tire System
Before you grab a wrench, you need to know what you’re dealing with. Ford has used a couple of different setups over the years. Identifying yours is the critical first step. Crawl under your truck (with it safely on level ground and wheels chocked!) and locate the spare tire carrier assembly. You’re looking for the mechanism that holds the tire up.
The Classic Drop-Down Winch (Most Common on Older & Many Newer Models)
This is the system most people picture. The spare tire hangs vertically from a cable or strap winch mounted inside the spare tire well, directly under the truck bed. The access point is a square-shaped nut or a bolt with a square drive, usually located in the center of the wheel on the backside (the side facing the cab). You’ll see it through the hole in the center of the spare tire’s rim. Turning this nut counter-clockwise (lefty-loosey) lowers the tire. This is the system the factory plastic “T-handle” tool is made for. If this is your setup, you’re in luck—it’s the most straightforward to improvise for.
The Under-Bed Cable System (Common on Some 4WD and Earlier Models)
On some four-wheel-drive F-150s and certain model years, the spare tire is held by a cable that runs from a winch mounted on the frame rail (often on the driver’s side, behind the rear tire) to a hook or plate under the tire. The access point is a square nut on the end of a long bolt protruding through the frame. You access it from the side of the truck, not from underneath. This system can be trickier because the bolt is long and the cable is under tension. You’ll need a very deep socket and a long breaker bar to get enough torque on the square nut.
Once you’ve identified your system, you can gather your improvised tools. For the drop-down winch, you’ll need a large square-drive socket (likely 21mm or 22mm) that fits over the square nut. A 1/2″ drive socket with a long ratchet or breaker bar is ideal. For the under-bed system, you’ll need a deep impact socket of the correct size (often 21mm) and a very long handle. In a pinch, a large adjustable wrench that can grip the square nut’s flats might work, but it’s less ideal and can round off the nut if you’re not careful. If your truck has a plastic cover over the nut, you’ll need to pry or cut that away first.
Preparing for Manual Removal: Safety and Setup
Rushing into this is the fastest way to get hurt or damage your truck. This phase is about creating a safe, stable workspace. Your truck is heavy, and that spare tire is a serious projectile if it falls unexpectedly.
Visual guide about How to Remove a Spare Tire from a Ford F-150 Without the Tool
Image source: f150lab.com
Essential Safety Gear and Setup
Park your F-150 on a solid, level surface. Concrete or packed dirt is best. Avoid soft soil or an incline. Engage the parking brake firmly. For automatic transmissions, put it in “Park.” For manuals, leave it in gear. Now, chock the wheels. Place wheel chocks or large blocks of wood snugly against the front and rear of the front tires. This prevents any rolling. This is a critical step you cannot skip.
Next, you need to support the truck properly. You will be underneath it. The factory spare tire winch is not a lifting point. You must use proper jack stands. Find a solid, factory-recommended jacking point on the frame—usually a reinforced pinch weld or pad near the rear axle. Use a hydraulic floor jack to lift the rear of the truck just enough to take the weight off the spare tire’s cable/strap. Your goal is to relieve tension, not to lift the entire rear end. Once lifted, immediately place jack stands under the designated rear frame jacking points. Lower the truck onto the stands. Now the truck’s weight is supported by the stands, not the jack. Only then should you crawl under to work. Never get under a vehicle supported only by a jack.
Gathering Your Improvised Tools
Based on your system identification, assemble your tools. You’ll likely need:
- A large socket: 21mm (13/16″) or 22mm (7/8″) are the most common for F-150s. Take the old tool (if you have a broken piece) to an auto parts store to match it.
- A long handle: A 1/2″ drive breaker bar (24″ or longer) is perfect. A piece of sturdy steel pipe can slip over a ratchet handle to extend it (this is called a “cheater bar,” but use cautiously to avoid breaking the ratchet).
- Penetrating oil: Like WD-40, Liquid Wrench, or PB Blaster.
- A hammer or mallet: For tapping the socket on or to break initial rust.
- Pliers or vice-grips: To hold the cable/strap if it retracts as you loosen.
- A helper: Strongly recommended.
- Gloves and safety glasses.
Step-by-Step Removal: The Drop-Down Winch Method
This is the most common scenario. The principle is simple: you’re turning that square nut to unwind the winch and let the tire drop. But the location and rust make it tricky.
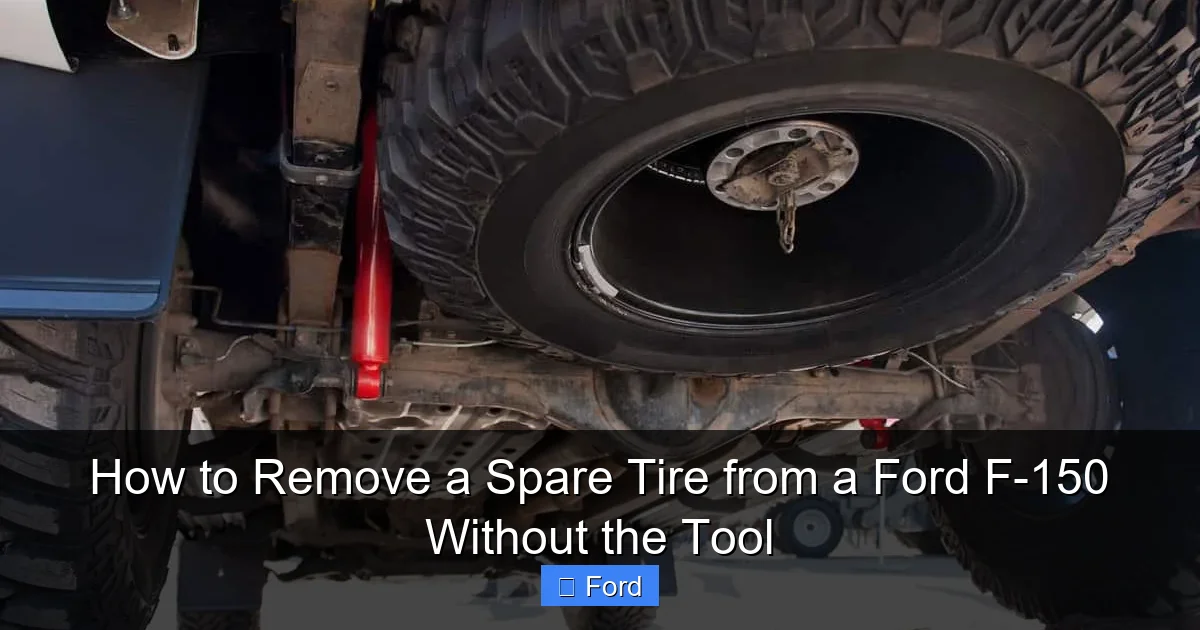
Visual guide about How to Remove a Spare Tire from a Ford F-150 Without the Tool
Image source: torquetrip.com
Access and Initial Assessment
Lie on your back under the truck. Position yourself so you can see and reach the square nut through the center hole of the spare tire rim. You might need to rotate the tire slightly to align the hole. Shine a flashlight. Is there a plastic cap over the nut? If so, pry it off with a flathead screwdriver. Inspect the nut. Is it covered in rust, dirt, and grime? This is where the penetrating oil comes in. Give it a generous spray. Don’t just spray and go. Let it soak. If it’s really bad, spray it, let it sit for 10-15 minutes, then gently tap the nut with a hammer. The vibrations help the oil work. Repeat this process. Patience here saves immense frustration later.
Applying the Tool and Breaking Loose
Fit your largest square-drive socket onto the nut. It should be snug. If it’s slightly loose, you can sometimes wrap a rag around it to fill the gap. Now, attach your long breaker bar. Here’s the technique: you need to apply steady, increasing pressure. Never use a pipe on a ratchet unless you know the ratchet’s rating; it’s better to use a solid breaker bar. Position yourself so you can push with your legs and body weight, not just arm strength. Your helper can stand beside the tire, ready to guide it and be prepared for it to drop suddenly as the last threads come loose. Give a firm, steady push counter-clockwise. It will likely resist at first. That’s the rust and the winch’s spring tension fighting you. Keep the pressure steady. If it doesn’t budge after a solid effort, reapply penetrating oil and wait. Do not use a torch near the fuel tank or fuel lines. Heat can also damage the winch mechanism.
The Final Release and Lowering
Once it breaks free, it will start turning relatively easily. Keep turning. You’ll feel the tension release. After about 10-15 full turns, the tire will start to lower on its own as the cable unwinds. This is when your helper’s job becomes critical. The tire will drop the last foot or two quickly. Guide it down slowly and evenly to prevent it from swinging wildly and hitting the ground or your helper. Once it’s on the ground, you can fully unscrew the nut and remove it from the tire carrier. The spare tire is now free! If the cable or strap is retracting as you work, have your helper use pliers to grip it near the winch to control the descent.
Step-by-Step Removal: The Under-Bed Cable System
This method is similar in principle but differs in access and tool length. The nut is on a long bolt, and you’re fighting the tension of the entire cable system.
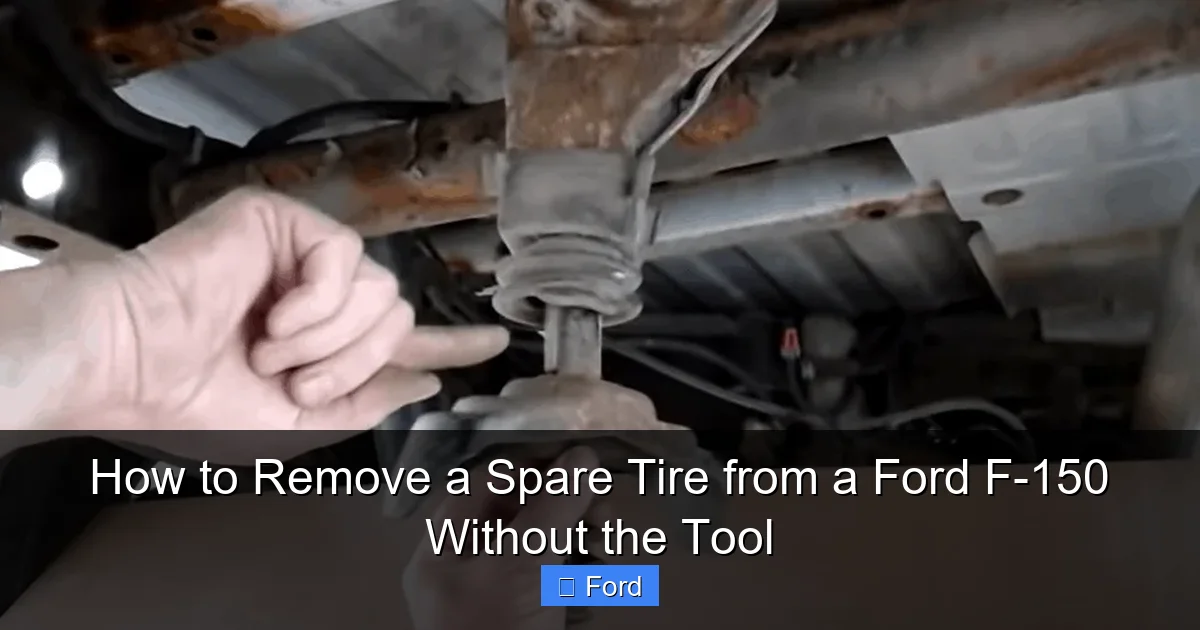
Visual guide about How to Remove a Spare Tire from a Ford F-150 Without the Tool
Image source: torquetrip.com
Locating and Reaching the Bolt
Find the square nut on the long bolt. It will be on the frame rail, usually on the driver’s side. You may need to lie on your side or reach in from behind the rear tire. The bolt is often long, so you need a very deep socket. A standard deep socket might not be long enough to fully engage the nut. An “impact” socket is often longer and stronger. Spray penetrating oil generously onto the nut and the bolt threads. Let it soak thoroughly. Because the bolt is long, the oil has a harder time getting to the threads, so be patient and reapply.
Applying Massive Torque
Fit your deep socket and use your longest breaker bar. You may need to position the bar so it’s almost parallel to the ground to get clearance. This gives you less mechanical advantage, so you’ll need more force. Engage your core and legs. Push in a slow, controlled manner. You might hear creaks from the cable. This is normal. The goal is to turn the nut enough to start releasing the cable tension. It may take several full turns before you feel the cable begin to loosen. Keep turning. As the cable loosens, the tire will lower slightly, which might change the angle of the bolt, making it easier or harder to turn. Be prepared for this.
Controlling the Descent
As the nut comes off, the cable will start to spool out. The tire is still attached to the cable’s hook or plate. You now need to carefully guide the tire down. This is tricky because the cable can whip or snag. Have your helper ready to support the tire’s weight from the moment it starts moving. Once the nut is completely off, you can carefully lower the tire the rest of the way, guiding the cable to avoid kinking. You’ll then need to disconnect the cable hook from the tire’s mounting plate to fully free the tire.
Handling Common Challenges and Stuck Situations
Even with the right tools, you can hit snags. Here’s how to troubleshoot.
The Nut is Rounded Off
If your improvised socket is slipping and rounding the corners of the square nut, stop immediately. You’re making it worse. Try these tricks:
- Use a Vice-Grip: Clamp a large, strong vise-grip directly onto the square nut. Turn the vise-grip handle. This grips the flats, not the corners.
- The Hammer and Socket Trick: Place the socket on the nut. Tap it firmly with a hammer in the direction you want to turn (counter-clockwise). The impact can shock the rust loose. Re-tap and try turning.
- Heat Application (Extreme Caution):strong> As a last resort, and with absolute certainty you are far from the fuel tank, fuel lines, or brake lines, you can carefully apply heat to the nut with a propane torch. Heat expands metal. Heat the nut for 30-60 seconds, then try turning it. The nut expands and may break free from the bolt. Never heat the bolt itself, as it will expand and tighten onto the nut. Have a fire extinguisher ready.
The Tire is Rusted to the Carrier
Sometimes the tire itself is fused to the metal carrier plate via rust. The winch may turn, but the tire doesn’t drop. In this case:
- After lowering the tire as much as the winch allows, try to rock the tire side-to-side and front-to-back. This can break the rust bond.
- Spray penetrating oil between the tire rim and the carrier plate. You may need to access this from the side. Let it soak.
- Use a crowbar or pry bar (protected with a wood block to avoid rim damage) between the tire and the truck’s frame or a solid part to lever it free once the winch is loose.
The Cable is Stuck or Kinked
If the cable doesn’t retract or extend smoothly, it may be kinked or corroded in its guide. Don’t force it. Access the cable’s path along the frame. Try to manually free the kink. Lubricate the cable with a dry lubricant like graphite powder (avoid oil, which attracts dirt). Work the cable back and forth gently. If the cable is severely damaged or frayed, it may need replacement before you reinstall the spare.
Reinstalling or Storing Your Spare Tire
Once you’ve changed the flat and have the spare on the ground, you’re not done. You now have a 90-pound tire in your truck bed and a broken or missing tool. What’s next?
For Immediate Reinstallation (If the Flat is Repaired)
If you patched or plugged the flat and want to put it back as the spare, you must reverse the process. But before you do, clean and lubricate. Scrape any rust and dirt off the winch nut threads and the cable/strap hook. Apply a thin coat of white lithium grease or anti-seize compound to the threads. This makes future removal infinitely easier. Now, wind the tire up by turning the square nut clockwise (righty-tighty). You’ll feel it get very tight. Turn it until the tire is snug against the carrier. Don’t overtighten; just take the slack out. The tension is designed to hold it securely. If your original tool is gone, you now have a perfect opportunity to buy a universal spare tire tool from an auto parts store or online. They are inexpensive and fit most F-150s.
For Long-Term Storage or Transport
If you’re not reinstalling the spare immediately (e.g., you bought a new tire and are storing the old one), you need to secure it. The best place is back in the spare tire well, but without the winch engaged, it will rattle. You can:
- Leave the winch nut loosened and rest the tire on the carrier plate, then secure it with ratchet straps from the tire’s lugs to the truck bed tie-down points.
- Place it flat in the truck bed and use multiple tie-downs.
- Consider a spare tire lock if you plan to carry it often. These are aftermarket devices that clamp onto the wheel and lock to the carrier, preventing theft without needing the special tool.
Never drive with an unsecured spare tire in the bed. It’s a dangerous projectile in a sudden stop.
Prevention and Future-Proofing
Having gone through this once, you’ll never want to do it again. Let’s make sure it doesn’t happen.
Acquire a Proper Tool Immediately
The number one prevention is having the right tool. You have options:
- OEM Ford Part: Order the exact factory tool from a Ford dealer using your VIN. It’s the perfect fit but can be pricey.
- Universal Aftermarket Tool: As mentioned, these are cross-shaped or T-handle tools with a square drive that fits most Ford, GM, and Ram spare nuts. They cost $10-$25. Keep this one in the truck at all times, perhaps chained to the bed.
- Make Your Own (Temporary): If you have a large 21mm or 22mm socket, you can sometimes weld a long bolt or pipe to it to create a handle. Or, use a large pipe wrench on the square nut (this can damage the nut, so only if you’re desperate).
Maintain Your Spare Tire System
The best time to service your spare tire is when the truck is up for an oil change. Once a year:
- Lower the spare tire completely using your tool.
- Inspect the cable/strap for fraying, kinks, or corrosion.
- Clean the winch nut and threads.
- Apply a light coating of grease to the threads.
- Raise the tire back up, but don’t fully tighten the nut. Just take the slack out.
This simple yearly maintenance ensures the system will work when you need it most, and it will remind you where the tool is! If you need help with other routine maintenance, our guide on how to tell the size of a tire is a great resource.
Understanding your F-150’s systems is key to handling any situation. While this guide focuses on the spare, the same principle of using common tools for specialized jobs applies elsewhere. For instance, knowing how to remove a tire from a wheel is a fundamental skill that complements this one.
Frequently Asked Questions
Will using a regular socket damage the square nut on my F-150’s spare tire?
It can, if the fit is too loose. A standard square-drive socket must fit snugly over the square nut. A slightly loose socket will round off the nut’s corners, making it impossible to use the factory tool later. If your socket is loose, try a different size, use a wrench on the nut’s flats, or consider the vice-grip method as a last resort. The goal is a tight, slip-free fit.
What if the spare tire is rusted solid to the metal carrier underneath?
This is a tough one. First, fully lower the tire as much as the winch allows. Then, spray penetrating oil liberally where the rim meets the carrier plate. Let it soak for hours. Try to rock the tire vigorously side-to-side. You can carefully use a pry bar (with a wood block to protect the rim) between the tire and the frame to lever it free. Patience and repeated oil applications are key. In extreme cases, the carrier plate may need to be cut off, which is a major job.
Can I just cut the cable or strap if I’m completely stuck?
This should be an absolute last resort. Cutting the cable means you cannot re-use the factory carrier system. You would then have to secure the spare tire with straps or bungees in the bed, which is not ideal for long-term or highway driving. If you cut it, you must also remove the now-loose winch mechanism from the truck, as it will rattle. It’s better to persist with the methods above or seek professional help.
Is there a risk of the spare tire falling on me while I’m working?
Yes, this is a real danger. That’s why the safety setup is non-negotiable. The tire is held by a single point of failure—the winch. If you unscrew the nut completely while under the truck, the tire could drop suddenly. Always have your helper ready to guide and support the tire the moment it starts to lower. Work from the side if possible, not directly beneath the tire. Use jack stands to support the truck’s weight, not the tire’s.
My F-150 is a 4×4 and the bolt is really long and hard to reach. What do I do?
For the under-bed system, you need a deep impact socket (often sold as “deep wall” or “extra deep”). These are longer than standard deep sockets. You may also need to position your breaker bar at an awkward angle. Sometimes, using a universal joint (u-joint) between the socket and the breaker bar can help achieve the right angle, but it reduces torque. Be prepared for this to be a physically demanding, awkward job. A helper to hand you tools and provide moral support is invaluable.
After I get the spare down, how do I secure it in my truck bed?
Do not just toss it in the bed. An unsecured 90-pound object becomes a deadly missile in a sudden stop. The best method is to place it flat on the bed floor and use at least two high-quality ratchet straps with soft loops or hooks. Criss-cross the straps and tighten them firmly. If your truck has built-in tie-down points in the bed corners, use them. You can also lay it against the tailgate and strap it to the front and rear tie-downs. The tire should not be able to shift more than an inch in any direction when you push on it.