How to Jumper Obd2 on a Toyota
Contents
- 1 Key Takeaways
- 2 📑 Table of Contents
- 3 What Is OBD2 Jumpering and Why Use It on a Toyota?
- 4 Tools and Safety Precautions Before You Begin
- 5 Step-by-Step Guide to Jumpering the OBD2 Port on a Toyota
- 6 Interpreting Flash Codes on Toyota Vehicles
- 7 Limitations and Risks of Jumpering OBD2 on Toyota
- 8 Alternative Methods for Diagnosing Toyota Issues
- 9 Tips for Maintaining Your Toyota’s OBD2 System
- 10 Conclusion
- 11 Frequently Asked Questions


Jumpering the OBD2 port on a Toyota can help reset error codes, test sensors, or perform diagnostics without a scanner. This guide walks you through the process safely, with clear instructions and important warnings to avoid damaging your vehicle’s electronics.
If you’ve ever seen the dreaded “Check Engine” light pop up on your Toyota’s dashboard, you know how frustrating it can be. You’re left wondering: Is it serious? Can I fix it myself? Do I need to spend hundreds at the dealership? While modern OBD2 scanners make diagnostics easier, there’s still a place for old-school methods—especially when you don’t have a scanner handy. One such method is jumpering the OBD2 port. It’s a simple, low-tech trick that can help you reset error codes or enter diagnostic mode on many older Toyota vehicles.
Now, before you grab a paperclip and start poking around under the dash, let’s be clear: jumpering the OBD2 port isn’t magic. It won’t fix a broken oxygen sensor or a misfiring engine. But it can help you read flashing light patterns from the check engine light, which can point you toward the problem. This technique is especially useful for Toyota owners with vehicles from the 1990s to early 2000s. These models often support a feature called “flash code diagnostics,” where the check engine light blinks in specific patterns to indicate trouble codes. By jumpering two specific pins in the OBD2 connector, you can trigger this mode and read the codes manually.
Key Takeaways
- Understand the purpose: Jumpering the OBD2 port is typically used to reset the check engine light or enter diagnostic mode on older Toyota models.
- Use the correct pins: Most Toyota vehicles use pins 4 (ground) and 13 (diagnostic trigger) for basic jumper procedures.
- Safety first: Always disconnect the battery before working on electrical systems to prevent short circuits or ECU damage.
- Know your model year: Pre-2000 Toyotas are more likely to support jumper-based diagnostics; newer models require professional scanners.
- Avoid common mistakes: Never jumper power pins (like pin 16) to ground—this can fry your vehicle’s computer.
- Use a proper tool: A simple paperclip or jumper wire works, but insulated tools reduce the risk of accidental shorts.
- Verify results: After jumpering, monitor the check engine light behavior to confirm the procedure worked.
📑 Table of Contents
- What Is OBD2 Jumpering and Why Use It on a Toyota?
- Tools and Safety Precautions Before You Begin
- Step-by-Step Guide to Jumpering the OBD2 Port on a Toyota
- Interpreting Flash Codes on Toyota Vehicles
- Limitations and Risks of Jumpering OBD2 on Toyota
- Alternative Methods for Diagnosing Toyota Issues
- Tips for Maintaining Your Toyota’s OBD2 System
- Conclusion
What Is OBD2 Jumpering and Why Use It on a Toyota?
OBD2 stands for On-Board Diagnostics II, a standardized system used in all vehicles sold in the U.S. since 1996. It monitors engine performance, emissions, and other critical systems. When something goes wrong, the car’s computer stores a diagnostic trouble code (DTC) and turns on the check engine light. Most people use an OBD2 scanner to read these codes. But jumpering is a manual alternative—essentially tricking the car into displaying the codes through light flashes.
So why would you jumper the OBD2 port instead of using a scanner? First, it’s free. You don’t need to buy or borrow a scanner. Second, it works even if your scanner is broken or unavailable. Third, it’s a great learning tool. By reading flash codes, you gain insight into how your Toyota’s computer communicates. And finally, some older Toyotas—like the Camry, Corolla, or 4Runner from the late ’90s—were designed to support this method. It’s like speaking the car’s native language.
But here’s the catch: not all Toyotas support jumper-based diagnostics. Vehicles from 2000 onward increasingly rely on digital communication protocols that can’t be triggered with a simple jumper. If your Toyota is newer than 2005, you’ll likely need a scanner. Still, if you’re working on a classic or older model, jumpering can be a lifesaver.
Tools and Safety Precautions Before You Begin

Visual guide about How to Jumper Obd2 on a Toyota
Image source: automotivian.com
Before you start, let’s talk safety. Working with your car’s electrical system can be risky if you’re not careful. A single mistake—like shorting the wrong pins—can damage the engine control unit (ECU), blow fuses, or even cause a fire. So take these precautions seriously.
Gather the Right Tools
You don’t need much. Here’s what you’ll need:
– A paperclip, small jumper wire, or dedicated OBD2 jumper tool
– Safety gloves (optional but recommended)
– A flashlight (to see the OBD2 port clearly)
– Your vehicle’s owner’s manual (to confirm pin layout)
Avoid using metal tools like screwdrivers or pliers—they can slip and cause shorts. A bent paperclip works perfectly. Straighten it out, then bend a small hook at one end to make insertion easier.
Disconnect the Battery
This is non-negotiable. Before touching any electrical component, disconnect the negative terminal of your car battery. Use a wrench to loosen the clamp and move the cable away from the terminal. This prevents accidental power surges or shorts while you’re working.
Wait at least 10 minutes after disconnecting the battery. This allows any residual charge in the ECU to dissipate. It’s a small step, but it greatly reduces the risk of damage.
Locate the OBD2 Port
In most Toyotas, the OBD2 port is under the dashboard on the driver’s side. It’s usually within arm’s reach, near the steering column. It’s a 16-pin rectangular connector, often black or gray. If you can’t find it, check behind a small cover or consult your owner’s manual.
Once you’ve found it, inspect the port. Make sure it’s clean and free of dirt, corrosion, or bent pins. A dirty port can cause poor connections and inaccurate readings.
Understand the Pin Layout
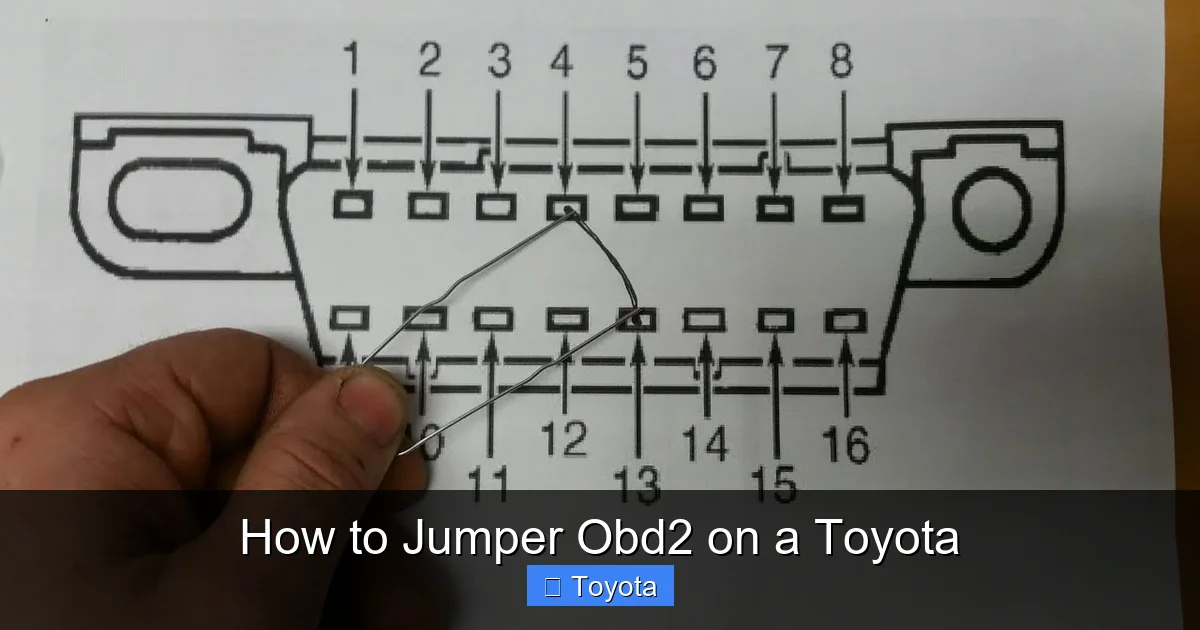
The OBD2 connector has 16 pins, arranged in two rows of eight. Each pin has a specific function. For jumpering on Toyotas, you’ll focus on two key pins:
– Pin 4: Chassis Ground
– Pin 13: Diagnostic Trigger (also called “Service Engine Soon” or “Check Engine” signal)
These pins are typically located in the bottom row. Pin 4 is usually the fourth from the left on the bottom row. Pin 13 is the third from the right on the same row. Double-check your vehicle’s wiring diagram to confirm—pin layouts can vary slightly between models.
Never jumper pin 16 (battery power) to ground. This pin supplies 12 volts and can cause serious damage if shorted.
Step-by-Step Guide to Jumpering the OBD2 Port on a Toyota

Visual guide about How to Jumper Obd2 on a Toyota
Image source: i.pinimg.com
Now that you’re prepared, let’s walk through the jumpering process step by step. This method works best on Toyota models from 1996 to 2004, including the Camry, Corolla, Avalon, RAV4, and Tacoma.
Step 1: Prepare the Jumper Wire
Take your paperclip or jumper wire and straighten it. Bend a small loop or hook at one end to help it stay in place. Make sure the wire is clean and free of insulation if using a coated jumper. You need bare metal contact.
Step 2: Insert the Jumper
With the ignition off and the battery disconnected, insert one end of the jumper wire into pin 4 (ground) and the other end into pin 13 (diagnostic trigger). Push gently but firmly to ensure a good connection. The pins are small, so take your time.
If you’re unsure which pin is which, refer to a Toyota OBD2 pinout diagram. You can find these online or in repair manuals. Some ports have numbers molded near the pins—use those as a guide.
Step 3: Reconnect the Battery
Once the jumper is in place, reconnect the negative battery terminal. Tighten it securely with a wrench. Do not turn on the ignition yet.
Step 4: Turn the Ignition to “On”
Turn the key to the “ON” position (but don’t start the engine). This powers up the ECU and instrument cluster. You should see the dashboard lights illuminate, including the check engine light.
Step 5: Observe the Check Engine Light
Watch the check engine light closely. It should begin to flash in a specific pattern. This is the flash code sequence. Each code consists of long and short flashes that represent numbers.
For example:
– One long flash, followed by three short flashes = Code 13
– Two long flashes, followed by four short flashes = Code 24
Long flashes count as tens, short flashes as ones. A pause separates each code. After the last code, the sequence may repeat.
Step 6: Record the Codes
Write down each code as it appears. Some Toyotas display multiple codes. Wait for the full sequence to complete before removing the jumper.
Step 7: Remove the Jumper and Reset
Once you’ve recorded the codes, turn the ignition off. Remove the jumper wire from the OBD2 port. Reconnect the battery if you disconnected it earlier.
To clear the codes, you can either:
– Disconnect the battery for 10–15 minutes (this resets the ECU)
– Use the jumper method again: after reading codes, leave the jumper in place and turn the ignition on and off three times within five seconds. This may reset the system on some models.
Note: Clearing codes doesn’t fix the underlying problem. If the issue persists, the light will return.
Interpreting Flash Codes on Toyota Vehicles

Visual guide about How to Jumper Obd2 on a Toyota
Image source: upload.autolanka.com
Now that you’ve retrieved the flash codes, what do they mean? Toyota uses a standardized set of diagnostic trouble codes (DTCs), but the flash codes you see are often simplified versions.
Common Toyota Flash Codes
Here are some typical codes and their meanings:
– Code 12: RPM signal missing (crankshaft position sensor issue)
– Code 13: Crankshaft position sensor circuit malfunction
– Code 14: Ignition signal problem (ignition coil or distributor)
– Code 21: Oxygen sensor heater circuit malfunction
– Code 22: Engine coolant temperature sensor issue
– Code 24: Intake air temperature sensor problem
– Code 31: Airflow meter (MAF sensor) malfunction
– Code 41: Throttle position sensor (TPS) issue
These codes point to specific sensors or circuits. For example, Code 21 suggests a problem with the oxygen sensor’s heating element, which can affect fuel efficiency and emissions.
How to Cross-Reference Codes
To get more details, consult a Toyota-specific repair manual or an online DTC database. Websites like OBD-Codes.com or Toyota’s official service portal provide detailed explanations. You can also search for “Toyota flash code [number]” to find forums and guides.
Keep in mind that flash codes may not always match modern OBD2 scanner codes exactly. Older systems used slightly different numbering. But they’re close enough to guide your diagnosis.
When to Seek Professional Help
If you get a code you don’t understand, or if multiple codes appear, it’s time to visit a mechanic. Some issues—like internal engine problems or transmission faults—require specialized tools and expertise. Don’t ignore persistent codes. They’re your car’s way of saying, “Hey, something’s wrong.”
Limitations and Risks of Jumpering OBD2 on Toyota
While jumpering can be helpful, it’s not a cure-all. Here are some important limitations and risks to consider.
Not All Toyotas Support Flash Codes
As mentioned earlier, newer Toyotas (2005 and later) often don’t support flash code diagnostics. They use advanced communication protocols like CAN (Controller Area Network), which require a scanner to read. If your car doesn’t respond to jumpering, don’t force it—you could damage the ECU.
Risk of Electrical Damage
Jumpering the wrong pins can cause serious harm. For example:
– Shorting pin 16 (12V power) to ground can blow fuses or fry the ECU
– Connecting power to a sensor input can damage the sensor
– Using a dirty or corroded jumper can cause intermittent connections
Always double-check your pin layout before inserting the jumper.
Doesn’t Fix the Problem
Jumpering only reads or clears codes—it doesn’t repair mechanical or electrical faults. If your oxygen sensor is faulty, jumpering won’t fix it. You’ll still need to replace the part.
May Void Warranty (If Applicable)
If your Toyota is still under warranty, tampering with the OBD2 system could void coverage. Check your warranty terms before proceeding.
Not a Substitute for Regular Maintenance
Relying on jumpering instead of regular maintenance is a bad idea. Preventive care—like oil changes, air filter replacements, and spark plug checks—keeps your Toyota running smoothly and reduces the chance of trouble codes.
Alternative Methods for Diagnosing Toyota Issues
If jumpering doesn’t work or isn’t suitable for your vehicle, consider these alternatives.
Use an OBD2 Scanner
A basic OBD2 scanner costs as little as $20 and plugs directly into the port. It reads codes, clears lights, and provides real-time data like engine RPM, coolant temperature, and fuel trim. Many scanners also offer code definitions and repair suggestions.
For Toyota-specific diagnostics, consider a scanner with enhanced features, like the BlueDriver or Autel MaxiCOM. These can access manufacturer-specific codes and systems.
Visit a Dealership or Independent Mechanic
Toyota dealerships have advanced diagnostic tools that can read deep system data, perform module resets, and update software. Independent mechanics with Toyota experience can also help, often at a lower cost.
Check for Recalls or Technical Service Bulletins (TSBs)
Sometimes, trouble codes are caused by known issues. Toyota issues TSBs for common problems—like faulty mass airflow sensors or transmission glitches. Check the NHTSA website or contact a Toyota dealer to see if your vehicle is affected.
Monitor Driving Behavior
Pay attention to how your car drives. Rough idling, poor acceleration, or strange noises can give clues about the problem. Combine this with code readings for a fuller picture.
Tips for Maintaining Your Toyota’s OBD2 System
Keeping your OBD2 system in good shape ensures accurate diagnostics and prevents false codes.
Keep the OBD2 Port Clean
Dust, dirt, and moisture can interfere with connections. Use compressed air or a soft brush to clean the port periodically. Avoid spraying liquids directly into the connector.
Use Quality Fuel and Oil
Contaminants in low-quality fuel or oil can trigger sensor errors. Stick to reputable gas stations and use the oil grade recommended in your owner’s manual.
Replace Sensors as Needed
Sensors like the oxygen sensor, MAF, and TPS wear out over time. Replace them according to your maintenance schedule—typically every 60,000 to 100,000 miles.
Avoid Aftermarket Modifications
Performance chips, non-OEM sensors, or altered exhaust systems can confuse the ECU and trigger false codes. If you modify your Toyota, use compatible parts and consider a custom tune.
Reset the ECU After Repairs
After fixing a problem, reset the ECU by disconnecting the battery or using a scanner. This clears old data and allows the system to relearn optimal settings.
Conclusion
Jumpering the OBD2 port on a Toyota is a handy skill for any DIY mechanic, especially if you own an older model. It’s a low-cost, effective way to read diagnostic codes and understand what your car is trying to tell you. By following the steps in this guide—using the correct pins, taking safety precautions, and interpreting flash codes—you can troubleshoot issues without spending money on a scanner or mechanic.
But remember: jumpering is a diagnostic tool, not a repair tool. It helps you identify problems, but you’ll still need to fix the root cause. And always prioritize safety—disconnect the battery, use the right tools, and avoid risky shortcuts.
Whether you’re resetting a check engine light on a 1998 Camry or diagnosing a rough idle on a 2002 4Runner, jumpering gives you insight and control. Just know its limits, respect your vehicle’s electronics, and when in doubt, consult a professional. Your Toyota will thank you with better performance, fewer surprises, and a longer life on the road.
Frequently Asked Questions
Can I jumper the OBD2 port on any Toyota?
No, jumpering only works on older Toyota models (typically 1996–2004) that support flash code diagnostics. Newer vehicles use advanced systems that require a scanner.
What happens if I jumper the wrong pins?
Jumpering the wrong pins—especially power to ground—can blow fuses, damage the ECU, or cause electrical fires. Always verify pin functions before connecting.
Will jumpering clear the check engine light permanently?
Jumpering can clear codes temporarily, but if the underlying issue isn’t fixed, the light will return. It’s a diagnostic step, not a repair.
Do I need to disconnect the battery before jumpering?
Yes, always disconnect the negative battery terminal first. This prevents accidental shorts and protects your vehicle’s electronics.
Can I use a paperclip to jumper the OBD2 port?
Yes, a straightened paperclip works well. Just ensure it’s clean and makes solid contact with the pins. Insulated tools are safer to prevent slips.
What if my check engine light doesn’t flash after jumpering?
If there’s no flash pattern, your Toyota may not support this method, the ECU has no stored codes, or there’s a connection issue. Try reinserting the jumper or use a scanner.