
How to Apply Paint Protection Film on Cars
Contents
- 1 Key Takeaways
- 2 📑 Table of Contents
- 3 Why Use Paint Protection Film?
- 4 Choosing the Right Paint Protection Film
- 5 Tools and Materials You’ll Need
- 6 Step-by-Step Application Process
- 7 Post-Application Care and Maintenance
- 8 Troubleshooting Common Issues
- 9 When to Call a Professional
- 10 Final Thoughts
- 11 Frequently Asked Questions
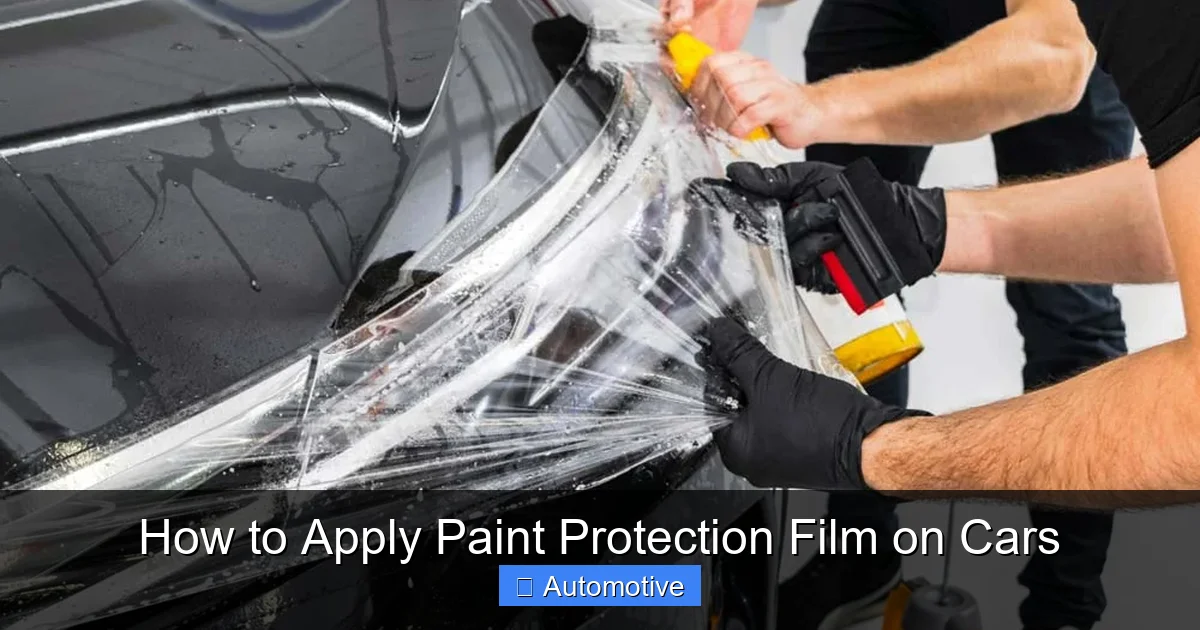
Applying paint protection film (PPF) on your car can seem daunting, but with the right tools and technique, it’s totally doable. This guide walks you through every step—from prep to final inspection—so you can protect your vehicle’s paint from chips, scratches, and UV damage with confidence.
So, you’ve decided to protect your car’s paint with a paint protection film—smart move! Whether you drive a brand-new sports car, a rugged SUV, or your trusty daily commuter, PPF acts like an invisible shield against rock chips, bug splatter, tree sap, and even minor scratches. It’s like giving your vehicle a second skin that’s tough, self-healing, and nearly undetectable when applied correctly.
But here’s the thing: applying paint protection film isn’t just slapping on a sticker. It’s a meticulous process that requires patience, the right tools, and a clean workspace. Done well, it can last 5–10 years and keep your car looking showroom-fresh. Done poorly? You might end up with bubbles, peeling edges, or visible seams that ruin the look you were trying to preserve. The good news? With this step-by-step guide, you’ll learn how to apply paint protection film on cars like a seasoned detailer—no professional experience required.
We’ll cover everything from choosing the right film and prepping your vehicle to mastering the wet application technique and troubleshooting common issues. By the end, you’ll not only know how to apply PPF yourself but also understand why each step matters. So grab your microfiber towels, slip solution, and a little determination—we’re about to turn you into a DIY PPF pro.
Key Takeaways
- Understanding How to Apply Paint Protection Film on Cars: Provides essential knowledge
📑 Table of Contents
Why Use Paint Protection Film?
Before diving into the “how,” let’s talk about the “why.” Paint protection film has come a long way since its military origins in the 1960s (yes, it was originally used to protect helicopter rotor blades!). Today’s PPF is a marvel of modern polymer science—transparent, durable, and designed to absorb impacts without transferring damage to your car’s clear coat.
One of the biggest benefits is **prevention**. Think about all the tiny hazards your car faces every day: gravel kicked up by tires, parking lot door dings, bird droppings, and even UV rays that fade paint over time. PPF acts as a sacrificial layer—it takes the hit so your paint doesn’t have to. And because many high-end films have self-healing properties, light scratches on the film itself can disappear with a little heat from the sun or a hairdryer.
Another major advantage is **resale value**. A car with well-maintained paint—especially on high-impact areas like the hood, fenders, and mirrors—will command a higher price when it’s time to sell or trade in. PPF helps preserve that factory finish, making your vehicle more attractive to buyers. Plus, it’s completely removable without damaging the original paint, so you’re not locking yourself into a permanent change.
Finally, PPF offers **peace of mind**. Whether you’re driving through construction zones, taking a road trip, or just navigating city streets, you won’t have to worry as much about everyday wear and tear. It’s an investment in longevity and aesthetics—one that pays off in both looks and protection.
Choosing the Right Paint Protection Film
Visual guide about How to Apply Paint Protection Film on Cars
Image source: carwraps.co.za
Not all paint protection films are created equal. With so many brands and types on the market, it’s important to choose one that matches your needs, budget, and skill level. Here’s what to look for:
Film Thickness and Durability
Most quality PPFs range from 6 to 8 mils (thousandths of an inch) thick. Thicker films offer better impact resistance but can be harder to stretch and conform to complex curves. For most DIYers, a 6-mil film strikes a good balance between protection and ease of application. If you drive off-road or in areas with heavy road debris, consider an 8-mil option.
Self-Healing Properties
Top-tier films like XPEL Ultimate Plus or 3M Pro Series feature a top coat that heals minor scratches when exposed to heat. This means swirl marks from washing or light abrasions can vanish on their own—no polishing needed. While not essential, this feature greatly enhances the film’s longevity and appearance.
Clarity and Gloss
A good PPF should be optically clear, with no orange peel texture or hazing. Look for films with a high-gloss finish that enhances your car’s existing shine. Avoid cheap films that appear cloudy or have a plastic-like sheen—they’ll detract from your paint rather than protect it.
Brand Reputation and Warranty
Stick with reputable brands that offer manufacturer warranties. XPEL, 3M, SunTek, and Llumar are industry leaders with proven track records. Many offer 5- to 10-year warranties against yellowing, cracking, and peeling—peace of mind that your investment is protected.
Pre-Cut vs. Bulk Rolls
For beginners, pre-cut kits are highly recommended. These are digitally designed to fit your specific make and model, reducing the need for trimming and minimizing waste. Brands like XPEL and Orafol offer extensive vehicle databases. If you’re experienced or working on multiple cars, bulk rolls give you more flexibility—but require precise cutting with a plotter or template.
Tools and Materials You’ll Need

Visual guide about How to Apply Paint Protection Film on Cars
Image source: calgarywindowtinting.ca
Before you start, gather all your supplies. Having everything ready will save time and reduce frustration during the application process.
Essential Tools
- Paint protection film kit: Choose a pre-cut kit or bulk roll based on your needs.
- Spray bottle with slip solution: Mix 1–2 drops of baby shampoo or dedicated PPF slip solution per quart of distilled water. This creates a lubricating layer that lets you reposition the film.
- Squeegee: A soft, felt-edged squeegee (like the ones used for window tinting) is ideal for smoothing out bubbles without scratching the film.
- Microfiber towels: Use clean, lint-free towels for cleaning and final buffing.
- Heat gun or hairdryer: Needed to soften the film for stretching around curves and edges.
- Isopropyl alcohol (70%): For final surface cleaning before application.
- Masking tape: To hold panels open or mark alignment points.
- Utility knife or precision cutter: Only if trimming is required (less common with pre-cut kits).
Optional but Helpful
- Steam cleaner: Great for removing stubborn contaminants from the paint.
- Paint decontamination kit: Includes clay bar and lubricant to remove embedded fallout.
- LED work light: Helps spot dust, fingerprints, or imperfections under the film.
- Gloves: Nitrile gloves prevent oils from your hands transferring to the film or paint.
Workspace Setup
Choose a clean, enclosed space like a garage. Avoid windy or dusty areas—even a single speck of dust can create a visible bubble. Ideal conditions are low humidity, moderate temperature (65–75°F), and minimal foot traffic. Turn off fans and close windows to reduce airborne particles.
Step-by-Step Application Process

Visual guide about How to Apply Paint Protection Film on Cars
Image source: libertyautoworx.com
Now for the main event: applying the paint protection film. Follow these steps carefully for a flawless finish.
Step 1: Wash and Decontaminate the Vehicle
Start with a thorough wash using a pH-neutral car shampoo. Rinse well and dry with a clean microfiber towel. But washing alone isn’t enough—your paint needs to be chemically clean.
Use a clay bar kit to remove embedded contaminants like tar, tree sap, and industrial fallout. Spray the clay lubricant on a small section, then gently glide the clay bar over the surface. You’ll feel it grab onto impurities. Wipe clean and inspect under bright light. Repeat until the surface feels smooth as glass.
Finish with an isopropyl alcohol wipe to remove any remaining oils or residues. This ensures maximum adhesion.
Step 2: Dry Fit the Film
Unpack your pre-cut film and lay it over the target area (e.g., hood, fender, mirror). Don’t remove the backing yet—just check alignment and fit. Make sure it covers the intended zone with a slight overlap (about 1/8 inch) onto adjacent panels. This allows for minor adjustments during application.
If using a bulk roll, trace the panel with painter’s tape to create a template, then cut the film slightly larger than the template.
Step 3: Prepare the Slip Solution
Fill your spray bottle with distilled water and add 1–2 drops of baby shampoo or a few drops of dedicated PPF slip solution. Shake gently to mix. Avoid using dish soap—it can leave residues that interfere with adhesion.
Step 4: Apply Slip Solution to the Panel
Spray the entire surface generously with the slip solution. The panel should be wet but not dripping. This creates a slippery layer that lets you position the film without it sticking immediately.
Step 5: Remove Film Backing and Apply
Peel off the protective liner from the adhesive side of the film. Hold the film by the edges to avoid touching the adhesive. Align it over the wet panel, starting from one edge (e.g., top of the hood) and gently laying it down.
Don’t try to stick it perfectly on the first try—the slip solution gives you time to reposition. Use your hands to guide it into place, ensuring it’s centered and aligned with body lines.
Step 6: Squeegee Out the Water
Once the film is positioned, use the squeegee to push water and air bubbles out from the center toward the edges. Work in overlapping, straight strokes. Apply firm, even pressure—too light and bubbles remain; too hard and you might stretch the film.
For curved areas like fender flares or bumper corners, use a heat gun on low setting to soften the film. Gently stretch and squeegee while warm. Be careful not to overheat—aim for warm, not hot.
Step 7: Trim Excess Film (If Needed)
With pre-cut kits, trimming is usually minimal. If you have overhang, use a sharp utility knife and a straight edge to trim along panel gaps or edges. Always cut away from the painted surface to avoid scratches.
Step 8: Final Inspection and Tacking
Inspect the film under bright light. Look for bubbles, dust particles, or lifting edges. Small bubbles often disappear within 24–48 hours as the adhesive cures. For persistent bubbles, gently lift the film with a pin, apply slip solution, and re-squeegee.
Use a clean microfiber towel to buff the surface, removing any residual moisture or haze.
Post-Application Care and Maintenance
Your work isn’t done once the film is on. Proper care ensures it lasts and looks great for years.
Wait Before Washing
Avoid washing the car for at least 48 hours. This allows the adhesive to fully bond with the paint. High-pressure washes should be avoided for the first week.
Use Gentle Cleaning Products
Stick to pH-neutral car shampoos and soft wash mitts. Avoid abrasive cleaners, waxes with harsh solvents, or automatic brush-style car washes—they can degrade the film over time.
Regular Inspections
Check edges and seams monthly for lifting or peeling. If you spot an issue, address it early by reactivating the adhesive with a bit of slip solution and re-squeegeeing.
Reapply Top Coat (Optional)
Some detailers recommend applying a ceramic coating over PPF for added gloss and hydrophobic properties. While not necessary, it can enhance shine and make cleaning easier.
Troubleshooting Common Issues
Even with careful application, problems can arise. Here’s how to handle the most common ones:
Bubbles Under the Film
Small bubbles usually disappear as the adhesive cures. If they persist, gently lift the film with a pin, inject a drop of slip solution, and re-squeegee. Large bubbles may indicate contamination—reapplication might be needed.
Film Lifting at Edges
This often happens if the film wasn’t fully adhered or if it was exposed to moisture too soon. Use a heat gun to soften the edge, apply slip solution, and press down firmly with the squeegee.
Hazing or Cloudiness
Caused by trapped moisture or improper squeegeeing. Buff the area with a clean microfiber towel. If it doesn’t clear, the film may need to be replaced.
Stretching or Wrinkling
Overheating or aggressive stretching can distort the film. Prevent this by using low heat and gentle pressure. If it occurs, reheat and carefully smooth it out.
Dust Particles Trapped Under Film
Unfortunately, these are hard to remove without reapplication. Prevention is key—work in a clean environment and inspect the panel under bright light before applying.
When to Call a Professional
While DIY PPF application is possible, some situations call for a professional installer:
– Full-body wraps on complex vehicles (e.g., supercars with deep curves)
– Films with intricate patterns or custom designs
– If you’ve never applied PPF before and want a flawless result on a high-value car
– When time is limited and perfection is non-negotiable
Professional installers have specialized tools, climate-controlled booths, and years of experience. They can achieve results that are nearly impossible to replicate at home.
That said, for partial kits (hood, mirrors, bumper), DIY is very achievable—even for first-timers. Start small, practice on less visible areas, and build confidence over time.
Final Thoughts
Learning how to apply paint protection film on cars is a rewarding skill that saves money and protects your investment. It’s not the easiest DIY project, but with the right preparation, tools, and mindset, you can achieve professional-looking results.
Remember: patience is your greatest ally. Rushing leads to mistakes. Take your time with cleaning, alignment, and squeegeeing. Celebrate small wins—like getting a bubble-free hood on your first try—and learn from any setbacks.
And don’t forget—PPF isn’t just for luxury cars. Any vehicle benefits from this layer of protection. Whether you’re shielding a family minivan from soccer cleats and grocery carts or preserving the pristine paint of a vintage classic, PPF is a smart, practical choice.
So go ahead—give it a try. Your car (and your future self) will thank you.
Frequently Asked Questions
Can I apply paint protection film myself?
Yes, you can apply PPF yourself with the right tools, preparation, and patience. Pre-cut kits make it easier for beginners, and many DIYers achieve excellent results on partial wraps like hoods and mirrors.
How long does paint protection film last?
High-quality PPF typically lasts 5 to 10 years, depending on brand, climate, and maintenance. Most manufacturers offer warranties against yellowing, cracking, and peeling during this time.
Will PPF damage my car’s paint when removed?
No, when applied and removed correctly, PPF does not damage the original paint. It’s designed to be removable without leaving residue or harming the clear coat.
Can I wash my car immediately after applying PPF?
No, wait at least 48 hours before washing. This allows the adhesive to fully cure. Avoid high-pressure washes for the first week to prevent edge lifting.
Does PPF turn yellow over time?
Cheap films may yellow, but premium brands like XPEL and 3M use UV-stable materials that resist discoloration for many years.
Can I apply wax over paint protection film?
Yes, but use a wax formulated for PPF or ceramic coatings. Avoid abrasive or solvent-heavy waxes, as they can degrade the film’s top coat over time.


