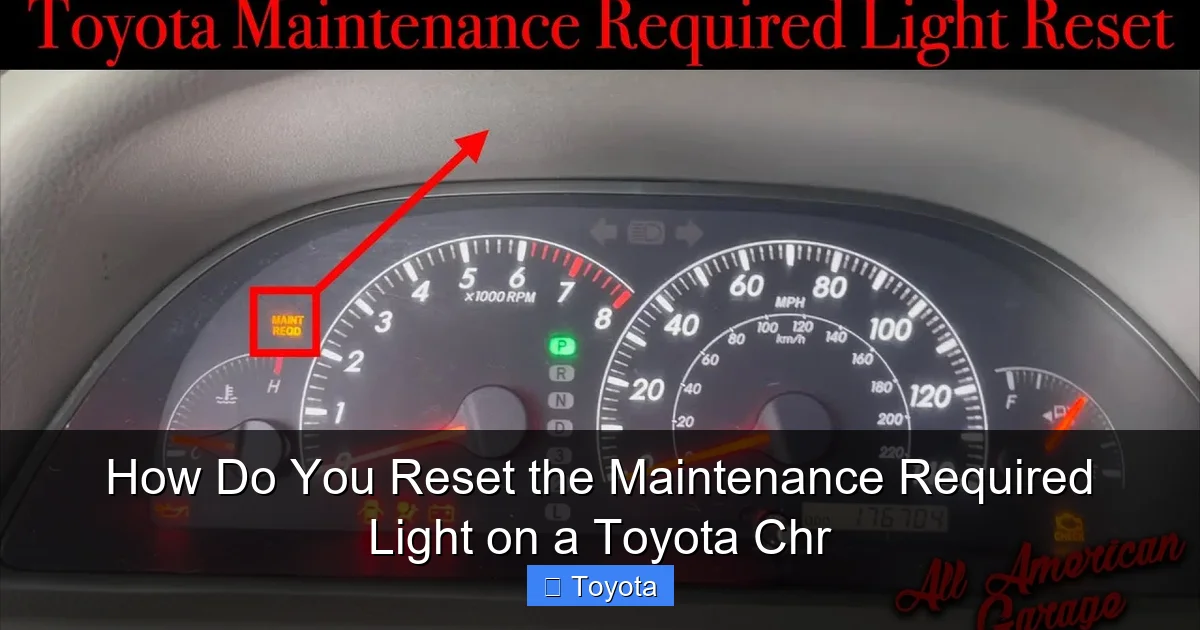
How Do You Reset the Maintenance Required Light on a Toyota Chr
Contents
- 1 Key Takeaways
- 2 📑 Table of Contents
- 3 Understanding Your Toyota CHR’s Maintenance Required Light
- 4 The Golden Rule: Complete Maintenance FIRST
- 5 Step-by-Step: Resetting the Light (The Standard Method)
- 6 Alternative Scenarios & Troubleshooting
- 7 Important Distinctions: Maintenance Light vs. Check Engine Light
- 8 Beyond the Reset: A Holistic View of Toyota Maintenance
- 9 Conclusion: Empowerment Through Understanding
- 10 Frequently Asked Questions


The maintenance required light on your Toyota CHR is a helpful reminder for scheduled service, not an emergency. You can reset it yourself in under two minutes using only your dashboard controls, but only after completing the necessary maintenance like an oil change. This guide provides the exact button sequence and crucial tips to do it correctly and avoid confusion with a check engine light.
Key Takeaways
- The light is a mileage-based reminder: It illuminates after a set interval (usually 5,000 miles) to remind you of routine maintenance like oil changes and tire rotations.
- Reset ONLY after maintenance is performed: Resetting the light without doing the required service is unsafe and defeats its purpose, potentially leading to engine damage.
- The process is a simple button combo: You reset it using the odometer/trip meter button and the ignition, with no special tools or a dealership visit needed.
- It’s different from a check engine light: The maintenance required light looks like a wrench or says “MAINT REQD” and is not an urgent warning like a check engine light.
- If it comes back quickly, investigate: A light that returns soon after resetting often indicates the maintenance wasn’t completed properly or there’s a sensor issue.
- Your owner’s manual is your best friend: Always verify the specific interval and procedure for your model year CHR in the manual, as details can vary slightly.
- Professional reset is available: If you’re uncomfortable or the light won’t reset, any Toyota service center can perform and document the reset for you.
📑 Table of Contents
- Understanding Your Toyota CHR’s Maintenance Required Light
- The Golden Rule: Complete Maintenance FIRST
- Step-by-Step: Resetting the Light (The Standard Method)
- Alternative Scenarios & Troubleshooting
- Important Distinctions: Maintenance Light vs. Check Engine Light
- Beyond the Reset: A Holistic View of Toyota Maintenance
- Conclusion: Empowerment Through Understanding
Understanding Your Toyota CHR’s Maintenance Required Light
That little wrench icon or “MAINT REQD” message glowing on your Toyota CHR’s instrument cluster isn’t trying to stress you out. It’s actually your car’s way of being a helpful, if slightly naggy, assistant. Think of it as a highly reliable calendar reminder that has physically attached itself to your dashboard. Its sole job is to tell you, “Hey, based on the miles you’ve driven since your last service, it’s time to take care of some routine upkeep.” This is a fundamentally different and less urgent message than the dreaded check engine light, which signals an active problem.
The system is remarkably simple. Your CHR’s computer, often called the ECU or ECM, keeps a meticulous log of your total odometer reading. When that reading hits a predetermined mileage interval—most commonly every 5,000 miles—the system triggers the light. It’s a proactive, preventive measure designed to keep your vehicle running smoothly and reliably for the long haul. Ignoring it doesn’t make it go away; it just means you’re driving past the manufacturer’s recommended service point. The good news? Once you’ve had the necessary work done (like an oil and filter change, tire rotation, and a multi-point inspection), you hold the power to turn that light off yourself. It’s a satisfying little ritual that signals your car is all caught up.
What Triggers the Light?
The interval is typically set from the factory. For many CHR models, it’s 5,000 miles. However, some model years or specific trims might use a time-based interval (like 6 months) if the mileage threshold isn’t met. The most common trigger is an oil change. Since engine oil degrades over time and with use, regular changes are the single most important maintenance item for engine longevity. The light also often coincides with other scheduled services in your maintenance guide, such as inspecting brakes, fluids, and the cabin air filter. It’s a bundled reminder for a complete service package.
Why You Should Never Ignore It
It might be tempting to just reset the light and keep driving, especially if your car seems to be running fine. This is a dangerous game. The maintenance schedule exists because engineers have determined that certain parts and fluids have a predictable service life. Fresh oil reduces friction and wear. Properly inflated and rotated tires ensure even wear and safe handling. Letting these intervals slide can turn a minor, inexpensive service into a major, costly repair. A $50 oil change can become a $3,000 engine rebuild if neglected long enough. The light is your first line of defense against that scenario.
The Golden Rule: Complete Maintenance FIRST
Before we dive into the button-pushing sequence, let’s establish the most critical rule: you must perform the required maintenance before you reset the light. Resetting it without changing the oil or addressing other scheduled items is like erasing a to-do list without doing the tasks. You are simply lying to your car’s computer and, more importantly, to yourself. You lose the valuable reminder system and continue driving with degraded fluids and worn components. This step is non-negotiable for responsible vehicle ownership.
What “Maintenance” Typically Means
For the 5,000-mile interval, the standard service includes:
- Oil and Filter Change: The absolute core of the service. Using the correct oil grade and a quality filter is essential.
- Tire Rotation: Promotes even tire wear, extending their life and maintaining proper handling.
- Multi-Point Inspection: A technician (or you, if you’re DIY) checks belts, hoses, fluid levels (coolant, brake, windshield washer), battery health, and brake pad thickness.
- Cabin Air Filter Replacement: Often recommended at this interval, it keeps the air inside your car clean.
If you’re doing it yourself, you’ve already handled the oil change. If you’re at a quick-lube shop, ensure they performed a rotation and checked the basics. Don’t be shy about asking for a checklist. Once you’re satisfied the work is complete, then and only then, proceed to the reset procedure.
What Happens If You Reset Too Early?
The immediate effect is that the light goes off. The hidden consequence is that your car’s internal maintenance timer starts counting down from zero again. You will not get another reminder for another 5,000 miles, even though your oil may only have 3,000 miles of life left. You’ve essentially created a gap in your maintenance log. Forgetting to change oil at the proper interval is the fastest path to premature engine wear, sludge buildup, and potential failure. The light is a tool for your benefit; using it incorrectly harms your vehicle and your wallet.
Step-by-Step: Resetting the Light (The Standard Method)
Now, for the moment you’ve been waiting for. Resetting the maintenance required light on a Toyota CHR is a manual process done through the instrument cluster. It requires no special tools, no OBD-II scanner (for this specific light), and no internet connection. Just you, your car, and a few seconds of button presses. The method is consistent across most CHR model years (2017-2023).
What You’ll Need
- A Toyota CHR with the maintenance required light on.
- The ignition key or key fob.
- Your attention (it’s easy, but don’t rush).
The Button Sequence: A Detailed Walkthrough
Follow these steps precisely. The entire process should take less than 30 seconds once you get the hang of it.
- Start with the car OFF. Ensure all doors are closed and the vehicle is in park (if automatic) or neutral (if manual). The engine must be completely off.
- Turn the ignition to the “ON” position. Do not start the engine. Press the start/stop button once (or turn the key to the “ON” or “IG-ON” position) so that all dashboard lights illuminate, including the maintenance required light. You should see the odometer/speedometer display active.
- Locate the correct button. You need to use the button that controls your trip meter and odometer. This is typically the button on the instrument cluster itself, often near the speedometer. On the CHR, it’s usually a single button or a small dial/knob on the steering wheel stalk. Important: Do not use the button on the multi-information display screen on the center console. The reset uses the physical odometer/trip meter reset button.
- Press and hold the odometer/trip meter button. While the ignition is in the “ON” position (engine off, dash lights on), press and hold that button down. You will need to hold it for several seconds.
- Watch the display. After holding the button for about 5-10 seconds, the maintenance required light will begin to blink. It will usually blink a few times and then go out. The odometer display may also show “SET” or simply return to showing the total mileage.
- Release the button. Once the light has blinked and turned off, you can release the button.
- Turn the ignition OFF and then back ON. To confirm the reset was successful, turn the car completely off (key out or button to “OFF” position). Wait a second, then turn it back to the “ON” position. The maintenance required light should remain off. If it comes back on immediately, you likely missed a step or the system didn’t register the reset. Try the sequence again carefully.
That’s it! You have successfully reset your maintenance required light. For many owners, this simple act provides a great sense of accomplishment and control over their vehicle’s care. If your CHR has a multi-information display that shows the mileage until next service, it should now read around 5,000 miles (or the full interval) again.
Alternative Scenarios & Troubleshooting
What if the standard method doesn’t work? While rare, there are a few scenarios where you might encounter issues. Don’t panic; most have simple solutions.
The Light Won’t Reset After Multiple Tries
First, double-check your steps. Are you using the correct button? Are you holding it long enough (until it blinks)? Is your ignition in the correct “ON” position (engine off, dash lights on)? If you’ve confirmed all this and the light still refuses to go out, there are two primary possibilities. One, the maintenance interval has not actually been reached. Some systems require the mileage to be at or very near the service interval before they will allow a reset. If you’re trying to reset it at 4,800 miles instead of 5,000, it might not work. Drive a few more miles and try again. Two, there could be an electrical glitch or a problem with the instrument cluster itself. This is uncommon but possible.
Different Display Types
Some CHR model years might show the maintenance message on the central multi-information display screen between the gauges. The reset procedure is still the same—using the physical odometer button on the steering wheel stalk or cluster. The light might not be a dedicated “wrench” icon but a text message that says “MAINTENANCE REQUIRED.” The blinking behavior during the reset might be a message like “SET” appearing and disappearing. The core principle remains: hold the trip/odometer button with ignition on until you see the system acknowledge the reset.
When to Seek Professional Help
If you’ve completed the maintenance, followed the steps precisely, and the light still illuminates or comes back on within a very short distance (e.g., 100 miles), it’s time to consult a professional. A Toyota technician can use a specialized diagnostic scan tool to communicate directly with the vehicle’s computer. They can force a reset if the manual method fails, but more importantly, they can check for any stored fault codes that might be preventing the reset or indicating a separate issue, such as a faulty sensor related to the maintenance reminder system. This is also your opportunity to ensure all other systems are healthy.
Important Distinctions: Maintenance Light vs. Check Engine Light
Confusing these two lights is one of the most common mistakes new car owners make. Understanding the difference is crucial for your safety and your car’s health.
The Maintenance Required Light
This is your friendly reminder. It is not an emergency. It’s yellow or amber in color (on most CHRs). Its shape is often a wrench or it displays text. It tells you about scheduled, preventative care. It will come on steadily when the mileage interval is reached and will stay on until you manually reset it after service. It does not blink or flash under normal operation. Flashing this light would be unusual and would typically indicate a system error.
The Check Engine Light (MIL)
This is your car’s panic button. It is urgent. It is usually yellow as well, but its shape is an engine block. It illuminates when the engine computer detects a fault that could increase emissions or potentially cause damage. This could be anything from a loose gas cap (easy fix) to a misfiring cylinder (serious problem). A steady check engine light means “get this checked soon.” A flashing check engine light means “stop driving immediately and get help,” as it often indicates a severe misfire that can destroy the catalytic converter. You cannot and should not reset a check engine light yourself without first diagnosing and repairing the underlying problem. Simply erasing the code will cause it to return.
Why the Confusion Happens
Both lights are yellow and located in the same gauge cluster. On some vehicles, the text “CHECK ENGINE” is very clear. On the CHR, the maintenance light is more icon-based. The key takeaway: if your car is running well, has no strange noises or smells, and the light looks like a wrench or says “MAINT,” it’s almost certainly the maintenance reminder. If you have a loss of power, rough running, strange smells, or the light is an engine icon, it’s the check engine light, and you need a professional diagnosis. For more on check engine lights across models, resources like our guide on resetting a check engine light on a Toyota Corolla explain the critical differences and proper procedures, which are universally applicable: diagnose first, reset last.
Beyond the Reset: A Holistic View of Toyota Maintenance
Resetting the light is the final, symbolic step in a maintenance cycle. It’s the “checking off the box” moment. But the real value lies in the work that happened before the reset. Treating the maintenance required light as a prompt for a comprehensive service routine is how you protect your investment. The Toyota CHR, with its efficient hybrid powertrain in some models, still has conventional mechanical systems—brakes, tires, fluids—that require attention.
Building a Maintenance Habit
Use the light’s interval as your backbone. When it comes on, schedule your service. If you’re a DIY enthusiast, gather your parts: the correct oil (likely 0W-20 for modern CHRs), a premium filter, and any other items like wiper blades or air filters you want to replace. If you prefer a professional, call your trusted independent shop or dealer. Use the light as your trigger to action, not just to erase a message. Keep a simple log—even a notebook in the glovebox—of what service was performed and at what mileage. This history is invaluable for future owners and for you when diagnosing future issues.
Model-Specific Nuances
While the CHR reset procedure is standard, it’s worth noting that other Toyota models have similar, but sometimes slightly different, processes. For instance, the procedure for a 2021 Toyota RAV4 might involve using steering wheel stalk buttons in a different sequence, and a Toyota Highlander might have a menu-driven reset via the touchscreen in newer years. This is why your CHR’s owner’s manual is the ultimate authority. However, the principle—complete service, then use the trip meter button with ignition on—is a Toyota hallmark. You’ll find this method repeats across the lineup, from the compact Yaris to the full-size Tundra, as detailed in our general guide to resetting maintenance lights on any Toyota.
Conclusion: Empowerment Through Understanding
Knowing how to reset the maintenance required light on your Toyota CHR is more than just a party trick. It’s a fundamental piece of knowledge that puts you in the driver’s seat—literally—of your car’s care schedule. It transforms that dashboard icon from a source of annoyance into a clear signal that you’ve completed your due diligence. The process is intentionally simple, a testament to Toyota’s design philosophy of owner-friendly maintenance. Remember the sacred rule: service first, reset second. By honoring the reminder with actual work, you’re not just turning off a light; you’re investing in the reliability, efficiency, and longevity of your vehicle. You’re ensuring that your CHR will be there, ready to go, for all your future journeys. So next time that wrench glows, smile, make your service appointment, get the work done, and then enjoy the satisfying few seconds of pressing that button to silence it for another 5,000 miles. You’ve earned it.
Frequently Asked Questions
Will resetting the maintenance light turn it off permanently?
No. The light is programmed to illuminate again after you drive the preset mileage interval (usually 5,000 miles). Resetting it only clears the current reminder cycle. It will return when your odometer reaches the next service point.
Can I reset the light without getting an oil change?
Technically yes, but you should never do this. The light exists to ensure you get critical maintenance like oil changes. Resetting it without performing the service means you will drive with degraded oil, risking severe engine damage and voiding any related warranty claims.
What if the maintenance light comes back on immediately after resetting?
This indicates a problem. Either the reset procedure wasn’t followed correctly, the service interval hadn’t actually been reached, or there is a fault with the sensor or instrument cluster. Re-check your steps and if it persists, consult a Toyota technician.
Is the reset procedure the same for all Toyota CHR model years?
For the vast majority of CHR models (2017-2023), the procedure using the odometer/trip meter button is identical. However, you should always confirm in your specific owner’s manual, as minor variations can occur between model years or regional specifications.
Will disconnecting the battery reset the maintenance light?
No. The maintenance required light is stored in a non-volatile memory that retains the mileage count even when the battery is disconnected. You must use the specific button-press sequence to reset it; simply disconnecting the battery will not work and may cause other issues like radio code locks.
My CHR has a multi-information display. Does the reset process use the screen buttons?
No. The reset is almost always performed using the physical button on the steering wheel stalk or instrument cluster that controls your trip meter and odometer. You do not navigate through the center console touchscreen menus to reset this particular light.