
Harley-davidson Tire Pressure Chart
Contents
- 1 Key Takeaways
- 2 Why Tire Pressure Matters on a Harley-Davidson
- 3 Understanding Harley-Davidson Tire Pressure Basics
- 4 Harley-Davidson Tire Pressure Chart by Model
- 5 How to Check and Adjust Tire Pressure
- 6 Factors That Affect Tire Pressure
- 7 Common Tire Pressure Mistakes to Avoid
- 8 When to Replace Your Harley’s Tires
- 9 Conclusion
- 10 Frequently Asked Questions

Car Seat Cover (Universal Fit)

Emergency First Aid Kit
Power Steering Fluid

Car Trash Can
Proper tire pressure is essential for safety, performance, and tire longevity on your Harley-Davidson. This guide provides a detailed Harley-Davidson tire pressure chart and expert tips to help you maintain optimal inflation for every ride.
This is a comprehensive guide about Harley-Davidson Tire Pressure Chart.
Key Takeaways
- Correct tire pressure improves handling and fuel efficiency: Riding with the right PSI ensures better control, smoother rides, and reduced rolling resistance.
- Pressure varies by model and load: Touring models need different pressure than Sportsters or Softails, especially when carrying passengers or luggage.
- Check pressure when tires are cold: Always measure before riding or after the bike has sat for at least 3 hours for accurate readings.
- Use a quality tire pressure gauge: Digital or analog gauges are more reliable than built-in valve stem indicators.
- Adjust for weather and altitude: Cold weather lowers pressure; hot weather increases it. Adjust accordingly.
- Underinflated tires wear faster and overheat: Low pressure causes sidewall flexing, leading to blowouts and uneven tread wear.
- Refer to your owner’s manual: Always follow Harley-Davidson’s official recommendations over generic charts.
[FEATURED_IMAGE_PLACEHOLDER]
Why Tire Pressure Matters on a Harley-Davidson
When you’re cruising down the highway on your Harley-Davidson, the last thing you want is a wobbly ride, poor braking, or a sudden tire blowout. Believe it or not, something as simple as tire pressure can make or break your riding experience. Whether you’re on a sleek Street 750, a powerful Road King, or a nimble Sportster, maintaining the correct tire pressure is one of the most important—and often overlooked—aspects of motorcycle maintenance.
Think of your tires as the only point of contact between your Harley and the road. They handle everything: steering, braking, acceleration, and absorbing bumps. If the pressure is too low, the tire flexes too much, generating heat that can lead to failure. If it’s too high, the tire becomes stiff, reducing grip and making the ride harsh. Over time, incorrect pressure wears down tread unevenly, shortens tire life, and even affects fuel economy. That’s why knowing and following the right Harley-Davidson tire pressure chart isn’t just smart—it’s essential.
Understanding Harley-Davidson Tire Pressure Basics
Before diving into specific numbers, let’s break down what tire pressure actually means and why it’s so critical for Harley riders. Tire pressure is measured in pounds per square inch (PSI), and it refers to the amount of air inside the tire. Harley-Davidson recommends specific PSI levels for the front and rear tires, and these can vary depending on the model, year, and whether you’re riding solo or with a passenger.
What Is Cold Tire Pressure?
One of the most common mistakes riders make is checking tire pressure after a ride. When tires roll, they heat up, and heat causes air to expand. This means the PSI reading will be higher than it actually is when the tire is cold. Harley-Davidson specifies that tire pressure should always be checked when the tires are “cold”—meaning the bike hasn’t been ridden for at least three hours or has been ridden less than one mile at moderate speed.
Why PSI Varies Between Front and Rear Tires
You might notice that the recommended PSI for the front tire is different from the rear. This is intentional. The rear tire typically carries more weight—especially on touring models like the Electra Glide or Road Glide—and handles more torque from the engine. As a result, it needs higher pressure to support the load and maintain stability. The front tire, while crucial for steering, doesn’t bear as much weight and can operate at a slightly lower PSI for better grip and comfort.
The Role of Load and Passenger Weight
Harley-Davidson designs its tire pressure recommendations with average rider weight in mind—usually around 180–200 pounds. But if you’re lighter or heavier, or if you’re carrying a passenger, saddlebags, or touring gear, you’ll need to adjust. Most owner’s manuals include a “loaded” or “dual riding” pressure recommendation. For example, a Street Glide might require 36 PSI in the rear when riding solo, but 40 PSI when two-up. Ignoring this can lead to poor handling and increased wear.
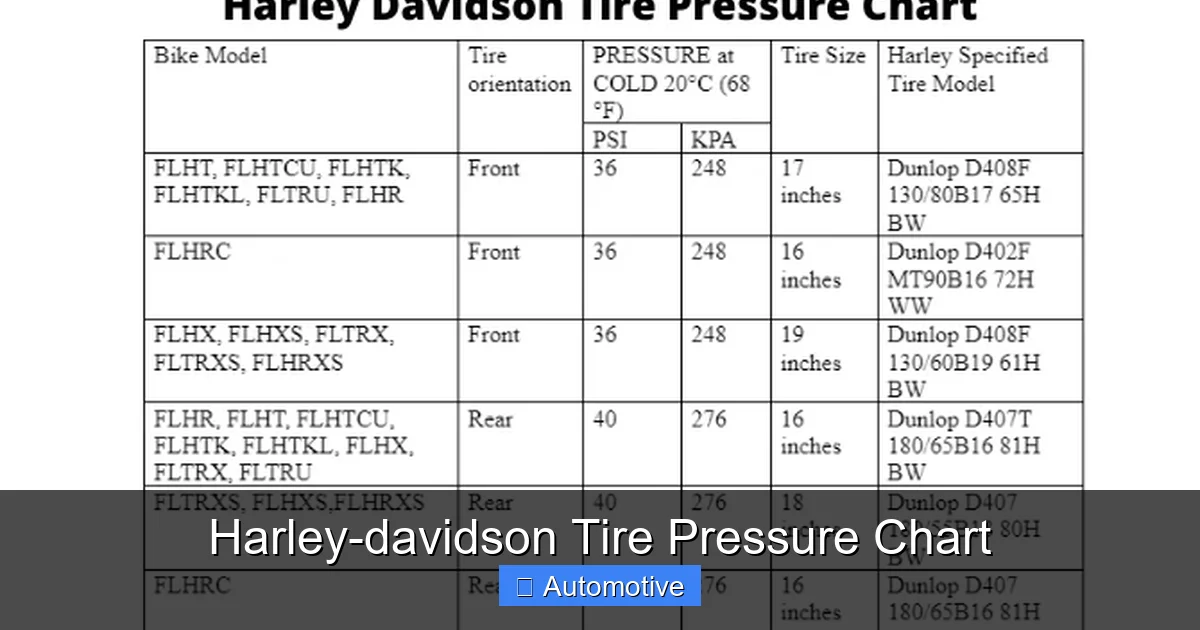
Harley-Davidson Tire Pressure Chart by Model
Below is a comprehensive Harley-Davidson tire pressure chart covering popular models. These values are based on manufacturer recommendations for cold tires under normal riding conditions. Always double-check your owner’s manual, as specifications can vary slightly by year and tire type.
Sportster Series (XL Models)
The Sportster lineup, including the XL883 and XL1200, is known for its agility and classic style. These bikes are lighter than touring models, so they require lower tire pressure.
- Front Tire: 30–32 PSI (solo), 32–34 PSI (with passenger)
- Rear Tire: 36–38 PSI (solo), 38–40 PSI (with passenger)
For example, an XL1200C Sportster Custom typically runs 30 PSI front and 36 PSI rear when riding alone. If you add a passenger, bump the rear up to 38 PSI. These bikes are sensitive to overinflation, which can make the ride feel harsh and reduce cornering grip.
Softail Series (Heritage, Fat Boy, Street Bob)
Softail models like the Heritage Classic, Fat Boy, and Street Bob offer a balance of comfort and performance. They’re heavier than Sportsters but not as loaded as touring bikes.
- Front Tire: 32–34 PSI (solo), 34–36 PSI (with passenger)
- Rear Tire: 38–40 PSI (solo), 40–42 PSI (with passenger)
A 2023 Softail Standard, for instance, recommends 32 PSI front and 38 PSI rear for solo riding. When loaded, increase both by 2–4 PSI. These models often use wider rear tires, which need higher pressure to maintain shape and prevent cupping.
Touring Series (Road King, Street Glide, Electra Glide)
Touring models are built for long-distance comfort and carry the most weight. They require the highest tire pressures, especially when fully loaded.
- Front Tire: 36–38 PSI (solo), 38–40 PSI (with passenger and luggage)
- Rear Tire: 40–42 PSI (solo), 42–44 PSI (with passenger and luggage)
Take the 2024 Road King Special: it calls for 36 PSI front and 40 PSI rear when riding solo. Add a passenger and full saddlebags, and you’ll want 38 PSI front and 42 PSI rear. These bikes often come with tubeless tires and air pressure monitoring systems (TPMS), but manual checks are still recommended monthly.
CVO and Limited Edition Models
Custom Vehicle Operations (CVO) models like the CVO Street Glide or CVO Road Glide are high-performance machines with upgraded suspension and tires. Their pressure requirements are similar to standard touring models but may vary slightly due to tire brand and size.
- Front Tire: 38 PSI (solo), 40 PSI (loaded)
- Rear Tire: 42 PSI (solo), 44 PSI (loaded)
Always check the tire sidewall and owner’s manual, as CVO models sometimes use different tire compounds or sizes that affect pressure needs.
Street and Rider Edition Models
The Street 750 and 500 are entry-level Harleys designed for urban riding. They’re lighter and use smaller tires, so pressure requirements are lower.
- Front Tire: 28–30 PSI (solo), 30–32 PSI (with passenger)
- Rear Tire: 34–36 PSI (solo), 36–38 PSI (with passenger)
These bikes are more sensitive to underinflation, which can cause sluggish handling and increased wear on the rear tire’s center tread.
How to Check and Adjust Tire Pressure
Checking tire pressure might seem simple, but doing it correctly makes a big difference. Here’s a step-by-step guide to ensure you’re getting accurate readings every time.
Step 1: Gather the Right Tools
You’ll need a reliable tire pressure gauge. Digital gauges are easy to read and often more accurate than analog ones. Avoid using the gauge at gas stations—they’re often worn out and unreliable. A handheld gauge costs around $10–$20 and is a worthwhile investment for any rider.
Step 2: Check When Tires Are Cold
As mentioned earlier, always check pressure before riding or after the bike has sat for at least three hours. Even a short 10-minute ride can increase tire temperature and skew your reading by 2–4 PSI.
Step 3: Remove the Valve Cap and Press the Gauge
Unscrew the valve cap on the tire’s valve stem. Press the gauge firmly onto the stem until you hear a slight hiss—that means it’s sealed. Read the PSI on the gauge. If it’s digital, the number will appear on the screen. If it’s analog, check the dial.
Step 4: Compare to Recommended PSI
Refer to your owner’s manual or the Harley-Davidson tire pressure chart above. Note whether you’re riding solo or loaded. If the pressure is too low, add air using a compressor. If it’s too high, press the valve pin to release air in small bursts, then recheck.
Step 5: Replace the Valve Cap
Always screw the valve cap back on tightly. It keeps dirt and moisture out of the valve, which can cause leaks over time.
Pro Tips for Accurate Readings
- Check both tires every time—don’t assume they’re the same.
- If you have tubeless tires, inspect the valve stem for cracks or damage.
- Use a torque wrench when reinstalling valve stems after maintenance.
- Keep a log of your pressure checks to spot trends or leaks early.
Factors That Affect Tire Pressure
Tire pressure isn’t a “set it and forget it” task. Several factors can cause PSI to fluctuate, so it’s important to understand what influences it.
Temperature Changes
Air expands when heated and contracts when cooled. For every 10°F change in temperature, tire pressure changes by about 1 PSI. That means a tire at 36 PSI on a 70°F day could drop to 33 PSI on a 40°F morning. In winter, check pressure more frequently. In summer, monitor for overinflation on long rides.
Altitude and Barometric Pressure
If you ride in mountainous areas, altitude can affect tire pressure. Higher elevations have lower atmospheric pressure, which can make your tires seem overinflated. However, the effect is usually minor—most riders don’t need to adjust unless riding above 8,000 feet regularly.
Riding Style and Speed
Aggressive riding, high speeds, and hard braking generate more heat in the tires, increasing pressure. If you’re planning a long highway trip or a spirited canyon run, check pressure before and after. Some riders even carry a portable compressor for mid-ride adjustments.
Tire Age and Condition
Older tires lose air more quickly due to microscopic cracks in the rubber. If you notice frequent pressure drops, it might be time for new tires. Also, inspect for punctures, bulges, or uneven wear—these can all affect how pressure behaves.
Common Tire Pressure Mistakes to Avoid
Even experienced riders make mistakes when it comes to tire pressure. Here are some common pitfalls and how to avoid them.
Using the Max PSI on the Tire Sidewall
Many riders see the “Max Pressure: 44 PSI” on the tire and assume that’s what they should use. Wrong! That number is the tire’s maximum safe pressure under load, not the recommended operating pressure. Always follow Harley’s guidelines, not the tire’s max rating.
Ignoring Passenger and Luggage Weight
Adding a passenger or full saddlebags increases the load on the rear tire. Failing to adjust pressure can lead to poor handling, reduced traction, and increased risk of blowouts. Always increase rear PSI when riding two-up or loaded.
Checking Pressure After a Ride
As discussed, hot tires give false high readings. Checking pressure after a ride can lead to underinflation over time. Make it a habit to check first thing in the morning before your ride.
Relying on Visual Inspection
You can’t accurately judge tire pressure by looking at it. A tire can look fine but be 5–10 PSI low. Always use a gauge.
Neglecting the Front Tire
Many riders focus only on the rear tire, but the front is just as important. Low front pressure can cause wobble, poor steering, and reduced braking performance.
When to Replace Your Harley’s Tires
Proper pressure extends tire life, but all tires eventually wear out. Here’s how to know when it’s time for a replacement.
Tread Depth
Harley-Davidson recommends replacing tires when tread depth reaches 2/32 of an inch. Use a tread depth gauge or the “penny test”: insert a penny into the tread with Lincoln’s head upside down. If you can see the top of his head, it’s time for new tires.
Age
Even if the tread looks good, tires older than 5–7 years should be replaced. Rubber degrades over time, becoming brittle and prone to failure. Check the DOT code on the sidewall to determine the manufacture date.
Cracks, Bulges, or Punctures
Inspect tires regularly for sidewall cracks, bulges, or embedded objects. These are signs of internal damage and can lead to sudden failure.
Uneven Wear Patterns
If you notice cupping, feathering, or center wear, it could indicate incorrect pressure, alignment issues, or suspension problems. Address the root cause and replace the tire if damage is severe.
Conclusion
Maintaining the correct tire pressure on your Harley-Davidson is one of the simplest yet most impactful things you can do for your safety, performance, and wallet. By following the Harley-Davidson tire pressure chart and checking your tires regularly, you’ll enjoy smoother rides, better fuel economy, and longer tire life. Remember: always check pressure when tires are cold, adjust for load and weather, and never rely on guesswork.
Whether you’re a weekend rider or a cross-country tourer, treat your tires with care. They’re the only thing standing between you and the road. So grab your gauge, consult your manual, and keep those PSI levels where they belong. Your Harley—and your ride—will thank you.
Frequently Asked Questions
What is the recommended tire pressure for a Harley-Davidson Road King?
The recommended tire pressure for a Harley-Davidson Road King is 36 PSI in the front and 40 PSI in the rear when riding solo. When carrying a passenger or luggage, increase to 38 PSI front and 42 PSI rear. Always check when tires are cold.
Can I use the max PSI listed on the tire sidewall?
No, the max PSI on the sidewall is the tire’s maximum safe pressure, not the recommended operating pressure. Always follow Harley-Davidson’s guidelines in your owner’s manual for optimal performance and safety.
How often should I check my Harley’s tire pressure?
Check tire pressure at least once a month and before long trips. Also check after significant temperature changes or if you notice handling issues. Regular checks prevent underinflation and extend tire life.
Does tire pressure change with temperature?
Yes, tire pressure changes about 1 PSI for every 10°F change in temperature. Cold weather lowers pressure; hot weather increases it. Adjust accordingly, especially in winter or during summer rides.
What happens if my Harley’s tires are underinflated?
Underinflated tires flex more, generating heat that can lead to blowouts. They also wear faster, reduce fuel efficiency, and impair handling and braking. Always maintain the correct PSI.
Do I need to adjust tire pressure for a passenger?
Yes, always increase rear tire pressure when carrying a passenger or luggage. Most Harley models require 2–4 PSI more in the rear when loaded. Check your owner’s manual for exact recommendations.


