How to Adjust Headlights on a Mazda 6
Contents
- 1 Key Takeaways
- 2 📑 Table of Contents
- 3 Why Proper Headlight Aim on Your Mazda 6 Matters
- 4 Understanding Your Mazda 6 Headlight System
- 5 Gathering Your Tools and Preparing the Workspace
- 6 The Step-by-Step Adjustment Process
- 7 Common Mistakes and How to Avoid Them
- 8 When to Seek Professional Help
- 9 Maintenance Tips for Long-Lasting Alignment
- 10 Conclusion: Light Up the Road with Confidence
- 11 Frequently Asked Questions
Properly adjusted headlights on your Mazda 6 are crucial for your safety and the safety of others. This guide walks you through the entire process, from understanding your specific headlight type to the precise steps for vertical and horizontal alignment. You’ll learn the simple tools needed, how to use a wall as a reference, and common pitfalls to avoid. With clear instructions, you can confidently perform this important maintenance task yourself.
Key Takeaways
- Safety First: Correct headlight aim prevents you from blinding other drivers and ensures you see the road clearly at night.
- Know Your System: Mazda 6 models use different headlight types (halogen, LED, HID), and adjustment methods can vary slightly.
- Simple Tools: You only need basic items like a screwdriver, tape measure, and a blank wall to do the job correctly.
- Two-Axis Adjustment: You must adjust both the vertical (up/down) and horizontal (left/right) aim for proper beam pattern.
- Owner’s Manual is Key: Always check your Mazda 6’s manual for the specific headlight aim specifications for your model year.
- When to Get Help: If your headlights are severely misaligned after an accident or you’re uncomfortable, seek a professional alignment.
- Regular Checks: Inspect your headlight aim annually or if you notice poor nighttime visibility or complaints from other drivers.
📑 Table of Contents
- Why Proper Headlight Aim on Your Mazda 6 Matters
- Understanding Your Mazda 6 Headlight System
- Gathering Your Tools and Preparing the Workspace
- The Step-by-Step Adjustment Process
- Common Mistakes and How to Avoid Them
- When to Seek Professional Help
- Maintenance Tips for Long-Lasting Alignment
- Conclusion: Light Up the Road with Confidence
Why Proper Headlight Aim on Your Mazda 6 Matters
Hey there! Let’s talk about something we all use but rarely think about until it’s a problem: your Mazda 6’s headlights. You might not realize it, but even slightly misaligned headlights can turn your nighttime driving from safe to seriously risky. They can blind oncoming drivers, causing dangerous glare, or fail to illuminate the road far enough ahead, hiding hazards like pedestrians or debris. On your Mazda 6, this is especially important because its sporty stance and responsive handling often mean you’re taking curves and driving on varied roads. Properly adjusted headlights are a non-negotiable part of vehicle safety and maintenance.
Beyond safety, there’s a legal side, too. In most states and provinces, there are strict regulations about headlight aim. A failed inspection for improper beam height or pattern is a common and easily avoidable headache. Think about it: adjusting your headlights is one of the simplest, most cost-effective things you can do to maximize your visibility and stay compliant. It’s a quick DIY job that pays huge dividends in peace of mind. Whether you drive a 2014 model or a brand-new 2026 Mazda 6, the principles are the same, though the exact adjustment mechanism might differ slightly. We’ll cover it all. So grab your tools, and let’s get those beams pointing exactly where they should.
Understanding Your Mazda 6 Headlight System
Before we touch a screwdriver, we need to understand what we’re working with. Mazda 6 models over the years have used different headlight technologies, and knowing which one you have is the first step. The good news is that the adjustment process is fundamentally similar for all, but the location of the adjustment screws or the nature of the beam pattern differs.
Visual guide about How to Adjust Headlights on a Mazda 6
Image source: raybuck.com
Halogen Headlights
Most base and mid-trim Mazda 6 models from earlier years (pre-2018) and some current models use traditional halogen bulbs. These produce a warm, yellowish light. The beam pattern typically has a distinct, sharp cutoff line. When adjusting these, you’re aiming to get that cutoff line to sit just below the line of sight of oncoming drivers—usually a few inches below the horizontal center point of your headlight assembly. The adjustment screws are typically located behind the headlight bezel, accessible from the engine bay.
LED and HID (Xenon) Headlights
Higher trim Mazda 6 models, especially from the late 2010s onward, often feature LED or HID (High-Intensity Discharge) units. LED strips are common for daytime running lights and sometimes low beams. HID systems produce a brighter, whiter, or bluish light. Their beam patterns can be different—often more focused and intense. The adjustment screws might be in slightly different locations, and some newer models even have self-leveling systems that adjust automatically based on vehicle load. However, manual override screws are almost always present for fine-tuning. If your 2026 Mazda 6 has adaptive headlights that swivel in turns, the basic static aim still needs to be correct first.
A crucial note: If your Mazda 6 has projector-style headlights (common with HIDs and LEDs), the adjustment is even more critical. Projector beams are very focused; a small misalignment creates a significant hotspot or dark area. Always consult your owner’s manual for the exact specifications for your specific VIN and headlight type. It will have diagrams showing the ideal beam pattern on a wall.
Gathering Your Tools and Preparing the Workspace
This is the easy part. You don’t need a fancy mechanic’s toolkit. In fact, the simpler, the better for this job. Here’s your checklist:

Visual guide about How to Adjust Headlights on a Mazda 6
Image source: familyhandyman.com
- A flat, vertical wall: A garage door, a blank section of a fence, or a friend’s house. It needs to be absolutely vertical and flat. No hills or slopes!
- Tape measure or a long ruler: For measuring distances from the ground and from the car’s center.
- Masking tape or painter’s tape: To mark measurements on the wall and on your headlight assemblies.
- Screwdrivers: Usually a Phillips head #1 or #2, and sometimes a flathead. Check your manual.
- Level ground and a properly loaded car: This is huge. Park on a perfectly level surface. The car should be in its normal driving condition—tires inflated to spec, and with a typical load (you and maybe a passenger). Do not adjust headlights with an empty trunk or after adding heavy cargo. The weight distribution changes the car’s pitch and will throw off your adjustment. If you often drive with a full trunk, you might need to adjust for that specific load, but the standard adjustment is for normal, empty-ish conditions.
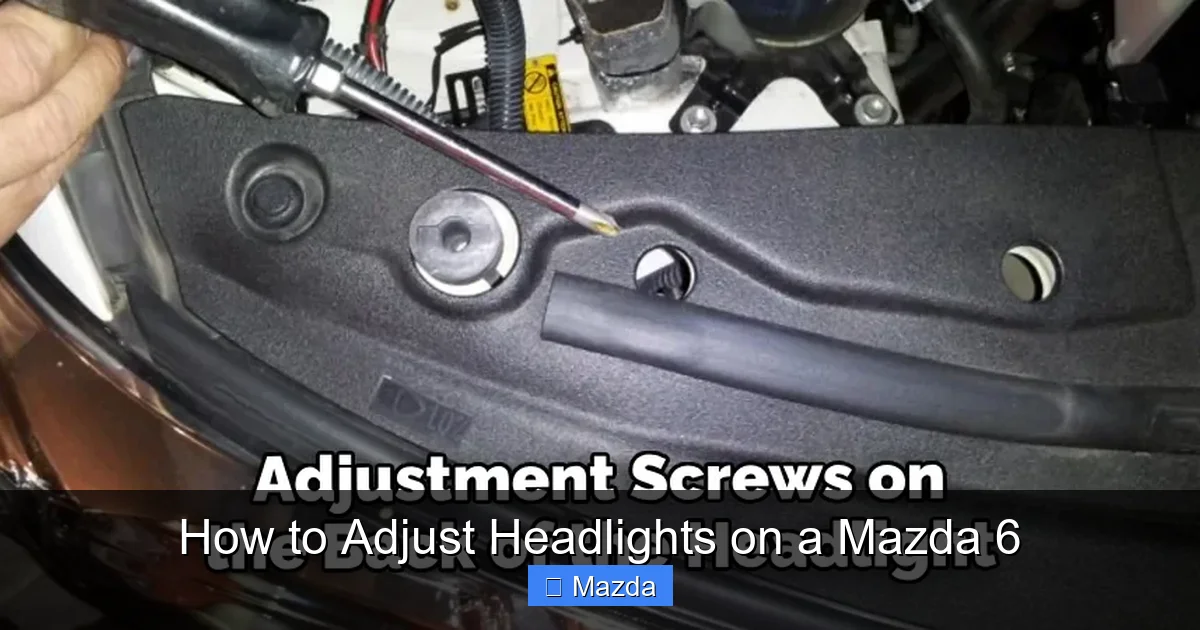
Now, prepare your Mazda 6. Park it 25 feet (about 7.6 meters) straight back from the wall. The distance is critical for an accurate reading. Use your tape measure to get this exact. Make sure the headlights are on low beam ( dipped beam). High beam adjustment is a different procedure and usually not needed unless your high beams are also off. Turn off all other lights. Pop the hood and locate the adjustment screws on the back of each headlight assembly. They are usually small, plastic screws with a Phillips or hex slot. There are typically two per headlight: one for vertical (up/down) and one for horizontal (left/right). They might be labeled or have a diagram on the housing. If you can’t find them, your owner’s manual is your best friend here.
While you’re under the hood, check that your headlights are clean. Dirt and grime on the lens can scatter light and make it seem like an aiming problem. A quick wash with automotive soap and water can sometimes solve the issue without any adjustment. Also, ensure the headlight assemblies are securely mounted and not loose, which can cause constant misalignment.
The Step-by-Step Adjustment Process
Alright, the car is parked, tools are ready. Let’s get those beams dialed in. This process is all about creating a reference point on the wall that matches your Mazda 6’s factory specifications.
Visual guide about How to Adjust Headlights on a Mazda 6
Image source: lightenify.com
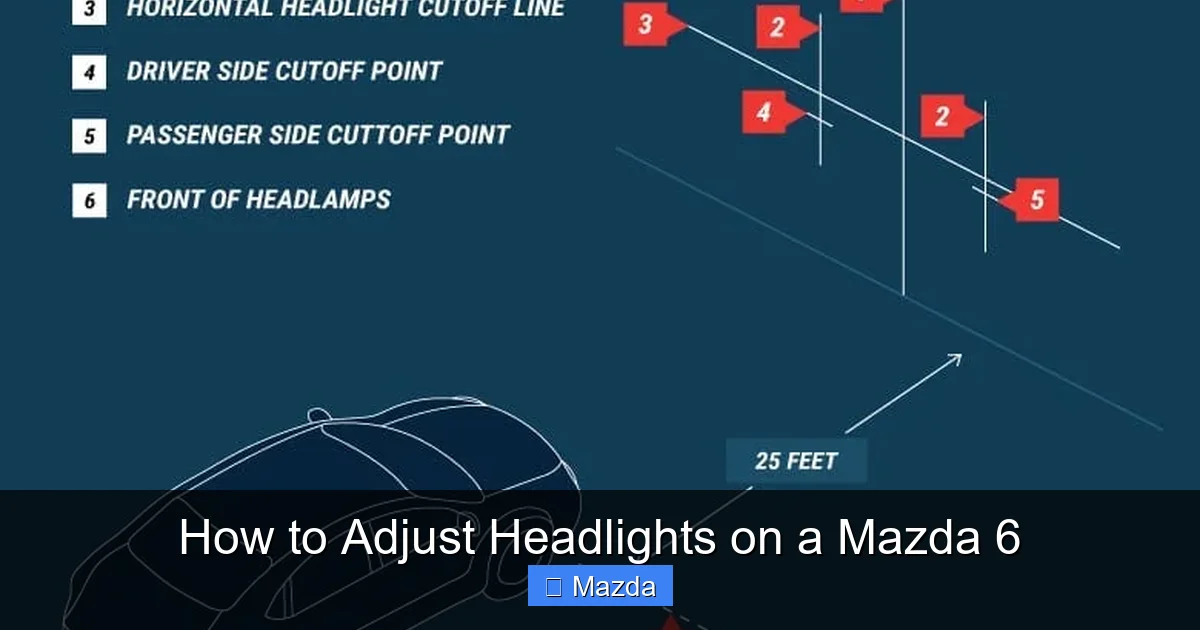
Step 1: Create Your Reference Center Line on the Wall
First, we need to mark the center point of each headlight on the wall. Measure the distance between the centers of your two Mazda 6 headlights. You can find this spec in your manual, or measure from the outer edge of one headlight lens to the outer edge of the other and divide by two. Once you have that measurement, go to the wall. From the center of your car’s position on the wall (you can mark the center of the car’s width on the wall based on where you parked), measure left and right to find the center point for each headlight. Mark these two points clearly with a small piece of tape. This is your horizontal center.
Next, we need the vertical reference. Find the height from the ground to the center of your Mazda 6’s headlight lens. Measure from the ground straight up to the physical center of the headlight assembly (not the bulb, but the middle of the lens). Write this number down. Now, on the wall, from the ground up to that exact height, make a small horizontal mark on the tape at each of your two center points. You now have a crosshair for each headlight on the wall: a vertical line (the center point) and a horizontal line (the headlight center height).
Step 2: Aim the Vertical (Up/Down) Adjustment
Turn on your low beams. Stand in front of your Mazda 6 (safely to the side, not in the beam path) and look at the pattern on the wall. For most Mazda 6 models, the top of the low beam cutoff should be at or just slightly below (by about 1-2 inches) the horizontal center line you marked for that specific headlight. This is the key safety spec: the beam should not shine directly into the eyes of oncoming drivers.
Go to the driver’s side headlight first (in countries with right-hand traffic like the US, the passenger side beam is often aimed slightly higher and to the right to illuminate road signs, but the driver’s side is aimed lower to avoid glare). Locate the vertical adjustment screw. Turning it clockwise usually aims the beam up, and counter-clockwise aims it down, but this can vary. Make small, quarter-turn adjustments. Check the wall after each turn. Your goal is to get the sharp, horizontal cutoff line of the beam to align with your marked horizontal line. It might take several tries. Be patient. Once the driver’s side is set, move to the passenger side. For the passenger side, aim the cutoff line to be at the same height or, if your manual specifies, 1-2 inches higher than the driver’s side line. This “asymmetrical” pattern is designed to light up the curb and roadside without dazzling oncoming traffic.
Step 3: Aim the Horizontal (Left/Right) Adjustment
Now we fine-tune left and right. The beam should be centered directly in front of the car, not off to one side. Look at the wall pattern. The brightest part of the beam (the hotspot for halogens, the center for projectors) should be directly on your vertical center tape mark for each headlight. It should not be significantly to the left or right. If it is, find the horizontal adjustment screw. Again, small turns. Turn to move the beam in the direction you want. If the beam is too far left, you need to adjust the screw to move it right, and vice versa. Get the center of the beam pattern as close to the vertical mark as possible. For projector lenses, the entire beam should be symmetric around that mark.
Pro Tip: Some Mazda 6 models have a small access hole or a rubber plug on the back of the headlight assembly that you can remove to see the beam pattern on the wall from behind the car. This can give you a more direct view of where the beam is hitting.
Step 4: The Final Test and Road Check
Once both vertical and horizontal seem good from 25 feet, do a final check. Sit in the driver’s seat and look at the wall pattern. It should look balanced and symmetrical. Now, take the car for a short drive on a dark, familiar road. Point the headlights at a distant sign or tree line. The beams should illuminate the road evenly without a hot spot that washes out your view or a dark patch right in front of you. You should not be getting flashed by oncoming drivers. If you are, go back and lower the vertical aim a bit more. The goal is a long, flat, well-distributed beam that lets you see 300-500 feet ahead comfortably.
Common Mistakes and How to Avoid Them
Even with the best instructions, it’s easy to slip up. Here are the most common pitfalls when you adjust headlights on a Mazda 6 and how to sidestep them.
- Not Using the Correct Distance: The 25-foot (7.6m) distance is not arbitrary; it’s based on standard engineering specs. Parking too close or too far will give you a false reading and result in poor aim on the road. Always measure precisely.
- Adjusting on an Unlevel Surface: This is a big one. If your driveway has a slope, your car’s nose will be tilted up or down. This makes the headlights point incorrectly, no matter how perfect your wall marks are. Find a truly level spot, like a flat parking lot.
- Ignoring Vehicle Load: Adjusting with a full trunk, roof rack, or heavy cargo will lower the rear of the car, raising the front and aiming your headlights up. Adjust with a normal, lightly loaded vehicle. If you frequently carry heavy loads, you may need to readjust afterward or understand that the aim will change with load.
- Over-Adjusting: Tiny turns of the adjustment screw make a big difference. Turn in small increments—a quarter turn at a time—then check the wall. It’s easy to go too far and have to backtrack.
- Forgetting to Check Both Beams: It’s not enough to get one headlight perfect. The two beams must work together as a cohesive pattern. They should meet at the same distance down the road without overlapping excessively or leaving a dark gap in the center.
- Dirty Headlight Lenses: As mentioned earlier, cloudy or dirty plastic lenses scatter light. Clean them thoroughly with a headlight restoration kit or appropriate plastic cleaner before adjusting. A clean lens will give you a truer beam pattern to adjust.
- Relying Solely on the “Wall Method” Without a Road Test: The wall method is excellent for setting a baseline, but the final judge is the actual road. Always do a nighttime drive to confirm the feel and performance of the beam.
When to Seek Professional Help
While adjusting headlights is a classic DIY task, there are absolutely times when calling a pro is the smarter, safer choice. First, if your Mazda 6 has recently been in an accident, even a minor front-end bump, the headlight assembly itself could be bent or the mounting bracket damaged. In this case, no amount of screw turning will fix it; the assembly needs to be realigned or replaced by a body shop. Second, if you’ve attempted the adjustment and the beams still seem wildly off—one pointing at the sky and the other at the ditch—there could be a broken or stripped adjustment mechanism. Forcing it will only cause damage.
Third, if your Mazda 6 is equipped with advanced adaptive front-lighting systems (AFS) that swivel the headlights in turns, the static aim might be set correctly, but the dynamic system could be faulty. Diagnosing that requires specialized computer tools that scan the headlight control module. Finally, if you simply do not feel comfortable working under the hood or are unsure about the specifications, a professional alignment at a tire and lube shop or a dealership is usually inexpensive (often $30-$60) and guarantees it’s done correctly. They have specialized headlight aiming tools that are even more precise than the wall method. There’s no shame in outsourcing a task that involves your safety and the safety of others.
Maintenance Tips for Long-Lasting Alignment
You’ve done the work, and your beams are perfect. How do you keep them that way? Headlight alignment isn’t a “set it and forget it” item. Over time, normal wear and tear, road vibration, and minor bumps can gradually nudge your headlights out of spec. Here’s how to stay on top of it.
Annual Check: Make it a habit to check your headlight aim once a year, perhaps in the fall when daylight saving time ends and you’ll be driving in the dark more often. The wall method is quick. Just verify the beams are still hitting where they should.
Inspect After Impacts: Did you hit a deep pothole? Curse a curb? Even a moderate jolt can shift a headlight assembly. After any significant front-end impact, re-check the aim before your next long nighttime drive.
Keep Lenses Crystal Clear: As plastic headlight lenses age, they oxidize and turn yellow or cloudy. This drastically reduces light output and can scatter the beam, making it seem like an aiming problem. Regularly wash your headlights with soap and water. For severe oxidation, use a restoration kit with sandpaper and polish. This simple maintenance can restore 80-90% of lost light output, making your perfectly aimed headlights even more effective.
Secure Mounting: Occasionally, check that the headlight assembly is firmly bolted to the car’s frame. Loose bolts or corroded mounting points will allow the unit to shift. Tighten any loose fasteners.
Combine with Other Checks: Use your headlight adjustment session as a reminder to perform other critical visual checks. While you’re under the hood, glance at your engine oil level, check your windshield washer fluid, and inspect your wiper blades. Good visibility isn’t just about headlights; it’s about a clean windshield and functional wipers. For instance, knowing how to change windshield wipers on a Honda Civic is a similar quick DIY task that complements your headlight care for overall driving visibility.
By incorporating these habits, you’ll ensure your Mazda 6 provides maximum illumination for years to come, keeping you safe and legal on the road.
Conclusion: Light Up the Road with Confidence
So there you have it! Adjusting the headlights on your Mazda 6 is a straightforward, empowering DIY project that directly impacts your safety. It demystifies a part of your car that’s often overlooked until there’s a problem. You now know how to identify your headlight type, gather the simple tools, create a precise reference on a wall, and make both vertical and horizontal adjustments for the perfect beam pattern. Remember the golden rules: use a level surface, account for normal vehicle load, make tiny adjustments, and always verify with a road test.
Don’t be discouraged if it takes a couple of tries to get it perfect. Even seasoned mechanics tweak and check. The satisfaction of doing it yourself and the immediate improvement in your nighttime visibility are huge wins. Keep your owner’s manual handy, respect the process, and your Mazda 6’s headlights will serve you well. If at any point you hit a snag or feel uncertain, especially with newer models featuring complex adaptive systems, don’t hesitate to consult a professional. Your lights are your eyes on the road at night—it’s worth getting them just right. Now, go enjoy those perfectly aimed beams on your next evening drive!
Frequently Asked Questions
How do I know if my Mazda 6 headlights are misaligned?
Common signs include other drivers flashing their lights at you frequently, your own headlights seem to only illuminate a short distance directly in front of the car, or you see a bright hotspot on the road or a dark patch right where you need to see. A simple wall test at 25 feet will confirm it.
What is the ideal height for Mazda 6 headlight beams on a wall?
Can I adjust my Mazda 6 headlights without a wall or garage?
While a flat wall is the standard and most accurate method, in a pinch you can use a large, flat, vertical surface like the side of a building. Some people use a sheet of plywood propped up vertically. The key is a perfectly flat, vertical reference plane at the correct 25-foot distance. Without this, your adjustment will be guesswork and likely incorrect.
How often should I check my headlight aim?
It’s a good practice to check your headlight alignment annually, such as when you switch to daylight saving time. You should also check them any time you have work done near the front of the car, after a significant bump or pothole impact, or if you notice any change in visibility or get flashed by other drivers.
My Mazda 6 has LED headlights. Is the adjustment process different?
The fundamental process is the same—find the adjustment screws and use the wall method. However, LED projector beams can be much more focused, so the tolerance for error is smaller. The adjustment screws might be in slightly different locations, and some newer models have electronic adjustments accessed via the vehicle settings menu. Always consult your owner’s manual for LED-specific instructions and aim specifications.
Will adjusting my headlights affect my automatic headlight or high beam assist systems?
Basic low-beam adjustment should not interfere with the function of automatic headlight sensors or high beam assist systems, as those rely on a forward-facing camera or light sensor. However, if your Mazda 6 has adaptive swiveling headlights (AFS), the static aim must be correct first. If the dynamic system is malfunctioning, it’s a separate issue that may require a professional scan tool diagnosis.